Angelcare AC701 Manuel De L'utilisateur
Masquer les pouces
Voir aussi pour AC701:
- Manuel du propriétaire (84 pages) ,
- Manuel de l'utilisateur (112 pages)

Manuels Connexes pour Angelcare AC701


Sommaire des Matières pour Angelcare AC701
- Page 1 FOR YOUR PEACE OF MIND OWNER’S MANUAL TOUCHSCREEN MOVEMENT & SOUND MONITOR Model AC701...
-
Page 2: Table Des Matières
Keep small parts away from children when assembling. We, at Angelcare , stand behind all of our products. ® If you are not completely satisfied or have any questions, United States and Canada: please contact us at: angelcare@cdecinc.ca Other countries: please contact your local distributor. -
Page 3: Warnings
WARNINGS 1. THIS PRODUCT CANNOT REPL ACE CAUTION RESPONSIBLE ADULT SUPERVISION. This product is designed to aid in the monitoring RISK OF ELECTRIC SHOCK of your child. When using the monitor, you DO NOT OPEN must still provide the supervision necessary DO NOT EXPOSE TO RAIN OR MOISTURE for the continued safety of your child. - Page 4 and the correct adapter. Remove batteries Sensor Pad cord and AC Adapter’s power when product is stored for long periods cord from being walked on or pinched by of time or when batteries are exhausted. furniture or other items – Power supply Dispose exhausted batteries properly.
- Page 5 33 x 33 cm and 6 mm electric light or power circuit, or where it thick. Only use your Angelcare monitor ® can fall into such power lines or circuits as in a stationary sleeping environment such contact with them may be fatal.
- Page 6 16. IMPORTANT SAFETY INSTRUCTIONS RELATED TO USE OF BATTERIES 16.1 Use O N LY the t ype and size of 16.9 DO NOT attempt to recharge batteries batteries specified in the owner’s manual. provided with or identified for use with There is a risk of explosion if batteries are this product that are not intended to be replaced with an incorrect type.
- Page 7 WARNING (North America Only) 17. Modifications not authorized by the 17.3 This device complies with part 15 of manufacturer may void users authority the FCC Rules and the Industry Canada to operate this device. licence-exempt RSS standard(s). Operation is subject to the following two conditions: 17.1 NOTE : This equipment has been 1) This device may not cause harmful tested and found to comply with Part 15...
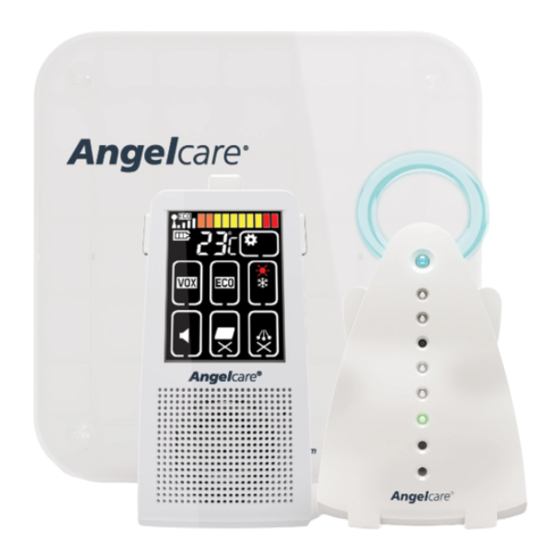
- Page 8 TOUCHSCREEN MOVEMENT SETUP REQUIREMENTS & SOUND MONITOR Model AC701 INCLUDED: Rechargeable Charging Cradle 1 Sensor Pad (AC701) or 2 Sensor Pads (AC701-2SP) Parent Unit with pre-installed cord covers Nursery Unit 2 AC Adapters 2 AAA Rechargeable Belt Clip Batteries for Parent Unit...
-
Page 9: Step 1 - Charging The Parent Unit (15 Hours)
STEP 1 - CHARGING THE PARENT UNIT (15 HOURS) WARNING Never use regular alkaline batteries in the Parent Unit; they may explode. 1) Slide the button to unlock and open the battery cover. Insert the Rechargeable Batteries (included) as per picture. 2) Connect the AC Adapter to the Parent Unit and into an electrical outlet. -
Page 10: Step 2 - Installing The Sensor Pad
STEP 2 - INSTALLING THE SENSOR PAD Cord covers 1, 2, 3, 4: Position on floor Cord cover 4: Contains double sided tape to securely install beneath crib leg Cord cover 5: Position vertically between mattress support and floor Cord cover 6: Sensor Pad with pre-installed cord covers Place under the mattress... - Page 11 2.2 SELECT THE CRIB LEG YOU WILL BE USING TO SECURE THE CORD COVERS RECOMMENDED 1) Use the crib leg by the wall closest to the Nursery Unit (Fig 1). In cases where the Nursery Unit is across the room, use the leg closest to the Nursery Unit to position the covered wire (Fig 2).
- Page 12 6) Place the 6 cord cover approximately 8 cm 8 cm from the edge of the mattress support. 7) Snap together the remaining cord covers that will run along the floor. 8) Remove any cord slack to make sure no parts of the cord are loose. 9) Peel off the double-sided tape on the cord cover and place it securely under the crib leg.
-
Page 13: Step 3 - Setting Up The Nursery Unit
STEP 3 - SETTING UP THE NURSERY UNIT 1) Unscrew the battery cover and insert 2 AA Alkaline Batteries (not included). 2) Place the Nursery Unit at a minimum of 1 m away from the crib. 3) Connect the AC Adapter to the Nursery Unit and plug into an electrical outlet. -
Page 14: Step 4 - Turning On Your Monitor
STEP 4 - TURNING ON YOUR MONITOR 1) Press the Parent Unit ON/OFF button to open and display normal mode. 2) Push and hold the Nursery Unit left ‘wing’ button for 2 seconds. The LCD monitor has 30 seconds timeout to go to power saving mode (dimmer illumination). -
Page 15: Step 5 - Testing And Getting To Know Your Monitor
STEP 5 - TESTING AND GETTING TO KNOW YOUR MONITOR The Angelcare monitor can be used with the pre-program factory settings ® or you can also customize your settings to your preference. IMPORTANT NOTE: All changes When in Settings mode, sound... - Page 16 TO STOP THE ALARM Press Nursery Press any key on Unit’s Hold button the Parent Unit to put on Hold (see Step 6.5) (see Step 6.5) Hold down left ‘wing’ button for 2 seconds Place your to turn OFF the unit hand back on the mattress.
- Page 17 5.2 - SOUND Level 0 TO ADJUST THE SOUND: Level 1 Raise volume Press (+) or (-) buttons to adjust level (+) the volume level. Level 2 Lower volume NOTE: level (-) Level 3 At level L0 the level bar will still appear on the screen and the icon will blink.
- Page 18 YOU ARE NOW READY TO USE YOUR MONITOR The Angelcare monitor can be used with the pre-program factory settings ® or you can also customize your settings to your preference. DEFAULT SETTINGS Sound Mode: ON Speaker Volume: Level 3 (of 5)
-
Page 19: Step 6 - Activating And Deactivating
STEP 6 - ACTIVATING AND DEACTIVATING ADDITIONAL FUNCTIONS MULTIFUNCTIONAL The Angelcare monitor is multifunctional. It can be use in different combinations ® according to your needs. SOUND & MOVEMENT: Allows you to detect the baby’s MOVEMENT & SOUND while using both Parent Unit and Sensor Pad. - Page 20 6.1 - VOICE ACTIVATION (VOX) OR CONTINUOUS SOUND MODE Allows you to select your option on how you monitor sound: VOX (voice activation picks up sound based on the selected sensitivity level settings) or Continuous (sound monitoring is continuously on, picking up all sounds). 1) Press the VOX icon to activate or deactivate the VOX function.
- Page 21 6.2 - ECO MODE Allows you to reduce the electro-smog and save battery life. TO ACTIVATE ECO MODE: 1) Press the Settings icon to access setting mode. 2) Press the ECO icon to activate or deactivate the ECO function. 3) Press the Return icon to confirm your choice and return to normal screen.
- Page 22 TO ACTIVATE THE TEMPERATURE ALARM: 1) Press the Temperature Alarm icon to activate or deactivate the high and low temperature alarm. TO SET TEMPERATURE RANGE: 1) Press the Settings icon to access setting mode. 2) Press the Temperature Alarm icon. 3) High Temperature (SUN) icon will blink, press (+) or (-) to set the high temperature alarm (22 to 35 °C).
- Page 23 When in Settings mode no sound or alarms will transmit to the Parent Unit, except the Movement alarm (if this function was already activated). 6.5 - HOLD Allows you to put your Angelcare Monitor on HOLD. 1) Press the Setting icon to access the setting mode.
- Page 24 6.6 - MUTE Allows you to activate the MUTE function. TO ACTIVATE MUTE: Press the Sound icon. TO DEACTIVATE MUTE: Press the Sound icon to deactivate. NOTE: The Sound icon will blink on the Parent Unit. 6.7 - NIGHT LIGHT Allows you to use your monitor as a Night light.
-
Page 25: Troubleshooting
TROUBLESHOOTING TAKING CARE OF YOUR RECHARGEABLE BATTERIES • Ensure that you fully charge your batteries for 15 hours before their first use. • To maintain maximum battery life it is recommended that you fully discharge your batteries periodically. Battery performance can be diminished by leaving the batteries constantly charging on the Charging Cradle. - Page 26 FALSE ALARMS • Turn OFF the Nursery Unit. • Verify the connection between the Sensor Pad and the Nursery Unit. Unplug and reconnect the cord. • Make sure there is no bedding between the mattress and the Sensor Pad. • If the crib has a spring or slat base, place a hardboard between the crib base and the Sensor Pad measuring at least 33 x 33 cm and 6 mm thick.
-
Page 27: Limited Warranty
® ® MOVEMENT & SOUND MONITOR (model AC701) is free from any material and workmanship defects, for a period of two (2) years from the date of the original purchase. If this monitoring system fails to function properly when used as directed under normal... -
Page 28: Technical Specifications
Please take it to a collecting point for electric and electronic equipment (ask your local authorities for details). ErP COMPLIANCE SOUTH AFRICA-BRAZIL-ECUADOR-EUROPEAN UNION-UK Use only Angelcare Brand power supply - model number: T05005V001 / T05005B001 ® GERMANY... - Page 29 POUR VOTRE TRANQUILLITÉ D’ESPRIT MANUEL DE L’UTILISATEUR MONITEUR DE MOUVEMENTS ET SONS À ÉCRAN TACTILE Modèle AC701...
- Page 30 , nous endossons fièrement tous nos produits. ® Si vous n’êtes pas complètement satisfait ou si vous avez des questions : États-Unis et Canada : prière d’envoyer un courriel à : angelcare@cdecinc.ca Autres pays : prière de communiquer avec votre distributeur.
-
Page 31: Avertissements
AVERTISSEMENTS 1. CE PRODUIT NE REMPLACE PAS LA SU PERVISION RESPONSABLE D’UN ADULTE. Ce produit est conçu pour aider à la surveillance de votre enfant. Lors de l’utilisation du moniteur, vous devez continuer d’assurer la supervision nécessaire pour la sécurité ininterrompue de votre enfant. - Page 32 la polarité. NE court-circuitez PAS les bornes une unité ou l’autre près d’une source de d’alimentation. Utilisez UNIQUEMENT chaleur, telle qu’un radiateur, une bouche les piles recommandées ou des piles d’air chaud, une cuisinière, un téléviseur équivalentes (en tension et en taille), ainsi ou tout autre appareil (y compris un que le bon adaptateur.
- Page 33 33 cm x 33 cm et d’une épaisseur de ÉTRANGLÉS avec des fils. Gardez les fils 6 mm entre la base du lit et le détecteur des adaptateurs hors de mouvements. Le moniteur Angelcare ® de la portée des enfants ne doit servir que dans un environnement (éloignés de plus de...
- Page 34 16. INSTRUCTIONS IMPORTANTES DE SÉCURITÉ CONCERNANT L’UTILISATION DES PILES 16.1 Utilisez UNIQUEMENT des piles du type 16.9 N’essayez PAS de recharger les piles et de la taille précisés dans le manuel de fournies ou identifiées pour utilisation avec l’utilisateur. Il y a risque d’explosion si vous ce produit qui ne sont pas destinées à...
- Page 35 AVERTISSEMENT (Amérique du Nord seulement) 17. Toute modification non autorisée par le 17.3 Cet appareil conforme fabricant peut annuler le droit de l’utilisateur règlements de la FCC, partie 15. L’utilisation de faire fonctionner cet appareil. est sujette aux deux conditions suivantes : 1) cet appareil ne doit pas produire 17.1 NOTE : Cet appareil a subi des essais d’interférences nuisibles;...
-
Page 36: Instructions D'installation Ac701
à pointe cruciforme du nourrisson supérieure à celle du détecteur de mouvements, (Phillips) ou, dans le cas du modèle AC701-2SP, celle de deux détecteurs de mouvements. IMPORTANT CHAMBRE DU BÉBÉ : Placez le lit près d’un mur de soutènement et loin des courants d’air. -
Page 37: Étape 1 - Charge De L'unité Des Parents (15 Heures)
ÉTAPE 1 - CHARGE DE L’UNITÉ DES PARENTS (15 HEURES) AVERTISSEMENT N’utilisez jamais de piles alcalines ordinaires dans l’unité des parents : elles pourraient exploser. 1) Glissez le bouton afin de déverrouiller et d’ouvrir le couvercle du compartiment à piles. Insérez les piles rechargeables (incluses) tel qu’illustré. -
Page 38: Étape 2 - Installation Du Détecteur De Mouvements
ÉTAPE 2 - INSTALLATION DU DÉTECTEUR DE MOUVEMENTS Baguettes de protection du fil 1,2,3,4 : Positionnez sur le plancher Baguette de protection du fil 4 : Contient un ruban à double face adhésive permettant de fixer la baguette de protection solidement sous le pied du lit Baguette de protection du fil 5 : Positionnez verticalement entre... - Page 39 2.2 SÉLECTIONNEZ LE PIED DU LIT SOUS LEQUEL VOUS FIXEREZ LES BAGUETTES DE PROTECTION DU FIL EN PLACE RECOMMANDÉ Utilisez le pied du lit près du mur le plus rapproché de l’unité du nourrisson (voir Figure 1). Dans les cas où l’unité du nourrisson se trouve de l’autre côté...
- Page 40 4) Installez les quatre premières baguettes de protection du fil sur le plancher, et gardez la cinquième baguette de protection du fil verticale, le long du côté arrière du pied du lit, entre le support du matelas et le rebord intérieur du lit.
-
Page 41: Étape 3 - Installation De L'unité Du Nourrisson
• Le détecteur de AVERTISSEMENT mouvements n’est pas conçu pour la DANGER D’ÉTRANGLEMENT surveillance d’adultes • Éliminez tout jeu ou flottement dans ou d’enfants âgés de toute partie du fil du détecteur de plus de 24 mois. mouvements. • Cessez toute utilisation du détecteur •... -
Page 42: Étape 4 - Mise En Marche Du Moniteur
UNITÉ DU NOURRISSON : A) Veilleuse B) Bouton de pause et de localisation C) MARCHE-ARRÊT (« aile » gauche) D) MARCHE-ARRÊT de la veilleuse (« aile » droite) E) Témoin de fonctionnement (vert) de piles faibles (rouge) de pause (vert clignotant) F) Témoin de mouvements (vert) d’alarme (rouge) -
Page 43: Étape 5 - Test Et Familiarisation Avec Le Moniteur
Icône Alarme de température : Indique que l’alarme de température est activée. ÉTAPE 5 - TEST ET FAMILIARISATION AVEC LE MONITEUR Vous pouvez utiliser le moniteur Angelcare avec les réglages préprogrammés en usine ® ou encore les modifier selon vos préférences. - Page 44 5.1 - DÉTECTEUR DE MOUVEMENTS POUR ACTIVER LE DÉTECTEUR DE MOUVEMENTS : 1) Appuyez sur l’icône Détecteur de mouvements pour l’activer ou le désactiver. ACTIVÉ DÉSACTIVÉ NOTE: Lorsque le détecteur de mouvements est désactivé, cela désactive automatiquement la fonction « TIC ». Cela vous permet de détecter les sons du bébé...
- Page 45 POUR RÉGLER LE NIVEAU DE SENSIBILITÉ DU DÉTECTEUR DE MOUVEMENTS : 1) Appuyez sur l’icône Réglages pour accéder au mode Réglages. 2) Appuyez sur l’icône Sensibilité du détecteur de mouvements. L’icône se met à clignoter. 3) Utilisez le bouton (+) ou (-) du côté droit de l’unité...
- Page 46 5.2 - SON POUR RÉGLER LE NIVEAU SONORE : Niveau 0 Appuyez sur le bouton (+) ou (-) pour Niveau 1 Augmentez le régler le niveau sonore. niveau sonore (+) Niveau 2 Baissez le niveau NOTE : sonore (-) Niveau 3 Au niveau L0, la barre du niveau sonore s’affiche encore à...
- Page 47 VOUS ÊTES MAINTENANT PRÊT À UTILISER VOTRE MONITEUR Vous pouvez utiliser le moniteur Angelcare avec les réglages préprogrammés en usine ou ® encore les modifier selon vos préférences. RÉGLAGES PAR DÉFAUT Transmission sonore : ACTIVÉ Niveau sonore du haut-parleur : Niveau 3 (de 5) Détecteur de mouvement : ACTIVÉ...
-
Page 48: Étape 6 - Activation Et Désactivation Des Fonctions Supplémentaires
Vous pouvez utiliser le moniteur Angelcare avec les réglages préprogrammés en usine ®... - Page 49 6.1 - ACTIVATION VOCALE (VOX) OU TRANSMISSION SONORE CONTINUE Vous permet de choisir votre option préférée quant à la manière de capter les sons : VOX (l’activation vocale capte les sons sur la base du niveau de sensibilité sélectionné) ou Transmission sonore en continu (la surveillance sonore se fait en continu et capte tous les sons).
- Page 50 6.2 - MODE ECO Vous permet de réduire les émissions d’électrosmog et de prolonger la durée de vie utile des piles. POUR ACTIVER LE MODE ECO : 1) Appuyez sur l’icône Réglages pour accéder au mode réglages. 2) Appuyez sur l’icône ECO pour activer ou désactiver la fonction ECO.
- Page 51 POUR ACTIVER L’ALARME DE TEMPÉRATURE 1) Appuyez sur l’icône Alarme de température pour activer ou désactiver l’alarme des températures élevée et basse. ACTIVÉ DÉSACTIVÉ POUR ÉTABLIR UN INTERVALLE DE TEMPÉRATURES : 1) Appuyez sur l’icône Réglages pour accéder au mode réglages. 2) Appuyez sur l’icône Alarme de température.
- Page 52 En mode Réglages, aucun son et aucune alarme ne se transmettent à l’unité des parents, sauf l’alarme du détecteur de mouvements (si vous aviez déjà activé cette fonction). 6.5 - PAUSE Permet de mettre le moniteur Angelcare ® en pause. 1) Appuyez sur l’icône Réglages pour accéder au mode réglages.
- Page 53 6.6 - SOURDINE Vous permet d’activer la fonction SOURDINE (blocage du son). POUR ACTIVER LA FONCTION SOURDINE : Appuyez sur l’icône Son. ACTIVÉ DÉSACTIVÉ POUR DÉSACTIVER LA FONCTION SOURDINE : Appuyez de nouveau sur l’icône Son. NOTE : L’icône Son clignote sur l’unité...
-
Page 54: Résolution De Problèmes
RÉSOLUTION DE PROBLÈMES SOIN DE VOS PILES RECHARGEABLES • Assurez-vous de charger vos piles au maximum pendant 15 heures avant d’utiliser l’unité pour la première fois. • Pour assurer une durée de vie des piles, nous vous recommandons de décharger complètement les piles sur une base périodique. - Page 55 FAUSSES ALARMES • ÉTEIGNEZ l’unité du nourrisson. • Vérifiez le raccordement du détecteur de mouvements à l’unité du nourrisson. Débranchez et rebranchez le fil. • Assurez-vous qu’il n’y a aucune literie entre le matelas et le détecteur de mouvements. • Si le lit repose sur une base à lattes ou à ressorts, placez une planche entre la base du lit et le détecteur de mouvements mesurant au moins 33 cm x 33 cm et d’une épaisseur de 6 mm.
-
Page 56: Garantie Limitée
Le produit doit s’accompagner d’une preuve d’achat, c’est-à-dire une facture ou tout autre reçu de vente prouvant que le moniteur est toujours sous garantie. Les coûts de réparation ou du remplacement du produit ainsi que sa réexpédition seront aux frais d’Angelcare ®... -
Page 57: Spécifications Techniques
Veuillez le rapporter à un point de collecte spécialisé en appareils électriques et électroniques (demandez des détails à vos autorités locales). CONFORMITÉ ERP AFRIQUE DU SUD, BRÉSIL, ÉQUATEUR, UNION EUROPÉENNE, ROYAUME-UNI Utilisez uniquement l’alimentation de marque Angelcare ® numéro de modèle : T05005V001 / T05005B001 ALLEMAGNE Utilisez uniquement l’alimentation de marque Angelcare... - Page 60 www.angelcarebaby.com...