
Manuels Connexes pour Alt EXPORONDO 3.0 90530


Sommaire des Matières pour Alt EXPORONDO 3.0 90530
- Page 1 #90530 EXPORONDO 3.0 shower column Colonne de douche EXPORONDO 3.0 Installation & care guide Guide d’installation et d’entretien last revision: 29/09/2021...
-
Page 2: Félicitations Pour L'achat De Votre Produit Alt
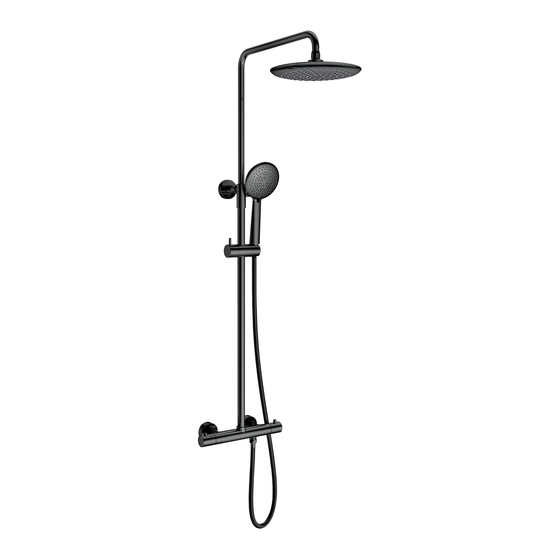
Félicitations pour l’achat de purchase of your Alt product votre produit Alt By purchasing an Alt product, you are taking part in En achetant un produit Alt, vous prenez part au the global movement for better living. We take pride in mouvement global pour le mieux-vivre. - Page 3 SHOWER COLUMN COMPONENTS COMPOSANTS DE LA COLONNE DE DOUCHE SPECS AT LARGE / SCHÉMA DES PIÈCES ALT7-908-17-XX : Rainhead / Tête de pluie ALT7-607-09-XX : Handshower holder / Support de douchette ALT7-908-18-XX : Handshower / Douchette ALT7-607-10-XX : Temperature control handle / Poignée de contrôle de température ALT7-607-01-00 : Thermostatic cartridge / Cartouche thermostatique ALT7-607-02-00 : Volume cartridge / Cartouche de volume ALT7-607-11-XX : Volume control handle / Poignée de contrôle de volume...
-
Page 4: Before You Start Avant De Commencer
BEFORE YOU START AVANT DE COMMENCER CAUTION: FOR BEST RESULTS, WE STRONGLY MISE EN GARDE: POUR OBTENIR UN RECOMMEND THE INSTALLATION OF THIS SHOWER RÉSULTAT OPTIMAL, NOUS RECOMMANDONS COLUMN BE DONE BY A LICENSED PLUMBER. FORTEMENT QUE L’INSTALLATION DE CETTE COLONNE DE DOUCHE ET SOIT FAITE PAR UN CAUTION: MAKE SURE TO PROPERLY FLUSH PLOMBIER ACCRÉDITÉ. - Page 5 INSTALLATION The installation of rigid 1/2’’ copper pipes is required L’installation de tuyaux rigides 1/2’’ en cuivre est nécessaire avant prior to the installation of this column. The hot and cold l’installation de cette colonne. Les raccords d'alimentation en eau chaude female water-supply connectors (1/2"...
-
Page 6: Install The Valve
INSTALLATION Install the valve Seal the wall opening around the water-supply connectors. Screw the asymmetrical elbows (1) in place making sure the final position of the 3/4" exposed ends is 5-15/16” (150mm) C-C apart, leveled, and projects ~1-3/16” (~30mm) from the finished wall. - Page 7 INSTALLATION 180º Install the column ± Insert the bottom of shower column (1) onto the valve [300.00] body (2) and the top into the wall anchor (3) and secure 11 13/16" with two retaining screws (4). Connect the hose (6) to the bottom of the column and the hand shower (8) to the hose (7).
-
Page 8: Maintenance, Entretien
MAINTENANCE ENTRETIEN Cartridge replacement First shut off water supply lines. To replace the cartridge (5 or 9), remove the all components (from 1 to 4 or 6 to 8). Replace the cartridge (5 or 9) with the new one and reas- semble by reversing steps Remplacement de la cartouche Couper l'alimentation d'eau. - Page 9 CARE SOIN To clean your ALT faucet or accessory, wash with a Pour nettoyer et conserver l’apparence de vos robinets wet nonabrasive soapy cloth. Then wipe dry with a soft ou accessoires ALT, utiliser un linge non-abrasif imbibé towel or cloth. We recommend this be done on a d'eau tiède et de savon doux, puis essuyer avec un linge...
-
Page 10: Warranty Garantie
WARRANTY GARANTIE GARANTIE LIMITÉE À VIE LIMITED LIFETIME WARRANTY This product is manufactured to the highest quality standards and will procure you Ce produit est fabriqué selon les standards les plus élevés et vous procurera de with many years of trouble-free enjoyment. Our product carry a limited lifetime nombreuses années d’usage sans soucis.