
Manuels Connexes pour Alt CIRCO 40770


Sommaire des Matières pour Alt CIRCO 40770
- Page 1 CIRCO # 40770 single-hole lavatory faucet robinet de lavabo monotrou Installation & Care Guide Guide d’installation et d’entretien last revision: 15/05/2018...
- Page 2 Félicitations pour l’achat de purchase of your Alt product votre produit Alt By purchasing an Alt product, you are taking part in En achetant un produit Alt, vous prenez part au the global movement for better living. We take pride in mouvement global pour le mieux-vivre.
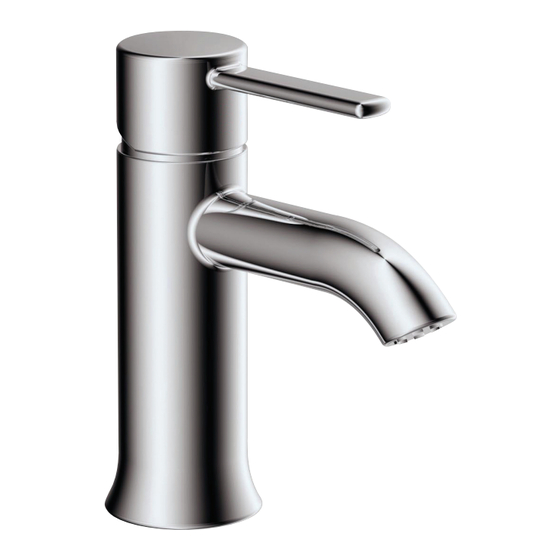
- Page 3 FAUCET COMPONENTS COMPOSANTES DU ROBINET SPECS AT LARGE / SHÉMA DES PIÈCES 1 ALT7-40-781-01: handle / poignée 2 ALT7-50-797-00: cartridge / cartouche 3 ALT7-40-793-01: hot water supply hose / flexible d'eau chaude 4 ALT7-40-792-01: cold water supply hose / flexible d'eau froide 5 ALT7-40-723-01: tie-down kit / pièces d’assemblage 6 ALT7-40-717-01: aerator / aérateur 7 ALT7-10-799-01: press pop-up drain / drain pop-up à...
- Page 4 BEFORE YOU START AVANT DE COMMENCER CAUTION: FOR BEST RESULTS, WE STRONGLY MISE EN GARDE: POUR OBTENIR UN RÉSULTAT RECOMMEND THE INSTALLATION OF THIS FAUCET BE OPTIMAL, NOUS RECOMMANDONS FORTEMENT QUE DONE BY A LICENSED PROFESSIONAL PLUMBER. L’INSTALLATION DE CE ROBINET SOIT FAITE PAR UN PLOMBIER PROFESSIONNEL ACCRÉDITÉ.
- Page 5 INSTALLATION Installing the Faucet We recommend drilling a 1-3/8" diameter hole for insertion of the faucet Insert the o-ring (1) under the spout base. Then insert threaded rod (2) and hoses into the sink or countertop hole as shown. Ø 1 -3/8" Secure with mounting kit (3) (4) and (5).
- Page 6 INSTALLATION Connect the Hot & Cold Water Inlets Connect the hot & cold 3/8" G water inlet to the water supply lines. Then turn on both hot and cold water in order to flush residue and impurities. Raccorder les entrées d'eau chaude et froide Raccorder les deux entrées d'eau chaude et froide à...
- Page 7 MAINTENANCE ENTRETIEN Cartridge Replacement Start by shutting off water supply lines and then turn- ing on water to drain the faucet. To replace the car- tridge (12), pull out the handle (7) by removing the cap (8) and the set screw (9) first. Afterwards, remove the dome cap (10) and the retainer ring (11).
- Page 8 CARE SOIN To clean your ALT faucet or accessory, wash with a Pour nettoyer et conserver l’apparence de vos wet nonabrasive soapy cloth. Then wipe dry with a robinets ou accesoires ALT, lavez-les avec un linge soft towel or cloth. We recommend this be done on mouillé...
- Page 9 - Any and all ALT products that are subjected to any type of harsh de produits abrasifs, de corrosion et/ou d’accidents causés par un abrasive, such as cleaners containing abrasive cleansers, ammonia, professionnel ou par toute autre personne.