
Manuels Connexes pour Alt 1840


Sommaire des Matières pour Alt 1840
- Page 1 Collection 1840 #18471 WIDESPREAD LAVATORY FAUCET ROBINET DE LAVABO 8” C.C. Installation & care guide Guide d’installation et d’entretien Last revision: 1/11/2021...
- Page 2 Félicitations pour l’achat de purchase of your Alt product votre produit Alt By purchasing an Alt product, you are taking part in En achetant un produit Alt, vous prenez part au the global movement for better living. We take pride in mouvement global pour le mieux-vivre.
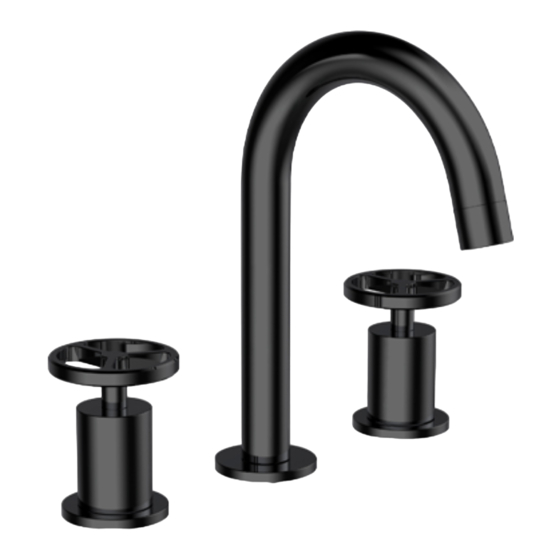
- Page 3 FAUCET COMPONENTS COMPOSANTS DU ROBINET SPECS AT LARGE / SHÉMA DES PIÈCES ALT7-555-37-00: Aerator / Aérateur 2A ALT7-555-33-xx: Handle / Poignée 2B ALT7-555-42-xx: Lever / Levier ALT7-555-30-00: Hot cartridge/ Cartouche d’eau chaude ALT7-555-31-00: Cold cartridge/ Cartouche d’eau froide ALT7-555-32-xx: Handle base / Base de poignée ALT7-555-34-00: Tie down kit for valve/ Kit d’assemblage pour valve ALT7-555-36-00: Quick Connect system / Système Quick Connect ALT7-555-35-00: Water supply hoses / Boyaux d’alimentation en eau...
- Page 4 BEFORE YOU START AVANT DE COMMENCER CAUTION: FOR BEST RESULTS, WE STRONG- MISE EN GARDE: POUR OBTENIR UN RÉ- LY RECOMMEND THE INSTALLATION OF THIS SULTAT OPTIMAL, NOUS RECOMMANDONS FORTE- FAUCET BE DONE BY A LICENSED PLUMBER. MENT QUE L’INSTALLATION DE CE ROBINET SOIT FAITE PAR UN PLOMBIER ACCRÉDITÉ.
- Page 5 INSTALLATION Installing the spout We recommend drilling 1 1/4" diameter holes. Place the rubber ring (2) against the faucet body flange and insert the faucet (1) into the hole of the basin or countertop as shown (Fig. 1). From underneath, insert the rubber washer (3) and the metal washer (4), then secure with the fixing nut (5) onto the threaded body.
- Page 6 Connecting the hoses Attach the Quick Connect system as shown (1 to 6) (Fig.3). Then, connect the hot and cold water inlet of the shanks to the water supply lines (7 & 8) Raccordement des boyaux flexibles Raccorder le système Quick Connect tel qu’illustré (1 à 6) (Fig.3). Par la suite, raccorder les entrées d’eau chaude et froide aux lignes d’alimentation d’eau (7 et 8) Fig.3...
- Page 7 MAINTENANCE ENTRETIEN Cartridge replacement Start by shutting off water supply lines and then turn the faucet on to drain it. To replace the cartridge (2), unscrew the cylindrical handle-hub (1). Replace the cartridge (2) with the new one and reassemble by reversing steps. Remplacement de la cartouche Couper l’alimentation d’eau et ouvrir le robinet pour vider l’eau résiduelle.
- Page 8 CARE SOIN To clean your ALT faucet or accessory, wash with a Pour nettoyer et conserver l’apparence de vos wet nonabrasive soapy cloth. Then wipe dry with a robinets ou accessoires ALT, utiliser un linge soft towel or cloth. We recommend this be done on non-abrasif imbibé...
- Page 9 Any labor or shipping charges, or damages whatsoever incurred in whole or in part from installation, removal, re-installation, repair or replacement of any Alt product or part, as well as any incidental or consequential damages, expenses, losses, direct or indirect, arising from any cause whatsoever.
- Page 10 GARANTIE Alt offre une garantie à vie contre les défauts de matériel et de main d’œuvre dans des conditions normales d’utilisation et d’entretien du produit, et ce tant que l’acheteur d’origine est propriétaire de sa maison. La garantie est applicable seulement si le produit est acheté chez un détaillant Alt dûment autorisé.