Table des Matières
Publicité
Les langues disponibles
Les langues disponibles
Liens rapides
VDP
PLP64S
SMART
T LED PAR6
LED PA
AR64 - ABS
PAR64
4 LED - ABS
FOCO
PAR64 LED
10mm
m LEDs
INTEL
LIGENTER
DOPPE
ELTE HALTE
USER
MANUAL
GEBRU
UIKERSHAND
NOTIC
CE D'EMPLOI
MANU
AL DEL USU
BEDIE
ENUNGSANLE
SL
64 - ABS - B
BLACK - DO
S - ZWART -
- DUBBELE
S - NOIR - D
DOUBLE ÉTR
D INTELIGE
NTE - ABS
LED PAR64
4-SCHEINW
ERUNG - 18
80 x 10mm
3
DLEIDING
8
I
14
UARIO
20
EITUNG
26
OUBLE BRAC
BEUGEL - 1
RIER - 180
- NEGRO -
WERFER - AB
LEDs
CKET - 180
x 10mm LE
180 LEDS V
VAN 10mm
LED DE 10
0mm
DOBLE SOP
PORTE - 18
BS - SCWW
WARZ -
EDs
0 x
Publicité
Table des Matières

Manuels Connexes pour HQ Power VDPLP64SL


Sommaire des Matières pour HQ Power VDPLP64SL
- Page 1 PLP64S SMART T LED PAR6 64 - ABS - B BLACK - DO OUBLE BRAC CKET - 180 x 10mm LE LED PA AR64 - ABS S - ZWART - - DUBBELE BEUGEL - 1 180 LEDS V VAN 10mm PAR64 4 LED - ABS S - NOIR - D...
- Page 2 VDPLP6 64SL termin nator eindwee erstand résistan nce de termin naison termin nación Termin ierung How to t turn the contr roller line from m 3-pins into 5 5-pins (plug an nd socket) Controll er line van 3-p pin naar 5-pin aanpassen (s stekker en con ntact).
- Page 3 4SL at a minima al distance of 0 .5 m from flamm mable and explo osive objects or subst tances. Keep th e VDPLP64SL at a minimal di stance of 1 m f rom the lighted surface. • Keep p the air vents fr ree at all times.
-
Page 4: Overhead Mounting
When applicable, connect an XLR cable to the female 3-pin XLR output of a controller (not incl.) and the other side to the male 3-pin XLR input of the VDPLP64SL. Multiple VDPLP64SL’s can be linked through serial linking. The linking cable should be a dual core, screened cable with XLR input and output connectors. - Page 5 VDPLP64SL number of fixtures on a serial data link is 32 fixtures. • A DMX terminator is recommended for installations where the DMX cable has to run a long distance or is in an electrically noisy environment (e.g. discos). The terminator prevents corruption of the digital control signal by electrical noise.
-
Page 6: Master/Slave Mode
• In case of the 3-channel VDPLP64SL, you will have to set the start address of the first unit to 1 (CH1~3), the second unit to 4 (1 + 3) (CH4~6), the third to 7 (4 + 3) (CH7~9), and so on. -
Page 7: Cleaning And Maintenance
VDPLP64SL • Press <ENTER> to confirm your selection. • Use <UP> or <DOWN> to set the DMX starting address. • Press <ENTER> to confirm your selection. DMX Channel Values 3-Channel Mode channel function from description dimmer 0 ~ 100% green... - Page 8 VDPLP6 64SL fixtu ure is powered o on but eck audio mode on the LCD dis play ther re is no moveme ent to the ust sound sens itivity knob light t will not come on after eck fuse wer failure e DMX cables on sign nal loss...
- Page 9 VDPLP6 64SL Let op: dit toestel wor dt zeer warm tij jdens het gebru uik. Kijk niet t rechtstreeks in n de lichtbron o ilepsieaanvallen n bij gevoelige p personen tijd delijke blindheid d (flitsblindheid) rmanente en on nherroepelijke s schade aan de o ogen te verm...
-
Page 10: Installatie
Indien van toepassing, sluit een XLR-kabel aan de vrouwelijke 3-pin XLR-uitgang van een controller (niet meegelev.) en de andere kant van de mannelijke 3-pin XLR-ingang van de VDPLP64SL. U kunt verscheidene VDPLP64SL’s aan elkaar koppelen met behulp van een seriële koppeling. -
Page 11: Het Bedieningspaneel
VDPLP64SL Het bedieningspaneel • Bedien het paneel met behulp van de vier toetsen onderaan de lcd-display. toets functie <MENU> toegang tot het menu of terugkeer naar het vorige menu <DOWN> scroll door de verschillende menuopties in dalende volgorde <UP> scroll door de verschillende menuopties in stijgende volgorde <ENTER>... - Page 12 • In het geval van de 3-kanaals VDPLP64SL, zult u het startadres van het eerste toestel op 1 (CH1~3) moeten instellen, van het tweede toestel op 4 (1 + 3) (CH4~6), van het derde op 7 (4 + 3) (CH7~9), enz.
-
Page 13: Reiniging En Onderhoud
VDPLP64SL DMX-waarden per kanaal 3-kanaals modus kanaal functie omschrijving rood dimmer 0 ~ 100% groen dimmer 0 ~ 100% blauw dimmer 0 ~ 100% 7-kanaals modus kanaal functie omschrijving rood dimmer 0 ~ 100% groen dimmer 0 ~ 100% blauw... - Page 14 VDPLP6 64SL toeste el geeft geen lic cht na cont troleer de zeker stroom monderbreking gebr ruik enkel DMX- -kabels signa alverlies plaa ts een eindweer rstand houd d de DMX-kabel s weg van voed dingskabels en b blacklights toeste el geeft geen lic neem m contact met u...
- Page 15 0,5 m de tou ut objet ou prod duit inflammable e ou explo osif. Installer le VDPLP64SL à une distance m minimale de 1 m m de la surface il lluminée. • Ne ja amais obstruer l les fentes d’aéra...
-
Page 16: Montage De L'appareil
Si nécessaire, connecter un câble à fiche XLR à la sortie XLR femelle à 3 broches de votre contrôleur (non incl.) et l’autre fiche XLR mâle à 3 broches à l’entrée du VDPLP64SL. Il est possible de relier plusieurs VDPLP64SL à partir d’une connexion sérielle. Utiliser un câble de connexion blindé... -
Page 17: Navigation Dans Le Menu
VDPLP64SL 7. Emploi Se référer aux illustrations en page 2 de cette notice. Navigation dans le menu • Accéder aux fonctions en utilisant les touches au bas de l’afficheur LCD. touche fonction <MENU> accès au menu ou retour vers le niveau précédent <DOWN>... -
Page 18: Mode Maître / Esclave
• Pour le VDPLP64SL à 3 canaux, l’adresse de départ du premier appareil est 1 (CH1~3), du deuxième 4 (1 + 3) (CH4~6), du troisième 7 (4 + 3) (CH7~9), etc. -
Page 19: Nettoyage Et Entretien
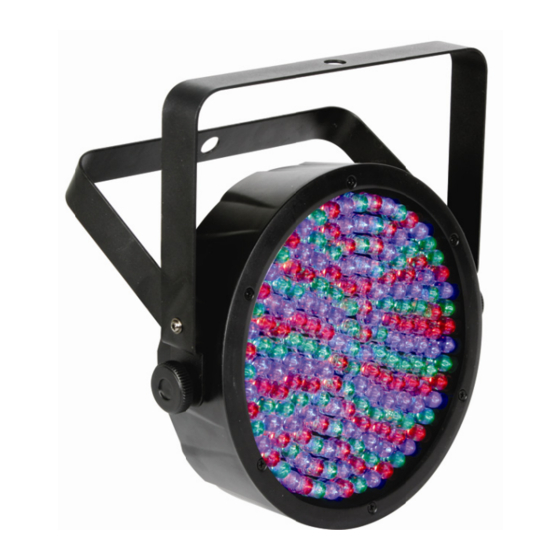
VDPLP64SL Mode 7 canaux canal fonction à description rouge obturateur 0 ~ 100% vert obturateur 0 ~ 100% bleu obturateur 0 ~ 100% pas de fonction macros couleur macros couleur vitesse lent ~ rapide (canal 6 @ 032 ~ 223) - Page 20 VDPLP6 64SL 10. Spé écifications s technique alimentation 230 VCA ~ 50 consommatio 38 W 180 pcs (60x ro ouge, 60x vert, 60x bleu) angle de rayo onnement 25° dimensions 250 x 280 x 65 5 mm poids 1,5 kg N’emplo oyer cet appare eil qu’avec de...
-
Page 21: Normas Generales
El desgaste mecánico no está cubierto por la garantía. • Utilice sólo el VDPLP64SL para aplicaciones descritas en este manual a fin de evitar p.ej. cortocircuitos, quemaduras, descargas eléctricas, etc. Un uso desautorizado puede causar daños y anula la garantía completamente. -
Page 22: Conexión Dmx512
Si fuera necesario, conecte un cable con conector XLR (no incl.) a la salida XLR hembra de 3 polos del controlador y el otro conector XLR macho de 3 polos a la entrada del VDPLP64SL. Es posible conectar varios VDPLP64SL en serie. Use un cable blindado de doble hilo conductor con conectores XLR de entrada y de salida VDPLP64SL. -
Page 23: Modo Autónomo
VDPLP64SL 7 colores, control por seleccione uno de los 2 efectos con control por el el sonido sonido 3 colores, control por utilice el ajuste de sensibilidad [5] el sonido 3-ch d001-d512 seleccione el control DMX de 3 canales (RGB) -
Page 24: Modo Maestro/Esclavo
Por lo tanto, cambiar los ajustes de un solo canal sólo afecta al canal en cuestión. • En el caso del VDPLP64SL de 3 canales, la dirección inicial del primer aparato es 1 (CH1~3), del segundo aparato 4 (1 + 3) (CH4~6), del tercer aparato 7 (4 + 3) (CH7~9), etc. •... -
Page 25: Limpieza Y Mantenimiento
VDPLP64SL 8. Limpieza y mantenimiento • Apriete bien las tuercas y los tornillos y verifique que no hay señales de oxidación. • No modifique la caja, los soportes y las conexiones p.ej. no taladre agujeros adicionales en un soporte o no modifique las conexiones, etc. - Page 26 VDPLP6 64SL BEDIEN NUNGS SANLEIT TUNG 1. Ein nführung An alle E Einwohner der r Europäischen n Union Wichtige e Umweltinfor rmationen übe er dieses Produ Dieses Symbol auf dem Produk kt oder der Verp packung zeigt a an, dass die Ents sorgung dieses Produktes nach h seinem Lebens...
-
Page 27: Allgemeine Richtlinien
VDPLP64SL 3. Allgemeine Richtlinien Siehe Velleman® Service- und Qualitätsgarantie am Ende dieser Bedienungsanleitung. Schützen Sie das Gerät vor Staub. Schützen Sie das Gerät vor extremen Temperaturen. Beachten Sie, dass die Lüftungsschlitze nicht blockiert werden. Beachten Sie eine minimale Entfernung von 2.5cm zwischen dem Gerät und jedem anderen Gegenstand. -
Page 28: Dmx512-Anschluss
• Wenn nötig, so verbinden Sie ein XLR-Kabel mit dem 3-Pin XLR-Ausgang der Steuerung (nicht mitgeliefert) und die andere Seite mit dem 3-Pin XLR-Eingang des VDPLP64SL. Sie können verschiedene VDPLP64SLin Serie schalten. Verwenden Sie ein zweipoliges abgeschirmtes Kabel mit XLR Ein- und Ausgangsanschlüssen. -
Page 29: Automatische Steuerung
VDPLP64SL Wählen Sie die 7-Kanal DMX-Steuerung (RGB, 7-ch d001-d512 Makros, Geschwindigkeit, Stroboskop, automatisch/Musik, Dimmer) Grün Blau Cyan Wählen Sie zwischen 7 statischen Farben Magenta Gelb Weiß Geschwindigkeitseinstellung für 2 interne Effekte mit 5001-5100 Standard Bereich 5050 direktem Übergang und 2 interne Effekte mit... - Page 30 Gerät beeinflusst. • Im Falle des 3-Kanal VDPLP64SL, werden Sie die Startadresse des ersten Gerätes auf 1 (CH1~3), der zweiten Einheit auf 4 (1 + 3) (CH4~6), der dritten Einheit auf 7 (4 + 3) (CH7~9) usw.
-
Page 31: Reinigung Und Wartung
VDPLP64SL 8. Reinigung und Wartung • Verwendete Schrauben müssen fest angespannt werden und dürfen keine Rostspuren zeigen. • Das Gehäuse, die Linsen, die Montagebügel und der Montageort (z.B. Decke oder Gebinde) dürfen nicht angepasst werden, z.B. bohren Sie keine zusätzlichen Löcher in Montagebügeln, verändern Sie die Anschlüsse nicht, usw. - Page 32 door het toestel, alsook zijn inhoud (bv. verlies van data), vergoeding voor eventuele winstderving. - verbruiksgoederen, onderdelen of hulpstukken die regelmatig dienen te Velleman® Service and Quality Warranty worden vervangen, zoals bv. batterijen, lampen, rubberen onderdelen, Velleman® has over 35 years of experience in the electronics world and aandrijfriemen...
- Page 33 • tuyau : il est conseillé de consulter la notice et de contrôler câbles, in Anspruch (siehe Garantiebedingungen). piles, etc. avant de retourner l’appareil. Un appareil retourné jugé Allgemeine Garantiebedingungen in Bezug auf Konsumgüter (für défectueux qui s’avère en bon état de marche pourra faire l’objet d’une die Europäische Union): note de frais à...