clage MBH 7 Instructions D'utilisation Et D'installation
Masquer les pouces
Voir aussi pour MBH 7:
- Instructions d'utilisation et d'installation (148 pages) ,
- Manuel d'instructions (201 pages)

Manuels Connexes pour clage MBH 7


Sommaire des Matières pour clage MBH 7
- Page 1 Gebrauchs- und Montageanleitung Operating and installation instructions E-Kleindurchlauferhitzer MBH 3..7 E-mini instant water heater MBH 3..7 > > > > > > > > 108 > 122...
- Page 3 CLAGE Inhaltsverzeichnis 1. Gerätebeschreibung 3.2 Einstellen der Wassermenge und Temperatur . . . 13 1.1 Technische Daten ......4 3.3 Wechsel des Filtersiebes .
- Page 4 Wasser während es durch das Gerät fließt. Nur in dieser Zeit verbraucht das Gerät Strom. Die Temperatur- erhöhung ist dabei abhängig von der Durchflussmenge. 1.1 Technische Daten MBH 3 MBH 4 MBH 6 MBH 7 Energieeffizienzklasse Nenninhalt Liter Zulässiger Betriebsüberdruck MPa (bar)
- Page 5 CLAGE Gerätebeschreibung 1.2 Abmessungen Abb. 1: »Abmessungen« (Maßangaben in mm) 1.3 Lieferumfang Durchlauferhitzer Wandhalter Spezial-Strahlregler Dichtungen Montageschrauben und Dübel T-Stück Flexschlauch Gebrauchs- und Montageanleitung Abb. 2: »Lieferumfang«...
- Page 6 MBH 3..7 Installation 2. Installation Montage, erste Inbetriebnahme und Wartung dieses Gerätes dürfen nur durch einen Fach mann erfolgen, der dabei für die Beachtung der bestehenden Normen und Instal la tionsvorschriften voll verantwortlich ist. Wir über- nehmen keine Haftung für Schäden, die durch Nicht beachtung dieser Anleitung entstehen! 2.1 Installationsbeispiele 2.1.1 Drucklose (offene) Installation Spezial-Strahlregler einsetzen:...
- Page 7 2.2 Montagehinweise Die Montage erfolgt direkt an die Anschlussleitungen der Sanitärarmatur. Wir garantieren eine einwandfreie Funktion des Durchlauferhitzers nur bei Verwendung von CLAGE-Armaturen und -Zubehör. Bei der Installation ist Folgendes zu beachten: • DIN VDE 0100 und EN 806 sowie die gesetzlichen Vor schriften des jeweiligen Landes und die Bestim mungen des örtlichen Elektrizitäts- und Wasserversorgungsunternehmens.
- Page 8 MBH 3..7 Installation • Bei Verwendung des mitgelieferten, flexiblen Verbindungsschlauches darf der minimale Biegeradius von 27 mm niemals unterschritten werden. Der Verbindungsschlauch darf sowohl bei der Montage, als auch im Betrieb keinerlei Zug- oder Druckeinwirkungen ausgesetzt sein. • Die Mindestanforderungen an den spezifischen Widerstand des Wassers sind einzuhalten. Der spezifische Widerstand des Wassers kann bei Ihrem Wasserversorgungsunternehmen erfragt werden.
- Page 9 CLAGE Installation a. Dichtung b. Filtersieb c. Kaltwasseranschluss (Zulauf) d. Warmwasseranschluss (Auslauf) e. Typenschild-Blende Abb. 6: »Anschluss der Wasserleitungen« 6. Vergewissern Sie sich, dass die Wasserleitungen keine mechanische Kraft auf den Durchlauferhitzer ausüben. 7. Öffnen Sie das Warmwasserventil der Armatur und prüfen Sie alle Verbindungen auf Dichtheit.
- Page 10 Schaltplan an. Die Tülle muss die Leitung wasserdicht umschließen. f. Montieren Sie die Haube wieder auf dem Gerät. Der Schutzleiter muss angeschlossen werden! MBH 3 (230 V) MBH 4 (230 V) MBH 6 (230 V) MBH 7 (400 V) Abb. 7: »Schaltplan«...
- Page 11 CLAGE Installation 2.5 Erstinbetriebnahme Noch keinen Strom einschalten! 1. Öffnen Sie das Warmwasserventil der Armatur und warten Sie, bis das Wasser blasenfrei heraus strömt, um den Durchlauferhitzer zu entlüften. 2. Setzen Sie den beigefügten Spezial-Strahlregler in die Hülse (M 22/24) am Auslauf der Armatur, um einen optimalen Wasserstrahl bei sparsamer Durchflussmenge zu erhalten.
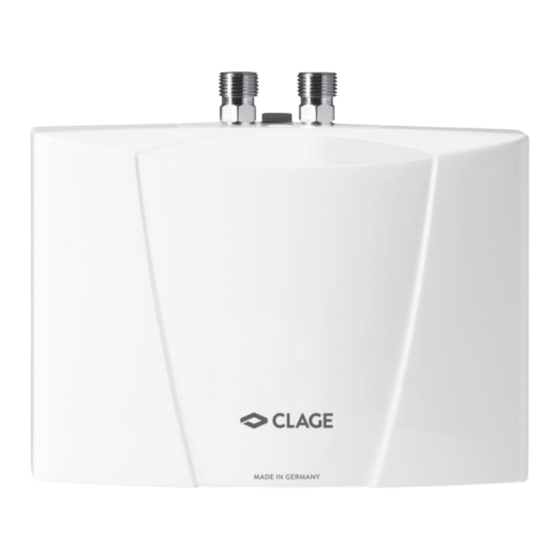
- Page 12 MBH 3..7 Gebrauch 3. Gebrauch Sobald das Warmwasserventil an der Armatur geöffnet wird, schaltet sich der Durchlauf erhitzer automatisch ein. Beim Schließen der Armatur schaltet sich das Gerät automatisch wieder aus. 3.1 Typenschild-Blende Auf der Unterseite der Blende befinden sich neben der Geräte typen bezeichnung (1) auch die Geräte- Seriennummer (2) und die Artikelnummer (3).
- Page 13 CLAGE Gebrauch 3.2 Einstellen der Wassermenge und Temperatur Nur durch einen Fachmann auszuführen. Entfernen Sie die Blende, lösen die darunter befindliche Haubenschraube und nehmen die Haube ab. Die maximal erreichbare Temperatur und die maximale Durchflussmenge sind von den örtlichen Gegebenheiten abhängig.
- Page 14 MBH 3..7 Gebrauch 3.3 Wechsel des Filtersiebes Der Kaltwasseranschluss des Durchlauferhitzers ist mit einem Filtersieb ausgestattet. Durch Verschmutzung die- ses Filtersiebes kann die Warmwasserleistung vermindert werden. Eine Reinigung, beziehungsweise ein Austausch ist wie folgt vorzunehmen. Schalten Sie die elektrischen Zuleitungen zum Durchlauferhitzer spannungsfrei.
- Page 15 CLAGE Störungsbehebung 4. Störungsbehebung 4.1 Selbsthilfe bei Problemen Diese Tabelle hilft dabei, die Ursache einer evtl. Störung zu finden und diese zu beseitigen. Problem Mögliche Ursache Abhilfe Es kommt kein Wasser Wasserzufuhr versperrt Hauptwasserhahn und Eckventil aufdrehen Strahlregler fehlt Spezial-Strahlregler montieren...
- Page 16 MBH 3..7 Störungsbehebung 4.2 Ersatzteile Filtersieb Kaltwasseranschluss Warmwasseranschluss Wandhalter Netzleitung Zweite Heizwendel (MBH 6, MBH 7) Heizwendel Abb. 14: »Ersatzteile« 4.3 Kundendienstadresse CLAGE GmbH Werkskundendienst Pirolweg 4 21337 Lüneburg Deutschland Fon: +49 4131 8901-400 E-Mail: service@clage.de Falls ein Mangel vorliegt, senden Sie das Gerät bitte mit einem Begleitschreiben und dem Kaufnachweis zur...
- Page 17 CLAGE Entsorgung 5. Entsorgung 5.1 Demontage Schalten Sie die elektrischen Zuleitungen zum Durchlauferhitzer spannungsfrei. 2. Schließen Sie das Absperrventil in der Zulaufleitung. 3. Lösen Sie die elektrische Verbindung in der Geräteanschlussdose, beziehungsweise ziehen Sie den Schutzkontaktstecker, sofern das Gerät mit einem Stecker ausgestattet ist.
- Page 18 MBH 3..7 Contents 1. Description of appliance 3.3 Changing the strainer ..... .29 1.1 Technical specifications ..... 19 3.4 Purging .
- Page 19 It is only then that the appliance uses electricity. The temperature increase depends on the flow rate. 1.1 Technical specifications Type MBH 3 MBH 4 MBH 6 MBH 7 Energy efficiency class Capacity Litre Rated Pressure MPa (bar) 1 (10)
- Page 20 MBH 3..7 Description of appliance 1.2 Dimensions Fig. 1: “Dimensions” (in mm) 1.3 Scope of delivery Instantaneous water heater Wall bracket Special jet regulator Seals Fixing screws and plugs T-piece Flexible hose Operating and installation instructions Fig. 2: “Scope of delivery“...
- Page 21 CLAGE Installation 2. Installation Installation, initial operation and maintenance of this appliance must only be conducted by an authorised professional, who will then be responsible for adherence to applicable standards and installation regulations. We assume no liability for any damages caused by failure to observe these instructions! 2.1 Typical installations...
- Page 22 The heater is installed directly to the connecting pipes of the tap. We guarantee trouble-free operation of the instantaneous water heater only if CLAGE fittings and accessories are used. Note the following during installation: • Installation must comply with DIN VDE 0100 and EN 806 and with the statutory regulations of the country and the provisions of the local electricity and water supply company.
- Page 23 CLAGE Installation • When using the supplied flexible connecting hose, the minimum bending radius of 27 mm must be observed at all times. The connecting hose must not be subjected to any tensile or compressive effects during assembly and when in use.
- Page 24 MBH 3..7 Installation a. Seal b. Filter c. Cold water connection (inlet) d. Hot water connection (outlet) e. Rating plate cover Fig. 6: “Connecting the water pipes” 6. Make sure that the water pipes do not apply any kind of mechanical pressure on the instantaneous water heater.
- Page 25 Make sure that the grommet fits tightly around the cable to ensure optimal protection against water. f. Refit the cover on the appliance. The earth conductor must be connected! MBH 3 (230 V) MBH 4 (230 V) MBH 6 (230 V) MBH 7 (400 V) Fig. 7: “Circuit diagram”...
- Page 26 5. Explain the functions and use of the instantaneous water heater to the user and hand over these operating instructions to the user for information and future reference. 6. Register the appliance with the customer service department using the registration card or online at www. clage.com.
- Page 27 CLAGE 3. Use As soon as the hot water tap is opened, the instantaneous water heater switches on automatically. Close the tap and the appliance switches off automatically again. 3.1 Rating plate cover On the inner part of the cover you can find the name of the application type (1), as well as the serial number (2) and the article number (3).
- Page 28 MBH 3..7 3.2 Adjusting the water flow and temperature May only be carried out by a specialist. Remove the cover, undo the hood screw underneath and remove the hood. The maximum temperature and flow depend on the conditions at the installation site. In case of quite low or high cold water temperatures, you may reduce or increase the flow with the adjustment screw to achieve a comfortable outlet temperature.
- Page 29 CLAGE 3.3 Changing the strainer The cold water connection of the instantaneous water heater is equipped with a strainer. Dirt deposited in this strainer can reduce the hot water output. Clean or replace as follows. Switch off the power supply to the instantaneous water heat- 2.
- Page 30 MBH 3..7 Troubleshooting 4. Troubleshooting 4.1 Self-help when problems occur The following table will help you to determine and rectify the reasons for possible problems. Problem Possible cause Remedy No water flows Water supply is turned off Open the main water valve and angle valve Special tap aerator is not fitted Fit the special tap aerator Water flows more slowly than...
- Page 31 4.2 Spare parts Strainer Cold water connection Hot water connection Wall bracket Power supply cable Second heating element (MBH 6, MBH 7) Heating element Fig. 14: “Spare parts” 4.3 Customer service address CLAGE GmbH After-Sales Service Pirolweg 4 21337 Lüneburg...
- Page 32 MBH 3..7 Disposal 5. Disposal 5.1 Disassembly Switch off the power supply to the instantaneous water heater. 2. Close the shut-off valve in the inlet pipe. 3. Disconnect the electrical connection in the appliance junction box or disconnect the protective earth plug if the appliance is fitted with a plug.
- Page 33 Sommaire 1. Description de l’appareil 3.3 Remplacement du filtre .....44 1.1 Caractéristiques techniques ....34 3.4 Purge .
- Page 34 L’élévation de la température dépend ici du débit. 1.1 Caractéristiques techniques Type MBH 3 MBH 4 MBH 6 MBH 7 L’efficacité énergétique de classe Capacité nominale Litres Surpression de service admissible MPa (bar) 1 (10) Type de raccordement résistant à...
- Page 35 Description de l’appareil 1.2 Dimensions Fig. 1: « Dimensions » (cotes indiquées en mm) 1.3 Matériel fourni Chauffe-eau instantané Support mural Régulateur de jet spécial Joints Vis de montage et chevilles Raccord en Té Tuyau flexible Instructions d’utilisation et de montage Fig. 2: « Matériel fourni »...
- Page 36 Installation 2. Installation Seul un professionnel certifié est autorisé à effectuer le montage, la première mise en service et l’entretien de cet appareil. Celui-ci est alors pleinement responsable de l’observation des normes en vigueur et des consignes d’installation. Nous n’assumons aucune responsabilité pour les dommages résultant du non-respect du présent manuel ! 2.1 Exemples d’installation 2.1.1 Installation basse pression (écoulement libre)
- Page 37 être garanti qu’à la condition d’utiliser des robinets de distribution et accessoires CLAGE. À observer lors de l’installation : • Norme VDE 0100 et EN 806 ainsi que les prescriptions légales du pays et les dispositions de la régie d’électri- cité...
- Page 38 Installation • Il ne faut laisser aucun accessoire dans l’emballage. • En cas d’utilisation du tuyau de raccordement souple fourni, le rayon de flexion ne doit jamais être inférieur au rayon minimal de 27 mm. Le tuyau de raccordement ne doit subir aucune contrainte de traction ou de com- pression, ni pendant le montage, ni en service.
- Page 39 Installation a. Joint b. Filtre c. Raccord d’eau froide (arrivée) d. Raccord d’eau chaude (sortie) e. Cache à plaque signalétique Fig. 6: « Raccordement des conduites d’eau » 6. Assurez-vous que les conduites d’eau d’exercent aucune contrainte mécanique sur le chauffe-eau instantané. 7.
- Page 40 électrique. Le manchon doit entourer le câble de manière étanche. f. Remontez le capot sur l’appareil. Il faut brancher la terre ! MBH 6 (230 V) MBH 3 (230 V) MBH 4 (230 V) MBH 7 (400 V) Fig. 7: « Schéma électrique »...
- Page 41 « Utilisation ». 5. Expliquez le fonctionnement du chauffe-eau instantané à l’utilisateur et remettez-lui la présente notice pour information en lui demandant de la conserver. 6. Enregistrez l’appareil avec la carte d’enregistrement auprès du S.A.V. ou sur l’Internet à l’adresse www.clage.fr.
- Page 42 Utilisation 3. Utilisation Le chauffe-eau instantané se met automatiquement en marche lorsque vous ouvrez le robinet d’eau chaude. Il s’éteint automatiquement en refermant le robinet. 3.1 Cache à plaque signalétique Sur le côté inférieur du cache, en plus de la désignation du modèle de l’appareil (1), se trouvent également le numéro de série de l’appareil (2) et le numéro de référence (3).
- Page 43 Utilisation 3.2 Réglage du volume d’eau et de la température À réaliser par un spécialiste uniquement. Retirer le cache, desserrer la vis de capot qui se trouve en dessous et retirer le capot. La température maximale qui peut être atteinte ainsi que le débit maximum dépendent des conditions locales. Pour obtenir une température de sortie confortable en présence de basses températures de l’eau froide ou un débit élevé...
- Page 44 Utilisation 3.3 Remplacement du filtre Le raccord à eau froide du chauffe-eau instantané est équipé d’un filtre. L’encrassement du filtre peut réduire la capacité de production d’eau chaude. Pour le nettoyer ou le remplacer, procéder comme suit. Déconnectez le câble d’alimentation électrique du chauffe- eau instantané.
- Page 45 Dépannage 4. Dépannage 4.1 À vérifier en présence de problèmes Ce tableau vous aide à trouver la cause d’un éventuel défaut et d’y remédier. Problème Cause possible Solution L’eau ne coule pas Arrivée d’eau fermée Ouvrir le robinet principal et le robinet d’arrêt Régulateur de jet absent Monter le régulateur de jet spécial Le débit d’eau est inférieur à...
- Page 46 4.2 Pièces de rechange Filtre Raccord d’eau froide Raccord d’eau chaude Support mural Câble secteur Deuxième serpentin chauffant (MBH 6, MBH 7) Serpentin chauffantment Fig. 14: « Pièces de rechange » 4.3 Adresse du S.A.V. Pour la France: CLAGE SAS CLAGE GmbH Service Après Vente S.A.V.
- Page 47 Mise au rebut 5. Mise au rebut 5.1 Démontage Déconnectez le câble d’alimentation électrique du chauffe-eau instantané. 2. Fermez le robinet d’arrêt dans la conduite d’arrivée. 3. Débranchez la liaison électrique dans la boîte de connexion d’appareil ou, si l’appareil est équipé d’une fiche avec terre, retirez cette dernière de la prise électrique.
- Page 48 Inhoudsopgave 1. Beschrijving van het toestel 3.2 Instellen van waterhoeveelheid en temperatuur .58 1.1 Technische gegevens ..... . .49 3.3 Vervanging van de filterzeef ....59 1.2 Afmetingen .
- Page 49 Het toestel verbruikt alleen gedurende deze tijd elektrische stroom. De temperatuurverhoging is hierbij afhankelijk van de waterhoeveelheid. 1.1 Technische gegevens Type MBH 3 MBH 4 MBH 6 MBH 7 Energielabel Nominale capaciteit liter Toegestane bedrijfsdruk MPa (bar) 1 (10)
- Page 50 Beschrijving van het toestel 1.2 Afmetingen Afb. 1: “Afmetingen” (maten in mm) 1.3 Leveringsomvang Doorstroomwaterverwarmer Wandhouder Speciale straalregelaar Pakkingen Montageschroeven en pluggen T-stuk Flexibele slang Gebruiks- en montagehandleiding Afb. 2: “Leveringsomvang”...
- Page 51 Installatie 2. Installatie Montage, eerste ingebruikneming en onderhoud van dit toestel mogen uitsluitend door een vakman worden uitgevoerd. Deze is volledig verantwoordelijk voor het in acht nemen van de van toepassing zijnde normen en installatievoorschriften. Wij zijn niet aansprakelijk voor schade die ontstaat door het niet in acht nemen van deze handleiding.
- Page 52 CLAGE. Bij de installatie dienen de volgende punten in acht te worden genomen: • De richtlijn VDE 0100 en EN 806, de van toepassing zijnde wettelijke voorschriften van het land waar het toe- stel wordt geïnstalleerd alsook de bepalingen van het lokale elektriciteits- en waterbedrijf.
- Page 53 Installatie • Er mogen geen onderdelen van het toebehoren in de verpakking overblijven. • Bij gebruik van de meegeleverde flexibele verbindingsslang mag de minimale buigradius van 27 mm nooit wor- den onderschreden. De verbindingsslang mag zowel tijdens de montage als tijdens gebruik niet aan trek- of drukkrachten worden blootgesteld.
- Page 54 Installatie a. Pakking b. Filterzeef c. Koudwateraansluiting (toevoer) d. Warmwateraansluiting (afvoer) e. Afdekking typeplaatje Afb. 6: “Aansluiting van de waterleidingen” 6. Controleren of de waterleidingen geen mechanische kracht op de doorstroomwaterverwarmer uitoefenen. 7. De warmwaterkraan van de armatuur openen en alle verbindingen op dichtheid controleren. 2.4 Elektrische aansluiting De warmwaterkraan vóór de elektrische aansluiting meerdere keren open- en dichtdraaien om het toestel met water te vullen en volledig te ontluchten.
- Page 55 De tule moet de kabel waterdicht omsluiten. f. De kap weer op het toestel monteren. De aardleiding moet aangesloten worden! MBH 3 (230 V) MBH 4 (230 V) MBH 6 (230 V) MBH 7 (400 V) Afb. 7: “Schakelschema”...
- Page 56 5. De werking en het gebruik van de doorstroomwaterverwarmer aan de gebruiker uitleggen en de handleiding ter informatie aan de gebruiker overhandigen, zodat deze de handleiding kan bewaren. 6. Het toestel met de registratiekaart bij de klantenservice van de fabriek of online onder www.clage.com regis- treren.
- Page 57 Gebruik 3. Gebruik Zodra de warmwaterkraan van de armatuur wordt opengedraaid, wordt de doorstroomwaterverwarmer automa- tisch ingeschakeld. Als de armatuur wordt dichtgedraaid, wordt de doorstroomwaterverwarmer automatisch weer uitgeschakeld. 3.1 Afdekking typeplaatje Aan de onderkant van de afdekking bevinden zich naast de typeaanduiding van het toestel (1) ook het serienum- mer van het toestel (2) en het artikelnummer (3).
- Page 58 Gebruik 3.2 Instellen van waterhoeveelheid en temperatuur Mag alleen uitgevoerd worden door een vakman. Verwijder de klep, draai de schroef die zich daaronder bevindt los en verwijder de kap. De maximaal bereikbare temperatuur en het maximale debiet zijn afhankelijk van de lokale omstandigheden. Het debiet kan met behulp van de stelschroef worden ingesteld om bij lage koudwatertemperaturen een com- fortabele uitgangstemperatuur te bereiken resp.
- Page 59 Gebruik 3.3 Vervanging van de filterzeef De koudwateraansluiting van de doorstroomwaterverwarmer is uitgerust met een filterzeef. Een vervuilde filter- zeef kan de warmwatercapaciteit echter reduceren. Een reiniging resp. een vervanging van de filterzeef dient als volgt uitgevoerd te worden. De elektrische stroomtoevoerkabels naar de doorstroomwa- terverwarmer spanningsloos schakelen.
- Page 60 Verhelpen van storingen 4. Verhelpen van storingen 4.1 Probleemoplossing De onderstaande tabel biedt hulp bij het opsporen en verhelpen van de oorzaak van een mogelijke storing. Probleem Mogelijke oorzaak Oplossing Er komt geen water uit de kraan Watertoevoer afgesloten Hoofdwaterkraan en hoekstopkraan opendraaien Straalregelaar ontbreekt Speciale straalregelaar monteren Er komt minder water dan...
- Page 61 Verhelpen van storingen 4.2 Reserveonderdelen Filterzeef Warmwateraansluiting Koudwateraansluiting Wandhouder Netkabel Tweede verwarmings- element (MBH 6, MBH 7) Verwarmingselement Afb. 14: “Reserveonderdelen” 4.3 Adres klantenservice Voor Nederland: Voor België: AB Sales & Trade KV Systeme sprl. Afrikaweg 43 Rue du Parc, 83...
- Page 62 Afvoer 5. Afvoer 5.1 Demontage De elektrische stroomtoevoerkabels naar de doorstroomwaterverwarmer spanningsloos schakelen. 2. De afsluitklep in de toevoerleiding sluiten. 3. De elektrische verbinding in de contactdoos van het toestel loskoppelen of de stekker met randaarde eruit trekken als het apparaat van een stekker voorzien is. 4.
- Page 63 Índice 1. Descrição do aparelho 3.3 Substituição da peneira do filtro ....74 1.1 Especificações técnicas .....64 3.4 Arejamento .
- Page 64 O aparelho consome energia apenas durante este período. A elevação da temperatura depende da taxa do fluxo de água. 1.1 Especificações técnicas MBH 3 MBH 4 MBH 6 MBH 7 Denominação Eficiência energética classe Conteúdo nominal litros Excesso de pressão operacional permitido...
- Page 65 Descrição do aparelho 1.2 Dimensões Ilustraçao 1: «Dimensões» (medidas em mm) 1.3 Conteúdo da embalagem Esquentador Suporte de parede Regulador de jacto especial Vedações Parafusos de montagem e buchas Peça em T Mangueira flexível Instruções de utilização e montagem Ilustraçao 2: «Conteúdo da embalagem»...
- Page 66 Instalação 2. Instalação A montagem, a primeira colocação em funcionamento e manutenção deste aparelho deve ser efectuada ape- nas por um técnico especializado que garanta o cumprimento das normas estabelecidas e das instruções de instala- ção. Não nos responsabilizamos por danos decorrentes pelo não cumprimento destas instruções! 2.1 Exemplos de instalação 2.1.1 Instalação não-pressurizada (aberta) Montar regulador de jacto especial:...
- Page 67 A montagem deve ocorrer diretamente nos cabos de ligação da válvula sanitária. Garantimos um funcionamento sem falhas do esquentador apenas com a utilização de válvulas e acessórios da CLAGE. Ao instalar ter em atenção: • Observar as normas DIN VDE 0100 e EN 806, bem como as prescrições legais do país respectivo e as deter- minações das companhias de abastecimento de energia eléctrica e de água...
- Page 68 Instalação • Ao utilizar-se a mangueira flexível de ligação também fornecida, o raio de curvatura mínimo nunca deve ser inferior a 27 mm. A mangueira de ligação, tanto durante a montagem como durante o funcionamento, não pode, de modo nenhum, estar sujeita a efeitos de tracção ou de pressão. •...
- Page 69 Instalação a. Junta de vedação b. Peneira do filtro c. Ligação de água fria (entrada) d. Ligação de água quente (saída) e. Tampa da placa de identificação Ilustraçao 6: «Conexão das tubulações de água» 6. A montagem deve ser realizada sem que as tubulações de água exerçam qualquer força mecânica sobre o esquentador.
- Page 70 A conduta deve abranger a tubulação sem vazamento. f. Montar a novamente a cobertura no aparelho. O condutor de protecção deve ser ligado! MBH 3 (230 V) MBH 4 (230 V) MBH 6 (230 V) MBH 7 (400 V) Ilustraçao 7: «Esquema de ligação»...
- Page 71 5. Explicar a função do aparelho e a utilização do esquentador ao utilizador e entregar ao mesmo estas Instruções para que as conserve a fim de obter informações. 6. Registar o aparelho no serviço de atendimento ao cliente com o cartão de registo ou online no site www.clage. com.
- Page 72 Utilização 3. Utilização Ao abrir a torneira de água quente, o esquentador é ligado automaticamente. Quando a torneira é fechada, o aparelho desliga-se automaticamente. 3.1 Placa de identifi cação protectora No lado inferior da protecção, junto ao aparelho encontram-se a designação de tipo (1) também o número de série do aparelho (2) e o número de artigo (3).
- Page 73 Utilização 3.2 Ajustar a quantidade de água e a temperatura Execução exclusiva por técnicos. Retire o diafragma, solte o parafuso de tampa que se encontra do lado inferior e retire a tampa. A máxima temperatura a ser atingida e o máximo fluxo de água dependem de condições locais. Para alcançar uma temperatura de saída confortável com temperaturas muito baixas de água ou para atingir uma elevada taxa de fluxo de água com temperaturas de água elevadas, o fluxo de água pode ser ajustado através do parafuso de ajuste.
- Page 74 Utilização 3.3 Substituição da peneira do filtro A ligação de água fria do esquentador está equipada com uma peneira de filtro. O abastecimento de água quente pode ser reduzido se houver sujidades na peneira do filtro. Uma limpeza ou substituição deve ser realizada a seguinte forma: Desligar a corrente do abastecimento eléctrico do esquentador.
- Page 75 Eliminação de falhas 4. Eliminação de falhas 4.1 Auto-ajuda em caso de problemas Esta tabela ajuda-o a encontrar a causa de uma eventual avaria e a eleiminá-la. Problema Possível causa Solução Não vem nenhuma Alimentação de água bloqueada Abrir a torneira de água principal e a válvula angular água Falta regulador do jacto Montar regulador de jacto especial...
- Page 76 Ligação de água quente Suporte de parede Cabo de alimentação Segunda espiral de aquecimento (MBH 6, MBH 7) Espiral de aquecimento Ilustraçao 14: «Peças sobresselentes» 4.3 Endereço do Serviço de assistência técnica Indimante ll – Equipamentos e Sistemas para Fluidos, S.A.
- Page 77 Eliminação 5. Eliminação 5.1 Desmontagem Desligar a corrente do abastecimento eléctrico do esquentador. 2. Fechar a válvula de bloqueio do tubo de entrada. 3. Desligar a a conexão elétrica da caixa de ligações do aparelho e/ou puxar a ficha de corrente com terra, desde que o aparelho esteja equipado com uma ficha.
- Page 78 Índice 1. Descripción del aparato 1.1 Datos técnicos ......79 3.3 Cambio del tamiz de filtro ....89 1.2 Dimensiones .
- Page 79 El aparato consume electricidad sólo durante ese tiempo. El aumento de la temperatura depende del caudal. 1.1 Datos técnicos Tipo MBH 3 MBH 4 MBH 6 MBH 7 Clase de eficiencia Contenido nominal Litros Sobrepresión de servicio permitida MPa (bar) 1 (10) Tipo de conexión...
- Page 80 Descripción del aparato 1.2 Dimensiones Fig. 1: «Dimensiones» (medidas en mm) 1.3 Volumen de suministro Calentador de paso Soporte de pared Regulador de chorro especial Juntas Tornillos de montaje y tacos Pieza en T Tubo flexible Instrucciones de empleo y de montaje Fig.
- Page 81 Instalación 2. Instalación El montaje, la primera puesta en funcionamiento y el mantenimiento de este aparato tienen que ser llevados a cabo exclusivamente por un profesional, el cual es plenamente responsable de la observación de las normas exis- tentes y de las prescripciones de instalación. ¡No asumimos responsabilidad alguna por los daños que pudieran pro- ducirse como resultado de la no observación de estas instrucciones! 2.1 Ejemplos de instalación 2.1.1 Instalación sin presión (abierta)
- Page 82 2.2 Indicaciones para el montaje El montaje tiene lugar directamente a las conducciones de conexión de la grifería sanitaria. Garantizamos un funcionamiento impecable del calentador de paso sólo si se emplean griferías y accesorios de CLAGE. Durante la instalación hay que observar lo siguiente: •...
- Page 83 Instalación • No debe dejarse ningún accesorio dentro del embalaje. • Si se emplea el tubo de conexión flexible adjunto, hay que respetar siempre el radio de flexión mínimo de 27 mm. El tubo de conexión no debe exponerse jamás, ni durante el montaje ni durante la operación, ni a trac- ciones ni a presiones.
- Page 84 Instalación a. Junta b. Tamiz de filtro c. Conexión de agua fría (entrada) d. Conexión de agua caliente (salida) e. Panel de la placa de características Fig. 6: «Conexión de las tuberías de agua» 6. Asegúrese de que las tuberías de agua no ejercen ninguna fuerza mecánica sobre el calentador de paso. 7.
- Page 85 El manguito tiene que envolver el cable de forma estanca al agua. f. Monte la tapa de nuevo en el aparato. ¡Hay que conectar el conductor de protección! MBH 3 (230 V) MBH 4 (230 V) MBH 6 (230 V) MBH 7 (400 V) Fig. 7: «Esquema de conexiones»...
- Page 86 5. Explíquele al usuario el funcionamiento y el empleo del calentador de paso y entréguele estas instrucciones para su información y para que las conserve. 6. Registre el aparato con la tarjeta de registro en el servicio postventa de fábrica o en Internet bajo www.clage. com.
- Page 87 Empleo 3. Empleo El calentador de paso se conecta automáticamente en cuanto se abre el grifo de agua caliente de la grifería. Al cerrar la grifería el aparato se desconecta de nuevo automáticamente. 3.1 Panel de la placa de características En el lado inferior del panel se encuentra junto a la denominación de tupo de aparato (1) también el número de serie del aparato (2) y el número de artículo (3).
- Page 88 Empleo 3.2 Ajuste de la cantidad de agua y de la temperatura A realizar solamente por personal cualificado. Retirar la placa, aflojar el tornillo de la tapa que se encuentra debajo y levantar la tapa. La temperatura máxima que puede alcanzarse y el caudal máximo dependen de las circunstancias locales. Para obtener una temperatura de salida confortable también con temperaturas bajas del agua fría o para obtener un caudal mayor con temperaturas altas del agua fría, es posible regular el caudal con el tornillo de ajuste.
- Page 89 Empleo 3.3 Cambio del tamiz de filtro La conexión de agua fría del calentador de paso está equipada con un tamiz de filtro. Debido al ensuciamiento de este tamiz de filtro, es posible que se reduzca el rendimiento de agua caliente. Para la limpieza o para el recambio hay que proceder como se indica a continuación.
- Page 90 Eliminación de fallos 4. Eliminación de fallos 4.1 Autoayuda en caso de problemas Esta tabla sirve como ayuda para determinar y eliminar la causa de un posible fallo. Problema Posible causa Solución No sale agua Suministro de agua cerrado Abrir el grifo de agua principal y la válvula de ángulo Falta el regulador de chorro Montar el regulador de chorro especial Sale menos agua de la espe-...
- Page 91 (MBH 6, M 7) Espiral calentadora Fig. 14: «Piezas de repuesto» 4.3 Dirección del servicio postventa TECNA CLAGE GmbH Servicio postventa Crta. Paracuellos Fuente el Saz Km 19, 100 (Antigua M-111) Pirolweg 4 28110 ALGETE (Madrid) 21337 Lüneburg España...
- Page 92 Eliminación 5. Eliminación 5.1 Desmontaje Corte la corriente de los cables de alimentación eléctrica al calentador de paso. 2. Cierre la llave de paso de la tubería de alimentación. 3. Desconecte la unión eléctrica de la caja de conexión de aparatos o desenchufe el conector con puesta a tierra en la medida en que el aparato disponga de un conector.
- Page 93 Obsah 1. Popis přístroje 3.2 Nastavení množství vody a teploty ... 103 1.1 Technické údaje ......94 3.3 Výměna vložky filtru .
- Page 94 Průtokový ohřívač se automaticky zapíná při otevření ventilu teplé vody na armatuře a ohřívá vodu protékající pří- strojem. Elektrický proud přístroj spotřebovává jen během této doby. Zvýšení teploty přitom závisí na průtoku. 1.1 Technické údaje MBH 3 MBH 4 MBH 6 MBH 7 Třída energetické úspornosti Jmenovitý obsah litry Dovolený provozní přetlak MPa (bar) 1 (10) Druh přípojky...
- Page 95 Popis přístroje 1.2 Rozměry Obr. 1: «Rozměry» 1.3 Rozsah dodávky Průtokový ohřívač Nástěnný držák Speciální regulátor průtoku Těsnění Montážní šrouby a hmoždinky Tvarovka T Pružná hadice Návod k použití a montáži Obr. 2: «Rozsah dodávky»...
- Page 96 Instalace 2. Instalace Montáž, první uvedení do provozu a údržbu přístroje smí provést pouze kvalifikovaný odborník, který přitom plně odpovídá za dodržování platných norem a instalačních předpisů. Za škody, které vzniknou nedodržováním toho- to návodu, nepřebíráme žádné záruky. 2.1 Příklady instalace 2.1.1 Beztlaká...
- Page 97 Instalace 2.1.2 Tlaková (uzavřená) instalace Použijte speciální regulátor vodního proudu 3,5 / 4,4 kW: CSP 3 5,7 / 6,5 kW: CSP 6 Elektrická přípojka přívodním kabelem (příp. zkraťte) Rohový ventil výstup G ⅜“ Obr. 4: «Tlaková (uzavřená) instalace se standardní baterií » (rozměry v mm)
- Page 98 Montáž je provedena přímo na přítokovém potrubí sanitární baterie. Zaručujeme bezvadnou funkci průtokového ohřívače pouze při použití armatur a příslušenství CLAGE. Při instalaci pamatujte: • DIN VDE 0100 a EN 806 a legislativní předpisy příslušné země a ustanovení místních dodavatelů elektrické...
- Page 99 Instalace Obr. 5: «Montáž nástěnného držáku» 4. Důkladně propláchněte vodovodní potrubí dříve než provedete připojení k přístroji. 5. Připojte vodovodní přípojky s příslušnými přípojkami armatury. Přívod vody je označen na typovém štítku pod krytem modrou barvou, výtok vody červenou. a. Těsnění b. Filtrační síto c.
- Page 100 Instalace 2.4 Elektrické připojení Před připojením k elektrické síti musíte přístroj napustit opakovaným otevíráním a zavíráním ventilu teplé vody armatury vodou a provést kompletní odvzdušnění. V opačném případě může dojít k poškození topného prvku! Odpojte přívodní elektrické kabely od napětí. 2. Zkontrolujte, zda průřez přívodního kabelu odpovídá požadavkům uvedených v technických údajích tohoto návodu.
- Page 101 4. Pokud například není dosaženo požadované teploty, musíte případně upravit množství vody. Postup naleznete v kapitole »Použití«. 5. Vysvětlete uživateli funkci a použití průtokového ohřívače a předejte ji k informaci a k úschově. 6. Registrujte přístroj pomocí registrační karty u zákaznického servisu nebo online na stránkách www.clage.com.
- Page 102 Použití 3. Použití Jakmile otevřete vodovodní kohoutek baterie, průtokový ohřívač se automaticky zapne. Při zavření armatury se přístroj automaticky vypne. 3.1 Kryt typového štítku Na spodní straně krytu jsou kromě označení typu přístroje (1) také sériové číslo přístroje (2) a číslo výrobku (3). Gerät an Schutzleiter AAAA BBBB...
- Page 103 Použití 3.2 Nastavení množství vody a teploty Smí provádět pouze odborník. Odmontujte zástěnu, uvolněte šroub krytu, který se nachází pod ní, a sundejte kryt. Maximální dosažitelná teplota a maximální průtočné množství závisí na místních poměrech. Aby bylo možné dosáhnout komfortní výstupní teploty i při nízké teplotě studené vody vody nebo velkého prů- točného množství...
- Page 104 Použití 3.3 Výměna vložky filtru Přípojka studené vody průtokového ohřívače je vybavena filtrační vložkou. Znečištěním této filtrační vložky může dojít ke snížení výkonu přípravy teplé vody. Čištění a případnou výměnu provedete následujícím způsobem. Odpojte přívodní elektrické kabely od průtokového ohřívače. 2.
- Page 105 Odstraňování závad 4. Odstraňování závad 4.1 Svépomoc při odstraňování problémů Tato tabulka vám pomůže najít příčinu případné poruchy a odstranit ji. Problém Možná příčina Řešení Nevytéká voda Uzavřený přívod vody Otevřete hlavní vodovodní kohout a rohový ventil Chyba regulátor vodního proudu Namontujte speciální...
- Page 106 4.2 Náhradní díly Filtrační síto Připojení studené vody Připojení teplé vody Nástěnný držák Přívodní kabel Druhá topná spirála (MBH 6, MBH 7) Topná spirála Obr. 14: «Náhradní díly» 4.3 Adresa zákaznického servisu CLAGE CZ s.r.o. Trojanovice 644 744 01 Frenštát pod Radhoštěm Česká...
- Page 107 Likvidace 5. Likvidace 5.1 Demontáž Odpojte přívodní elektrické kabely od průtokového ohřívače. 2. Uzavřete uzavírací ventil na přívodu vody. 3. Odpojte elektrické připojení z elektrické přípojky přístroje, případně odpojte zástrčku s ochranným kontaktem, pokud je přístroj vybaven zástrčkou. 4. Odpojte vodovodní potrubí od přípojek přístroje. Může přitom vytékat voda. 5.
- Page 108 Obsah 1. Popis prístroja 3.2 Nastavenie množstva vody a teploty ..117 1.1 Technické údaje ......109 3.3 Výmena sitka filtra .
- Page 109 K spotrebe elektrickej energie dochádza iba počas tohto procesu. Zvýšenie teploty je pritom závislé od prietokového množstva. 1.1 Technické údaje MBH 3 MBH 4 MBH 6 MBH 7 Energetická trieda Menovitý objem liter Prípustný prevádzkový pretlak MPa (bar) 1 (10) Spôsob zapojenia...
- Page 110 Popis prístroja 1.2 Rozmery Obr. 1: »Rozmery« (rozmerové údaje v mm) 1.3 Rozsah dodávky Prietokový ohrievač Nástenný držiak Špeciálny regulátor vodného prúdu Tesnenia Montážne skrutky a hmoždinky T-kus Pružná hadica Návod na použitie a montáž Obr. 2: »Rozsah dodávky«...
- Page 111 Inštalácia 2. Inštalácia Montáž, prvé uvedenie do prevádzky a údržbu tohto prístroja smie vykonávať len odborník, ktorý je plne zod- povedný za dodržanie platných noriem a inštalačných predpisov. Nepreberáme žiadne ručenie za škody vzniknuté nedodržaním tohto návodu! 2.1 Príklady inštalácie 2.1.1 Beztlaková...
- Page 112 2.2 Pokyny pre montáž Montáž sa uskutočňuje priamo na prípojných vedeniach sanitárnej armatúry. Bezchybnú funkciu prietokového ohrievača zaručujeme iba pri použití armatúr a príslušenstva firmy CLAGE. Pri inštalácii je potrebné dodržiavať nasledovné: • DIN VDE 0100 a EN 806, ako aj zákonné predpisy príslušnej krajiny a ustanovenia miestneho elektrorozvodné- ho a vodárenského podniku.
- Page 113 Inštalácia Obr. 5: »Montáž nástenného držiaka« 4. Predtým, než na prístroj pripojíte vodovodné potrubia, dôkladne ich prepláchnite. 5. Spojte vodovodné prípojky pomocou príslušných prípojok batérie. Prítok vody je označený na typovom štítku pod krytkou modrou farbou, odtok vody červenou. a. Tesnenie b.
- Page 114 Inštalácia 2.4 Elektrické pripojenie Pred elektrickým pripojením naplňte prístroj vodou niekoľkonásobným otvorením a zatvorením ventilu teplej vody na batérii a úplne ho odvzdušnite. V opačnom prípade sa môže poškodiť vyhrievací článok! Odpojte elektrické prívody od napätia. 2. Uistite sa, že prierez prívodného kábla je dimenzovaný podľa údajov uvedených v technických údajoch tohto návodu.
- Page 115 4. Prispôsobte prípadne množstvo vody, ak sa napríklad nedosahuje teplota. Postup k tomu je popísaný v kapitole »Používanie«. 5. Vysvetlite používateľovi funkciu a používanie prietokového ohrievača a odovzdajte mu tento návod pre infor- máciu a uschovanie. 6. Zaregistrujte prístroj registračnou kartou u zákazníckeho servisu alebo na internete na stránke www.clage.com.
- Page 116 Používanie 3. Používanie Hneď ako sa otvorí kohútik na teplú vodu na batérii, prietokový ohrievač sa automaticky zapne. Pri zatvorení baté- rie sa prístroj znova automaticky vypne. 3.1 Krytka typového štítka Na spodnej strane krytky sa okrem názvu typu prístroja (1) nachádza aj sériové číslo prístroja (2) a číslo výrobku (3).
- Page 117 Používanie 3.2 Nastavenie množstva vody a teploty Realizáciu môže vykonávať len odborník. Vyberte viečko, povoľte skrutku krytu, ktorá sa pod ním nachádza, a vyberte kryt. Maximálne dosiahnuteľná teplota a maximálne prietokové množstvo sú závislé od miestnych pomerov. Aby bola pri nízkej teplote studenej vody dosiahnutá ešte komfortná výstupná teplota, resp. pri vysokej teplote studenej vody veľké...
- Page 118 Používanie 3.3 Výmena sitka filtra Prípojka studenej vody prietokového ohrievača je vybavená sitkom filtra. Znečistením tohto sitka filtra sa môže znížiť prietok teplej vody. Čistenie, resp. výmenu je potrebné vykonať nasledovne. Odpojte elektrické prívody k prietokovému ohrievaču od napätia. 2. Zatvorte uzavierací ventil v prívodnom vedení. 3.
- Page 119 Odstránenie porúch 4. Odstránenie porúch 4.1 Svojpomoc pri problémoch Táto tabuľka Vám pomôže nájsť príčinu prípadnej poruchy a odstrániť ju. Problém Možná príčina Odstránenie Otvorte kohútik hlavného prívodu vody a rohový Netečie voda Zablokovaný prívod vody ventil Chýba regulátor vodného prúdu Namontujte špeciálny regulátor vodného prúdu Tečie menšie množstvo vody ako Tlak vody je príliš...
- Page 120 Sitko filtra Prípojka studenej vody Prípojka teplej vody Nástenný držiak Sieťové vedenie Druhá ohrievacia špirála (MBH 6, MBH 7) Ohrievacia špirála Obr. 14: »Náhradné diely« 4.3 Adresa zákazníckeho servisu KAMA - CLAGE Ing. Roman Škvarka Vyšnokubínska 10/151 026 01 Vyšný Kubín...
- Page 121 Likvidácia 5. Likvidácia 5.1 Demontáž Odpojte elektrické prívody k prietokovému ohrievaču od napätia. 2. Zatvorte uzavierací ventil v prívodnom vedení. 3. Odpojte elektrické pripojenie z pripojovacej zásuvky prístroja, resp. vytiahnite zástrčku s ochranným kontak- tom, ak je prístroj vybavený zástrčkou. 4. Odpojte vodovodné potrubia od prípojok prístroja. Pritom môže dôjsť k úniku vody. 5.
- Page 122 Съдържание 1. Описание на уреда 3.2 Настройки на количеството вода и температура 1.1 Технически данни ......123 3.3 Почистване...
- Page 123 то водата преминав през уреда. Уредът използва електричество само през това време. Повишаването на температурата зависи от количеството на течащата вода. 1.1 Технически данни MBH 3 MBH 4 MBH 6 MBH 7 Тип Класа на енергийна ефикасност Обем литър Допустимо пренатоварване...
- Page 124 Описание на уреда 1.2 Измерване Абр. 1: ”Измерване“ (данни в мм) 1.3 Обем на доставка Бойлер Устройство за стена Специален регулатор на течаща вода Уплътнения Гайки и дюбели за монтаж Т-част Подв.мъркуч Инструкции за употреба и монтаж Абр. 2: ”Обем на доставка“...
- Page 125 Поставяне 2. Поставяне Монтирането, пръвоначалното задействане и обслужването на този уред се извършват само от лица, които поемат цялата отговорност за спазването на съществуващите норми и указания за поставяне. Не пое- маме никаква отговорност за щети, възникнали от неспазването на това упътване! 2.1 Примери...
- Page 126 2.2 Указания за монтаж Монтажът се извършва директно на санитарната арматура. Гарантираме безупречна работа на бойлера само при използване на арматури и допълнителни части на CLAGE При поставянето трябва да се спазва следното: • Европейските, националните и регионални разпоредби за електро- и водоснабдяване.
- Page 127 Поставяне Абр. 5: ”Монтаж на устройството за стена“ 4. Пуснете обилно вода през водната арматура преди да включите уреда. 5. Свържете водните връзки със съответните връзки на арматурата. Подаването на вода е показано в синьо на обозначението за вид под блендата, а извеждането на вода е в червено. a.
- Page 128 Поставяне 2.4 Свързване с електричество Преди свързването с електричеството напълнете уреда с вода чрез многократно отваряне и затваряне на вентила за топла вода и напълно изведете въздуха. Иначе е възможно да се повреди частта за загряване! Включете електрическите връзки без напрежение. 2.
- Page 129 нагласяване на водата е описан в глава „Употреба“. 5. Обяснете на потребителя функионирането и употребата на бойлера, и му предайте това упътване с информация и начин на съхранение. 6. Регистрирайте уреда с регистрационната карта на производителя или в интернет на www.clage.com.
- Page 130 Употреба 3. Употреба Веднага с пускането на крана за топла вода на арматурата автоматично се включва бойлера. При затваряне на крана автоматично се изключва и бойлера. 3.1 Обозначение за тип бленда Върху долната страна на блендата до обозначението на тип уреди(1) се намират, както серийният номер на уредите(2), така...
- Page 131 Употреба 3.2 Настройки на количеството вода и температура Да се извършва само от специалист. Отстранете панела (виж фиг. 10), разхлабете винта на капачката отдолу и свалете капака. Максимално достиганата температура и максималното количество на водата зависят от регионалните осо- бености. За...
- Page 132 Употреба 3.3 Почистване и грижа Връзката за студена вода на бойлера има филтър. При замърсяване на този филтър намалява потока на топла вода. Почистването съотв., подмяната се извършва както следва. Изключете електрическите свръзки към бойлера. 2. Затворете вентила на подаване. 3.
- Page 133 Отстраняване на смущение 4. Отстраняване на смущение 4.1 Самопомощ при проблеми Тази табела помага за намирането на причината за евент. смущение и отстраняването му. Проблем Възможна причина Помощ Няма поток на вода Подаването на водата е възпрепятствано Отвийте главния воден кран и вентил. Липсва...
- Page 134 4.2 Части за смяна Филтър Свръзка за студена вода Свръзка за топла вода Устройство за стена Мрежа Второ сгряване (MBH 6, MBH 7) Сгряване Абр. 14: ”Части за смяна“ 4.3 Адрес за обслужване на клиенти GRESIA2 Ltd България 1606 София...
- Page 135 Изхвърляне 5. Изхвърляне 5.1 Демонтаж Изключете електрическите свръзки към бойлера. 2. Затворете вентила на подаване. 3. Освободете електрическите свръзки в контакта на уреда, съответно издърпайте защитния щепсел, ако уредът има щепсел. 4. Освободете захранването с вода на уреда. Възможно е при това да изтече вода. 5.
- Page 136 Produktdatenblatt / Product data sheet / Fiche technique de produit / Product informatieblad / Ficha do produto / Ficha de datos del producto / Technický list podle Produktdatenblatt nach Vorgabe der EU Verordnungen - 812/2013 814/2013 η °C dB(A) CLAGE MBH3 0HF035B CLAGE MBH4 0HF044B...
- Page 137 Produktdatenblatt / Product data sheet / Fiche technique de produit / Product informatieblad / Ficha do produto / Ficha de datos del producto / Technický list podle > en Product data sheet in accordance with EU regulation (a) Brand name or trademark, (b.1) Model, (b.2) Type, (c) Specified load profile, (d) Energy-efficiency class, (e) Energy-efficiency, (f) Annual power consumption, (g) Additional load profile, the appropriate energy-efficiency and the annual power consumption, if applicable, (h) Temperature setting for the temperature controller, (i) Sound power level, internal.
- Page 138 Produktdatenblatt / Product data sheet / Fiche technique de produit / Product informatieblad / Ficha do produto / Ficha de datos del producto / Technický list podle > es Ficha de datos del producto conforme a los reglamentos de la CE (a) Nombre o marca comercial, (b.1) Denominación del aparato, (b.2) Tipo de aparato, (c) Perfil de carga, (d) Clase de eficiencia energética de la producción de agua caliente, (e) Eficiencia energética de la producción de agua caliente, (f) Consumo anual de corriente, (g) Perfil de carga alternativo, la correspondiente eficiencia energética de producción de agua caliente y el consumo anual...
- Page 144 CLAGE GmbH Pirolweg 4 21337 Lüneburg Deutschland Telefon: +49 4131 8901-0 E-Mail: service@clage.de Internet: www.clage.de Technische Änderungen, Änderungen der Ausführung und Irrtum vorbehalten. Subject to technical changes, design changes and errors. Sauf modifications techniques, changements constructifs et erreur ou omission. Technische wijzigingen, wijzigingen van de uitvoering en misverstanden voorbehouden.