Table des Matières
Publicité
Les langues disponibles
Les langues disponibles
Liens rapides
Publicité
Table des Matières
Dépannage

Sommaire des Matières pour Rotel U448CH1
- Page 1 THERMOCOOKEREXPERT448CH1 U448CH1 GEBRAUCHSANWEISUNG MODE D’EMPLOI ISTRUZIONI PER L’USO INSTRUCTIONS FOR USE Gebrauchsanweisung ○ Mode d’emploi ○ Istruzioni per l’uso ○ Instructions for use U448CH1_BED_Rev01_2017-04-18...
-
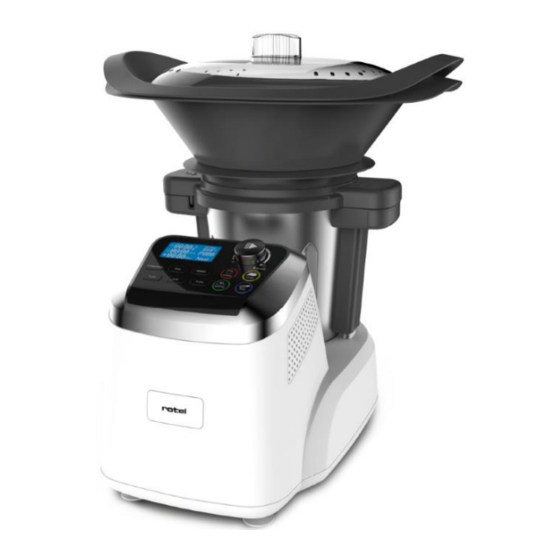
Page 2: Schematische Darstellung
H. Écran LCD H. Schermo LCD H. LCD Display Bedienerfeld Panneau de com- Pannello di comando Control panel mande Rotel Logo Marque Rotel Marca Rotel Rotel Logo K. Motoreneinheit K. Corps du robot K. Corpo del robot K. Main body... - Page 3 TECHNISCHE DATEN Caractéristiques techniques Specifiche tecniche Technical specifications Nennspannung 220-240 V Tension nominale Tensione nominale Rated voltage Nennfrequenz 50/60 Hz Fréquence nominale Frequenza nominale Rated frequency Motorleistung 500 W Puissance du moteur Potenza del motore Motor power 1000 W Heizleistung Puissance cuisson...
-
Page 4: Table Des Matières
Inhaltsverzeichnis / Table des matières / Indice / Table of contents Deutsch .............................. 10 Sicherheitshinweise ........................10 Vor dem ersten Gebrauch ......................14 Bedienerfeld ..........................14 Start/Stop/Reset-Drehknopf ......................14 Temperatur ............................ 15 Timer (Time) ..........................15 Geschwindigkeit (Speed) ....................... 15 Turbo ............................. - Page 5 Anwendung des Thermocooker Expert ..................25 Mix-Schüssel einsetzen ......................... 25 Herausnehmen der Mix-Schüssel ....................26 Betriebsarten ..........................26 Arbeitsmodus 1: Mixen/pürieren ....................26 Arbeitsmodus 2: Kochen ....................... 27 Arbeitsmodus 3: Mixen/pürieren und kochen ................28 Arbeitsmodus 4: Dampfgaren ....................... 29 ...
- Page 6 Anneaux d’étanchéité ........................43 Lame multifonction ........................44 Insérer la lame multifonction ......................44 Utiliser la lame multifonction ......................45 Fouet papillon ..........................46 Insérer le fouet papillon ........................ 46 Utiliser le fouet papillon ........................ 46 Pale de pétrissage..........................
- Page 7 Confettura (marmalade) ....................... 63 Impasto (dough) ..........................63 Cottura a vapore (steaming) ......................64 Frustino (whisk) ..........................64 Schermo LCD ..........................65 Temperatura effettiva (Actual temperature) ................65 Minuteria (Time) ........................... 65 Velocità (speed) ..........................65 Temperatura selezionata (Set temperature) ................65 ...
- Page 8 Safety instructions ......................... 79 Before first use ..........................82 Control Panel ..........................82 Start/Stop/Reset knob ........................82 Temperature ..........................82 Time ............................... 83 Speed ............................. 83 Turbo ............................. 83 Auto ............................... 83 Pulse .............................. 84 Marmalade ............................ 84 Dough ............................
- Page 9 Working modes ..........................93 Mode 1: mixing ingredients ......................93 Mode 2: only cooking ........................94 Mode 3: chopping and cooking ..................... 95 Mode 4: Steaming ......................... 96 Cleaning and maintenance ......................97 Troubleshooting ..........................98 Disposal ............................
-
Page 10: Deutsch
Deutsch SICHERHEITSHINWEISE Lesen Sie zuerst alle Hinweise, bevor Sie das Gerät in Be- trieb nehmen. o Dieses Gerät kann von Personen mit eingeschränk- ten physischen, sensorischen oder geistigen Fähig- keiten oder einem Mangel an Erfahrung und/oder Wissen verwendet werden, wenn diese beaufsich- tigt werden oder bezüglich des sicheren Gebrauchs des Geräts unterwiesen wurden und die daraus re- sultierenden Gefahren verstanden haben. - Page 11 o Bevor das Gerät angeschlossen wird muss die Über- einstimmung der Netzspannung mit der Kennzeich- nung auf dem Typenschild überprüft werden. o Das Gerät darf nicht mit einem beschädigten Kabel oder Stecker, nach einer Fehlfunktion, oder falls es in irgendeiner Weise beschädigt wurde, betrieben werden.
- Page 12 o ACHTUNG - HEISS: Manche Oberflächen, sowie heis- ses Wasser und der vom Gerät erzeugte Wasser- dampf erreichen sehr hohe Temperaturen was zu Verbrennungen führt. Die Mix-Schüssel, den Mess- becher, den Dampfkorb und deren Deckel während der Verarbeitung von warmen Speisen nicht berüh- ren.
- Page 13 o Dieses Gerät ist dazu bestimmt, im Haushalt und ähnlichem verwendet zu werden, wie beispiels- weise: in Mitarbeiterküchen für Läden, Büros, etc.; in landwirtschaftlichen Betrieben; von Gästen in Hotels, Motels und anderen Wohneinrichtungen; in Frühstückspensionen; in Catering-Betrieben und vergleichbaren einzelhandelsfremden Nutzungen.
-
Page 14: Vor Dem Ersten Gebrauch
VOR DEM ERSTEN GEBRAUCH o Vor der ersten Benutzung das gesamte Verpackungsmaterial und alle Werbeaufkle- ber entfernen. o Prüfen, ob alle aufgeführten Zubehörteile vorhanden sind. Sollte etwas fehlen, wen- den Sie sich an den Kundendienst. o Alle Teile, die mit Lebensmittel in Kontakt kommen, mit einem feuchten Tuch wa- schen. -
Page 15: Temperatur
Temperatur Taste „Temperature“ drücken und Knopf drehen um eine Arbeitstemperatur einzu- stellen, im Uhrzeigersinn um die Temperatur zu erhöhen, gegen den Uhrzeigersinn um sie zu verringern. Temperaturbereich: zwischen 20 und 120 Grad. Timer (Time) Taste „Time“ drücken und Knopf drehen um eine Stoppuhr einzustellen, im Uhrzei- gersinn um die Zeit zu erhöhen, gegen den Uhrzeigersinn um sie zu verringern. -
Page 16: Auto
Auto Taste „Auto“ drücken und Knopf im Uhrzeigersinn drehen um ein automatisches Pro- gramm, basierend auf dem Thermocooker Expert Rezeptbuch, auszuwählen. Programmauswahl: 1 bis 29. P01: Gemüse-Suppe P16: Älplermagronen mit Apfelmus P02: Quiche mit Ziegenkäse und Zucchetti P17: Dorsch-Päckchen mit buntem Gemüse P03: Tom Kha Gai (Thailändische Kokossuppe) P18: Fisch-gratin P04: Béchamel-Sauce... -
Page 17: Marmelade (Marmalade)
Marmelade (Marmalade) Die Taste „Marmalade“ im Standby-Modus drücken, um die voreingestellte Funktion wie folgt auszuführen: akustisches Signal, 3 Wiederholungen. Mischen: Geschwindigkeitsstufe 12, 10 Sekunden. Heizung: 65 Grad, mischen: Geschwindigkeitsstufe 1. Akustisches Signal, 3 Wiederholungen. Geschwindigkeit stufenweise erhöhen bis 12, mixen: 10 Sekunden. ... -
Page 18: Dampfgaren (Steaming)
Dampfgaren (Steaming) Die Taste „Steaming“ im Standby-Modus drücken, um die voreingestellte Funktion wie folgt auszuführen: Heizung: bis auf 120 Grad. Voreingestellte Zeit: 30 Minuten (Dieser Wert ist veränderbar). HINWEIS: In einem anderen Arbeitsmodus ist diese Taste inaktiv. HINWEIS: Eingestellte Temperatur, aktuelle Geschwindigkeit und Temperatur werden wäh- rend des Programmablaufs des Thermocooker Expert angezeigt. -
Page 19: Lcd Bildschirm
LCD BILDSCHIRM Ist-Temperatur (Actual temperature) Das Display zeigt die tatsächliche Temperatur der verarbeiteten Speisen in der Mix- Schüssel an. Zeit (Time) Mit Timer-Funktion: Die verbleibende Zeit ist auf dem Bildschirm rückwärts zählend (... 5, 4, 3, 2, 1) angezeigt. Ohne Timer-Funktion: Der Bildschirm zeigt die aktuelle Laufzeit an. -
Page 20: Dichtungsringe
DICHTUNGSRINGE Beide Dichtungsringe einsetzen, siehe unten. Der Deckeldichtungsring (Abb. C) zwischen Mixtopf und Deckel und der Dichtungsring zwischen Universalmesser und Motoreneinheit des Thermocooker Expert verhindert, dass Flüssigkeiten oder Gargut zwischen Mixtopf und Deckel entweichen oder her- ausspritzen können. Aus Sicherheitsgründen soll der Thermocooker Expert nur mit ordnungsgemäss auf- gesetzten Dichtungsringen betrieben werden. -
Page 21: Universalmesser
UNIVERSALMESSER Der Aufsatz bietet unzählige Möglichkeiten, zum Zerkleinern oder Hacken von Fleisch, Nüssen, Zwiebeln, Kräutern, Gemüsen und Zutaten aller Art. Das Universalmesser wird für die Zubereitung von hausgemachtem Apfelmus verwendet, für Suppe oder Kartoffelpüree, um die Zutaten, direkt nach dem Kochen, zu pürieren. Dank ihm werden auch Früchte und Milchprodukte gemixt, um köstliche und gesunde Smoothies, Eis oder Sorbets zu kreieren. -
Page 22: Mit Dem Universalmesser Arbeiten
Mit dem Universalmesser arbeiten Das Universalmesser in die Mix-Schüssel einsetzen. Mix-Schüssel auf die Motoreneinheit des Geräts einsetzen. Zutaten in die Schüssel geben und Deckel, mit den Messbecher in der Deckelöffnung, schliessen. Thermocooker Expert an den Strom anschliessen und einschalten. Zeit und Geschwindigkeit (von 1 bis 12) einstellen. Start/Stop/Reset-Drehknopf drü- cken, das Gerät startet den Mixvorgang. -
Page 23: Schmetterlings Aufsatz
SCHMETTERLINGS AUFSATZ Dieses Werkzeug ist perfekt um Schlagrahm, Mayonnaise, Kuchenteig oder Eiweiss luftig zu schlagen. Der Schmetterlings Aufsatz ermöglicht eine konstante und sanfte Bewegung der Zutaten. Milchreis, Haferbrei und Saucen kleben nicht an. Schmetterlings Aufsatz einsetzen Den Rühraufsatz an das kugelförmige Ende halten. -
Page 24: Teigkneter
TEIGKNETER Dank dem Teigkneter gelingt das Mischen und Kneten von Hefeteig wie Brot-, Pizza- und Pas- tateig immer. Teigkneter einsetzen Den Dichtungsring (E) auf das untere Ende des Teigkneters setzen. Den oberen Teil des Teigkneters mit einer Hand festhalten, die Mix-Schüssel mit der anderen. -
Page 25: Anwendung Des Thermocooker Expert
ANWENDUNG DES THERMOCOOKER EXPERT Ausguss Mix-Schüssel einsetzen Vor dem Einsetzen der Mix-Schüssel darauf achten, dass der Thermocooker Expert ausgeschaltet ist. Prüfen, dass das Universalmesser und ggf. der Schmetterlings Aufsatz ordnungsge- mäss in der Mix-Schüssel eingesetzt ist. Mix-Schüssel auf die Motoreneinheit des Geräts einsetzen. Dabei muss der Ausgies- ser der Mix-Schüssel nach hinten zeigen. -
Page 26: Herausnehmen Der Mix-Schüssel
Herausnehmen der Mix-Schüssel Warten, bis der gesamte Vorgang abgeschlossen ist. Thermocooker Expert dann aus- schalten. Deckel der Mix-Schüssel nach links drehen, damit sich der Schüssel von der Motoren- einheit entriegelt. Mix-Schüssel herausheben. VORSICHT: Die Mix-Schüssel wird beim Kochen sehr warm. Ausschliesslich die Isoliergriffe benutzen, um die Mix-Schüssel aus der Motoreneinheit des Thermocooker Expert zu neh- men. -
Page 27: Arbeitsmodus 2: Kochen
Arbeitsmodus 2: Kochen Der Thermocooker Expert bereitet Babynahrung, Eintopf, usw. zu. Das Universalmesser in die Mix-Schüssel einsetzen. Mix-Schüssel auf die Motoreneinheit des Geräts einsetzen. Zutaten in die Schüssel geben und Deckel, mit dem Messbecher in der Deckelöffnung, schliessen. Gerät an den Strom anschliessen und Thermocooker Expert einschalten. Die Taste „Time“... -
Page 28: Arbeitsmodus 3: Mixen/Pürieren Und Kochen
Arbeitsmodus 3: Mixen/pürieren und kochen Die verschiedenen Funktionen des Thermocooker Expert lassen sich kombinieren um ganze Mahlzeiten oder Speisen wie Risotto, Bolognese-Sauce, Gemüsesuppe vorzubereiten. Das Universalmesser in die Mix-Schüssel einsetzen. Mix-Schüssel auf die Motoreneinheit des Geräts einsetzen. Basis-Zutaten in die Schüssel geben und Deckel, mit dem Messbecher in der Deckel- öffnung, schliessen. -
Page 29: Arbeitsmodus 4: Dampfgaren
Arbeitsmodus 4: Dampfgaren Der Dampfkorb des Thermocooker Expert ist ideal um gesunde Mahlzeiten zu kochen, zum Beispiel Gemüse mit Fleisch, Wurst, gedünstetem Brot, gedämpftem Fisch usw. Der Dampfaufsatz kann mit folgenden zwei Kombinationen genutzt werden: Kombination 1: Dampfplatte (M) + Dampfkorb (N) + Deckel Diese Zusammensetzung bietet sich an, um verschiedene Speisen gleichzei- tig zu kochen. -
Page 30: Reinigung Und Wartung
VORSICHT: 30 Minuten Dampfkochen benötigt 0.5 Liter Wasser (500 Gramm). Für alle weiteren 15 Minuten, sind jeweils 250 Milliliter Flüssigkeit zusätzlich in die Mix-Schüssel einzu- füllen. Vorsicht während des Betriebs, es tritt Wasserdampf seitlich und oben aus dem De- ckel des Gerätes aus. Nach dem Danpfgaren, Deckel vorsichtig entfernen und umgekehrt auf die Arbeits- fläche legen. -
Page 31: Störungsbehebung
STÖRUNGSBEHEBUNG Code Erklärung Lösung Der Temperatursensor der Mix-Schüssel Lokalen Kundendienst kontaktieren funktioniert nicht ordnungsgemäss Maschinenfehler Lokalen Kundendienst kontaktieren Die Mix-Schüssel ist nicht richtig ins Gerät eingesetzt Kein Deckel auf der Mix-Schüssel Gerät ausschalten Mix-Schüssel wieder aufsetzen, Deckel der Mix-Schüssel da- raufsetzen oder Deckel entfernen und wieder ordnungsgemäss einrasten, Gerät wiedereinschalten... -
Page 32: Entsorgung
ENTSORGUNG Zur ordnungsgemässen Entsorgung geben Sie das Gerät bitte an einen Händler, den Kundendienst oder Rotel AG zurück. Die Richtlinie 2012/19/EU über Elektro- und Elektronik-Altgeräte (WEEE) legt fest, dass Haushaltsgeräte nicht mit dem normalen Hausmüll entsorgt werden dürfen. Alt- geräte sind getrennt zu sammeln, um einerseits Wiederverwertung und Recycling zu... -
Page 33: Français
Français CONSIGNES DE SECURITE Veuillez lire toutes les instructions avant la mise en ser- vice de l’appareil. o Cet appareil peut être utilisé par des personnes aux capacités physiques, sensorielles ou intellectuelles limitées ou manquant d’expérience ou de connais- sance si elles sont sous surveillance ou ont été... -
Page 34: L'appareil Doit Toujours Être Débranché Du Secteur
agréé le plus proche pour vérification, réparation ou réglage. o L’appareil doit toujours être débranché du secteur lorsqu’il n’est pas utilisé ou si laissé sans surveil- lance, avant tout montage, démontage ou net- toyage. Il doit être débranché en tirant sur la fiche et pas sur le cordon. - Page 35 rect avec le bol de mixage, le gobelet doseur, le pa- nier vapeur et son couvercle doit être évité lors de la cuisson d’aliments. o De même, se prévenir de tout contact avec les pièces en mouvement ou les lames de l’appareil, susceptibles d’occasionner de graves blessures.
- Page 36 o Cet appareil est destiné à un usage domestique ou des applications similaires dans : les coins-cuisine réservés au personnel dans des magasins, bureaux et autres environne- ments professionnels; les fermes; les hôtels, motels et autres environnements de type résidentiel, par leurs clients;...
-
Page 37: Avant La Première Utilisation
AVANT LA PREMIÈRE UTILISATION Retirer tous les emballages ou les autocollants de la surface de l’appareil. Vérifier que tous les accessoires indiqués dans la présente notice sont bien présents. Dans le cas contraire, contacter le service après-vente. Nettoyer toutes les pièces l’aide d’un chiffon humide. Ne jamais utiliser de produits de nettoyage abrasifs ou corrosifs. -
Page 38: Température
Température Appuyer sur la touche « Temperature » puis tourner le sélecteur Démarrage / Ar- rêt / Annulation dans le sens des aiguilles d’une montre afin de régler la température désirée. La plage de température disponible est comprise entre 20 et 120 degrés. Minuteur (Time) Appuyer sur la touche «... -
Page 39: Auto
Auto Appuyer sur la touche « Auto » puis faire tourner le sélecteur dans le sens des ai- guilles d’une montre afin de sélectionner l’un des programmes automatiques, définis selon les recettes du livre Thermocooker Expert. La gamme des programmes s’échelonne de 1 à 29. P01 : Soupe de légumes P16 : Macaronis de l’alpage P02 : Quiche chèvre-courgette... -
Page 40: Confiture (Marmalade)
Confiture (Marmalade) Sans valeur programmée, appuyer sur la touche « Marmalade » (confiture) permet de faire fonctionner l’appareil comme suit : Signal sonore, 3 fois Mixage : vitesse 12, 10 secondes Chauffage : 65 degrés, mixage : vitesse 1 ... -
Page 41: Cuisson Vapeur (Steaming)
Cuisson vapeur (Steaming) Sans valeur programmée, appuyer sur la touche « Steaming » (cuisson vapeur) per- met de faire fonctionner l’appareil comme suit : Chauffage : jusqu’à 120 degrés Valeur par défaut : 30 minutes (la durée peut être modifiée) REMARQUE : cette touche est inactive dans un autre mode. -
Page 42: Écran Lcd
ÉCRAN LCD Température effective (actual temperature) L’écran affiche la température effective des aliments à l’intérieur du bol de mixage. Minuterie (Time) Lorsque la minuterie est activée, l’écran affiche le décompte du temps restant (…5, 4, 3, 2, 1). Sans minuterie, l’écran affiche le temps d’utilisation effectif. Vitesse (speed) L’écran affiche la vitesse d’utilisation effective, dans une gamme allant de 1 à... -
Page 43: Anneaux D'étanchéité
ANNEAUX D’ÉTANCHÉITÉ Installer les anneaux d’étanchéité comme suit : Les anneaux d’étanchéité empêchent les aliments ou les liquides de s’écouler entre le bol et le couvercle (figure C) et entre la lame multifonction et le fond du Thermo- cooker Expert (figure E). Afin d’éviter tout risque de blessure ou de dommage matériel, n’utiliser le Thermo- cooker Expert qu’avec des joints d’étanchéité... -
Page 44: Lame Multifonction
LAME MULTIFONCTION Outil complet et indispensable, la lame multifonction permet de hacher, de mixer ou d’émin- cer viande, noix, oignons, fines herbes, légumes et toutes sortes d’ingrédients. Pour réaliser une compote de pommes maison, une savoureuse soupe ou une purée de pommes de terre, la lame multifonction réduit la préparation en purée lisse, directement après cuisson. -
Page 45: Utiliser La Lame Multifonction
Utiliser la lame multifonction Insérer la lame multifonction à l’intérieur du bol de mixage. Installer le bol sur l’appareil. Mettre les aliments à transformer dans le bol puis fermer le couvercle, gobelet do- seur inclus. Brancher le Thermocooker Expert et le mettre sous tension. Régler la vitesse (de 1 à... -
Page 46: Fouet Papillon
FOUET PAPILLON Cet accessoire est parfait pour fouetter la crème, monter la mayonnaise, mélanger une pâte à gâteau ou battre les blancs d’œufs. Lors de la cuisson de riz au lait, porridge ou sauces, le fouet papillon brasse constamment les ingrédients, les empêchant ainsi d’accrocher à... -
Page 47: Pale De Pétrissage
PALE DE PÉTRISSAGE Grâce à cet accessoire, le pétrissage des pâtes à pain, à pizza ou pour pâtes fraîches devient un jeu d’enfant. Insérer la pale de pétrissage Installer l’anneau d’étanchéité (E) à la base de la pale de pétrissage. Tenir la partie supérieure de la pale de pétrissage d’une main et le bol de mixage de l’autre. -
Page 48: Utilisation Du Thermocooker Expert
UTILISATION DU THERMOCOOKER EXPERT Insérer le bol de mixage Vérifier que le Thermocooker Expert est éteint. S’assurer que la lame multifonction et/ou le fouet papillon, est correctement placé dans le bol de mixage. Placer le bol sur le socle de l’appareil. Contrôler que le bec verseur du bol pointe vers l’arrière. -
Page 49: Retirer Le Bol De Mixage
Ne jamais tenter d’ouvrir le couvercle du bol par la force afin d’éviter tout risque de brûlure occasionnée par des éclaboussures d’aliments ou de liquides chauds. N’ôter le couvercle du bol qu’après l’arrêt du programme. Retirer le bol de mixage Attendre que le Thermocooker Expert s’arrête à... -
Page 50: Mode 2 : Cuisson
Mode 2 : cuisson Le Thermocooker Expert cuit aussi la nourriture de bébé, mijote un ragoût, etc. Insérer la lame multifonction à l’intérieur du bol de mixage. Installer le bol sur l’appareil. Mettre les aliments à cuire dans le bol puis fermer le couvercle, gobelet doseur inclus. Brancher le Thermocooker Expert et enclencher l’interrupteur. -
Page 51: Mode 3 : Mixage Et Cuisson
Mode 3 : mixage et cuisson Cuisiner un repas complet comme le risotto, la sauce bolognaise, la soupe de légumes dans le Thermocooker Expert devient très facile : il suffit de combiner ses différentes fonctions. Insérer la lame multifonction à l’intérieur du bol de mixage. Installer le bol sur l’appareil. -
Page 52: Mode 4 : Cuisson Vapeur
Mode 4 : cuisson vapeur Le panier vapeur du Thermocooker Expert est incontournable pour préparer des repas légers combinant légumes, viande, saucisses, pain ou poisson cuits à la vapeur. L’accessoire vapeur peut s’utiliser de deux manières : Combinaison 1 : Plateau (M) + panier vapeur (N) + couvercle C’est la combinaison idéale pour cuisiner différents ingrédients en même temps. -
Page 53: Nettoyage Et Entretien
PRUDENCE : Trente minutes de cuisson vapeur requièrent 0.5 litre d’eau (500 grammes). Ajouter 250 millilitres d’eau dans le bol de mixage pour 15 minutes de cuisson supplémen- taire. Se tenir hors de portée des émissions de vapeur bouillante par les côtés et le dessus du couvercle du panier vapeur en cours d’utilisation. -
Page 54: Dépannage
DÉPANNAGE Code Explication Solution Le capteur de température du bol de Contacter le service après-vente mixage ne fonctionne pas correctement Défaillance technique Contacter le service après-vente Le bol n’est pas correctement inséré sur le bloc moteur Impossible de fermer le couvercle Éteindre l’appareil. -
Page 55: Élimination
ÉLIMINATION Pour une élimination dans les règles de l’art, veuillez remettre l’appareil à un reven- deur, un responsable du service après-vente ou Rotel SA. Selon la directive européenne 2012/19/UE relative aux déchets d’équipements élec- triques et électroniques (DEEE), les appareils électroménagers ne doivent pas être éliminés avec les déchets solides urbains normaux. -
Page 56: Italiano
Italiano AVVERTENZE DI SICUREZZA Prima dell’uso leggere tutte le istruzioni. o Questo apparecchio può essere usato da persone con ridotte capacità fisiche, sensoriali o mentali, o con insufficiente esperienza e conoscenza, a condi- zione che siano sotto sorveglianza o che abbiano ri- cevuto istruzioni sull'uso sicuro dell'apparecchio e siano consapevoli dei rischi connessi. - Page 57 montarlo, smontarlo o pulirlo. Non togliere la spina tirando il cavo; estrarre con cura la spina collegata alla presa del muro. o Ogni tentativo di riparazione, montaggio o smon- taggio non conforme, così come l’uso di accessori non raccomandati o forniti dal fabbricante stesso, possono causare scosse elettriche letali o ferite;...
- Page 58 con cautela gli accessori, afferrarli unicamente dalla parte superiore, per inserirli o toglierli dall’apparec- chio. o Per evitare schizzi e ustioni, non superare la tacca del livello massimo di riempimento del boccale di mixaggio. o Per gli alimenti caldi (più di 60 gradi) evitare di au- mentare la velocità...
- Page 59 o Questo apparecchio è destinato unicamente all’uso domestico, o a impieghi tipo: ▪ Angoli cucina riservati al personale di negozi, uf- fici e altri ambienti professionali; ▪ fattorie; ▪ alberghi, motel e altri tipi di residenze, quando messo a disposizione della clientela; ▪...
-
Page 60: Prima Della Messa In Servizio
PRIMA DELLA MESSA IN SERVIZIO Eliminare tutti gli elementi d’imballaggio, adesivi ed etichette dalle superfici dell’ap- parecchio. Verificare che tutti gli accessori indicati nel presente libretto d’istruzioni siano forniti con l’apparecchio. In caso contrario, prendere contatto con il servizio di assistenza tecnica più... -
Page 61: Temperatura
Temperatura Schiacciare il pulsante «Temperatura» poi girare la manopola di Accensione / Arre- sto / Annullare in senso orario per selezionare la temperatura desiderata. È disponibile una variazione di temperatura da 20 a 120 gradi centigradi. Minuteria (Time) Schiacciare il pulsante «time» (minuteria) e girare la manopola Accensione / Arre- sto / Annullare. -
Page 62: Automatico
Automatico Premere il bottone “Auto” e girare il bottone in senso orario per selezionare un pro- gramme automatic a base del ricettario del Thermocooker allegato. Gamma dei programmi: 1-29. P01: Minestrone di verdure P15: Ratatouille P02: Quiche con formaggio di capra e zuc- P16: Maccheroni alpine svizzeri con salsa di chetti mele cotte... -
Page 63: Confettura (Marmalade)
Confettura (marmalade) Senza parametri selezionati (standby mode), premendo il pulsante «marmalade» (con- fettura) si può ricorrere alla seguente funzione: ▪ Segnale sonoro, 3 volte ▪ Mixaggio: velocità 12, 10 secondi ▪ Riscaldamento: 65 gradi, mixaggio: velocità 1 ▪ Segnale sonoro, 3 volte ▪... -
Page 64: Cottura A Vapore (Steaming)
Cottura a vapore (steaming) Senza parametri selezionati (standby mode), premere il pulsante «steaming» (cottura a vapore) per usare l’apparecchio come segue: ▪ Riscaldamento: fino a 120 gradi ▪ Impostazione predefinita: 30 minuti (la durata può essere modificata) Nota bene: questo tasto è inattivo in un’altra funzione. Nota bene: Allo schermo del Thermocooker Expert appaiono la velocità, la temperatura sele- zionata e la temperatura effettiva per tutta la durata del programma. -
Page 65: Schermo Lcd
SCHERMO LCD Temperatura effettiva (Actual temperature) Allo schermo appare la temperatura effettiva degli alimenti all’interno del boccale di mixaggio. Minuteria (Time) Quando la minuteria è attivata, lo schermo indica il tempo rimanente (…5, 4, 3, 2, 1). Senza selezione della minuteria, nello schermo appare il tempo effettivo di utilizzo. Velocità... -
Page 66: Guarnizioni Isolanti
GUARNIZIONI ISOLANTI Inserire le guarnizioni isolanti come segue: Le guarnizioni isolanti impediscono agli alimenti solidi e ai liquidi di fuoriuscire tra il boccale e il coperchio (figura C) e tra la lama multifunzioni e lo zoccolo del Thermo- cooker Expert (figura E). Per evitare rischi di lesioni o danni al materiale, utilizzare il Thermocooker Expert so- lamente con le guarnizioni isolanti pulite e correttamente fissate all’apparecchio. -
Page 67: Lama Multifunzioni
LAMA MULTIFUNZIONI Accessorio completo e indispensabile, la lama multifunzione permette di tritare, mixare o af- fettare sottilmente carne, noci, cipolle, erbette, legumi e ogni sorta d’ingrediente. Si possono realizzare composte di mele casalinghe, saporite zuppe o purea di patate grazie alla lama multifunzioni che reduce gli ingredienti scelti in una finissima preparazione, imme- diatamente dopo cottura. -
Page 68: Utilizzare La Lama Multifunzioni
Utilizzare la lama multifunzioni Inserire la lama multifunzioni all’interno del boccale. Fissare il boccale sull’apparecchio. Mettere gli alimenti richiesti per la ricetta nel boccale e chiudere bene il coperchio, collocando il misurino sul coperchio. Infilare la spina del Thermocooker Expert nella presa a muro. Selezionare la velocità... -
Page 69: Utilizzare Il Frustino A Farfalla
Utilizzare il frustino a farfalla Inserire la lama multifunzioni nel boccale come indicato precedentemente, poi posi- zionare il frustino a farfalla. Mettere gli alimenti da elaborare nel boccale poi chiudere il coperchio, fissando il misurino nell’apposito interstizio. Installare il boccale sull’apparecchio. Inserire la spina e accendere l’apparecchio. -
Page 70: Utilizzare La Pala Per Impasto
Utilizzare la pala per impasto Inserire la pala per impasto all’interno del boccale di mixaggio. Mettere gli ingredienti nel boccale, poi chiudere il coperchio, fissando il misurino nello spazio riservatogli sul coperchio. Installare il boccale sull’apparecchio. Inserire la spina nella presa e accendere l’apparecchio. Selezionare la velocità... -
Page 71: Utilizzazione Del Thermocooker Expert
UTILIZZAZIONE DEL THERMOCOOKER EXPERT Beccuccio Inserire il boccale di mixaggio Verificare che il Thermocooker Expert sia spento. Assicurarsi che la lama multifunzioni e/o il frustino a farfalla, siano piazzati corretta- mente ne boccale. Piazzare il boccale sul piede dell’apparecchio. Controllare che il beccuccio per versare il contenuto sia rivolto all’indietro. -
Page 72: Togliere Il Boccale Di Mixaggio
Per evitare rischi di ustioni, causate dagli schizzi di alimenti o liquidi caldi, non tentare mai di aprire con forza il coperchio del boccale. Togliere il coperchio del boccale solo successivamente all’ arresto del programma. Togliere il boccale di mixaggio Per spegnerlo, aspettare che il Thermocooker Expert si fermi alla fine del programma. -
Page 73: Modo 2: Funzione Cottura
Modo 2: funzione cottura Il Thermocooker Expert permette di preparare le pappe per bebè, di cuocere a fuoco lento un ragù ecc. Inserire la lama multifunzioni nel boccale di mixaggio. Installare il boccale sull’apparecchio. Mettere gli alimenti da cuocere nel boccale e chiudere il coperchio con il misurino inserito nello spazio previsto. -
Page 74: Modo 3: Mixaggio E Cottura
Modo 3: mixaggio e cottura Cucinare un pasto completo come il risotto, la salsa bolognese, la zuppa di verdure nel Ther- mocooker Expert diventa facilissimo: basta combinare le sue diverse funzioni. Inserire la lama multifunzione nel boccale di mixaggio. Installare il boccale sull’apparecchio. Mettere gli ingredienti da tritare, sminuzzare o macinare nel boccale e chiudere il coperchio, fissando il misurino nello spazio previsto. -
Page 75: Modo 4 : Cottura A Vapore
Modo 4 : cottura a vapore IL cestello vapore del Thermocooker Expert è indispensabile per preparare pasti leggeri che combinano verdure, carne, salsicce, pane o pesce cotti a vapore. L’accessorio per vapore può essere utilizzato in due maniere: ▪ Combinazione 1: Vassoio (M) + cestello vapore (N) + coperchio La combinazione ideale per cucinare alimenti di diversa consistenza. -
Page 76: Pulizia E Cura
Cautela: Trenta minuti di cottura a vapore richiedono 0.5 litri d’acqua (500 grammi). Per 15 minuti di cottura supplementare, aggiungere 250 millilitri d’acqua nel boccale di mi- xaggio. Durante l’uso, l’apparecchio emette del vapore molto caldo dai lati e dalla parte su- periore del coperchio: restare lontani dall’emissione di vapore. -
Page 77: Guida Per La Risoluzione Di Anomalie
GUIDA PER LA RISOLUZIONE DI ANOMALIE Codice Spiegazione Soluzione Il captatore di temperature del boccale di Prendere contatto con il servizio di assistenza mixaggio non funziona correttamente Difetto tecnico Prendere contatto con il servizio di assistenza Il boccale di mixaggio non è fissato cor- rettamente sul blocco motore Impossibile richiudere il coperchio Spegnere l’apparecchio. -
Page 78: Smaltimento
SMALTIMENTO Per lo smaltimento corretto, la macchina deve essere restituita al rivenditore specia- lizzato, al servizio di assistenza o alla ditta Rotel AG. La Direttiva UE 2012/19/CE sui rifiuti di apparecchiature elettriche ed elettroniche (WEEE) sancisce che gli elettrodomestici non possono essere smaltiti usando il nor- male ciclo di rifiuti solidi urbani. -
Page 79: English
English SAFETY INSTRUCTIONS Please read all instructions before using the device. o This appliance may be used by persons with limited physical, sensory or mental abilities or lack of expe- rience and/or knowledge, if they are supervised by persons responsible for their security or if they have been instructed about the safe use of the appliance and therefore fully understand the hazards involved. - Page 80 be returned to the nearest authorized service facility for examination, repair or adjustment. o Incorrect repair attempt, assembly, or use of any ac- cessory attachment not recommended or sold by the manufacturer may cause fire, electric shock or personal injury and will void the manufacturer’s warranty.
- Page 81 o The speed setting must never be abruptly increased when processing hot food (above 60°C). o The appliance must be used on a flat, stable and heat-resistant surface and placed at a sufficient dis- tance from the edge of this surface to prevent it from falling while processing (vibrations).
-
Page 82: Before First Use
BEFORE FIRST USE Remove all packaging materials and stickers from the appliance. Check that all listed parts are included. If anything is missing, please contact the after- sales service. Wipe off all removable parts with a damp cloth. Never use abrasive products. DO NOT IMMERSE THE MOTOR BASE IN WATER. -
Page 83: Time
Time To set the timer function, press the Time button and rotate the knob clockwise to increase time, counterclockwise to decrease. Timer range: from 1 second to 100 minutes (99’ 60’’). 1-60 seconds: the time increases or decreases in increments of 1 second. 1-10 minutes: the time increases or decreases in increments of 30 seconds. -
Page 84: Pulse
Pulse In standby mode, press Pulse to set the automatic pulse function with repeat working interval as follow: speed 12, 10 seconds. Stop, 2 seconds. The same interval continues until the button Pulse is pressed again. NOTE: this button is invalid in another work mode or if the temperature of the processed food exceeds 60°C. -
Page 85: Steaming
Steaming In standby mode, press Steaming to run the pre-set function as follow: Heating: up to 120℃ Default time: 30 minutes (Time setting can be modified). NOTE: this button is invalid in another work mode. NOTE: set temperature, actual speed and temperature are displayed while the Thermocooker Expert is running. -
Page 86: Lcd Display
LCD DISPLAY Actual temperature The display shows the actual temperature of the processed food inside the bowl. Time With timer function: the display shows the remaining time, counted backwards (…5, 4, 3, 2, 1). Without timer function: the display shows the actual running time. Speed The display shows the actual running speed, within a range from 1 to 12. -
Page 87: Sealing Rings
SEALING RINGS Please insert both sealing rings as shown below. The sealing rings prevent liquid or food from escaping between the bowl and the lid (Fig. C) and between the multiblade and the bottom of the Thermocooker Expert (Fig. Only use the Thermocooker Expert with correctly fitted and clean sealing rings to prevent damage or injury. -
Page 88: Multiblade
MULTIBLADE This tool is a perfect allrounder for chopping or mincing meat, nuts, onions, herbs, vegetables and all kind of ingredients. For homemade applesauce, soup ou mashed potatoes, use the multiblade to reduce the food to a smooth purée, directly after cooking. The multiblade of the Thermocooker Expert is also to be used to blend fruits and dairy to create delicious and healthy smoothies, ice creams or sorbets. -
Page 89: Working With The Multiblade
Working with the multiblade Assemble the multiblade into the bowl. Insert the bowl into the main unit. Put the food to be processed into the bowl and close the lid, including measuring cup. Plug in and switch the Thermocooker Expert on. Set the mixing time required and select the speed (1-12). -
Page 90: Working With The Butterfly Tool
Working with the butterfly tool Insert the multiblade as shown before and the butterfly tool onto the multiblade. Put the food to be processed into the bowl and close the lid, including measuring cup. Insert the bowl into the main unit. Plug in and start the appliance. -
Page 91: Dough Kneader
DOUGH KNEADER With the dough kneader, mixing and kneading yeast dough such as bread, pizza and pasta dough is getting very easy. Inserting the dough kneader Put the sealing ring (E) on the bottom end of the dough kneader. Hold the upper part of the dough kneader with one hand and the bowl with the other. -
Page 92: Getting Started With The Thermocooker Expert
GETTING STARTED WITH THE THERMOCOOKER EXPERT Spout Inserting the bowl Always ensure that the Thermocooker Expert is switched off before inserting the bowl. Check that the multiblade and the butterfly tool where appropriate, are correctly placed inside the bowl. Place the bowl onto the socket of the main unit. -
Page 93: Removing The Bowl
Removing the bowl Wait until the cooking process is finished and switch off the Thermocooker Expert. Rotate the bowl lid counterclockwise to release the bowl. Lift the bowl out of the main unit. CAUTION: The bowl may become very hot while cooking. Avoid touching the bowl and use the insulating handles to remove it from the base unit of the Thermocooker Expert! ... -
Page 94: Mode 2: Only Cooking
Mode 2: only cooking Use the Thermocooker Expert for cooking baby food, stews, etc. Assemble the blade to the bowl. Insert the bowl into the main unit. Put the ingredients to be cooked in the bowl and close the lid, including measuring cup. -
Page 95: Mode 3: Chopping And Cooking
Mode 3: chopping and cooking Cook a whole meal such as risotto, bolognese sauce, vegetable soup in the Thermocooker Ex- pert by combining its various functions. Assemble the blade to the bowl. Set the bowl onto the main unit. Put the ingredients to be processed into the bowl and close the lid, including meas- uring cup. -
Page 96: Mode 4: Steaming
Mode 4: Steaming The steamer of the Thermocooker Expert is ideal to cook healthy meals, combining vegetables with meat, sausages, steamed bread, steamed fish etc. The steamer can be used in either of the following two combinations: Combination 1: Tray (M) + steamer (N) + lid Use this combination for cooking different food at the same time. -
Page 97: Cleaning And Maintenance
CAUTION: 30 minutes of steam cooking require 0.5 litre (500 g) of water. For every additional 15 minutes, add 250 ml water into the bowl. Mind the hot steam that escapes at the sides and from the top of the lid during op- eration. -
Page 98: Troubleshooting
TROUBLESHOOTING Code Explanation Solution The temperature sensor of the bowl is not Please contact your local service center functioning properly Machine failure Please contact your local service center The bowl does not sit correctly on the unit Bowl lid is not installed Turn off the appliance. -
Page 99: Disposal
DISPOSAL For proper disposal, please return device to a retailer, a service agent or Rotel AG. European Directive 2012/19/EC concerning Waste Electrical and Electronic Equip- ment (WEEE) states that household appliances should not be disposed of using the normal solid urban waste cycle. Exhausted appliances should be collected separately to optimise the cost of re-using and recycling materials comprising the machine, while preventing potential damage to public health and the environment. -
Page 100: D / F / I / E
Transport costs are to be borne by the purchaser. Remember to specify your address to your sending, as well as a short decla- ration about the failure, shall the defect not be obvious. Servicestation: Service après-vente: Rotel AG Servizio Assistenza: Parkstrasse 43 Telefon: 062 787 77 00 After-sales service: 5012 Schönenwerd...