Publicité
Les langues disponibles
Les langues disponibles
Liens rapides
FRANÇAIS
NOTICE D
ENGLISH
INSTRUCTION MANUAL
NEDERLANDS
GEBRUIKSAANWIJZING
ČESKY
• CLIMATISEUR SPLIT
• SPLIT AIR CONDITIONER
'
UTILISATION
NÁVOD K POUŽITÍ
SAC
SP140E
• SPLIT AIRCONDITIONER
• KLIMATIZAČNÍ JEDNOTKA TYPU SPLIT
Downloaded from www.vandenborre.be
Publicité

Manuels Connexes pour Proline SAC SP140E


Sommaire des Matières pour Proline SAC SP140E
- Page 1 FRANÇAIS ’ NOTICE D UTILISATION ENGLISH INSTRUCTION MANUAL NEDERLANDS GEBRUIKSAANWIJZING ČESKY NÁVOD K POUŽITÍ SP140E • CLIMATISEUR SPLIT • SPLIT AIRCONDITIONER • SPLIT AIR CONDITIONER • KLIMATIZAČNÍ JEDNOTKA TYPU SPLIT Downloaded from www.vandenborre.be...
- Page 2 Downloaded from www.vandenborre.be...
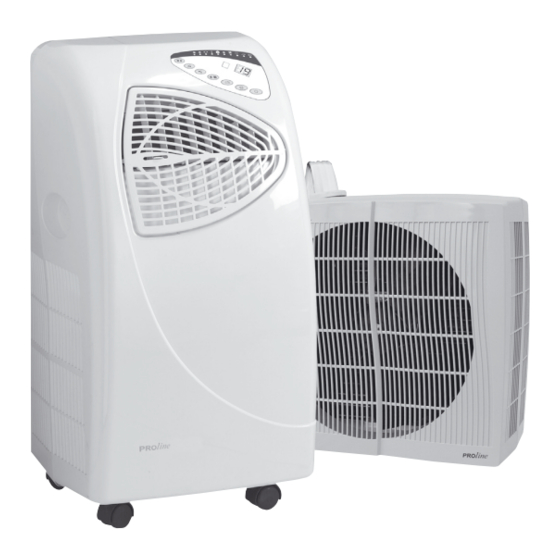
- Page 3 DESCRIPTION GÉNÉRALES GENERAL COMPONENT DESCRIPTION DES COMPOSANTS 1. Control panel 1. Tableau de commandes 2. Air outlet cooled air 2. Grille de sortie d’air frais 3. Transportation handles 3. Poignée 4. Spin wheels 4. Roulettes 5. Connecting tube 5. Tube de liaison 6.
- Page 4 FRANÇAIS FÉLICITATIONS ! Nous vous félicitons d’avoir choisi notre produit, un climatiseur de qualité supérieure, et nous vous remercions de la confiance que vous nous avez accordée. Avant de mettre en marche l’appareil, nous vous conseillons de lire attentivement la notice fournie avec le climatiseur, qui vous explique comment l’installer, l’utiliser et le conserver en parfait état.
- Page 5 FRANÇAIS • être enroulé sur lui-même de manière à former une bobine quand le climatiseur est en marche; • entrer au contact de superficies chaudes. Le cordon d’alimentation ne peut être remplacé que par un centre d’assistance agréé. Il est interdit de: •...
- Page 6 FRANÇAIS MISE EN PLACE Le climatiseur est composé d’une partie intérieure et une partie extérieure qui sont raccordées par un tuyau flexible d’environ 3 mètres de long. La partie intérieure est placée dans la pièce. Pour cela, veillez à ce que : •...
- Page 7 FRANÇAIS EMPLOI DU CLIMATISEUR Panneau de commande Commande à distance Légende commandes (sur panneau et commande à distance) et signalisations (sur le panneau) Bouton Description Marche/Arrêt Horlogerie Fonction SLEEP Ventilateur 4 - haute vitesse 5 - basse vitesse Thermostat: 6 - température ambiante a: diminuer 7 - température souhaitée b: augmenter...
- Page 8 FRANÇAIS Si on souhaite changer la vitesse du ventilateur, appuyer sur la touche D: LED 4 signale haute vitesse, LED 5 basse vitesse. La vitesse du ventilateur est sélectionnée en mode automatique (LED 8) dépendant de la température ambiante (voir LED 4 et 5), dans ce cas la touche D ne fonctionne pas. Mode froid Pour faire fonctionner le climatiseur dans le mode «FROID», appuyer sur la touche F jusqu'à...
- Page 9 FRANÇAIS Orientation du débit d’air Agir à la main sur le diffuseur et sur les ailettes du diffuseur pour orienter le débit d’air froid à la sortie du climatiseur. Pour une meilleure diffusion de l’air, il est recommandé d’orienter les ailettes vers le haut. ÉVACUATION D’EAU L’appareil est muni d’une évacuation d’eau automatique.
- Page 10 FRANÇAIS DONNÉES TECHNIQUES unité intérieure unité extérieure BTU/h 10300 Capacité de refroidissement Alimentation 220 - 240 V / 50 Hz / 1 Ph Consommation électrique 1070 Courant * Débit d’air m 3 /h (haute vitesse du ventilateur) Déshumidification L/24h (haute vitesse du ventilateur) Réfrigérant * R410A Quantité...
- Page 11 FRANÇAIS DÉCONNECTER DES ÉLÉMENTS (SEULEMENT POUR LE PROFESSIONNEL) I conduit d’évacuation d’eau II câble réseau III conduit du fluide réfrigérant Détacher Figure A: • ouvrez la boîte de raccordement (12) à l’arrière de la partie extérieure. Figure B: • détachez le conduit d’évacuation d’eau (I). •...
- Page 12 ENGLISH CONGRATULATIONS! We’d like to congratulate you for purchasing this superior quality air conditioner, and thank you for placing your trust in us. We recommend that you read the manual provided before starting your equipment, as it will explain how to install, use and maintain it in perfect working order.
- Page 13 ENGLISH The power cord may only be replaced by an authorized Service Centre. Do not: • insert objects into the air inlet or outlet grids; • use the air conditioner inside cabinets, closets and/or tight spaces between furniture; • repair, dismantle and/or personally alter the air conditioner; •...
- Page 14 ENGLISH INSTALLATION The air conditioner consists of an indoor mobile unit and an outdoor unit. The units are connected to each other by a 3 metre flexible tube. The indoor unit will be placed in the room. Keep in mind that: •...
- Page 15 ENGLISH USING THE AIR CONDITIONER Control panel Remote control Legend of the controls (on the control panel and on the remote control) and of the indicators on the control panel Button Description ON/OFF switch TIMER function switch SLEEP function switch Fan speed selection switch 4 - high speed 5 - low speed...
- Page 16 ENGLISH 23 °C and in ventilation mode when the temperature is higher than 20 °C but below or equal to 23 °C. Indicators of the function in progress come on at the same time, e.g. (9) and (5): cooling with low fan speed. Fan mode To run the air conditioner in ventilation mode, press button F until LED (10) is on.
- Page 17 ENGLISH Directing the air flow Manually adjust the diffuser and air diffuser fins to direct the cool air that flows from the air conditioner. We recommend aiming the fins upward for better air diffusion. DRAINAGE The unit is equipped with an automatic drainage function. The condensed water will be pumped from the back of the indoor unit to the outdoor unit.
- Page 18 ENGLISH TECHNICAL DATA indoor unit outdoor unit BTU/h 10300 Cooling capacity Power supply 220 - 240 V / 50 Hz / 1 Ph Power consumption 1070 Current * Air flow m 3 /h (at maximum fan speed) Dehumidification L/24h (at maximum fan speed) Refrigerant * R410A Refrigerant load...
- Page 19 ENGLISH ELECTRIC CONNECTION (UK ONLY) For your safety please read the following information. Warning: This appliance must be earthed. The appliance must be connected to a 220-240 volts 50 cycle AC supply by means of a three pin socket, suitably earthed and should be protected by a 13 amp fuse in the plug. The appliance is supplied with a moulded 13 amp 3 pin mains plug fi tted with a 13 amp fuse.
- Page 20 ENGLISH DISCONNECTING THE INDOOR AND OUTDOOR UNIT (FOR QUALIFIED PERSONNEL) I drain tube II electrical cable III refrigerant tube If the indoor unit needs to be disconnected from the outdoor unit, to place it in a more suitable position, follow these steps: Disconnecting Figure A: •...
- Page 21 ENGLISH Downloaded from www.vandenborre.be...
- Page 22 NEDERLANDS GEFELICITEERD ! Wij feliciteren u met de aankoop van deze airconditioner van superieure kwaliteit en danken u voor het In ons gestelde vertrouwen. Voordat u het apparaat in werking stelt, raden wij u aan deze bijgeleverde handleiding aandachtig te lezen. Er wordt uitgelegd hoe het apparaat te installeren, te gebruiken en de perfect efficiënte werking te handhaven.
- Page 23 NEDERLANDS • gebruikt worden wanneer de kabel beschadigd blijkt te zijn; • met vochtige of natte handen gehanteerd worden; • opgerold worden wanneer de airconditioner in werking is; • in aanraking komen met warme oppervlakken. De voedingskabel mag alleen vervangen worden door een bevoegd Servicecentrum.
- Page 24 NEDERLANDS INSTALLATIE De airconditioner bestaat uit een binnen- en een buitendeel, met elkaar verbonden door een ca. 3 meter lange flexibele slang. Het binnendeel wordt in het vertrek geplaatst. Let er daarbij op, dat: • het apparaat rechtop staat op een vlakke ondergrond. •...
- Page 25 NEDERLANDS GEBRUIK VAN DE AIRCONDITIONER Bedieningspaneel Afstandsbediening Betekenis van de knoppen (op het bedieningspaneel en op de afstandsbediening) en van de LED’s op het bedieningspaneel Knop Omschrijving AAN/UIT knop TIJD-functie knop SLAAP-functie knop Ventilatorsnelheid 4 - hoge snelheid 5 - lage snelheid Knop om de instelling van de aan 6 - aan: de kamertemperatuur te houden temperatuur te:...
- Page 26 NEDERLANDS Werking instellen Druk op de FUNCTIE-knop (F) om de gewenste werking in te stellen: een brandende LED (8), (9) of (10) geeft aan wat is ingesteld. In automatische werking wordt gekoeld als de temperatuur hoger is dan 23 °C en draait de ventilator als de temperatuur hoger is dan 20 °C en gelijk aan of lager dan 23 °C.
- Page 27 NEDERLANDS Richting van de luchtstroom Richt met de hand de luchtverspreider en zijn luchtvinnen om de richting van de koude luchtstroom die uit de airconditioner komt in te stellen. Voor een betere verspreiding van de lucht wordt het aangeraden de luchtvinnen omhoog te richten. WATERAFVOER Het apparaat heeft een automatische waterafvvoer.
- Page 28 NEDERLANDS TECHNISCHE GEGEVENS binnendeel buitendeel BTU/h 10300 Koelcapaciteit Elektrische spanning 220 - 240 V / 50 Hz / 1 Ph Energieverbruik 1070 Stroomsterkte * Luchtverplaatsing m 3 /h (bij hoge ventilatiesnelheid) Ontvochtiging L/24h (bij hoge ventilatiesnelheid) Koelmiddel * R410A Hoeveelheid koelmiddel Ventilatorsnelheden Tijdklok 1 - 12...
- Page 29 NEDERLANDS BINNEN- EN BUITENDEEL LOSMAKEN (UITSLUITEND VOOR DE VAKMAN) I afvoerleiding II elektriciteitsleiding III koelmiddelleidingen Als de delen moeten worden losgemaakt, om bijvoorbeeld elders te plaatsen, ga als volgt te werk: Losmaken Tekening A: • het aansluitkastje (12) achter op het binnendeel openmaken. Tekening B: •...
- Page 30 ČESKY GRATULUJEME! Rádi bychom Vám poblahopřáli k zakoupení této klimatizační jednotky nejvyšší kvality a poděkovali za důvěru, kterou jste nám tímto projevili. Doporučujeme Vám, abyste si před spuštěním zařízení pročetli přiložený manuál, protože Vám vysvětlí, jak jednotku instalovat, používat a udržovat správně v chodu. Máte-li jakékoliv další dotazy, kontaktujte prosím svého prodejce.
- Page 31 ČESKY Napájecí šňůra smí být vyměněna pouze v autorizovaném servisním středisku. Nesmí se: • vkládat předměty do mřížek, kudy je přiváděn nebo odváděn vzduch; • používat klimatizační jednotku uvnitř skříní, šatníků a/nebo těsných prostor mezi nábytkem; • opravovat, demontovat a/nebo neodborně upravovat klimatizační jednotku;...
- Page 32 ČESKY INSTALACE Klimatizační jednotka se skládá z vnitřní mobilní části a venkovní jednotky. Tyto dvě komponenty jsou vzájemně propojeny ohebnou trubicí o délce tří metrů. Vnitřní jednotka se umístí v místnosti určené pro klimatizaci. Pro její umístění mějte na paměti tato pravidla: •...
- Page 33 ČESKY POUŽÍVÁNÍ KLIMATIZAČNÍ JEDNOTKY Ovládací panel Dálkový ovladač Vysvětlivky k ovládacím prvkům (na ovládacím panelu a dálkovém ovladači) a ke kontrolkám Tlačítko Popis Kontrolka ON/OFF (zapnutí a vypnutí jednotky) Spínač TIMER (časové ovládání) Spínač funkce SLEEP (spánek) Přepínač rychlosti ventilátoru 4 –...
- Page 34 ČESKY Výběr režimu (MODE) Zvolte tlačítko MODE (F) – tak vyberete pracovní režim jednotky. Rozsvítí se kontrolka pro daný režim – (8), (9) nebo (10). V automatickém režimu se samočinně zapne chlazení, pokud je skutečná teplota vyšší než 23 °C, a ventilace, pokud je teplota v rozmezí od 20 °C do 23 °C. Při každé samočinné změně režimu se rozsvítí...
- Page 35 ČESKY Nastavení směru proudění vzduchu Nastavte ručně difuzor a žaluzie vzduchového difuzoru tak, aby vzduch proudil požadovaným směrem. Pro zlepšení rozptylu vzduchu doporučujeme žaluzie nasměrovat nahoru. ODVODŇOVÁNÍ Jednotka je opatřena automatickým odvodňováním. Kondenzovaná voda se ze zadní části vnitřní jednotky přečerpává...
- Page 36 ČESKY TECHNICKÉ ÚDAJE Vnitřní jednotka Venkovní jednotka BTU/h 10300 Výkon chlazení Napájení 220 - 240 V / 50 Hz / 1 fáz Spotřeba energie 1070 Proud * Průtok vzduchu m 3 /h (při maximální rychlosti ventilátoru) Odvlhčování L/24h (při maximální rychlosti ventilátoru) Chladivo * R410A Hmotnost chladiva...
- Page 37 ČESKY ROZPOJENÍ VNITŘNÍ A VNĚJŠÍ JEDNOTKY (SMÍ PROVÁDĚT POUZE KVALIFIKOVANÝ TECHNIK) I odvodňovací hadice II kabel elektrického napájení III hadice chlazení Je-li nutné odpojit vnitřní jednotku od vnější (např. kvůli instalaci na vhodnější místo), postupujte následovně: Odpojení Obr. A: • Otevřete připojovací krabici (12) na zadní straně vnitřní jednotky. Obr.
- Page 38 Downloaded from www.vandenborre.be...
- Page 39 Downloaded from www.vandenborre.be...
- Page 40 Downloaded from www.vandenborre.be...