Publicité
Les langues disponibles
Les langues disponibles
Liens rapides
INSTRUCTION MANUAL
EN 21" 3-in-1 GAS SELF PROPELLED LAWN MOWER
FR 21 POUCES 3-in-1 Tondeuse autopropulsée de gaz
ES 21" 3-en-1
CORTADORA DE CÉSPED AUTOPRO PULSADO A GASOLIN
Model # PSM2521SH
Have product questions or need technical support? Please feel free to contact us!
Website:
www.PowerSmartUSA.com
Toll free: 1-800-791-9458Mon-Fri9-5 EST
Email: support@amerisuninc.com
All manuals and user guides at all-guidesbox.com
Website
Publicité

Manuels Connexes pour Powersmart PSM2521SH


Sommaire des Matières pour Powersmart PSM2521SH
- Page 1 EN 21" 3-in-1 GAS SELF PROPELLED LAWN MOWER FR 21 POUCES 3-in-1 Tondeuse autopropulsée de gaz ES 21" 3-en-1 CORTADORA DE CÉSPED AUTOPRO PULSADO A GASOLIN Model # PSM2521SH Have product questions or need technical support? Please feel free to contact us! Website: www.PowerSmartUSA.com Toll free: 1-800-791-9458Mon-Fri9-5 EST Email: support@amerisuninc.com...
- Page 2 All manuals and user guides at all-guidesbox.com...
- Page 3 Operation……………………..………………………………………… 13 Maintenance……………………………………………………………... Storage……………………………………………………………………. 19 Troubleshooting…………………………………………………………. Exploded view & parts list……………………………………………… Warranty………………………………………………………………… TECHNICAL DATA 21" 3-in-1 Gas Self-propelled Lawn Mower Model # PSM2521SH Engine type: 4 Stroke, OHV, single cylinder with forced air-cooling system Displacement: 209cc Fuel tank capacity: 0.24 Gallon Oil capacity: 16.9 fl.oz...
- Page 4 All manuals and user guides at all-guidesbox.com INTRODUCTION Thank You for Purchasing a PowerSmart ® Product. This manual provides information regarding the safe operation and maintenance of this product. Every effort has been made to ensure the accuracy of the information ®...
- Page 5 All manuals and user guides at all-guidesbox.com GENERAL SAFETY PROCEDURES For any questions regarding the hazard and safety notices listed in this manual or on the product, please call (800) 791-9458 Mon-Fri 9-5 EST before using the engine. DANGER: CARBON MONOXIDE Using an engine indoors CAN KILL YOU IN MINUTES.
- Page 6 All manuals and user guides at all-guidesbox.com IMPORTANT SAFETY INSTRUCTIONS This machine is capable of amputating hands and feet and throwing objects. Failure to observe the following safety instructions could result in serious injury or death. I.General Operation 1. Read, understand, and follow instructions and warnings in this manual and on the machine, engine and attachments.
- Page 7 All manuals and user guides at all-guidesbox.com 4. Always keep the machine in gear when going down slopes. Do not coast downhill. 5. Avoid starting and stopping on slopes. Avoid making sudden changes in speed or direction. Make turns slowly and gradually. 6.
- Page 8 All manuals and user guides at all-guidesbox.com WARNING LABLE INSTRUCTIONS Read carefully the manual before use. Danger-flying objects; keep safe distance from the machine as long as the engine is running. Do not open or remove safety shields while engine is running. Pay more attention to the operator’s hands and feet to avoid injury.
- Page 9 All manuals and user guides at all-guidesbox.com Look behind while backing Steep slope hazard When repairing, please pull off the spark plug boot, then repair it according to the operational manual Hot surfaces When mowing,please wear the glasses ad ear plugs to defend the operator himself Keep bystanders away.
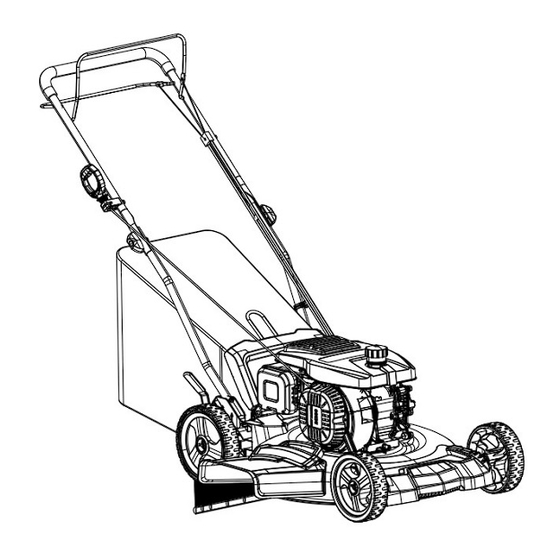
- Page 10 All manuals and user guides at all-guidesbox.com KNOWING YOUR LAWN MOWER Please use the illustration below to familiarize yourself with the location and function of the components that control of your lawn mower. Recoil starter handle Oil dipstick Grass catcher Fuel tank cap Cutting height adjustment lever Rear discharge door...
- Page 11 All manuals and user guides at all-guidesbox.com LAWN MOWER PREPARATION The following section describes steps necessary to prepare the lawn mower for use. If after reading this section, you are unsure about how to perform any of the steps please call (800) 791-9458 Mon-Fri 9-5 EST for customer service.
- Page 12 All manuals and user guides at all-guidesbox.com 3. Lock the cable to the lower handle using cable clip. Cable Clip 4. Insert the recoil starter handle cable into the hook provided on the upper handle. You must engage the start/stop control to release the recoil starter handle.
- Page 13 All manuals and user guides at all-guidesbox.com ADJUSTING THE CUTTING HEIGHT Warning! Cutting height adjustments should only be performed after the engine and blades have come to a complete stop! It is always best to begin cutting your lawn with a higher deck height to prevent scalping your lawn. The cutting height is adjusted with front and rear levers.
- Page 14 All manuals and user guides at all-guidesbox.com Adding Gasoline Remove the fuel tank cap and check fuel level. If the level is too low, refuel the tank, remember adding fuel not over the fuel upper level. Warning: 1. Gasoline is extremely flammable and is explosive under certain conditions. 2.
- Page 15 All manuals and user guides at all-guidesbox.com several times after the engine has started up. When the engine start/stop Control is released, the engine must stop within a few seconds. If not, contact Customer Service. Warning: The blade begins to rotate as soon as the engine is started. START THE ENGINE To start the engine, perform the following steps: 1.
- Page 16 All manuals and user guides at all-guidesbox.com USING AS SIDE DISCHARGE You should close the rear cover with mulching adapter in order to use the side discharge. 1. On the side of the mower, lift the side discharge cover. 2. Slide two hooks of side discharge chute under hinge pin on the side discharge cover. Lower the side discharge cover.
- Page 17 All manuals and user guides at all-guidesbox.com It is important to clean underside of the mower deck after use to prevent the build-up of grass clippings or other debris. Follow steps below for proper cleaning. 1. Allow the engine to run until it is out of fuel. Do not attempt to pour fuel from the engine. 2.
- Page 18 All manuals and user guides at all-guidesbox.com NOTE: Never dispose of used motor oil in the trash or down a drain. Please call a local recycling center or auto garage to arrange oil disposal. AIR CLEANER MAINTENANCE Routine maintenance of the air cleaner helps maintain proper airflow to the carburetor. Occasionally check that the air cleaner is free of excessive dirt.
- Page 19 All manuals and user guides at all-guidesbox.com MAINTENANCE SCHEDULE Item Action Before 5 Hours of First 25 50 hours of 100 hours of 150 hours of use each use or first hours of use or every use or every or every two month 6 months year...
- Page 20 All manuals and user guides at all-guidesbox.com TROUBLESHOOTING Problem Cause Solution Engine start/stop lever Engage engine start/stop lever. disengaged. Spark plug wire disconnected. Connect spark plug wire. Fuel tank empty or stale fuel. Fill tank with clean, fresh gasoline. Engine fails to start Engine not primed.
- Page 21 All manuals and user guides at all-guidesbox.com EXPLODED VIEW AND PARTS LIST...
- Page 22 All manuals and user guides at all-guidesbox.com Item Stock # Description Item Stock # Description 9999960902 Engine 303160195A Small tension sleeve 303090094 Gear box seat 303181406 Small tension plate 303100100 Bearing 303160192B Small tension plate spacer 303160961 Left hand bevel gear 303020154 Bolt M8*40 303020240...
- Page 23 All manuals and user guides at all-guidesbox.com ENGINE EXPLODE VIEW AND PART LIST...
- Page 24 All manuals and user guides at all-guidesbox.com Item Stock# Description Item Stock# Description 303020444 Bolt M6X12 303020608 Bolt CRANKCASE COVER, 9020960902 Cylinder head assembly 9563960902 LEFT 9142960901 Rocker arm shaft 303100072 6205 bearing 9230960902 ROCKER ARM 9198960101 Oil filler gauge 303020444 Bolt M6X12 9158960901...
- Page 25 To make a claim under this Limited Warranty, you must return the entire power tool product; transportation prepaid, to PowerSmart. The owner must include a legible copy of the original receipt, which shall list the date of purchase, along with the company’s name where the product was purchased.
- Page 26 Vue éclatée et liste des pièces………………………………………………... 45 Garantie…………………………………………………………………....49 DONNÉES TECHNIQUES 21" 3-in-1 Tondeuse autopropulsée de gaz à essence Modèle # PSM2521SH Type de moteur: 4 Course, Soupage en tête, monocylindre avec système de refroidissement à air forcé Déplacement: 209cc Capacité...
- Page 27 Tous les efforts ont été faits pour assurer l'exactitude des informations contenues dans ce manuel. PowerSmart® se réserve à tout moment le droit de la modification de ce produit et des spécifications sans préavis.
- Page 28 All manuals and user guides at all-guidesbox.com PROCEDURES GENERALES DE SECURITE Pour toute question concernant les avis de danger et de sécurité figurant dans ce manuel ou sur le produit, veuillez appeler (800)791-9458 Lun-Ven 9-5 EST avant le fonctionnement de la machine. DANGER : MONOXYDE DE CARBONE L'utilisation d'un moteur dans la pièce PEUT VOUS TUER EN QUELQUES MINUTES.
- Page 29 All manuals and user guides at all-guidesbox.com CONSIGNES DE SÉCURITÉ IMPORTANTES Cette machine est capable d'amputer les mains et les pieds et de lancer des objets. Des blessures graves ou la mort seront entraînées si vous ne respectez pas les consignes de sécurité suivantes. I.Opération générale 1.
- Page 30 All manuals and user guides at all-guidesbox.com V. PENTE SPÉCIFIQUE Les pentes sont un facteur majeur lié aux accidents. L'exploitation sur les pentes exige une prudence accrue. 1. Déplacez-vous dans la direction recommandée par le fabricant sur les pentes. Soyez prudent lorsque vous vous déplacez à...
- Page 31 All manuals and user guides at all-guidesbox.com INSTRUCTIONS SUR L'ÉTIQUETTE D'AVERTISSEMENT Lisez attentivement le manuel avant de l'utiliser. Objets volants dangereux; gardez une distance de sécurité par rapport à la machine tant que le moteur est en marche. N’ouvrez pas ni retirez les boucliers de sécurité lorsque le moteur est en marche. Faites plus attention aux mains et aux pieds de l'opérateur pour éviter les blessures 。...
- Page 32 All manuals and user guides at all-guidesbox.com Regardez derrière vous tout en soutenant Danger des pentes raides Lors de la réparation, retirez le soufflet de la bougie, puis réparez-le conformément au manuel d'utilisation. Surfaces chaudes Lors de la tonte, veuillez porter les lunettes et des bouchons d'oreilles pour vous protélé Tenir à...
- Page 33 All manuals and user guides at all-guidesbox.com CONNAÎTRE VOTRE TONDEUSE À GAZON Veuillez vous familiariser avec l'emplacement et la fonction des composants qui contrôlent votre tondeuse à gazon avec l'illustration ci-dessous. Poignée de démarrage à rappel Jauge d'huile Ramasseur d'herbe Couvercle du réservoir Levier de réglage de la hauteur de Porte de décharge arrière...
- Page 34 All manuals and user guides at all-guidesbox.com PREPARATION DE LA TONDEUSE A GAZON La section suivante décrit les étapes nécessaires pour préparer la tondeuse à gazon pour utilisation. Si, vous n'êtes pas sûr de savoir comment effectuer l'une des étapes après avoir lu cette section, veuillez appeler (800) 791-9458Lun-Ven 9-5 EST pour le service à...
- Page 35 All manuals and user guides at all-guidesbox.com 3. Verrouillez le câble à la poignée inférieure à l'aide d'un serre-câble. Pince pour câble 4. Insérez le câble de la poignée de démarrage du recul dans le crochet prévu à cet effet sur la poignée supérieure. Vous devez enclencher la commande de démarrage/arrêt pour libérer la poignée de démarrage à...
- Page 36 All manuals and user guides at all-guidesbox.com RÉGLAGE DE LA HAUTEUR DE COUPE Avertissement! Les réglages de la hauteur de coupe ne doivent être effectués qu'après l'arrêt complet du moteur et des lames! Il est toujours préférable de commencer à tondre votre pelouse avec une hauteur de pont plus élevée pour éviter de scalper votre pelouse.
- Page 37 All manuals and user guides at all-guidesbox.com 3. Vérifiez le niveau d'huile : Si le niveau d'huile est trop bas, ajoutez l'huile moteur recommandée et vérifiez le niveau d'huile entre le niveau supérieur (1) et le niveau inférieur (2). 4. Réinstallez la jauge d'huile. Ajouter de l'essence Retirez le bouchon du réservoir et vérifiez le niveau de carburant.
- Page 38 All manuals and user guides at all-guidesbox.com CONTROLE DU DEMARRAGE/ARRET DU MOTEUR Contrôle du Cette tondeuse à gazon est équipée d'une commande de démarrage/arrêt du démarrage/arrêt du moteur moteur pour empêcher tout démarrage involontaire et garantir un fonctionnement sûr. En relâchant ce levier, la lame s'arrête rapidement en cas de danger.
- Page 39 All manuals and user guides at all-guidesbox.com Tondez en ligne droite pour obtenir une belle apparence de propreté. Les andains doivent se chevaucher de quelques centimètres afin d'éviter les rayures. Garder le dessous du carter de la tondeuse propre et éliminer l'accumulation d'herbe est important. Cette accumulation diminuera la qualité...
- Page 40 All manuals and user guides at all-guidesbox.com ENTRETIEN Un entretien de routine de cette tondeuse aidera à prolonger la durée de vie de la machine. Respectez toujours les règles de sécurité lors de toute opération de maintenance. La garantie sur cette tondeuse à gazon ne couvre pas les articles qui ont fait l'objet d'abus ou de négligence de la part de l'opérateur.
- Page 41 All manuals and user guides at all-guidesbox.com La tondeuse à gazon doit être vérifiée avant chaque utilisation pour vérifier le niveau d'huile approprié. Ceci est une étape critique pour un démarrage correct du moteur. Pour vérifier le niveau d'huile: 1. Assurez-vous que la tondeuse à gazon est sur une surface plane 2.
- Page 42 All manuals and user guides at all-guidesbox.com 2. Dévissez la bougie du moteur en utilisant la clé de bougie fournie. Il y a un espace limité pour que la clé puisse tourner. Utilisez les deux rangées de trous dans la clé de bougie pour obtenir un effet de levier afin de desserrer la bougie.
- Page 43 All manuals and user guides at all-guidesbox.com STOCKAGE ATTENTION : Ne placez jamais de type de bâche de stockage ou de bâche sur la TONDEUSE tant qu'elle est encore chaude. Si la TONDEUSE est entreposée pendant de longues périodes (30 jours ou plus), vidangez le réservoir de carburant et le bol de carburateur.
- Page 44 All manuals and user guides at all-guidesbox.com DEPANNAGE Problème Cause Solution Le levier de démarrage / arrêt Engager le levier de démarrage / arrêt du du moteur est désengagé. moteur. Le fil de la bougie d'allumage Raccorder le fil de la bougie d’allumage. est déconnecté.
- Page 45 All manuals and user guides at all-guidesbox.com VUE ÉCLATÉE ET LISTE DES PIÈCES...
- Page 46 All manuals and user guides at all-guidesbox.com Item Stock # Description Item Stock # Description 9999960902 Moteur 303160195A Petit manchon de tension 303090094 Porte - boîte de vitesses 303181406 Petite plaque de tension 303100100 Orientation 303160192B entretoise 303160961 Engrenage conique gauche 303020154 303020240 303130383...
- Page 47 All manuals and user guides at all-guidesbox.com VUE ÉCLATÉE DU MOTEUR ET LISTE DES PIÈCES...
- Page 48 All manuals and user guides at all-guidesbox.com Item Stock# Description Item Stock# Description 303020444 Boulon M6X12 303020608 Boulon COUVERCLE DE CARTER 9020960902 Ensemble de la culasse 9563960902 MOTEUR, GAUCHE 9142960901 Axe de culbuteur 303100072 Roulement 6205 9230960902 CULBUTEUR 9198960101 Jauge de remplissage d'huile 303020444 Boulon M6X12 9158960901...
- Page 49 Pour faire une réclamation en vertu de cette garantie limitée, vous devez retourner l’ensemble du produit; transport prépayé, à PowerSmart. Le propriétaire doit inclure une copie lisible de l’original du ticket de caisse, qui doit indiquer la date d’achat, ainsi que le nom de la société où le produit a été acheté.
- Page 50 Vista detallada y lista de piezas………………………………………… Garantía………………………………………………………………… DATOS TÉCNICOS Cortadora de césped autopropulsada a gas 3 en 1 de 21 pulgadas , Modelo # PSM2521SH Tipo de Motor: 4 tiempos, OHV, cilindro único con sistema de refrigeración por aire forzado Desplazamiento: 209cc Capacidad del tanque de combustible: 0.24 Galones...
- Page 51 Gracias por comprar un producto PowerSmart®. Este manual proporciona información sobre la operación segura y el mantenimiento de este producto. Se ha hecho todo lo posible para garantizar la precisión de la información en este manual. PowerSmart® se reserva el derecho de cambiar este producto y especificaciones en cualquier momento sin previo aviso.
- Page 52 All manuals and user guides at all-guidesbox.com PROCEDIMIENTOS GENERALES DE SEGURIDAD Para cualquier pregunta relacionada con los avisos de peligro y seguridad enumerados en este manual o en el producto, llame al (800) 791-9458 de lunes a viernes de 9 a 5 Horario Estándar del Este antes de usar el motor. PELIGRO: MONÓXIDO DE CARBONO Usar un motor en interiores PUEDE MATARLO EN MINUTOS.
- Page 53 All manuals and user guides at all-guidesbox.com INSTRUCCIONES DE SEGURIDAD IMPORTANTES Esta máquina es capaz de amputar manos y pies, y arrojar objetos. El incumplimiento de las siguientes instrucciones de seguridad puede provocar lesiones graves o la muerte. I. FUNCIONAMIENTO GENERAL 1.
- Page 54 All manuals and user guides at all-guidesbox.com V. COSIDERACIONES ESPECIALES PARA PENDIENTES Las pendientes son un factor importante relacionado con los accidentes. La operación en pendientes requiere precaución adicional. 1. Viaje en la dirección sugerida por el fabricante en pendientes. Tenga precaución al operar cerca de pendientes. 2.
- Page 55 All manuals and user guides at all-guidesbox.com INSTRUCCIONES DE ETIQUETA DE ADVERTENCIA Lea atentamente el manual antes de usar. Peligro, objetos voladores; Mantenga una distancia segura de la máquina mientras el motor esté funcionando. No abra ni quite los protectores de seguridad mientras el motor está funcionando. Preste más atención a las manos y pies del operador para evitar lesiones.
- Page 56 All manuals and user guides at all-guidesbox.com Mire hacia atrás mientras retrocede Peligro en pendientes pronunciadas Al cortar, use los anteojos y tapones para los oídos para protejer al operador Superficies calientes Al cortar, use los anteojos y tapones para los oídos para protejer al operador Mantenga a los espectadores alejados.
- Page 57 All manuals and user guides at all-guidesbox.com CONOCIENDO SU CORTADORA DE CÉSPED Utilice la siguiente ilustración para familiarizarse con la ubicación y la función de los componentes que controlan su cortadora de césped. Empuñadura de retroceso Varilla de aceite Recolector de hierba Tapón del depósito de combustible Palanca de ajuste de altura de corte Puerta de descarga trasera...
- Page 58 All manuals and user guides at all-guidesbox.com PREPARACIÓN DE LA CORTADORA DE CÉSPED La siguiente sección describe los pasos necesarios para preparar el cortacésped para su uso. Si después de leer esta sección, no está seguro de cómo realizar alguno de los pasos, llame al (800)791-9458 de lunes a viernes de 9 a 5 horatrio estándar del este para obtener servicio al cliente.
- Page 59 All manuals and user guides at all-guidesbox.com 3. Fije el cable a la manija inferior con un gancho para cable. Gancho de cable 4. Inserte el cable del mango de arranque de retroceso en el gancho provisto en el mango superior. Debe activar el control de inicio / parada para liberar el mango del arrancador de retroceso.
- Page 60 All manuals and user guides at all-guidesbox.com AJUSTE DE LA ALTURA DE CORTE ¡Advertencia! ¡Los ajustes de altura de corte solo deben realizarse después de que el motor y las cuchillas se hayan detenido por completo! Siempre es mejor comenzar a cortar el césped con una altura de cubierta más alta para evitar escalpar el césped. La altura de corte se ajusta con palancas delanteras y traseras.
- Page 61 All manuals and user guides at all-guidesbox.com Nivel superior de combustible Agregar Gasolina Combustible 1. Retire la tapa del tanque de combustible y verifique el nivel de combustible. 2. Si el nivel es demasiado bajo, reabastezca el tanque de combustible, recuerde agregar combustible no sobre el nivel superior de combustible.
- Page 62 All manuals and user guides at all-guidesbox.com Repita la prueba varias veces después de que el motor haya arrancado. Cuando se suelta la palanca de arranque / parada del motor, el motor debe detenerse en unos pocos segundos. Si no es así, comuníquese con el Servicio al cliente.
- Page 63 All manuals and user guides at all-guidesbox.com Verifique regularmente si la cuchilla está bien sujeta, si está en buenas condiciones y si está afilada. Si ocurre lo contrario, afile la cuchilla o reemplácela. En caso de que la cuchilla golpee un objeto, apague inmediatamente la cortadora de césped y espere a que la cuchilla se detenga por completo.
- Page 64 All manuals and user guides at all-guidesbox.com Todos los ajustes deben verificarse al menos una vez por temporada. Revise periódicamente todos los sujetadores y asegúrese de que estén apretados. Advertencia: siempre pare el motor, deje que el motor se enfríe, desconecte el cable de la bujía antes de realizar cualquier tipo de mantenimiento en su máquina.
- Page 65 All manuals and user guides at all-guidesbox.com 2. Limpie alrededor del relleno de aceite. Retire la varilla y limpie la varilla con un trapo limpio. Inserte la varilla medidora en la abertura de llenado de aceite sin enroscarla. Retire la varilla medidora para verificar la marca de aceite.
- Page 66 All manuals and user guides at all-guidesbox.com 4. Mida el espacio del enchufe con un calibre de cable. El espacio debe ser de 0.7 a 0.8 mm (0.028-0.031 pulgadas). 5. Si reutiliza la bujía, use un cepillo de alambre para limpiar la suciedad alrededor de la base de la bujía y luego vuelva a abrir la bujía.
- Page 67 All manuals and user guides at all-guidesbox.com ALMACENAMIENTO PRECAUCIÓN: Nunca coloque ningún tipo de cubierta de almacenamiento o lona en la CORTADORA DE CÉSPED mientras aún esté caliente. Si la cortadora de césped se almacena durante largos períodos de tiempo (30 días o más), drene el tanque de combustible y el tazón del carburador.
- Page 68 All manuals and user guides at all-guidesbox.com SOLUCIÓN DE PROBLEMAS Problema Causa Solución Palanca de arranque / Accione la palanca de arranque / parada del parada del motor motor. desconectada. Cable de la bujía Conecte el cable de la bujía. desconectado.
- Page 69 All manuals and user guides at all-guidesbox.com VISTA DETALLADA Y LISTA DE PIEZAS...
- Page 70 All manuals and user guides at all-guidesbox.com Item Stock # Description Item Stock # Description 9999960902 Motor 303160195A Manguito tensor pequeño 303090094 Caja de cambios 303181406 Plato tensor pequeño 303100100 Orientación 303160192B espaciador 303160961 Engranaje biselado izquierdo 303020154 Tornillo 303020240 Tornillo 303130383 Resorte de tensión...
- Page 71 All manuals and user guides at all-guidesbox.com Vista detallada del motor y lista de piezas...
- Page 72 All manuals and user guides at all-guidesbox.com Item Stock# Description Item Stock# Description 303020444 Perno M6X12 303020608 Montaje de la cabeza del 9020960902 9563960902 Cubierta del cárter, izquierda cilindro 9142960901 Eje rocker 303100072 6205 rodamientos Manómetro de llenado de 9230960902 ROCKER ARM 9198960101 aceite...
- Page 73 PowerSmart ("Vendedor") garantiza únicamente al comprador original que todas las herramientas eléctricas de consumo PowerSmart estarán libres de defectos en materiales o mano de obra por un período de tres (3) años a partir de la fecha de compra. Si se utilizan las herramientas Al proporcionar servicios profesionales o comerciales, la cobertura de la garantía será...