Publicité
Les langues disponibles
Les langues disponibles
Liens rapides
Publicité

Manuels Connexes pour Silverline HO0001 009


Sommaire des Matières pour Silverline HO0001 009
- Page 1 USER MANUAL ENGLISH HO0001 009 HO0015 009 Read this manual prior to performing any task!
- Page 2 MANUFACTURER Merzifon OSB AMASYA, Silverline IMPORTER SCD Luisina La boisinière 35530 Servon sur Vilaine FRANCE Telephone: +33(0)299002424 Fax: +33(0)299002422 Internet: www.luisina.com 1, en_US ENGLISH 06.03.2023...
- Page 3 Table of contents Table of contents INPUT................... 4 TECHNICAL DRAWING............5 WARNING AND SAFETY PRECAUTIONS......8 3.1 LETHAL RISK, DANGER OF POISONING....10 USAGE WITH AND WITHOUT CARBON FILTER.... 14 CARBON FILTER REPLACEMENT........15 CLEANING AND PREVENTIVE MAINTENANCE..... 16 6.1 ALUMINIUM FILTER CLEANING....... 17 6.2 Washing in Dishwasher..........
- Page 4 INPUT INPUT This guideline and the safety data includes all necessary informa- tion for a safe mounting as well as a safe use without defects. Please read all of this guideline and safety data before using the device. Keep the guideline in an appropriate place. If you pass the device onto others, make sure you also give this guideline and safety data.
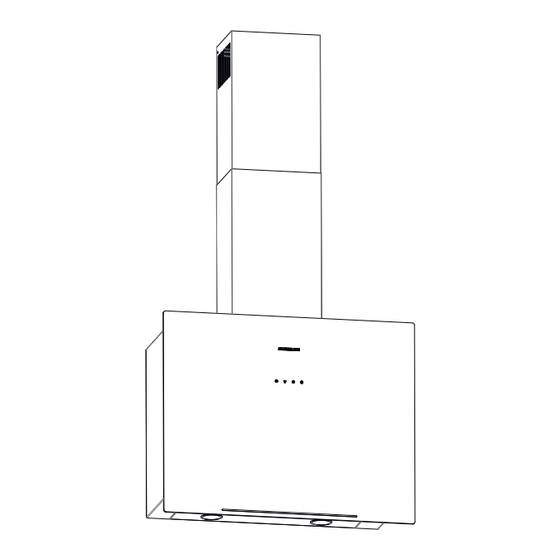
- Page 5 TECHNICAL DRAWING TECHNICAL DRAWING Fig. 1 06.03.2023 ENGLISH...
- Page 6 TECHNICAL DRAWING Fig. 2 ENGLISH 06.03.2023...
- Page 7 TECHNICAL DRAWING Fig. 3 06.03.2023 ENGLISH...
- Page 8 WARNING AND SAFETY PRECAUTIONS WARNING AND SAFETY PRECAUTIONS WARNING AND SAFETY PRECAU- This appliance can be used by children of 8 years and older, TIONS people with physical, sensory or mental capability deficiency or people with lack of experience or knowledge; as long as they are provided supervision or instructions for the safe use of the appliance and they comprehend the dangers.
- Page 9 WARNING AND SAFETY PRECAUTIONS If your product's periodic cleaning is not made in a timely manner, it could pose risk of fire. De-energize the appliance before any maintenance operations. (Plug off the appliance or turn off the main switch.) When electric cooker hood and devices fed with energies other than electricity operate simultaneously, the negative pressure in the room must not exceed 4 Pa ( 4 X 10 bar ).
- Page 10 WARNING AND SAFETY PRECAUTIONS LETHAL RISK, DANGER OF POISONING 3.1 LETHAL RISK, DANGER OF POISONING DANGER! Warning - Choking Hazard The packaging materials are dangerous for chil- dren. Never allow children to play with packaging materials. DANGER! Warning - Death Hazard There are life-threatening danger and poisoning danger due to reabsorbed combustion gases.
- Page 11 WARNING AND SAFETY PRECAUTIONS LETHAL RISK, DANGER OF POISONING WARNING! Fire danger! – The oil residue in the grease filter may catch fire.Clean the grease filter at least once every 3 months.Never operate the device without the grease filter . –...
- Page 12 WARNING AND SAFETY PRECAUTIONS LETHAL RISK, DANGER OF POISONING DANGER! Danger of physical injury! – During the installation, there is a danger of physical injury due to the sharp edges. Use protective gloves throughout the installation process of the appliance. –...
- Page 13 WARNING AND SAFETY PRECAUTIONS LETHAL RISK, DANGER OF POISONING NOTICE! If the feeder cable is damaged, it must be replaced by its manufacturer or its authorized technical service or any other personnel qualified at the same level, in order to avoid any dangerous situa- tion.
- Page 14 USAGE WITH AND WITHOUT CARBON FILTER USAGE WITH AND WITHOUT CARBON FILTER You can use this appliance in exhaust air mode and ventilated air mode. Exhaust air mode The absorbed air is cleaned by the grease filters, and is discharged through a piping system.Fig.
- Page 15 CARBON FILTER REPLACEMENT CARBON FILTER REPLACEMENT CARBON FILTER The appliance you have purchased is appropriate for use with carbon filters. 1-Place the carbon filter in its housing (Fig. 8). 2-Rotating the carbon filter clockwise, ensure that it is com- pletely fit (Fig. 8). If carbon filter does not fit in completely, it might drop and damage your product.
- Page 16 CLEANING AND PREVENTIVE MAINTENANCE CLEANING AND PREVENTIVE MAINTENANCE CAUTION! Cleaning and user maintenance of the appliance shall not be performed by unattended children. The surface could be damaged due to aggressive and abrasive cleaning agents. Never use aggressive and abrasive cleaning agents.
- Page 17 CLEANING AND PREVENTIVE MAINTENANCE Hand Wash 6.1 ALUMINIUM FILTER CLEANING Aluminium Filter Tab Clean the aluminium grease filters periodically every 3 months. Press the aluminium filter tab (1) and pull the aluminium filter to the direction of the arrow (Fig. 9). As you remove the aluminium filter, hold it with your other hand to prevent it from dropping.
- Page 18 APPLIANCE POSITION Installation and Unpacking of the Appliance APPLIANCE POSITION Fig. 10 After completing the installation of hood, the minimum distance must be 500 mm between the product and any electric cooker; and 700 mm between it and any gas ranges or cookers burning other fuels (Fig.
- Page 19 APPLIANCE POSITION Recommendations for Energy Saving 7.2 Recommendations for Energy Saving Your new appliance is exclusively energy saving. Here, you can find some recommendations on how you can save more energy while using your appli- ance and some advice required to dispose of your appliance properly.
- Page 20 CONTENT OF PACKAGE CONTENT OF PACKAGE Fig. 11 Product 10 - Ø 10 mm Plastic Dowel Outer Flue 11 - 4.8x50 Wall Mount Screw Inner Flue 12 - 3.5x9.5 Screw Flue Connection Plate 13 - Ø 6 mm Plastic Dowel Perforated Plate 14 - 3.9x22 Screw User Manual...
- Page 21 OVERVIEW OF hood OVERVIEW OF hood Fig. 12 1 - Inner Flue 2 - Outer Flue 3 - Control Panel 4 - Cooker Lighting 5 - Metal oil filter 06.03.2023 ENGLISH...
- Page 22 ASSEMBLY OF PRODUCT ASSEMBLY OF PRODUCT Checking the Wall It is important that the wall is straight, upright and has sufficient load-bearing capacity. It is necessary that the depth of the drill holes corresponds to the length of the bolt. It is possible to use the mounting accessories, bolts and dowels included in the product for brick walls.
- Page 23 ASSEMBLY OF PRODUCT Draw a mid location line from the ceiling perpendicular to the lower edge of the hood (). There is a tab in the middle of the flue connection plate. Place the middle point of this tab on the line that is drawn perpendicular to the wall.
- Page 24 ASSEMBLY OF PRODUCT Using with the Carbon Filter Installing Air Discharge Connection Connect one end of the air discharge pipe directly to the air discharge area. Mount the other end of the air discharge pipe on the air dis- charge on the appliance. Insulate the connection locations as applicable.
- Page 25 ASSEMBLY OF PRODUCT Using with the Carbon Filter Hold the upper flue and take out the flue by removing 2 pieces of 3.5x9.5 screws. Remove the outer flue connection screws and take the outer flue (Fig. 18). Disconnect the air outlet pipe connection of the device and remove the flue adapter if available.
- Page 26 ASSEMBLY OF PRODUCT Assembly of Rear Outlet 10.2 Assembly of Rear Outlet The motor can be rotated 90° inside the hood, so the air exit canal can be installed directly through the wall towards rear. To do this, proceed as follows. Remove the bolts of the motor (Fig.
- Page 27 USE OF PRODUCT USE OF PRODUCT When this button is pressed, product will operate at speed level 1. Fig. 23: Touch Button When this button is pressed, product will operate at speed level 2. When this button is pressed, product will operate at speed level 3.
- Page 28 REPLACING THE LAMPS REPLACING THE LAMPS 3 W LED LAMP Bulb Power (W) Lampholder / Socket GZ 10 Bulb Voltage (V) 220 - 240 Size (mm) 53x50mm ILCOS Code DR/F3-220-240- GZ10-50-53 Energy Class WARNING! During the replacement of the lamps, lampholder contacts are under the current.
- Page 29 REPLACING THE LAMPS Only self-protection tungsten LED lamp, LED or self-protection metal halide lamp must be used. Fig. 24: LED lamp symbol Ensure that the lamp is popping out by pressing the lamp from behind. Remove the lamp by turning a quarter of a round in coun- terclockwise (Fig.
- Page 30 AUTHORIZED SERVICE AUTHORIZED SERVICE If Lighting is Not Functioning: Make sure that the plug is plugged in, and that the fuses are intact. Check the bulbs. Make sure you unplugged the device before performing this check. Tighten the bulbs if they are loose; you can replace the bulbs if they still don't work.
- Page 31 AUTHORIZED SERVICE Fault description Cause Remedy It Does Not Discharge Air (in Check The Alumi- The aluminium cartridge filter should be washed flueless use) nium Filter. once a month under normal conditions. It Does Not Discharge Air (in Check The Carbon In products that work with carbon filters, carbon flueless use) Filter.
- Page 32 TECHNICAL TABLE TECHNICAL TABLE Supply Voltage 220-240V~ 50Hz Insulation Class of Motor Insulation Class CLASS I This product complies with the 2014/30/EC (Regulation on Electro- magnetic Compliance) and 2014/35/EC (Regulation on Low Voltage Devices (LVD)) Directives. This device complies with the Directive on the Control of Waste Electrical and Electronic Equipment.
- Page 33 MANUEL D'UTILISATION FRANCAIS HO0001 009 HO0015 009 Lire les instructions avant de commencer tout travail !
- Page 34 MANUFACTURER Merzifon OSB AMASYA, Silverline IMPORTER SCD Luisina La boisinière 35530 Servon sur Vilaine FRANCE Téléphone : +33(0)299002424 Fax : +33(0)299002422 Internet : www.luisina.com 1, fr_FR FRANCAIS 06.03.2023...
- Page 35 Table des matières Table des matières ENTRÉE :................4 ILLUSTRATION TECHNIQUE..........5 AVERTISSEMENTS ET MESURES DE SÉCURITÉ.... 8 3.1 DANGER DE MORT - RISQUE D’INTOXICATION..10 UTILISATION AVEC OU SANS FILTRE À CHARBON..15 REMPLACEMENT DU FILTRE AU CHARBON....16 NETTOYAGE ET ENTRETIEN PRÉVENTIF......
- Page 36 ENTRÉE : ENTRÉE : Ce mode d’emploi comporte toutes les informations nécessaires à un montage et une utilisation sûrs et sécurisés Veuillez lire l’intégralité de ce mode d’emploi avant d’utiliser l’appareil. Conservez les instructions dans un endroit approprié. Ne passez l’appareil à d’autres personnes, qu’accompagné de ce mode d’emploi.
- Page 37 ILLUSTRATION TECHNIQUE ILLUSTRATION TECHNIQUE Fig. 1 06.03.2023 FRANCAIS...
- Page 38 ILLUSTRATION TECHNIQUE Fig. 2 FRANCAIS 06.03.2023...
- Page 39 ILLUSTRATION TECHNIQUE Fig. 3 06.03.2023 FRANCAIS...
- Page 40 AVERTISSEMENTS ET MESURES DE SÉCURITÉ AVERTISSEMENTS ET MESURES DE SÉCURITÉ AVERTISSEMENTS ET MESURES Cet appareil peut être utilisé par des enfants de 8 ans et plus, DE SÉCURITÉ les personnes souffrant de déficience physique, sensorielle ou mentale, ou manquant d’expérience et de connaissances, à condition qu’elles soient supervisées ou qu’elles aient reçu des instructions relatives à...
- Page 41 AVERTISSEMENTS ET MESURES DE SÉCURITÉ Remplacez les filtres régulièrement. Les filtres non remplacés à temps peuvent provoquer des incendies en raison des résidus de graisse accumulés sur ces derniers. N'utilisez pas de matériaux filtrants ignifuges à la place du filtre. Ne faites pas fonctionner votre produit sans filtre et ne retirez pas les filtres lorsque le produit est en fonctionnement.
- Page 42 AVERTISSEMENTS ET MESURES DE SÉCURITÉ DANGER DE MORT - RISQUE D’INTOXICATION Faites attention lorsque vous utilisez votre appareil spontané- ment avec d'autres appareils (par exemple, chaufferies au gaz, au diesel, au charbon ou au bois, chauffe-eau, etc.) qui utilisent le même air dans le même environnement. Soyez prudent lorsque vous les utilisez simultanément.
- Page 43 AVERTISSEMENTS ET MESURES DE SÉCURITÉ DANGER DE MORT - RISQUE D’INTOXICATION Fig. 5 DANGER ! Risque d’incendie ! Les résidus d’huile dans le filtre à graisse peu- – vent prendre feu. Nettoyez le filtre à graisse au moins une fois tous les 3 mois. Évitez d’utiliser l’appareil sans filtre à...
- Page 44 AVERTISSEMENTS ET MESURES DE SÉCURITÉ DANGER DE MORT - RISQUE D’INTOXICATION DANGER ! Danger d'électrocution ! – Un dispositif défectueux peut provoquer un choc électrique. N’allumez jamais un périphé- rique défectueux. Débranchez la fiche d’alimentation et éteignez le disjoncteur. Contactez le service clients. –...
- Page 45 AVERTISSEMENTS ET MESURES DE SÉCURITÉ DANGER DE MORT - RISQUE D’INTOXICATION DANGER ! Risque de brûlure, risque d'électrocution ! – Patientez jusqu’à ce que l’appareil refroidisse avant de le nettoyer ou de réaliser toute opération d’entretien. Déconnectez le fusible ou débranchez de la prise secteur.
- Page 46 AVERTISSEMENTS ET MESURES DE SÉCURITÉ DANGER DE MORT - RISQUE D’INTOXICATION REMARQUE ! Lorsque les ampoules du dispositif sont défectu- euses, éteignez le disjoncteur et débranchez la fiche d’alimentation de la prise. Remplacez immé- diatement les ampoules défectueuses (laissez les ampoules refroidir d’abord), afin de protéger celles restantes contre les surcharges.
- Page 47 UTILISATION AVEC OU SANS FILTRE À CHARBON UTILISATION AVEC OU SANS FILTRE À CHARBON Vous pouvez utiliser cet appareil en mode d’air d’évacuation et en Mode Recyclage d’air. Mode d'air d'évacuation L’air absorbé est nettoyé par des filtres à graisse et évacué à travers le système de tuyauterie.Fig.
- Page 48 REMPLACEMENT DU FILTRE AU CHARBON REMPLACEMENT DU FILTRE A CHARBON FILTRE À CHARBON F009 L'appareil que vous avez acheté est approprié pour l'utilisation du filtre à charbon F009. 1-Placez le filtre à charbon dans son emplacement. Fig. 8 2-Tournez le filtre à charbon dans le sens horaire et assurez- vous qu'il est complètement fixé.
- Page 49 NETTOYAGE ET ENTRETIEN PRÉVENTIF NETTOYAGE ET ENTRETIEN PRÉVENTIF PRUDENCE ! Le service de nettoyage et d’utilisation ne doit pas être effectués par les enfants qui ne sont pas sur- veillés. La surface peut être endommagée par des produits de nettoyage agressifs ou des substances de nettoyage et de récurage.
- Page 50 NETTOYAGE ET ENTRETIEN PRÉVENTIF Lavage manuel 6.1 NETTOYAGE DES FILTRES EN ALUMINIUM Languette de Filtre en Aluminium Nettoyez les filtres à graisse en aluminium périodi-quement tous les 3 mois. Appuyez sur la languette du filtre en aluminium (1) et tirez le filtre en aluminium dans le sens de la flèche (Fig.
- Page 51 EMPLACEMENT DE L’APPAREIL Installation et déballage de l’appareil EMPLACEMENT DE L’APPAREIL Fig. 10 Une fois l'installation de la hotte terminée, la distance minimale doit être de 50 cm entre le produit et toute cuisinière électrique et de 70 cm entre le produit et toute cuisinière à gaz ou à d'autres combustibles (Fig.
- Page 52 EMPLACEMENT DE L’APPAREIL Recommandations relatives à l’économie d’énergie 7.2 Recommandations relatives à l’économie d’énergie Votre nouvel appareil est exclusivement destiné à économiser de l’énergie. Dans cette partie, vous pouvez obtenir des recommandations sur la façon d’économiser davantage d’énergie lors de l’utilisa- tion de votre appareil et des conseils nécessaires pour une mise au rebut adéquate.
- Page 53 CONTENU DE L'EMBALLAGE CONTENU DE L'EMBALLAGE Fig. 11 Produit 10 - Ø 10 mm Cheville en plastique Flue extérieure 11 - 4.8x50 Vis de montage mural Flue intérieure 12 - Vis 3.5x9.5 Plaque de raccordement au conduit de fumée 13 - Ø 6 mm Cheville en plastique Plaque perforée 14 - Vis 3.9x22 Manuel d'utilisation...
- Page 54 APERÇU DE LA HOTTE ASPIRANTE APERÇU DE LA HOTTE ASPIRANTE 1 - Flue intérieure 2 - Flue extérieure 3 - Panneau de contrôle 4 - Eclairage de la cuisinière 5 - filtre à graisse en métal Fig. 12 FRANCAIS 06.03.2023...
- Page 55 INSTALLATION DU PRODUIT INSTALLATION DU PRODUIT Vérification du mur Il est important que le mur soit droit, vertical et ait une capacité de charge suffisante. Il est nécessaire que la profondeur des trous de perçage cor- responde à la longueur du boulon. Il est possible d'utiliser les accessoires de montage, les boulons et les chevilles inclus dans le produit pour les murs en briques.
- Page 56 INSTALLATION DU PRODUIT Tracez une ligne d'emplacement intermédiaire depuis le plafond, perpendiculairement au bord inférieur de la hotte (Fig. 15). Il y a une languette au milieu de la plaque de connexion du conduit de fumée. Placez le point central de cet onglet sur la ligne tracée perpendiculairement au mur.
- Page 57 INSTALLATION DU PRODUIT Fig. 17 Installation de la connexion d'évacuation 06.03.2023 FRANCAIS...
- Page 58 INSTALLATION DU PRODUIT Utilisation avec le filtre à charbon Raccordez une extrémité du tuyau d'évacuation d'air directement à la zone d'évacuation d'air. Montez l'autre extrémité du tuyau d'évacuation d'air sur l'évacuation d'air de l'appareil. Isolez les emplacements de connexion, le cas échéant. Assemblage de combustibles en tôle S'il y a des feuilles de protection sur les conduits, retirez-les (Fig.
- Page 59 INSTALLATION DU PRODUIT Utilisation avec le filtre à charbon 1 - Vis 3.5x9.5 2 - Plaque de raccordement au conduit de fumée Enlevez les plaques de connexion du conduit de fumée en retirant les 4 vis de 3,5x9,5 (Fig. 19). Fig.
- Page 60 INSTALLATION DU PRODUIT Montage de la sortie arrière 10.2 Montage de la sortie arrière Le moteur peut être tourné de 90° à l'intérieur de la hotte, de sorte que le canal de sortie d'air peut être installé directement à travers le mur vers l'arrière.
- Page 61 COMMENT UTILISER LE PRODUIT COMMENT UTILISER LE PRODUIT Fig. 23: Bouton tactile Le produit fonctionne à la première vitesse lorsque ce bouton est appuyé. Le produit fonctionne à la deuxième vitesse lorsque ce bouton est appuyé. Le produit fonctionne à la troisième vitesse lorsque ce bouton est appuyé.
- Page 62 REMPLACEMENT DES LAMPES REMPLACEMENT DES LAMPES 3 W Lampe d'éclairage à LED Alimentation de l’ampoule (W) Douille / Prise GZ 10 Tension appliqué à l’ampoule 220 / 240 Taille (mm) 53X50 mm ILCOS Code DR/F3-220-240- GZ10-50-53 Classe Énergétique AVERTISSEMENT ! Les contacts de la douille sont soumis au courant pendant le remplacement des lampes.
- Page 63 REMPLACEMENT DES LAMPES Il faut utiliser uniquement une lampe LED à tungstène auto-protégée, une LED ou une lampe aux halogénures métalliques auto-protégée. Fig. 24: Symbole de la lampe LED Vérifiez que la lampe se détache en appuyant sur la lampe par l'ar- rière.
- Page 64 SERVICE AUTORISÉ SERVICE AUTORISÉ Si l’éclairage ne fonctionne pas: Assurez-vous que l'appareil est branché et que les fusibles sont pas défectueux. Vérifiez les ampoules. Assurez-vous de débrancher l'appareil tout en effectuant cette vérification. Serrez les lampes si elles sont lâches. Remplacez-les si elles ne fonctionnent toujours pas.
- Page 65 SERVICE AUTORISÉ Description d'erreur Origine Remède Ne décharge par l’air Vérifiez le filtre en alu- La cartouche filtrante en aluminium doit être lavée au (installation sans conduit) minium moins une fois par mois sous des conditions nor- males. Ne décharge par l’air Vérifiez le filtre à...
- Page 66 GRAPHIQUE TECHNIQUE GRAPHIQUE TECHNIQUE Tension d'alimentation 220 - 240 V 50Hz Classe d'isolation du moteur Classe d'isolation CLASSE I Ce produit est conforme à la directive 2004/108/CE relative à la compatibilité électromagnétique et à la directive basse tension (DBT) 2006/95/CE. Ce produit est conforme à...