Table des Matières

Manuels Connexes pour Bresser 88-54200


Sommaire des Matières pour Bresser 88-54200
- Page 1 USB Hand Microscope LCD Art. No. 88-54200 Bedienungsanleitung Operating Instructions Mode d’emploi Handleiding Istruzioni per l’uso Instrucciones de uso Manual de utilização...
- Page 2 Bedienungsanleitung ......... 4 Operating Instructions ......18 Mode d’emploi ..........30 Handleiding ..........44 Istruzioni per l’uso ........58 Instrucciones de uso ........72 Manual de utilização ........86...
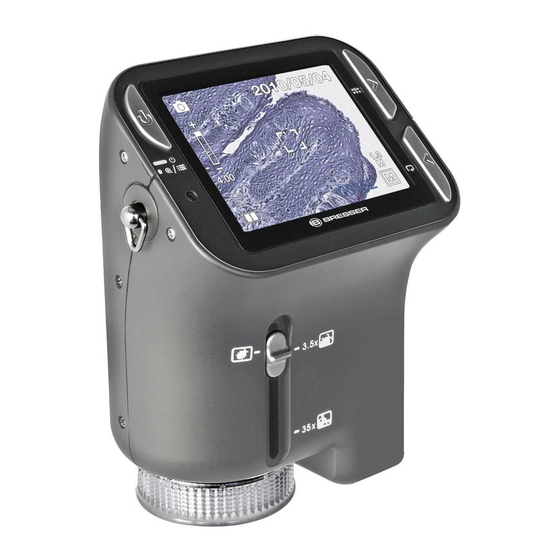
- Page 3 1&...
- Page 4 GEFAHR für Ihr Kind! BRAND-/EXPLOSIONSGEFAHR! HINWEISE zur Reinigung Dieses Gerät beinhaltet Elek- Setzen Sie das Gerät keinen Trennen Sie das Gerät tronikteile, die über eine hohen Temperaturen aus. Be- Reinigung Stromquelle (Netzteil und/oder Bat- nutzen Sie nur das mitgelieferte Netz- Stromquelle (Netz- terien) betrieben werden.
-
Page 5: Entsorgung
ENTSORGUNG EG-Konformitätserklärung Entsorgen Verpa- ckungsmaterialien sortenrein. Eine „Konformitätserklärung“ Informationen zur ordnungsgemäßen in Übereinstimmung mit den Entsorgung erhalten Sie beim kom- anwendbaren Richtlinien ist von Mea- munalen Entsorgungsdienstleister de Instruments Europe GmbH & Co. oder Umweltamt. KG erstellt worden und kann einge- sehen werden. -
Page 6: Treiber Installieren
Alle Teile deines Mikroskops 1. Einsetzen der Batterien: der Regel ist es dann ausreichend, 1. Optisches Zoom 1. Löse die Schraube und entferne wenn du den Treiber (von der CD) 2. Power LED den Objekthalter. nochmals neu installierst. Sollte 3. POWER & DIGITALZOOM 2. - Page 7 werden auf deinen PC kopiert. wechsel bitte in den Windows-Explo- 2.3 Problembehebung: Gerät Dieser Vorgang kann einige Minuten rer und wähle dein CD/DVD-Laufwerk wird vom Computer (USB) nicht dauern. aus. Starte die Datei „Menu.exe“ mit erkannt 4. Nachdem das Fenster ver- einem Doppelklick.
-
Page 8: Einsetzen Einer Speicherkarte
kennung eines USB-Geräts sowie punkt ANSICHT die Option AUSGE- Hinweis: den Start von Windows und ist für BLENDETE GERÄTE ANZEIGEN. Erscheint die Warnung “MEMORY das Nicht-Erkennen am USB-Port Die zuvor ausgeblendeten „Geister- FULL” auf dem LCD Monitor, ist die verantwortlich! geräte“... -
Page 9: Video Aufnehmen
Objekt, z.B. ein Schriftstück. Das 3.5 Digitalen Zoom verwenden Objekt wird auf dem LCD Monitor Während du ein Foto oder ein Video dargestellt. aufnimmst kannst du mit der ZOOM 4. Halte das Mikroskop am Gehäuse (Power) Taste die Abbildung vergrö- fest und betätige die Aufnahme/ ßern oder verkleinern. - Page 10 Display Information Digitalvideo-Modus Digitalfoto-Modus Digitalvideo- Digitalfoto- Modus Anzeige Modus Anzeige Datum Zoom Anzeige Einzelbild Video Bild Symbol Aufl ösung Aufl ösung Batterie Batterie SD Speicher- SD Speicher- Speicherplatz Kapazität Kapazität Speicherplatz karten Anzeige karten Anzeige (Noch zur Verfügung (Noch zur Verfügung stehende Anzahl für stehende Zeit für Bildaufnahmen)
- Page 11 möchtes, musst du zur Funktion 4.2 Digitalfoto-Modus 5. SETUP Digitalfoto-Modus zurückkehren. Wähle das Symbol und drücke Im Menü SETUP werden diese 4.4 Belichtungs- die Aufnahme/OK Taste um deine Symbole angezeigt. Einstellung Eingaben zu bestätigen. Betätige die Aufnahme/OK Taste um ein Bild Die EV-Funktion (EV = exposure aufzunehmen.
-
Page 12: Usb Verbindung
Mit den Tasten “Rechts” oder “Links” 5.5 Einstellungen 5.3 Einstellungen Video kannst du die Einstellungen von Bildfrequenz Datum und Uhrzeit verändern, mit In diesem Menüpunkt kannst du der Aufnahme/OK Taste gelangst du Damit bei Videoaufnahmen kein stö- die Bildqualität deiner Videos zur nächsten Einstellung. -
Page 13: Automatisches Ausschalten
‘X’: Diese Funktion wird nicht 5.7 Formatierung benutzt. Wähle Formatierung aus und bestäti- 5.9 Ausgang ge mit der Aufnahme/OK Taste. Zum Formatieren wählst du mit den Wähle Ausgang um das Menü Tasten “Rechts” oder “Links” das SETUP zu verlassen und um wieder Symbol ‘√’... -
Page 14: Delete All
6.2 Diaschau 6.4 Delete All 6.6 Ausgang Wähle den Diashow-Modus und be- Wähle das Symbol aus und bestätige Wähle das Symbol und bestätige mit stätige mit der Aufnahme/OK Taste. mit der Aufnahme/OK Taste. der Aufnahme/OK Taste. Das Mikroskop wird dir kontinuierlich Achtung: Es werden alle Daten des all deine Bilder anzeigen. - Page 15 des PC oder gar ein Datenverlust Einrichten der PC Cam eintreten! 1. Schalte das Mikroskop ein und drücke die Funktionstaste Taste. 8. Mikroskop als PC Cam benutzen Wähle SETUP aus und betätige die Aufnahme/OK Taste zur Bestätigung. Achtung! Gelange mit den Tasten “Rechts” Bitte schließe das Mikroskop noch oder “Links”...
- Page 16 9. Starten und Verwenden der Bild, das du speichern möchtest, Photomizer SE Software zu erfassen. Dies wird dann 1. Starte die Software Photomizer rechts in der Leiste angezeigt. SE auf deinem Computer. 7. Wähle dieses Bild durch einen 2. Für die beste Bilddarstellung einfachen Klick mit der Maus der Photomizer SE Software aus und klicke dann auf „Bild...
- Page 17 Technische Daten PC Interface USB 1.1, MSD Funktion Sensor 8,5 mm (1 / 3“) CMOS, Speichertyp SD Kartensteckplatz 1280 x 1024 Pixel (SD Karte nicht enthalten) Objektiv F8.0, f = 7.1 mm, Spannungsversor- 2 x “AA” 1.5V, Alkaline Batterien Öffnungswinkel 44°, 2G2P gung Beleuchtung LED x 4...
- Page 18 RISK to your child. FIRE-/ DANGER OF EXPLOSION! TIPS on cleaning This device contains elec- Do not expose the device to Remove the device from tronic components that are high temperatures. Use only it’s energy source before powered by either a mains connec- the mains adapter supplied or those cleaning (remove plug from tion or batteries.
- Page 19 DISPOSAL EEC conformity explanation Dispose packaging material/s as legally required. Meade Instruments GmbH & Consult the local authority on the Co. KG has formed a “Con- matter if necessary. formity Declaration” in line with the applicable guidelines. This declara- Do not dispose of electrical tion is available for review.
- Page 20 These are the parts of your 1. Install Batteries (from the CD). If this does not work, microscope 1. Rotate the screw. Take off the please see the chapter on trouble- 1. Optical Zooming switch View case. shooting. 2. Power LED 2.
- Page 21 window appears. Click on „Finish“. 5. The License Agreement appears. Delete ghost devices. These are de- 5. The driver is installed now. Confi rm with „Yes“. vices not actually currently connected 6. The next two windows will ask you to your computer. The reason for this 2.2 Installing the Image Editing for the „Destination Directory“...
-
Page 22: Insert An Sd Card
reboot the computer. LCD monitor, it means the SD card gently press the shutter button to Change to the device manager. In is full. Please transfer all the fi les to take a picture. the VIEW menu activate the SHOW your computer and delete the fi... - Page 23 provides 1x up to 4x magnifi cation of 4.2 Digital photo mode your pictures. Select the Digital photo mode button 3.6 Use Optical ZOOM and press the OK button to confi rm. User can slide Optical Press the OK button to take a picture. Zooming switch (1) to adjust optical zoom.
- Page 24 Display Information Digital video mode Digital photo mode Digital video Digital photo mode indicator mode indicator Date Zoom indicator Single picture Video Picture icon Resolution Resolution Battery Battery SD card Memory capacity SD card capacity capacity Memory capacity indicator (Remaining number indicator (Remaining record of storable pictures)
-
Page 25: Set Time And Date
set the resolution. Press the left or 5.1 Set time and date 4.4 Exposure value right button to select the video size, and press OK button to confi rm and Press the left or right button to Select EV mode and press OK but- return to main menu. -
Page 26: Automatic Shutdown
Then press the POWER button to play- 5.6 TV Output 5.9 Exit back mode. You will see the icons on the screen as shown. Press the Left or Connect the scanner to the TV with Select Exit to exit SETUP and back Right buttons to select one function. -
Page 27: Delete One
7. Download Files to PC 2. Connect the microscope to PC via 6.3 Delete One Connect the microscope to PC via USB cable. USB cable. A dialogue box with 3. You could use this PC-cam with Select the icon, press OK button options will appear as shown. - Page 28 9. Starting and Using the Photo- right in the menu bar. mizer SE Software 7. Select this image with a single 1. Start the Photomizer SE software mouse click, then click on „Trans- on your computer. fer image“. 2. For the best image result with 8.
- Page 29 Technical Data PC Interface USB 1.1, MSD Funktion Sensor Resolution 8.5 mm (1 / 3“) CMOS, Storage Type SD Card Slot 1280 x 1024 Pixel (SD card not included) Lens Specifi cation F8.0, f = 7.1 mm, Power 2 x “AA” 1.5V, Alkaline Batteries View Angle 44°, 2G2P Dimensions (LxWxH) 54.5x73x96.5 mm...
-
Page 30: Choc Électrique
DANGER pour votre enfant ! DANGER D’INCENDIE/ REMARQUES concernant le net- Cet appareil contient des piè- D’EXPLOSION ! toyage ces électroniques fonction- N’exposez pas l’appareil à de Avant de procéder au net- nant à l‘aide d’une source de courant fortes températures. Utilisez toyage de l’appareil, sépa- (bloc secteur et/ou piles). -
Page 31: Élimination
ÉLIMINATION conforme d’appareils usagés et de Certifi cat de conformité UE Éliminez les matériaux d’embal- piles usagées produites après le lage selon le type de produit. 01.06.2006, contactez le prestataire Un «Certifi cat de conformité» Pour plus d’informations concernant d’élimination communal ou bien l’of- conforme aux directives ap- l’élimination conforme, contactez le fi... -
Page 32: Installation Du Pilote
Toutes les parties de ton 1. Insertion des piles : l’ordinateur ne reconnaisse pas microscope 1. Desserre la vis et ôte le porte- l’appareil. En règle générale, il suffi t 1. Zoom optique objet. alors réinstaller le pilote (à partir du 2. -
Page 33: Installation Du Logiciel D'édition D'image
3. La fenêtre « Statut du setup » de votre choix. Confi rmez la langue 2.3 Résolution de problème : apparaît. Les fi chiers de programme sélectionnée en cliquant sur « OK ». l’appareil n’est pas reconnu par sont alors copiés sur ton PC. Ce 4. -
Page 34: Insertion D'une Carte Mémoire
Ce processus ralentit à la fois la re- ordinateur ! Après le redémarrage, rement et en la relâchant, la carte connaissance d’un appareil USB et le entrez dans le gestionnaire de péri- mémoire est à nouveau libérée avec démarrage de Windows et c’est aussi phériques. -
Page 35: Prendre Une Photo
Actionne la touche d’enregistre- entre la lentille de l’objectif et l’objet. 3.3 Prendre une photo ment/OK pour confi rmer. Tu peux observer l’objet en taille 3. Appuie sur la touche d’enre- d’origine. 1. Allume le microscope. gistrement/OK afi n de démarrer 2. - Page 36 Information sur l’écran Mode de vidéo numérique Mode de photo numérique Affi chage du mode Affi chage de mode de vidéo numérique de photo numérique Date Affi cha- ge du zoom Symbole Résolution Résolution d’image vidéo de l’image seule Capacité Capacité...
-
Page 37: Mode De Vidéo Numérique
Le symbole est affi ché en bas 4.1 Mode de vidéo 5. SETUP à gauche sur l’écran à cristaux numérique liquides. Pose le microscope sur un Les symboles suivants sont indiqués objet. L’objet s’affi che sur l’écran à Choisis le symbole et confi rme à dans le menu SETUP. -
Page 38: Réglages Photo
Avec les touches « droite » ou « 5.5 Réglages de la 5.3 Réglages vidéo gauche » tu peux modifi er les régla- fréquence d’images ges de la date et de l’heure ; avec À ce point du menu tu peux ajuster la touche d’enregistrement/OK tu Afi... -
Page 39: Image Par Image
5.7 Formatage 5.9 Sortie Choisis Formatage et confi rme à Choisis Sortie afi n de quitter le menu l’aide de la touche d’enregistrement/ SETUP et afi n de retourner au menu OK. Pour formater, sélectionne à FONCTIONS. l’aide des touches « droite » ou « gauche »... -
Page 40: Projection De Diapositives
6.2 Projection de 6.4 Delete All 6.6 Sortie diapositives Sélectionne le symbole et confi rme à Choisis le symbole et confi rme à Choisis le mode de projection de l’aide de la touche d’enregistrement/ l’aide de la touche d’enregistrement/ diapositives et confi rme à l’aide de la touche d’enregistrement/OK. - Page 41 désactivé cela peut entraîner un « Installation de la PC Cam plantage » de ton PC voire la perte 1. Allume le microscope et appuie de tes données ! sur la touche de commande. Choisis SETUP et appuie sur la touche d’en- 8.
- Page 42 9. Lancement et utilisation du 6. Clique sur „Enregistrer“, pour logiciel Photomizer SE capter une image que tu souhaite 1. Lance le logiciel Photomizer SE enregistrer. Cette image s’affi che sur ton ordinateur. alors à droite dans la barre. 2. Pour une représentation d’image 7.
- Page 43 Données techniques Interface PC USB 1.1, fonction MSD Capteur 8,5 mm (1 / 3“) CMOS, Type de mémoire Poste d’enfi chage pour cartes SD 1280 x 1024 pixels (carte SD non incluse) Objectif F8.0, f = 7.1 mm, Alimentation 2 x “AA” 1.5V, piles alcalines angle d’ouverture 44°, 2G2P Dimensions 54.5x73x96.5 mm...
- Page 44 GEVAAR voor uw kind! van kinderen! Hierdoor kunnen ze TIPS voor het schoonmaken STIKKEN! Ontkoppel apparaat Dit apparaat bevat elektroni- vóór het schoonmaken van sche onderdelen die via een stroom- BRAND-/EXPLOSIEGEVAAR! de stroombron (stekker uit bron (stroomvoorziening of batte- Stel het apparaat niet bloot het stopcontact nemen of batterijen rijen) worden aangedreven.
-
Page 45: Afvalverwerking
AFVALVERWERKING EU-Conformiteitsverklaring Bied het verpakkingsmateriaal op soort gescheiden als afval Een “conformiteitsverklaring” aan. Informatie over de juiste afval- in overenstemming met de verwerking kunt u van uw plaatselijke toepasselijke richtlijnen is door Mea- afvalverwerkingsbedrijf of de milieu- de Instruments GmbH & Co. KG op- dienst krijgen. - Page 46 Alle onderdelen van je 1. De batterijen plaatsen: (het stuurprogramma) opnieuw te microscoop 1. Maak de schroef los en verwijder installeren (vanaf de CD). Wanneer 1. Optische zoom de objecthouder. dit het probleem niet oplost kan je in 2. Power LED 2.
- Page 47 wordt naar je computer gekopieerd. 5. Er verschijnt nu een licentieover- kunt u het volgende proberen. (De Dit kan enkele minuten duren. eenkomst die je met “Ja” moet beant- fabrikant stelt zich hiervoor niet aan- 4. Wanneer het venster is ver- woorden.
- Page 48 CEERDE SYSTEEMINSTELLINGEN) 3. Bediening van de microscoop 2. Het Powerlampje is aan en het en daarna op OMGEVINGSVARIA- LCD-scherm laat het beginscherm BELEN. Selecteer nu in het onderste 3.1 Een geheugenkaart installeren: zien. gedeelte onder OMGEVINGSVA- 1. Zet de microscoop uit. 3.
-
Page 49: Video Opnemen
tingen 1x, 3,5x en 35x uitkiezen. 3.4 Video opnemen 4.1 Digitalevideomodus 1. Beweeg de schuif (1) naar de positie , hou een afstand van 1. Zet de microscoop aan. Kies dit symbool en druk op de 60mm tussen de lens en het object. 2. - Page 50 Afbeeldingsinformatie Digitalevideomodus Digitalefotomodus Indicator digita- Indicator digita- levideomodus lefotomodus Datum Zoomin- dicator Symbool Video- voor Beel- resolutie enkele dresolutie foto Batterijca- Batterij- Indicator SD- Indicator SD- Opslagruimte paciteit capaciteit Opslagruimte geheugenkaart geheugenkaart (Hoeveelheid foto’s (Nog beschikbare die nog kunnen opnametijd) worden genomen)
-
Page 51: Datum En Tijd Instellen
object is op het LCD-scherm te Met de knoppen “rechts” of “links” 5. SETUP zien. Houd de microscoop vast en kan je de correcte datum en tijd druk op de Opname/OK-knop. De instellen. Door op de Opname/ In het SETUP-menu staan deze microscoop maakt nu een serie van OK-knop te drukken kan je naar de symbolen. -
Page 52: Video-Instellingen
5.5 Beeldfrequentie- 5.3 Video-instellingen 5.7 Formatierung instellingen Kies dit menu-item om de beeldkwa- Kies Formatteren en druk op de Omdat er bij video-opnamen een liteit van je fi lmpjes in te stellen. Met Opname/OK-knop. storende fl ikkering kan ontstaan, kan de knoppen “Rechts”... - Page 53 5.9 Terug 6.2 Diashow Kies Terug om het SETUP-menu te Kies de Diashowmodus en druk op verlaten en weer in het FUNCTIE- de Opname/OK-knop. menu te komen. De microscoop zal één voor één al je foto’s laten zien. Door op een willekeurige knop te drukken wordt de diashow gestopt.
-
Page 54: Alles Wissen
eerst is gedeactiveerd, kan de com- 6.4 Alles wissen 6.6 Terug puter crashen of kan er dataverlies optreden! Kies dit symbool en druk op de Kies het symbool en druk op de Opname/OK-knop. Opname/OK-knop. 8. De microscoop als webcam Let op: Alle gegevens van het interne gebruiken geheugen en de SD-kaart worden 7. - Page 55 Webcam instellen 1. Zet de microscoop aan en druk op de functieknop. Kies SETUP en druk op de Opname/OK-knop om te bevestigen. Ga met de knoppen “Rechts” of “Links” naar het menu-item USB- verbinding. Kies in dit menu de optie PC Cam.
- Page 56 9. Opstarten en gebruiken van de te leggen. Dit wordt dan rechts in Photomizer SE software de balk weergegeven. 1. Start Photomizer SE op je 7. Selecteer het beeld weer door computer. een enkele klik met de muis en 2. Voor het beste resultaat met de breng het over naar de software Photomizer SE software raden we door op „Film Overstappen“...
- Page 57 Technische gegevens PC Interface USB 1.1, MSD-functie Sensor 8,5 mm (1 / 3“) CMOS, Opslagtype SD-kaart-slot 1280 x 1024 Pixel (SD-kaart niet meegeleverd) Objectief F8.0, f = 7.1 mm, Stroomvoorziening 2 x “AA” 1.5V, Alkalinebatterijen openingshoek 44°, 2G2P Afmetingen 54.5x73x96.5 mm Belichting LED x 4 (LxBxH)
- Page 58 PERICOLO per i bambini! re i materiali di imballaggio (buste di Non esporre l‘apparecchio a tempe- Il presente apparecchio con- plastica, elastici, ecc.) lontano dalla rature superiori ai 60°C! tiene parti elettroniche che portata dei bambini! PERICOLO DI funzionano con l’apporto di energia SOFFOCAMENTO! AVVERTENZE per la pulizia da sorgenti elettriche (alimentatore...
-
Page 59: Smaltimento
SMALTIMENTO volgersi all‘azienda municipale che si Dichiarazione di conformità CE Smaltire i materiali di imballag- occupa dello smaltimento dei rifi uti o gio dopo averli suddivisi. Per all’uffi cio pubblico competente. In ottemperanza alle vigenti informazioni sul corretto smaltimen- direttive è stata rilasciata una to, si prega di rivolgersi all‘azienda “Dichiarazione di conformità”, depo- municipale che si occupa dello smal-... -
Page 60: Installazione Del Driver
Componenti del microscopio 1. Inserimento delle batterie: sciuto dal computer. Di norma, in 1. Zoom ottico 1. Allentare la vite e rimuovere il questi casi è suffi ciente reinstallare 2. LED Power portaoggetti. il driver (utilizzando il CD fornito in 3. - Page 61 4. Dopo che la fi nestra si sarà 5. Viene visualizzato il Contratto di 2. Qualora l‘aggiornamento del driver chiusa, potrebbe essere necessario licenza; confermare con „Sì“. non risolva il problema, si proceda qualche minuto prima che venga 6. Nelle due fi nestre successive vie- nella maniera seguente: (Il produt- visualizzata la fi...
-
Page 62: Inserimento Di Una Scheda Di Memoria
sto. Successivamente nella fi nestra Fonte: Microsoft Knowledge Base re la scheda. Soltanto le schede di cliccare il tab AVANZATE (in Vista: h t t p : / / s u p p o r t . m i c r o s o f t . c o m / memoria SD sono compatibili con il IMPOSTAZIONI DI SISTEMA AVAN- kb/315539/de... - Page 63 Avvertenza: La scala di riproduzione dello zoom 1. È possibile ingrandire o ridurre digitale va da un ingrandimento di 1x l‘immagine mediante il tasto ZOOM a un ingrandimento di 4x dell‘oggetto (Power). osservato. 2. La fotografi a diventa „più granu- losa“...
- Page 64 Informazioni sul display Modalità Video digitale Modalità Foto digitale Indicatore modalità Indicatore modalità Video digitale Foto digitale Data Indicatore zoom Icona foto Risoluzione Risoluzione singola video immagine Capacità Capacità Indicatore Indicatore Spazio di memoria batterie batterie Spazio di memoria scheda di scheda di (quantità...
-
Page 65: Regolazione Dell'esposizione
terminare la funzione di acquisizione 4.2 Modalità Foto digitale di fotografi e in sequenza, tornare alla 5. SETUP funzione Modalità Foto digitale. Selezionare l‘icona e premere il tasto Nel menu SETUP vengono Acquisizione/OK per conferma- 4.4 Regolazione visualizzate le seguenti icone. re la selezione. -
Page 66: Collegamento Usb
Con i tasti „Destra“ o „Sinistra“ è 5.5 Impostazioni della 5.3 Impostazioni dei fi lmati possibile modifi care le impostazioni frequenza d‘immagine di data e ora, mentre con il tasto Questa voce di menu consente di Acquisizione/OK si passa all‘impo- Per evitare fastidiosi sfarfallamenti impostare la qualità... -
Page 67: Spegnimento Automatico
„X“: la funzione di spegnimento 5.7 Formattazione automatico è disattivata. Selezionare l‘icona della format- 5.9 Uscita tazione e confermare con il tasto Acquisizione/OK. Selezionare l‘icona di uscita per Per eseguire la formattazione, uscire dal menu SETUP e tornare al selezionare il simbolo „√“ con i tasti menu FUNZIONI. - Page 68 6.2 Diapositive 6.4 Elimina tutto 6.6 Uscita Selezionare la modalità Diapositive Selezionare l‘icona e confermare con Selezionare l‘icona e confermare e confermare con il tasto Acquisi- il tasto Acquisizione/OK. con il tasto Acquisizione/OK. zione/OK. Attenzione: verranno eliminati tutti Il microscopio visualizzerà tutte le i dati della memoria interna e della 7.
- Page 69 con il PC o si possono addirittura Confi gurazione della PC Cam perdere dei dati! 1. Accendere il microscopio e premere il tasto funzione. Selezionare 8. Utilizzo del microscopio come SETUP e confermare con il tasto PC Cam Acquisizione/OK. Mediante i tasti „Destra“ o „Sinistra“ Attenzione! selezionare la voce di menu Col- Non collegare ancora il microscopio...
- Page 70 9. Avvio e utilizzo del software memorizzare. L‘immagine viene Photomizer SE quindi visualizzata nella barra a 1. Avvia il software Photomizer SE destra. sul tuo computer. 7. Seleziona l‘immagine cliccan- 2. Per ottenere la migliore rappre- doci sopra una sola volta con il sentazione dell‘immagine con il mouse e clicca poi su „Immagine software Photomizer SE, si consi-...
- Page 71 Dati tecnici Interfaccia PC USB 1.1, funzione MSD Sensore 8,5 mm (1 / 3“) CMOS, Tipo memoria Slot per scheda SD (la scheda 1280 x 1024 pixel non è inclusa nella fornitura) Obiettivo F8.0, f = 7.1 mm, Alimentazione di 2 x “AA”...
- Page 72 ¡PELIGRO para su hijo! (bolsas de plástico, cintas de goma, ¡No exponga el aparato a temperatu- Este aparato incluye compo- etc.)! ¡Existe PELIGRO DE ASFIXIA! ras superiores a 60 °C! nentes electrónicos operados a través de una fuente de electri- ¡PELIGRO DE INCENDIO/EXPLO- INDICACIONES sobre la limpieza cidad (equipo de alimentación y/o...
- Page 73 suministrado o en el embalaje de Las pilas y los acumuladores gas- Declaración de conformidad con transporte. Se recomienda retirar las tados o descargados deben ser la UE pilas del aparato si no se va a utilizar eliminados por el consumidor en durante un período prolongado.
- Page 74 Todas las piezas de tu micros- 20. Cable de vídeo (opcional) el mismo puerto USB. copio 21. CD de software y cable USB En algunos casos puede ocurrir que 1. Zoom óptico el dispositivo no sea reconocido 2. LED de encendido 1.
- Page 75 1. Guarda los datos actuales y cierra 2. Haz clic en «Software Installieren». 2.3 Solución de problemas: el todos los programas abiertos. 3. Se muestra una selección en la ordenador no reconoce el dispo- 2. Haz clic en «Treiber Installieren». que puedes elegir el idioma que de- sitivo (USB) 3.
- Page 76 en cada inicio del sistema Windows Confi rme la entrada con OK y reinicie por delante hasta que encaje con busca dicho dispositivo. ¡Eso retrasa el ordenador. un ligero clic. Si se empuja de nuevo el reconocimiento de un dispositivo Tras el reinicio abra el administrador hacia dentro y se suelta la tarjeta de USB así...
- Page 77 LCD se oscurezca. 3. Pulsa la tecla Grabación/OK para 2. Si mueves la corredera (1) a iniciar la grabación. Pulsa nueva- las posiciones «3.5X» o «35X», el 3.3 Tomar fotografía mente la tecla Grabación/OK para aumento ascenderá a 3.5X o 35X. fi...
- Page 78 Información pantalla Modo de vídeo digital Modo de fotografía digital Visualización modo Visualización modo de fotografía digital Fecha de vídeo digital Visuali- zación Zoom Símbolo de imagen Resolución Resolución individual de vídeo de imagen Capaci- Capaci- Visualización Visualización Espacio de dad pila dad pila tarjetas de...
-
Page 79: Tomar Series De Imágenes
la tecla Grabación/OK para iniciar por la carcasa y acciona la tecla Gra- 5. INSTALACIÓN la grabación. Pulsa nuevamente la bación/OK. El microscopio tomará tecla Grabación/OK para fi nalizar la ahora 3 imágenes individuales en En el menú INSTALACIÓN se grabación. -
Page 80: Conexión Usb
Puedes modifi car la confi guración 5.5 Confi guración de la 5.3 Confi guración vídeo de la fecha y la hora con las teclas frecuencia de imagen «derecha» o «izquierda» y con la En este punto del menú puedes tecla Grabación/OK podrás acceder Para que en las grabaciones de ajustar la calidad de imagen de tus al siguiente ajuste. -
Page 81: Apagado Automático
5.7 Formateo 5.9 Salida Selecciona Formateo y confi rma con Selecciona Salida para abandonar el la tecla Grabación/OK. menú INSTALACIÓN y acceder de Para formatear selecciona con las nuevo al menú FUNCIONES. teclas «derecha» o «izquierda» el símbolo ‚√‘ y pulsa a continuación la tecla Grabación/OK. -
Page 82: Presentación De Diapositivas
6.2 Presentación de 6.4 Borrar todo 6.6 Salida diapositivas Selecciona el símbolo y confi rma con Selecciona el símbolo y confi rma Selecciona el modo Diashow y con- la tecla Grabación/OK. con la tecla Grabación/OK. fi rma con la tecla Grabación/OK. Atención: se borrarán todos los datos El microscopio te mostrará... - Page 83 extraíble, se puede producir un Ajustar la cámara PC «fallo general» del PC o incluso una 1. Conecta el microscopio y pulsa la pérdida de datos. tecla de función. Selecciona INSTA- LACIÓN y acciona para confi rmarlo 8. Utiliza el microscopio como la tecla Grabación/OK.
- Page 84 9. Inicio y utilización del software muestra a la derecha en la barra. Photomizer SE 7. Selecciona esta imagen haciendo 1. Inicia el software Photomizer SE clic sobre ella y a continuación en tu ordenador. haz clic en «Imagen transferidos». 2.
- Page 85 Datos técnicos Interfaz PC USB 1.1, función MSD Sensor 8,5 mm (1 / 3“) CMOS, Memoria Puerto para tarjetas SD 1280 x 1024 píxeles (no incluye tarjeta SD) Objetivo F8.0, f = 7.1 mm, Alimentación de 2 x pilas alcalinas «AA» 1.5 V ángulo de abertura 44°, 2G2P corriente Iluminación...
- Page 86 PERIGO para crianças! RISCO DE INCÊNDIO/EXPLOSÃO! INDICAÇÕES sobre a limpeza RISCO de ferimentos! Nunca sujeite o aparelho a Antes de limpar a fonte de Este aparelho contém compo- altas temperaturas. Utilize corrente, desligue o aparel- nentes electrónicos, que são apenas a fonte de alimentação forne- ho (retirar a fi...
- Page 87 ELIMINAÇÃO Indicações de conformidade da Separe os materiais da emba- lagem. Pode obter mais infor- mações sobre a reciclagem correcta Uma „Declaração de confor- nos serviços municipais ou na agên- midade” de acordo com as cia do meio ambiente. directivas aplicáveis foi criada pela Meade Instruments Europe GmbH &...
- Page 88 Todas as partes do teu micros- 20. Cabo de vídeo (opcional) Em alguns casos pode acontecer cópio 21. CD com software & cabo USB que o computador não reconheça o 1. Zoom óptico aparelho. Em geral basta reinstalar o 2. LED Power 1.
- Page 89 para o teu PC. Este processo pode 6. Nas duas janelas que se seguem gue. (o fabricante não assume qual- demorar alguns minutos. deves indicar o “Caminho” e a “Pasta quer garantia! 4. Depois de a janela ter desapare- do programa”. Confi rma estas infor- Elimine os chamados dispositivos cido, pode demorar um pouco até...
-
Page 90: Ligar O Microscópio
DE AMBIENTE. Seleccione agora na 3. Operação do microscópio 3.2 Ligar o microscópio: parte inferior, em VARIÁVEIS DE AM- 1. Prime a tecla POWER tal como BIENTE, a opção NOVO. No NOME 3.1 Inserção de um cartão de indicado. DA VARIÁVEL introduza o seguinte memória: 2. -
Page 91: Gravar Vídeos
1. Move o botão corrediço (1) para a 3.4 Gravar vídeos 4.1 Modo de vídeo digital posição , mantém uma distância de 60 mm entre a lente da objectiva 1. Liga o microscópio. Selecciona o símbolo e confi rma e o objecto. Podes observar o ob- 2. - Page 92 Informações no visor Modo de vídeo digital Modo de fotografi a digital Indicação do modo Indicação do modo de vídeo digital de fotografi a digital Data Indi- cação do zoom Símbolo Resolução Resolução de vídeo da imagem imagem individual Capaci- Capaci- Indicação de Indicação de...
- Page 93 Com as teclas “Para a direita” ou O símbolo é apresentado do 5. SETUP (defi nição) “Para a esquerda” podes alterar as lado inferior esquerdo no monitor defi nições da data e da hora, com a LCD. Coloca o microscópio por No menu SETUP são exibidos os tecla de aceitação/OK podes alcan- cima do objecto.
-
Page 94: Defi Nições De Vídeo
5.5 Defi nições de 5.3 Defi nições de vídeo 5.7 Formatação frequência da imagem Neste item do menu podes defi nir a Selecciona a formatação e confi rma Para que nas gravações de vídeo qualidade da imagem dos teus víde- com a tecla de aceitação/OK. - Page 95 6.2 Apresentação de 5.9 Saída diapositivos Selecciona Saída para saíres do Selecciona o modo de apresenta- menu SETUP e voltares ao menu ção de diapositivos e confi rma com FUNÇÕES. a tecla de aceitação/OK. O microscópio exibe continuamen- te todas as tuas imagens. Podes Prime a tecla POWER para chegares cancelar a apresentação premindo ao menu do modo de reprodução.
-
Page 96: Apagar Tudo
Se o dispositivo de dados amovível 6.4 Apagar tudo 6.6 Saída não for desactivado, pode ocorrer um “colapso” do PC ou mesmo uma Selecciona o símbolo e confi rma Selecciona o símbolo e confi rma perda de dados! com a tecla de aceitação/OK. com a tecla de aceitação/OK. - Page 97 Instalação da câmara do PC 1. Liga o microscópio e prime a tecla de função. Selecciona SETUP e prime a tecla de aceitação/OK para confi rmares. Com as teclas “Para a direita” ou “Para a esquerda” chegas ao item do menu Ligação USB. Neste menu, selecciona a câmara do PC.
- Page 98 9. Início e utilização do software guardar. Esta acção é indicada na Photomizer SE barra à direita. 1. Abre o software Photomizer SE 7. Selecciona esta imagem mediante no teu computador. um simples clique do rato e, em 2. Para conseguires a melhor apre- seguida, clica em “Imagem trans- sentação de imagem do software ferida”.
- Page 99 Dados técnicos Interface PC USB 1.1, função MSD Sensor 8,5 mm (1 / 3“) CMOS, Tipo de memória Entrada de cartão SD 1280 x 1024 Pixel (cartão SD não incluído) Objectiva F8.0, f = 7.1 mm, Alimentação de 2 x “AA” 1.5 V, pilhas alcalinas ângulo de abertura 44°, 2G2P tensão Iluminação...
- Page 102 Meade Instruments Europe GmbH & Co. KG Gutenbergstr. 2 DE-46414 Rhede Germany www.bresser-junior.de...