
Manuels Connexes pour Topcom SOLOGIC B921


Sommaire des Matières pour Topcom SOLOGIC B921
- Page 1 SOLOGIC B921 USER GUIDE / HANDLEIDING / MANUEL D’UTILISATEUR BEDIENUNGSANLEITUNG / MANUAL DE USUARIO BRUKSANVISNING / MANUALE D’USO MANUAL DO UTILIZADOR / UŽIVATELSKÁ P ÍRUýKA / INSTRUKCJA OBSàUGI V 1.0 - 05/11...
- Page 2 CZ P ipojit k ve ejné analogové telefonní síti. PL Do podá czenia do publicznej analogowej sieci telefonicznej. This product is in compliance with the essential requirements and other relevant provisions of the R&TTE directive 89/336/EEC. The Declaration of conformity can be found on : http://www.topcom.be/cedeclarations.asp...
- Page 3 UK The CE symbol indicates that the unit complies with the essential requirements of the R&TTE directive. NL Het toestel voldoet aan de basiseisen van de R&TTE-richtlijn. Dit wordt bevestigd door de CE- markering. FR La conformité de l’appareil avec les exigences fondamentales de la directive européenne R&TTE relative aux terminaux, est confirmée par le label CE.
- Page 4 Figure 1 Figure 2 Figure 3 Figure 4 ESC/...
- Page 5 Keep this user guide in a safe place and pass it on to another user if necessary. 1.1 The product: Sologic B921 This product has been manufactured in accordance with the uniform digital standard for cordless telephones (DECT). DECT technology features a high level of security against interception as well as high- quality digital transmission.
- Page 6 General information 1.3 Signal words and symbols Symbol Signal word Meaning Warning Warning of risk of potential serious injury or death if you fail to comply with this information. Caution Warning of risk of potential minor injury if you fail to comply with this information. none Caution Risk of material or environmental damage.
- Page 7 Safety notes 2 Safety notes The following basic safety notes must always be taken into account when using electrical devices. Carefully read the following safety notes and details on the correct use of the device. Familiarise yourself with all the functions of the device. Keep this user guide in a safe place near the device and pass it on to another user if necessary.
- Page 8 Safety notes • Do not use the device in humid areas (e.g. bathroom) or very dusty areas. • Devices connected to the mains may be damaged during thunderstorms. Therefore always unplug the device in a thunderstorm. • The mains adapter must be completely removed from the socket to disconnect the device fully from the power supply.
- Page 9 Safety notes Risk of suffocation: Warning Risk of injury due to suffocation! Exercise particular caution in respect of children! • Keep packaging films out of the reach of children. • Consider possible risks to children (risk of strangulation) if you use extension cables.
- Page 10 First steps 2.1 Notes on low-radiation operation This cordless telephone (compliant with the DECT standard) facilitates low-radiation operation (ECO mode). During a call, the handset reduces the radio output depending on the distance from the base station. When no call is being conducted, the handset reduces the radio output to a minimum.
- Page 11 First steps - 3A Base station - A. Telephone wall socket B. Mains adapter with cable C. Telephone cable 3.3 Handset Caution Risk of injury due to explosion! Only use the supplied rechargeable batteries or batteries of a similar type. Do not use ordinary disposable batteries! Otherwise the cordless handset may be damaged.
- Page 12 First steps 3.4 Battery status display The handset will stop working when the batteries are flat. If the batteries are completely flat and you place the handset on the base station for just a short time, the battery charge indicator will show that they are full.
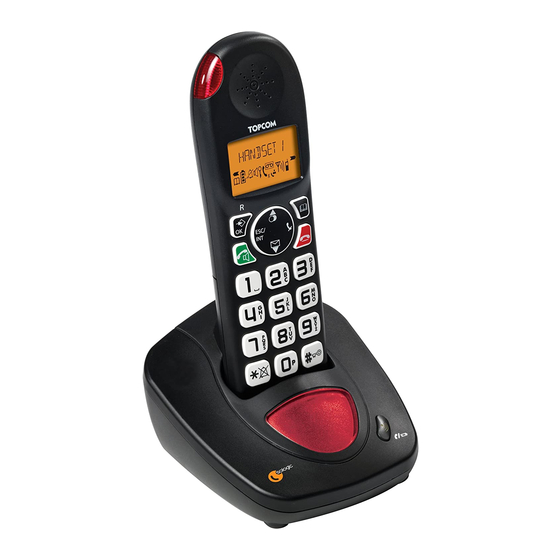
- Page 13 First steps batteries. 3.5 Keys/Display Cordless handset 1. Redial / up 2. Phone book 3. Mute / delete 4. Hang up 5. Alphanumeric keys 6. Key lock 7. Pause 8. Ringer on/off ESC/ 9. Calls list / down 10.Answer call / hands free / call button 11.
- Page 14 First steps Base station 15.Paging key 16.Handset charging LED 17.Ringer LED - 3D Base station - 3.6 Handset display HANDSE x = handset number Other numbers or scroll Other numbers or scroll left through the menu right through the menu Find or create phone Battery status display book entries...
- Page 15 3.7 Navigating through the menu The Sologic B921 has an easy-to-use menu system. Every menu consists of a series of options. A summary of the menus on the handset and base station can be found below.
- Page 16 First steps position. Now press the 2 key twice to select "b". You can use the delete key to delete letters that have been entered incorrectly. The letter before the cursor is deleted.
- Page 17 Operating the telephone Table of characters Space + - / 1 A B C 2 D E F 3 G H I 4 J K L 5 M N O 6 P Q R S 7 T U V 8 W X Y Z 9 4 Operating the telephone 4.1 Changing the language...
- Page 18 Operating the telephone The telephone number is automatically dialled. Press the hang up key to end the call. Redialling the last telephone number called Press the call button. Press the redial button. The last telephone number is automatically dialled. Press the hang up key to end the call. Redialling one of the last 3 telephone numbers called Press the redial key.
- Page 19 Operating the telephone 4.5 Mute The microphone can be muted during a call so that you can talk without being overheard by the person on the other end of the line. Press the mute key. The microphone is muted and "MUTED" is displayed.
- Page 20 Operating the telephone Select "RING TONE" and confirm. Select "VOLUME" and confirm. Select the required volume (Off, 1-5) and confirm. Important You can switch the ring tone volume of any individual handset on or off by simply holding the ring tone on/off key in standby mode.
- Page 21 Operating the telephone 4.11 Activate / deactivate keypad beep Press the menu/OK key. Select "HANDSET" and confirm. Select "KEYPAD BEEP" and confirm. Now select "ON“ or "OFF“. Press to confirm. Press the escape key to return to standby mode. 4.12 Phone book You can store 50 entries in the phone book.
- Page 22 Confirm again or press the escape key to skip. 4.13 Caller ID ( CLIP The Sologic B921 displays the telephone number of incoming calls. This function can only be used if you are registered for this service with your telephone line provider. Contact your provider for more information.
- Page 23 Operating the telephone Press the phone book key to skip the number. Press the phone book key to skip the date and time. Press the up and down keys to scroll through the list. Press the escape key to exit the calls list. Calling a number in the call list Press the calls list key.
- Page 24 Base settings 4.14 Resetting the handset to default settings. This deletes all the changes and restores all the defaults (ring tone volume, ring tone etc.). The calls list, redial list and phone book are also deleted! Press the menu/OK key. Select "HANDSET"...
- Page 25 Base settings Base ring tone volume Press the menu/OK key. Select "BASE" and confirm. Select "RING VOLUME" and confirm. Select the required volume (Off, 1-5) and confirm. 5.2 Setting the dialling mode There are two dialling modes for telephone connections: - DTMF / tone dialling (most common) - Pulse dialling mode (only necessary if this devices is operated on an older PBX!)
- Page 26 Now select "LONG" or "SHORT" and confirm. 6 Registering and de-registering a handset 6.1 Registering a handset to the Sologic B921 base station You can register to 4 handsets onto one base station. Every handset is already registered to the base station on delivery.
- Page 27 Registering and de-registering a handset 6.2 De-registering a handset from the Sologic B921 base station Press the menu/OK key. Select "DE-REGISTER" and confirm. Enter the PIN code of the base station (default 0000). Enter the internal number of the handset you want to de-register (1-4) and confirm.
- Page 28 Call forwarding and internal calls from one handset to another Manual Select If you set the handset to 'Manual Select', the handset will only search for the base station you have set. Press the menu/OK key. Select "HANDSET" and confirm. Select "SELECT BASE"...
- Page 29 Abbreviations and technical terms 8 Abbreviations and technical terms CLIP Calling Line Identification Presentation, display of the caller's telephone number on the called party's display. DECT Digital Enhanced Cordless Telecommunication; European telecommunications standard for digital cordless telephones. ECO mode Economic Mode; in DECT telephony this is low-radiation operation. Flash key Effects a brief line interruption that is used to activated features such as toggling or call forwarding.
- Page 30 Troubleshooting 9 Troubleshooting Problem Possible cause Solution No display The batteries are not Check that both charged batteries have been inserted correctly Charge the batteries No sound The telephone cable Check the cable is not connected connection. correctly. The line is engaged Wait until the other by a different handset handset hangs up...
- Page 31 Servicing Problem Possible cause Solution The telephone does Operating error Remove the batteries not respond when keys and reinsert them. are pressed Do not modify or repair the device. The device or cable should only be repaired by a specialist in the service centre. Repairs that are not carried out properly can cause significant risks to the user.
- Page 32 Technical data 10.3 Decommissioning, storage To decommission the device temporarily, disconnect the telephone cable from the wall socket and from the telephone jack on the base station. Unplug the base station and handset mains adapters from the 230 V sockets. Remove the batteries from the handsets.
- Page 33 12.2 Warranty handling A faulty unit needs to be returned to a Topcom service centre including a valid purchase note and a filled in service return card. If the unit develops a fault during the warranty period, Topcom or its...
- Page 34 The initial purchase date shall determine the start of the warranty period. The warranty period is not extended if the unit is exchanged or repaired by Topcom or its appointed service centre. 12.3 Warranty exclusions Damage or defects caused by incorrect treatment or operation and damage resulting from use of non-original parts or accessories are not covered by the warranty.
- Page 35 Bewaar deze gebruikershandleiding altijd bij het toestel. Bewaar deze gebruikershandleiding zorgvuldig en geef de handleiding indien nodig aan de volgende gebruiker. 1.1 Het product: Sologic B921 Dit product is geproduceerd in overeenstemming met de uniforme digitale standaards voor draadloze telefoons (DECT). DECT- technologie wordt gekenmerkt door een zeer goede beveiliging tegen afluisteren en een kwalitatief zeer goede digitale overdracht.
- Page 36 Algemene informatie 1.3 Signaalwoorden en -symbolen Symbool Signaalwoord Betekenis Waar- Waarschuwing voor het risico van mogelijk ernstig of zelfs dodelijk letsel als schuwing u zich niet aan deze informatie houdt. Voorzichtig Waarschuwing voor het risico van mogelijk licht letsel als u zich niet aan deze informatie houdt.
- Page 37 Veiligheidsvoorschriften Waar- Verstikkingsgevaar voor kinderen! Houd verpakkingsmaterialen buiten het bereik schuwing van kinderen. Belangrijk Gooi het verpakkingsmateriaal op een milieuvriendelijke manier weg! 2 Veiligheidsvoorschriften De volgende basisvoorschriften moeten altijd in acht genomen worden tijdens het gebruik van elektrische apparaten. Lees de volgende veiligheidsvoorschriften en informatie over het juiste gebruik van het toestel aandachtig door.
- Page 38 Veiligheidsvoorschriften • Kinderen onderschatten vaak de gevaren van het bedienen van elektrische toestellen. Laat kinderen niet zonder toezicht in de buurt van elektrische toestellen. • Laat kinderen niet met de toestellen of onderdelen ervan spelen. Voorzichtig Mogelijke schade aan het toestel. Koppel het toestel in gevaarlijke situaties meteen los van de 230 V-voeding.
- Page 39 Veiligheidsvoorschriften Vergiftigingsgevaar: Waar- Risico van letsel door vergiftiging! Wees vooral zeer voorzichtig met kinderen! schuwing • Houd oplaadbare en wegwerpbatterijen uit de buurt van kinderen. Gevaar voor verstikking: Waar- Risico van letsel door verstikking! Wees vooral zeer voorzichtig met kinderen! schuwing •...
- Page 40 De eerste stappen juiste manier worden geplaatst (zie de informatie op het batterijvak op het toestel). Gebruik nooit gewone wegwerpbatterijen! Belangrijk Bij een stroomstoring kunt u alleen met het basisstation bellen. 2.1 Opmerkingen bij lagestralingswerking Deze draadloze telefoon (conform de DECT-norm) vergemakkelijkt de lagestralingswerking (ECO-modus).
- Page 41 De eerste stappen - 3A Basisstation - A. Wandcontactdoos telefoonaansluiting B. Netadapter met kabel C. Telefoonkabel 3.3 Handset Voorzichtig Risico van letsel door explosie! Gebruik alleen de meegeleverde oplaadbare batterijen of batterijen van hetzelfde type. Gebruik geen gewone wegwerpbatterijen! Anders kan de draadloze handset beschadigd raken.
- Page 42 De eerste stappen 3.4 Indicatie laadniveau batterij De handset houdt op met werken als de batterijen leeg zijn. Wanneer de batterijen volledig leeg zijn en u de handset gedurende korte tijd op het basisstation hebt geplaatst, zal het batterijsymbool aangeven dat de batterijen volledig opgeladen zijn.
- Page 43 De eerste stappen Basisstation 15.Paging-toets 16.Handset bezig met opladen 17.Beltoon LED - 3D Basisstation - 3.6 Display handset x = nummer van handset HANDSET X Andere nummers of Andere nummers of naar naar links schuiven in rechts schuiven in het het menu menu Invoeren in het...
- Page 44 Interne oproep bereik is. 3.7 Door het menu bladeren De Sologic B921 heeft een eenvoudig menusysteem. Elk menu bestaat uit een aantal opties. Hieronder wordt een kort overzicht van de menu's op de handset en het basisstation gegeven.
- Page 45 De telefoon bedienen Druk één keer op toets 2 om de letter "a" te selecteren. Om achtereenvolgens de letters "a" en "b" in te voeren, drukt u toets 2 eerst één keer in om de letter "a" te selecteren. Wacht vervolgens 2 seconden totdat de cursor naar de volgende positie is gegaan.
- Page 46 De telefoon bedienen Druk op de ophangtoets om de oproep te beëindigen. Voorbereiding voor oproepen Voer het telefoonnummer in. U kunt een foutief nummer corrigeren door de microfoon uit-toets te gebruiken. Het nummer zal verdwijnen wanneer u gedurende 10 seconden niet op een toets hebt gedrukt. De handset keert dan terug naar de stand-bymodus.
- Page 47 De telefoon bedienen 4.3 Inkomende oproepen Wanneer een inkomende oproep wordt ontvangen, klinkt er op de handset en op het basisstation een beltoon en zal het lampje "Visueel oproepsignaal" (zie punt 14 in figuur 3C en punt 17 in figuur 3D) knipperen op de handset en op het basisstation.
- Page 48 De telefoon bedienen U kunt het volumeniveau instellen van 1 tot 5. 4.7 De toets (Flash) Druk op de toets Flash op het basisstation (toets 12 in afbeelding 3E „Draadloze handset“ op pagina 40) om speciale diensten op uw externe lijn te gebruiken, zoals 'tweede oproep' (mits uw telefoonmaatschappij deze dienst levert), of om een oproep door te schakelen als u een PBX gebruikt.
- Page 49 De telefoon bedienen 4.9 Toetsvergrendeling Als de toetsvergrendeling is ingeschakeld, zal er niets gebeuren bij het indrukken van een willekeurige toets in de stand-bymodus (behalve bij het indrukken van de toetsvergrendelingstoets). Houd de toetsvergrendelingstoets ingedrukt. Het symbool verschijnt op de display. Druk de toetsvergrendelingstoets opnieuw in om de toetsvergrendeling uit te schakelen.
- Page 50 De telefoon bedienen 4.12 Telefoonboek U kunt 50 invoeren opslaan in het telefoonboek. Namen kunnen maximaal 16 tekens bevatten en telefoonnummers kunnen maximaal 24 cijfers bevatten. Een invoer in het telefoonboek toevoegen Druk op de telefoonboektoets. Druk twee keer op de OK-toets. Voer de naam in en bevestig.
- Page 51 4.13 Nummerweergave ( CLIP De Sologic B921 geeft het telefoonnummer van inkomende oproepen weer. Deze functie kan alleen worden gebruikt als u zich voor deze dienst hebt aangemeld bij uw telefoonmaatschappij. Neem contact op met uw telefoonmaatschappij voor meer informatie.
- Page 52 De telefoon bedienen Druk op de telefoonboektoets om de datum en de tijd over te slaan. Gebruik de omhoog- en omlaag-toetsen om door de lijst te bladeren. Druk op de Escape-toets om de oproeplijst te verlaten. Een nummer uit de oproeplijst bellen Druk op de oproeplijsttoets.
- Page 53 Instellingen basisstation Bewerk of voeg een naam toe en bevestig daarna. Bewerk het telefoonnummer en bevestig. 4.14 De handset weer op de standaardinstellingen zetten. Alle wijzigingen worden dan ongedaan gemaakt en alle standaardwaarden worden hersteld (volume beltoon, beltoon enz.). De oproeplijst, de nummerherhalingslijst en het telefoonboek worden ook verwijderd! Druk op de Menu/OK-toets.
- Page 54 Instellingen basisstation 5.1 De beltoon selecteren en het volume instellen Handset beltoon voor interne/externe oproepen Druk op de Menu/OK-toets.. Selecteer "BASIS" (BASE) en bevestig. Selecteer "BELTOON" (RING TONE) en bevestig. Selecteer nu een beltoon (1 tot 9) en bevestig. Basisstation beltoonvolume Druk op de Menu/OK-toets..
- Page 55 • de handset eerder is afgemeld bij het basisstation (bijvoorbeeld om het basisstation opnieuw op te starten); • u een andere handset bij het basisstation wilt aanmelden. De volgende beschrijving is alleen van toepassing op Sologic B921 handsets en basisstations. Houd de paging-toets op het basisstation 10 seconden ingedrukt.
- Page 56 Als de handset is aangemeld, worden de naam en het nummer op de display weergegeven. 6.2 Een handset afmelden bij het Sologic B921- basisstation Druk op de Menu/OK-toets. Kies "HS VERWIJD" (DE-REGISTER) en bevestig.
- Page 57 Een oproep doorschakelen en interne oproepen tussen twee handsets Info Als het basisstation automatisch moet worden geselecteerd en de handset buiten bereik van het huidige basisstation komt, dan zoekt de handset alleen naar het sterkste basisstation in de stand- bymodus (niet tijdens een gesprek). Manual Select (handmatig selecteren) Als u de handset op 'Manual Select' (handmatige selectie) instelt, dan zoekt de handset alleen naar het basisstation dat u hebt...
- Page 58 Afkortingen en technische begrippen Druk op de ophangtoets om de oproep te beëindigen. 8 Afkortingen en technische begrippen CLIP Calling Line Identification Presentation, weergave van het telefoonnummer van de beller op de display van de gebelde persoon. DECT Digital Enhanced Cordless Telecommunication; Europese norm voor telecommunicatie voor digitale draadloze telefoons.
- Page 59 Probleemoplossing Twin Aanduiding voor een toesteleenheid met twee identieke apparaten, bijvoorbeeld twee handsets. 9 Probleemoplossing Probleem Mogelijke oorzaak Oplossing Geen weergave De batterijen zijn niet Controleer of de twee opgeladen batterijen op de juiste manier zijn geplaatst Batterijen opladen Geen geluid De telefoonkabel is niet Controleer de goed aangesloten.
- Page 60 Service Probleem Mogelijke oorzaak Oplossing Het basisstation of Het beltoonvolume Pas het de handset rinkelt staat uit of is te laag beltoonvolume aan niet Een oproep kan niet De flashtijd is te kort Stel een langere wordendoorgeschak flashtijd voor het eld naar een toestel in andertoestel...
- Page 61 Service 10.2 Reiniging Waar- Risico van elektrische schok of kortsluiting door aanraking van onderdelen die elektriciteit geleiden. schuwing Zorg ervoor dat er geen vloeistoffen in het toestel binnendringen. Als dit gebeurt, haalt u de netstroomadapter uit het stopcontact en de stekker van de telefoonkabel uit de wandcontactdoos en verwijdert u de batterijen.
- Page 62 Technische gegevens Gooi ook verpakkingsmaterialen op een milieuvriendelijke manier weg. Wend u tot uw plaatselijke overheid voor meer informatie over de inzamelpunten in uw buurt. 11 Technische gegevens Standaard DECT(Digital Enhanced Cordless Telecommunications) GAP (Generic Access Profile) Frequentiebereik 1880 MHz tot 1900 MHz Emissies 10 mW (gemiddeld vermogen per kanaal) Bereik...
- Page 63 De oorspronkelijke aankoopdatum is bepalend voor het begin van de garantieperiode. De garantieperiode wordt niet verlengd als het toestel wordt vervangen of gerepareerd door Topcom of een door Topcom geautoriseerde servicedienst. 12.3 Garantiebeperkingen...
- Page 64 Garantie Er kan geen aanspraak worden gemaakt op de garantie als het serienummer op het toestel gewijzigd, verwijderd of onleesbaar gemaakt is. Garantieclaims zijn ongeldig wanneer het toestel door de koper werd gerepareerd, gewijzigd of aangepast. Dit apparaat mag alleen worden gebruikt met oplaadbare batterijen. Als u de oorspronkelijk bijgeleverde batterijen wilt vervangen, let dan goed op of de batterijen die u gaat gebruiken geschikt zijn en oplaadbaar zijn.
- Page 65 Conservez toujours le mode d'emploi à proximité de l'appareil. Conservez précieusement ce mode d'emploi et transmettez-le le cas échéant aux autres utilisateurs. 1.1 Produit : Sologic B921 Ce produit a été fabriqué conformément à la norme harmonisée relative aux téléphones numériques sans fil (DECT). La technologie DECT se caractérise par une sécurité...
- Page 66 Généralités 1.3 Indications et symboles Symbole Indication Signification Avertisse- Risque de blessure grave ou mortelle en cas de non-respect de la consigne. ment Attention Risque de blessure bénigne en cas de non- respect de la consigne. aucun Attention Risque de dégâts matériels ou environnementaux.
- Page 67 Consignes de sécurité Avert- Risque d'étouffement pour les enfants ! Conservez les feuilles d'emballage hors de portée des enfants. issement Important Jetez l'emballage de manière respectueuse de l'environnement. 2 Consignes de sécurité Veillez à toujours respecter les consignes de sécurité suivantes lors de l'utilisation d'appareils électriques.
- Page 68 Consignes de sécurité • Les enfants sous-estiment souvent les dangers associés aux appareils électriques. Ne laissez jamais des enfants sans surveillance à proximité d'un appareil électrique. • Ne laissez pas les enfants jouer avec l'appareil ou ses pièces. Attention Possibilité de dégâts sur l'appareil. En cas de danger, débranchez immédiatement l'appareil de l'alimentation 230 V.
- Page 69 Consignes de sécurité Risque d'empoisonnement : Avert- Danger de blessure par empoisonnement ! Surveillez particulièrement les enfants ! issement • Conservez les batteries ou les piles hors de portée des enfants. Risque d'étouffement : Avert- Danger de blessure par étouffement ! Surveillez particulièrement les enfants ! issement •...
- Page 70 Premiers pas sont indiquées à l'intérieur du compartiment à piles du combiné). N'utilisez jamais des piles normales ! Important En cas de coupure de courant, vous ne pouvez téléphoner qu'avec la base. 2.1 Remarques sur le mode de faible rayonnement Ce téléphone sans fil (conforme à...
- Page 71 Premiers pas - 3A Base - A. Prise téléphonique murale B. Adaptateur secteur avec son câble C. Câble téléphonique 3.3 Combiné Attention Danger de blessure en cas d'explosion ! Insérez uniquement les piles rechargeables fournies ou des piles du même type. Pas de piles jetables ! Vous risquez d'endommager le combiné.
- Page 72 Premiers pas 3.4 Témoin de charge des piles Le combiné ne fonctionne plus lorsque les piles sont déchargées. Si vous laissez le combiné pendant un court moment seulement sur la station de charge alors que les piles sont complètement déchargées, le témoin de charge des piles vous indique qu'elles sont pleines.
- Page 73 Premiers pas Base 15.Touche Recherche 16.Voyant de chargement du combiné 17.Voyant Sonnerie - 3D Base - 3.6 Écran du combiné x = numéro du combiné COMBINÉ X Autres numéros ou faire Autres numéros ou faire défiler le menu vers la défiler le menu vers la gauche droite...
- Page 74 Premiers pas 3.7 Naviguer dans le menu L'appareil Sologic B921 propose un système de menus facile à utiliser. Chaque menu se compose d'une série d'options. Vous trouverez ci-après une vue d'ensemble des menus du combiné et de la base. Pour ouvrir le menu principal, appuyez sur la touche Menu/OK.
- Page 75 Utilisation du téléphone Tableau des caractères Espace + - / 1 A B C 2 D E F 3 G H I 4 J K L 5 M N O 6 P Q R S 7 T U V 8 W X Y Z 9 4 Utilisation du téléphone 4.1 Modifier la langue...
- Page 76 Utilisation du téléphone Prénumérotation Saisissez le numéro de téléphone. Vous pouvez corriger une erreur de saisie avec la touche de coupure du micro. Si vous n'appuyez sur aucune touche pendant 10 secondes, le numéro disparaît et le combiné repasse en mode veille. Appuyez sur la touche d'appel.
- Page 77 Utilisation du téléphone 4.3 Appels entrants Lors d'un appel entrant, le combiné et la base sonnent, tandis que le témoin de signal d'appel visuel (cf. numéro 14 sur l'illustration 3C et numéro 17 sur l'illustration 3D) du combiné et de la base clignote. Appuyez sur la touche Décrocher pour parler.
- Page 78 Utilisation du téléphone 4.7 Touche (Flash) Appuyez sur la touche Flash (touche 12 sur l'illustration 3C „Combiné sans fil“ à la page 70) pour utiliser des services spécifiques de votre ligne externe, p. ex. la présentation du numéro (à condition que votre opérateur téléphonique propose ce service) ou bien pour transférer un appel si vous utilisez un système téléphonique.
- Page 79 Utilisation du téléphone Important Vous pouvez régler le volume de la sonnerie de chaque combiné sur Marche ou Arrêt en maintenant enfoncée la touche Marche/Arrêt de la sonnerie en mode veille. L'icône s'affiche à l'écran et le clavier est verrouillé. 4.9 Verrouillage du clavier Lorsque le clavier est verrouillé, les touches ne fonctionnent pas en mode veille (sauf la touche de verrouillage du clavier).
- Page 80 Utilisation du téléphone 4.11 Activer/désactiver le bip touche Appuyez sur la touche Menu/OK. Sélectionnez COMBINE (HANDSET) et validez. Sélectionnez BIP TOUCHE (KEYPAD BEEP) et validez. Sélectionnez MARCHE (ON) ou ARRET (OFF). Appuyez pour valider. Appuyez sur la touche Esc (Echap) pour repasser en mode veille.
- Page 81 (Echap) pour annuler. 4.13 Affichage du numéro ( CLIP L'appareil Sologic B921 affiche le numéro de téléphone des appels entrants. Cette fonction n'est disponible que si vous avez souscrit à ce service auprès votre opérateur téléphonique. Pour de plus amples informations, consultez votre opérateur.
- Page 82 Utilisation du téléphone Si le numéro de téléphone contient plus de 12 chiffres, faites défiler l'écran vers la droite pour afficher les autres chiffres. Nouveaux appels Si le journal des appels contient un nouvel appel, l'icône CLIP clignote à l'écran. Afficher le journal des appels Appuyez sur la touche du journal des appels.
- Page 83 Utilisation du téléphone Sélectionnez EFFACE (DELETE) pour supprimer le numéro de téléphone sélectionné, puis validez. Sélectionnez EFFACE TOUT (DELETE ALL) pour supprimer toutes les entrées, puis validez. Appuyez pour valider ou appuyez sur la touche Esc (Echap) pour annuler. Enregistrer un numéro du journal des appels en tant que numéro abrégé...
- Page 84 Réglages de la base Sonnerie interne Mélodie 1 Bip touche Marche 4.15 Affichage de la messagerie vocale Cet affichage ne fonctionne que si vous avez activé la fonction répondeur ou messagerie et que votre opérateur téléphonique transmet ces informations et le numéro de téléphone ! Si votre messagerie vocale contient un nouveau message, l'icône s'affiche à...
- Page 85 Réglages de la base Appuyez sur la touche Menu/OK. Sélectionnez BASE et validez. Sélectionnez MODE COMPOS (DIAL MODE) et validez. Sélectionnez TONALITES (TONE) ou IMPULSIONS (PULSE) et validez. 5.3 Paramétrer le PIN système Certaines fonctions ne sont disponibles que si vous connaissez le PIN système de la base.
- Page 86 Enregistrer ou désenregistrer un combiné 6 Enregistrer ou désenregistrer un combiné 6.1 Enregistrer un combiné sur la base Sologic B921 Vous pouvez enregistrer jusqu'à 4 combinés sur une même base. Chaque combiné est déjà inscrit sur la base à la livraison.
- Page 87 Enregistrer ou désenregistrer un combiné Une fois le combiné correctement désenregistré, la base repasse en mode veille. Dans le cas contraire, vous êtes invité à ressaisir le numéro du combiné. Important Pour pouvoir désenregistrer le combiné, celui-ci ne doit pas être en cours d'utilisation. 6.3 Sélection d'une base Si votre combiné...
- Page 88 Transfert d'appels et appels internes entre combinés Important Pour pouvoir sélectionner une base, le combiné doit être enregistré sur la base en question. 7 Transfert d'appels et appels internes entre combinés 7.1 Transférer un appel et activer le mode conférence au cours d'une conversation externe Pendant une conversation externe, appuyez sur la touche INT, puis sélectionnez le numéro du...
- Page 89 Abréviations et termes techniques Touche Flash Provoque une brève coupure de la ligne permettant d'activer des fonctions comme le double appel ou la transmission d'appel. Sur des installations téléphoniques équipées d'une touche Flash ou R, cette touche est utilisée pour la mise en attente interne. Generic Access Profile ;...
- Page 90 Dépannage 9 Dépannage Problème Cause possible Solution Pas d'affichage. Les piles ne sont pas Vérifiez que les deux chargées. piles rechargeables sont correctement insérées. Chargez les piles. Absence de tonalité. Le câble téléphonique Vérifiez le n'est pas correctement raccordement du raccordé.
- Page 91 Procédures d'entretien Problème Cause possible Solution La base ou le Le volume de la Réglez le volume de la combiné ne sonne sonnerie est désactivé sonnerie. pas. ou trop faible. Impossible de La durée flash est trop Réglez une durée transférer un courte.
- Page 92 Procédures d'entretien 10.2 Nettoyage Avert- Danger de décharge électrique ou de court-circuit en cas de contact avec des pièces conductrices issement d'électricité. Ne laissez pas pénétrer de liquide dans l'appareil. Si cela se produit, retirez immédiatement la fiche d'alimentation de la prise et débranchez la fiche du câble téléphonique de la prise murale ou retirez les piles rechargeables de l'appareil.
- Page 93 Données techniques Jetez également l'emballage de manière respectueuse de l'environnement. Pour toute information supplémentaire au sujet des points de collecte dans votre région, adressez-vous aux autorités locales. 11 Données techniques Norme DECT (Digital Enhanced Cordless Telecommunications) GAP ( Generic Access Profile) Plage de fréquence 1880 MHz à...
- Page 94 Tout appareil défectueux doit être retourné à un centre de service après-vente Topcom, accompagné d'un ticket d'achat valable. En cas de panne pendant la période de garantie, Topcom ou son centre de service après-vente officiel réparera gratuitement les dysfonctionnements dus à un vice de matière ou de fabrication, en réparant ou en remplaçant les appareils ou les pièces défectueux.
- Page 95 Garantie Topcom Cet appareil doit être utilisé avec des piles rechargeables uniquement. Si vous voulez remplacer les piles fournies avec l'appareil, veuillez vérifier que les piles que vous utilisez sont adaptées et rechargeables. N'utilisez PAS de piles alcalines dans les combinés.
- Page 96 Bewahren Sie Bedienungsanleitung stets in der Nähe der Geräte auf. Bewahren Sie diese Bedienungsanleitung sorgfältig auf, und geben Sie sie, wenn nötig, an andere Benutzer weiter. 1.1 Das Produkt: Sologic B921 Dieses Produkt wurde in Übereinstimmung mit dem einheitlichen, digitalen Standard für schnurlose Telefone (DECT) hergestellt. Die DECT-Technologie ist durch hohe Abhörsicherheit sowie qualitativ...
- Page 97 Allgemeines 1.3 Signalworte und Symbole Symbol Signalwort Bedeutung Warnung Warnung vor möglicher schwerer Verletzungs- bzw. Lebensgefahr bei Nichtbeachten. Vorsicht Warnung vor möglicher leichter Verletzungsgefahr bei Nicht-beachten. ohne Vorsicht Gefahr von Sach- oder Umweltschaden. Wichtig Hier wird ein für die Funktion wichtiger Hinweis gegeben.
- Page 98 Sicherheitshinweise Wichtig Verpackungsmaterial umweltgerecht entsorgen! 2 Sicherheitshinweise Folgende grundlegende Sicherheitshinweise müssen beim Einsatz von elektrischen Geräten in jedem Fall berücksichtigt werden. Lesen Sie die folgenden Sicherheitshinweise und Angaben zum korrekten Gebrauch des Gerätes sorgfältig durch. Machen Sie sich mit allen Funktionen des Gerätes vertraut. Bewahren Sie diese Bedienungsanleitung sorgfältig in der Nähe des Gerätes auf und geben Sie sie, wenn nötig, an andere Benutzer weiter.
- Page 99 Sicherheitshinweise • Kinder unterschätzen häufig die Gefahren beim Umgang mit Elektrogeräten. Lassen Sie Kinder nie unbeaufsichtigt in die Nähe von Elektrogeräten. • Lassen Sie Kinder nich mit den Geräten oder seinen Teilen spielen. Vorsicht Mögliche Beschädigungen des Gerätes. Im Gefahr- fall Gerät sofort vom 230V-Stromnetz trennen.
- Page 100 Sicherheitshinweise Vergiftungsgefahr: Warnung Verletzungsgefahr durch Vergiftung! Achten Sie besonders auf Kinder! • Bewahren Sie Batterien bzw. Akkus für Kinder unzugänglich auf. Erstickungsgefahr: Warnung Verletzungsgefahr durch Ersticken! Achten Sie besonders auf Kinder! • Verpackungsfolien von Kindern fernhalten. • Bei Kabelverlegung mögliche Gefahren für Kinder bedenken (Gefahr des Strangulierens).
- Page 101 Erste Schritte Wichtig Bei Stromausfall ist das Telefonieren mit diesem Gerät nur möglich mit der Basisstation. 2.1 Hinweise zur strahlungsarmen Betriebsweise Dieses schnurlose Telefon (nach DECT-Standard) ermöglicht einen strahlungsarmen Betrieb (ECO mode). Während eines Gesprächs verringert das Mobilteil die Funkleistung entfernungsabhängig zur Basis.
- Page 102 Erste Schritte - 3A Basisstation - A. Telefonwandanschluss B. Netzadapter mit Kabel C. Telefonkabel 3.3 Mobilteil Vorsicht Verletzungsgefahr durch Explosion! Nur mitgelieferte oder gleichartige Akkus einlegen. Keine Batterien! Andernfalls kann das Mobilteil beschädigt werden. Öffnen Sie das Akkufach wie in Abbildung 3B dargestellt. Legen Sie die Akkus ein.
- Page 103 Erste Schritte 3.4 Akkuzustandsanzeige Das Mobilteil funktioniert nicht mehr, wenn die Akkus leer sind. Wenn die Akkus vollständig entladen sind und Sie das Mobilteil nur für kurze Zeit ins Ladegerät stellen, zeigt die Akkuzustandsanzeige an, dass die Akkus voll sind. Dies ist jedoch nicht der Fall, und die Akkuleistung wird rasch nachlassen.
- Page 104 Erste Schritte Basisstation 15.Paging-Taste 16.Mobilteil-Ladeanzeige (LED) 17.LED-Anzeige für Anruf - 3D Basisstation - 3.6 Mobilteil-Display x = Mobilteil-Nummer MOBILTEIL X Weitere Nummern oder Weitere Nummern oder Menü nach links Menü nach rechts durchblättern durchblättern Telefonbucheinträge Akkuzustandsanzeige finden oder erstellen Freisprechmodus Rufton ausgeschaltet eingeschaltet Tastatursperre...
- Page 105 Erste Schritte 3.7 Durch das Menü navigieren Das Sologic B921 verfügt über ein leicht zu bedienendes Menüsystem. Jedes Menü besteht aus einer Reihe von Optionen. Nachstehend finden Sie eine Übersicht über die Menüs des Mobilteils und der Basis. Zum Öffnen des Hauptmenüs die Menü/OK-Taste drücken.
- Page 106 Bedienung des Telefons eingegebene Buchstaben löschen. Es wird der Buchstabe vor dem Cursor gelöscht. Tabelle der Zeichen Leerzeichen+ - / 1 A B C 2 D E F 3 G H I 4 J K L 5 M N O 6 P Q R S 7 T U V 8 W X Y Z 9...
- Page 107 Bedienung des Telefons Wahlvorbereitung Die Telefonnummer eingeben. Sie können eine falsche Nummer mit der Stummschalttaste korrigieren. Wenn Sie 10 Sekunden lang keine Taste drücken, verschwindet die Nummer, und das Mobilteil kehrt in den Standby-Modus zurück. Drücken Sie die Anruftaste. Die Telefonnummer wird automatisch gewählt. Drücken Sie die Auflegen-Taste, um das Gespräch zu beenden.
- Page 108 Bedienung des Telefons Drücken Sie die Gespräch-annehmen-Taste, um das Gespräch zu beginnen. Drücken Sie die Auflegen-Taste, um das Gespräch zu beenden. 4.4 Freisprechmodus ein-/ausschalten Mit dieser Funktion kann man einen Anruf annehmen, ohne das Mobilteil festhalten zu müssen, oder wenn bereits ein Gespräch auf dem Mobilteil geführt wird.
- Page 109 Bedienung des Telefons 4.7 Die -Taste (Flash) Drücken Sie die Flash-Taste (Taste 12 in Abbildung 3C „Schnurloses Mobilteil“ auf Seite 101), um spezielle Dienste Ihres externen Anschlusses zu nutzen, z. B. „Anklopfen“ (vorausgesetzt, Ihr Netzbetreiber bietet diesen Dienst an), oder um einen Anruf weiterzuleiten, wenn Sie ein Telefonsystem verwenden.
- Page 110 Bedienung des Telefons 4.9 Tastatursperre Wenn die Tastatursperre aktiviert ist, haben die Tasten im Standby- Modus keine Funktion (mit Ausnahme der Tastatursperrtaste). Halten Sie die Tastatursperrtaste gedrückt. Das Symbol erscheint im Display. Die Tastatursperrtaste erneut gedrückt halten, um die Tastatursperre zu deaktivieren. Wenn die Tastatursperre aktiviert ist, können Sie trotzdem ankommende Anrufe annehmen, in dem Sie die Gespräch-annehmen-Taste drücken.
- Page 111 Bedienung des Telefons 4.12 Telefonbuch Sie können 50 Einträge im Telefonbuch speichern. Namen können bis zu 16 Zeichen und Telefonnummern bis zu 24 Ziffern lang sein. Einen Telefonbucheintrag hinzufügen Die Telefonbuch-Taste drücken. Drücken Sie zweimal die OK-Taste. Den Namen eingeben und bestätigen. Die gewünschte Telefonnummer eingeben und bestätigen.
- Page 112 Nochmals bestätigen oder zum Überspringen Esc- Taste drücken. 4.13 Anruferkennung ( CLIP Das Sologic B921 zeigt die Telefonnummer ankommender Anrufe an. Diese Funktion kann nur benutzt werden, wenn Sie sich für diesen Dienst bei Ihrem Netzanbieter angemeldet haben. Weitere Informationen erhalten Sie von Ihrem Netzanbieter.
- Page 113 Bedienung des Telefons Auf die Telefonbuchtaste drücken, um Datum und Uhrzeit zu überspringen. Die Nach-oben- bzw. die Nach-unten-Taste drücken, um die Liste zu durchblättern. Drücken Sie die Esc-Taste, um die Anrufliste zu verlassen. Eine Nummer aus der Anrufliste anrufen Die Taste für die Anrufliste drücken. Durchsuchen Sie die Anrufliste, bis die gewünschte Telefonnummer angezeigt wird.
- Page 114 Bedienung des Telefons „PB SPEICHERN“ (SAVE TO PB) wählen und bestätigen. Einen Namen ändern oder hinzufügen und dann bestätigen. Die Telefonnummer ändern und bestätigen. 4.14 Mobilteil auf die Standard-Einstellungen zurücksetzen Hierdurch werden alle Änderungen gelöscht und alle Voreinstellungen wiederhergestellt (Ruftonlautstärke, Ruftonmelodie, usw.). Außerdem werden dadurch die Anrufliste, die Wiederwahlliste und das Telefonbuch gelöscht! Die Menü/OK-Taste drücken.
- Page 115 Einstellungen der Basisstation 5 Einstellungen der Basisstation Info Dieser Abschitt beschreibt nur die in der Basisstation gespeicherten Einstellungen. 5.1 Rufton auswählen und Lautstärke einstellen Rufton des Mobilteils für interne/externe Anrufe Die Menü-/OK-Taste drücken. „BASIS“ (BASE) wählen und bestätigen. „RUFTON“ (RING TONE) wählen und bestätigen. Nun eine Ruftonmelodie (1 bis 9) wählen und bestätigen.
- Page 116 Sie müssen das Mobilteil nur anmelden, wenn: • das Mobilteil zuvor von dieser Basisstation abgemeldet wurde (z. B. zur erneuten Initialisierung). • Sie ein anderes Mobilteil an der Basisstation anmelden möchten. Die folgende Beschreibung gilt nur für Sologic B921 Mobilteile und Basisstationen.
- Page 117 Mobilteil erneut nach der Basisstation. Nachdem das Mobilteil angemeldet wurde, erscheinen der Name des Mobilteils und seine Nummer auf dem Display. 6.2 Ein Mobilteil von der Sologic B921 Basisstation abmelden. Die Menü/OK-Taste drücken. „MT ABMELDEN“ (DE-REGISTER) wählen und bestätigen.
- Page 118 Ein Mobilteil an- oder abmelden 6.3 Auswahl einer Basisstation Wenn Ihr Mobilteil an mehreren Basisstationen (max. 4) angemeldet ist, müssen Sie eine von diesen Basisstationen auswählen, da das Mobilteil zu einem Zeitpunkt immer nur mit einer Basisstation kommuniziert. Es gibt zwei Möglichkeiten: Automatische Auswahl Wenn Sie das Mobilteil auf automatische Auswahl einstellen, sucht sich das Mobilteil automatisch die nächste Basisstation im...
- Page 119 Anrufweiterleitung und interne Anrufe von einem Mobilteil zum anderen 7 Anrufweiterleitung und interne Anrufe von einem Mobilteil zum anderen 7.1 Anrufweiterleitung und Konferenzschaltung während eines externen Gesprächs Drücken Sie während eines externen Gesprächs die INT-Taste und anschließend die Nummer des Mobilteils (1-4).
- Page 120 Problembeseitigung Generic Access Profile; Schnittstelle zwischen Basisstation und Mobilteil, die die drahtlose Verbindung ermöglicht. Interner Teilnehmer. Weiteres Mobilteil oder Nebenstelle innerhalb einer Telefonanlage. Impulswahlverfahren; veraltetes, analoges Wahlverfahren („klackernde“ Wählgeräusche). Liquid Crystal Display; Flüssigkristallanzeige. Light Emitting Diode; Leuchtdiode. Mehrfrequenzwahlverfahren; modernes, digitales Wahlverfahren. Personal Identification Number.
- Page 121 Problembeseitigung Problem Mögliche Ursache Lösung Die Leitung ist von Warten, bis das einem anderen andere Mobilteil Mobilteil besetzt. aufgelegt wird. Der Anrufer ist zu Regeln Sie die leise. Lautstärke während des Gesprächs mit der Lautstärketaste. Der Rufton des Ruftonlautstärke Mobilteils ist zu einstellen.
- Page 122 Servicemaßnahmen Keine Veränderungen oder Reparaturen am Gerät vornehmen. Lassen Sie Reparaturen am Gerät oder am Kabel nur von einer Fachkraft des Service-Zentrums durchführen. Durch unsachgemäße Reparaturen können erhebliche Gefahren für den Benutzer entstehen. 10 Servicemaßnahmen 10.1 Wartung Das Gerät ist wartungsfrei. Prüfen Sie gelegentlich den Zustand der Akkus und tauschen Sie diese bei nachlassender Leistung oder beginnender Undichtigkeit gegen gleichartige neue Akkus aus.
- Page 123 Technische Daten Telefonbuchse der Basisstation. Ziehen Sie die Steckernetzgeräte der Basisstation sowie der Mobilteile aus den 230 V-Steckdosen. Entnehmen Sie die Akkus der Mobilteile. Bei längerer Außerbetriebnahme ersetzen Sie die Akkus bei Wiederinbetriebnahme durch gleichartige neue Akkus. Lagern Sie die Geräte und die Akkus an einem nicht zu warmen, trockenen Ort.
- Page 124 Senden Sie das fehlerhafte Gerät mit dem gültigen Kaufbeleg an ein Topcom Service-Zentrum. Tritt ein Gerätefehler innerhalb der Garantiezeit auf, übernimmt Topcom oder ein autorisiertes Service-Zentrum unentgeltlich die Reparatur jedes durch einen Material- oder Herstellungsfehler aufgetretenen Defekts mittels Reparatur oder Austausch des fehlerhaften Geräts oder von Teilen des fehlerhaften Geräts.
- Page 125 Topcom-Garantie Das ursprüngliche Kaufdatum bestimmt den Beginn der Garantiezeit. Die Garantiezeit verlängert sich nicht, wenn das Gerät von Topcom oder einem seiner autorisierten Service-Zentren ausgetauscht oder repariert wird. 12.3 Garantieausschlüsse Schäden oder Mängel, die durch unsachgemäße Handhabung oder unsachgemäßen Betrieb verursacht werden, sowie Defekte, die durch die Verwendung von Nicht-Originalteilen oder -zubehör entstehen,...
- Page 126 Guarde siempre este manual de usuario cerca del equipo. Guarde este manual de usuario en un lugar seguro y facilítelo a otros usuarios si es necesario. 1.1 Producto: Sologic B921 Este producto ha sido fabricado según el estándar de telecomunicación digital inalámbrica (DECT). La tecnología DECT se caracteriza por ofrecer una protección de alta seguridad frente a...
- Page 127 Información general modificaciones técnicas y sustanciales. 1.3 Símbolos y palabras de señalización Palabra de Símbolo Significado señalización Advertencia Advertencia de posible peligro de lesiones graves o de muerte en caso de inobservancia de esta información. Precaución Advertencia de posible peligro de lesiones leves en caso de inobservancia de esta información.
- Page 128 Instrucciones de seguridad 1 terminal inalámbrico con 2 pilas recargables (AAA, 1,2 V / 500 mAh, NiMH) y una tapa del compartimiento de las pilas 1 manual de usuario Advertencia Peligro de asfixia para los niños. Mantenga los plásticos de embalaje fuera del alcance de los niños.
- Page 129 Instrucciones de seguridad La reparación del dispositivo o del cable debe dejarse en manos de un especialista del centro de servicio. Las reparaciones que no se realizan correctamente pueden entrañar riesgos importantes para el usuario. • Los niños a menudo no son conscientes de los riesgos derivados de la manipulación de dispositivos eléctricos.
- Page 130 Instrucciones de seguridad Peligro de explosión: Advertencia Peligro de lesiones por explosión. Preste especial atención a los niños. • No tire nunca las pilas al fuego, ya sean desechables o recargables. • No use el dispositivo en lugares donde haya riesgo de explosiones.
- Page 131 Instrucciones de seguridad Posibles desperfectos: Precaución Es posible ocasionar desperfectos en el dispositivo. Observe las indicaciones de este manual de usuario. • Utilice únicamente los adaptadores de corriente facilitados. No use adaptadores de terceros, puesto que podrían provocar daños en las pilas recargables.
- Page 132 Primeros pasos 3 Primeros pasos 3.1 Cómo utilizar este manual de usuario En este manual de usuario, se utiliza el método que se indica a continuación para presentar las instrucciones de una forma clara: Texto... «Pantalla» (Display). Texto que aparece en la pantalla del teléfono Tecla que debe pulsarse 3.2 Instalación de la estación base Para instalar la estación base, siga estos pasos:...
- Page 133 Primeros pasos 3.3 Terminal Precaución Peligro de lesiones por explosión. Utilice solamente las pilas recargables suministradas o unas del mismo tipo. No utilice nunca pilas normales desechables. De lo contrario, el terminal inalámbrico podría resultar dañado. Abra el compartimento de las pilas tal y como se muestra en la figura 3B.
- Page 134 Primeros pasos 3.5 Teclas / Pantalla Terminal inalámbrico 1. Rellamada / Arriba 2. Agenda 3. Silencio / Borrar 4. Colgar 5. Teclas alfanuméricas 6. Bloqueo de teclas 7. Pausa 8. Activación / Desactivación de timbre ESC/ 9. Lista de llamadas / Abajo 10.Tecla de aceptación de llamadas / Manos libres / Llamar...
- Page 135 Llamada interna fuera de cobertura. 3.7 Navegación por el menú El sistema del menú del Sologic B921 es muy fácil de manejar. Cada menú consiste en una serie de opciones. Encontrará a continuación un resumen de los menús del terminal y la estación base.
- Page 136 Primeros pasos Terminal AGENDA TERMINAL TIMBRENOMB RE TERM TONO TECLA SELEC. BASE RESETEAR IDIOMA REGISTRAR TERMINAL DAR DE BAJA TERMINAL 3.8 Uso de las teclas alfanuméricas Puede utilizar las teclas alfanuméricas para introducir texto. Pulse la tecla alfanumérica correspondiente para seleccionar una letra .
- Page 137 Uso del teléfono 4 Uso del teléfono 4.1 Cambio del idioma Pulse la tecla Menú / OK. Seleccione «TERMINAL» (HANDSET) y confirme la selección. Seleccione «IDIOMA» (LANGUAGE) y confirme la selección. Seleccione el idioma deseado y confirme la selección. Pulse la tecla ESC para regresar al modo de espera.
- Page 138 Uso del teléfono Volver a llamar a uno de los 3 últimos números marcados Pulse la tecla de rellamada. Aparecerá en la pantalla el último número marcado. Si desea volver a llamar a uno de los 3 últimos números marcados, siga pulsando la tecla de rellamada hasta que aparezca el número que desea en la pantalla.
- Page 139 Uso del teléfono Pulse la tecla de silencio. El micrófono queda silenciado y aparece «MUTE ACT» (MUTED) en pantalla. Vuelva a pulsar la tecla de silencio para activar el micrófono de nuevo. 4.6 Ajuste del volumen del auricular / manos libres Durante la llamada: Pulse la tecla abajo.
- Page 140 Uso del teléfono Volumen del timbre del terminal Pulse la tecla Menú / OK. Seleccione «TERMINAL» (HANDSET) y confirme la selección. Seleccione «TIMBRE» (RING TONE) y confirme la selección. Seleccione «VOLUMEN» (VOLUME) y confirme la selección. Seleccione el volumen deseado (desactivado, 1-5) y confirme la selección.
- Page 141 Uso del teléfono Seleccione «HANDSET NAME» y confirme la selección. Borre el nombre anterior con la tecla de silencio e introduzca uno nuevo. Pulse la opción para confirmar. Pulse la tecla ESC para regresar al modo de espera. 4.11 Activación / desactivación del tono de las teclas Pulse la tecla Menú...
- Page 142 Uso del teléfono Pulse la tecla Agenda para ver el número de teléfono. Pulse ahora la tecla de llamada. El número de teléfono se marca automáticamente. Pulse la tecla de colgar para finalizar la llamada. Editar una entrada de la agenda Pulse la tecla Agenda.
- Page 143 Uso del teléfono 4.13 Identificación de llamada ( CLIP El Sologic B921 muestra en pantalla los números de teléfono desde los que se realizan las llamadas entrantes. Esta función solo está disponible si tiene contratado este servicio con su operador de telefonía.
- Page 144 Uso del teléfono Eliminar un número de la lista de llamadas Pulse la tecla de lista de llamadas. Desplácese por la lista de llamadas hasta que aparezca el número de teléfono deseado. Pulse la tecla Menú / OK. Seleccione «BORRAR» (DELETE) para borrar el número de teléfono actual y confirme la selección.
- Page 145 Config. base (Base settings) El dispositivo vuelve al modo en espera. Los ajustes predeterminados son: Nombre del terminal TERMINAL Volumen del auricular Nivel 3 Volumen del timbre Nivel 3 Timbre externo Timbre 8 Timbre interno Timbre 1 Tono de las teclas Activado 4.15 Indicador de buzón de voz Este indicador solo funciona si tiene habilitado un servicio de buzón de...
- Page 146 Config. base (Base settings) Seleccione «VOLUMEN» (RING VOLUME) y confirme la selección. Seleccione el volumen deseado (desactivado, 1-5) y confirme la selección. 5.2 Ajuste del modo de marcación Hay dos modos de marcación para las conexiones telefónicas: - DTMF / Marcación por tonos (la más empleada) - Marcación por pulsos (sólo necesaria si el dispositivo se utiliza en una instalación antigua) Pulse la tecla Menú...
- Page 147 • desea registrar otro terminal a la estación base. La descripción que se presenta a continuación corresponde únicamente a los terminales y las estaciones base Sologic B921. Mantenga pulsada la tecla de búsqueda de la estación base durante 10 segundos.
- Page 148 Una vez que se haya registrado el terminal, su nombre y número aparecerán en pantalla. 6.2 Baja de un terminal de la estación base Sologic B921 Pulse la tecla Menú / OK. Seleccione "ELIM PORT" (DE-REGISTER) y confirme la selección.
- Page 149 Transferencia de llamadas y llamadas internas de un terminal a otro Seleccione «AUTO» y confirme la selección. Información Si la selección automática de estación base está activada, y el terminal sale de la cobertura de la estación base seleccionada, este buscará solo una estación base con la señal más fuerte que se encuentre en modo de espera (no durante una llamada en curso).
- Page 150 Abreviaturas y términos técnicos Mantenga pulsada la tecla INT durante 3 segundos. De esta forma, podrá hablar con el segundo terminal y con la llamada externa al mismo tiempo (teleconferencia). Pulse de nuevo la tecla INT para volver a la llamada externa.
- Page 151 Solución de problemas DTMF Dual Tone Multiple Frequency; marcación multifrecuencia, moderno procedimiento de marcación digital. Personal Identification Number; número de identificación personal. Tecla R Tecla de rellamada (véase tecla Flash). En espera «Estado de reposo» de un dispositivo sin que esté completamente apagado.
- Page 152 Servicio Problema Posible causa Solución Parpadea el símbolo El terminal está fuera Mueva el terminal de cobertura. dentro del alcance de la estación base. La estación base no Compruebe el recibe alimentación. adaptador de corriente y el cable. El terminal no está Registre el terminal en registrado en la la base.
- Page 153 Servicio En caso de que el dispositivo haya entrado en contacto con líquido, extraiga las pilas de inmediato, desenchúfelo de la alimentación (estación base) y séquelo detenidamente. Compruebe su funcionamiento después de dejarlo secar entre 2 y 3 días. En caso de defectos, envíelo al servicio técnico. 10.2 Limpieza Advertencia Peligro de descarga eléctrica o cortocircuito por contacto con componentes con conductividad...
- Page 154 Datos técnicos electrónicos. Esto permitirá el reciclaje de algunos de los materiales del producto. El reciclaje de piezas o de materias primas de los productos usados ayuda a proteger el medio ambiente. Deseche el material de embalaje de forma respetuosa con el medio ambiente.
- Page 155 12 Garantía Topcom 12.1 Período de garantía Las unidades de Topcom tienen un período de garantía de 24 meses. El período de garantía entra en vigor el día en que se adquiere la nueva unidad. No existe ninguna garantía sobre las pilas estándar o recargables (tipo AA / AAA).
- Page 156 Garantía Topcom La garantía no será válida si el número de serie de las unidades se cambia, se elimina o resulta ilegible. Cualquier reclamación de la garantía se invalidará si la unidad ha sido reparada, alterada o modificada por el comprador.
- Page 157 Förvara alltid handboken i närheten av enheten. Förvara denna användarhandbok på ett säkert ställe och se till att nästa ägare får tillgång till den vid behov. 1.1 Produkten: Sologic B921 Denna produkt har tillverkats i enlighet med den vedertagna digitalstandarden för sladdlösa telefoner (DECT). DECT-teknik håller hög säkerhetsnivå...
- Page 158 Allmän information 1.3 Signalord och symboler Symbol Signalord Betydelse Varning Varning som visar på risker för allvarliga personskador eller dödsfall om du inte följer denna information. Försiktighet Varning som visar på risker för mindre personskador om du inte följer denna information.
- Page 159 Säkerhetsföreskrifter Viktigt! Kassera förpackningsmaterialet på ett miljövänligt sätt. 2 Säkerhetsföreskrifter Följande grundläggande säkerhetsanvisningar måste alltid följas när elektrisk utrustning används. Läs noga följande säkerhetsanvisningar och detaljer om korrekt an- vändning av apparaten. Bekanta dig med enhetens alla funktioner. För- vara denna användarhandbok på ett säkert ställe nära enheten och kom ihåg att överlämna den till eventuell nästa ägare av systemet.
- Page 160 Säkerhetsföreskrifter • Använd inte apparaten i fuktiga miljöer (t.ex. badrum) eller i mycket dammiga miljöer. • Apparater som är anslutna till elnätet kan skadas vid åska. Koppla därför alltid ur apparaten vid åska. • Adaptern måste vara helt utdragen ur eluttaget för att apparaten ska vara bortkopplad från strömförsörjningen.
- Page 161 Säkerhetsföreskrifter Kvävningsrisk: Varning Risk för skador på grund av kvävning! Var särskilt försiktig i närheten av barn! • Förvara plasten i förpackningen utom räckhåll för barn. • Var uppmärksam på eventuella risker för mindre barn (strypningsfara) om du använder förlängningssladdar. Fel: Varning Möjlig risk för skada på...
- Page 162 De första stegen 2.1 Information om funktionen för reducerad strålning Den här sladdlösa telefonen (som uppfyller DECT-standarden) har en lågeffektsfunktion för reducerad strålning (ECO-läge). Vid samtal minskas handenhetens radiofrekventa strålning, beroende på avståndet till basenheten. När inget samtal pågår, reduceras den radiofrekventa strålningen från handenheten till ett minimum.
- Page 163 De första stegen - 3A Basenhet - A. Telefonjack B. Nätadapter med sladd C. Telefonsladd 3.3 Handenhet Försiktighet Risk för skador på grund av explosion! Använd endast de medföljande uppladdningsbara batterierna eller batterier av samma typ. Använd inte vanliga batterier! Annars kan den sladdlösa handenheten skadas.
- Page 164 De första stegen 3.4 Batteristatusindikator Handenheten slutar fungera när batterierna är urladdade. Om batterierna är helt urladdade och du placerar handenheten i basenheten under endast en kort tid, visar batteristatusindikatorn att batterierna är fulladdade. Det är de dock inte och batteriprestandan kommer snabbt att försämras.
- Page 165 De första stegen Basenhet 15.Sök 16.Laddningslampa för handenhet 17.Lysdiod, samtal - 3D Basenhet - 3.6 Handenhetens display HANDENHET x = handenhetens nummer (HANDSET) X Andra nummer eller bläddra Andra nummer eller bläddra åt vänster genom menyn åt höger genom menyn Hitta eller skapa nya poster Batteristatusindikator i telefonboken...
- Page 166 De första stegen 3.7 Navigera i menyn Sologic B921 har ett menysystem som är lätt att använda. I varje meny finns en lista med alternativ. En sammanfattning av handenhetens och basenhetens menyer finns nedan. Tryck på knappen Meny/OK för att öppna huvudmenyn.
- Page 167 Använda telefonen Teckentabell Mellanslag+ - / 1 A B C 2 D E F 3 G H I 4 J K L 5 M N O 6 P Q R S 7 T U V 8 W X Y Z 9 4 Använda telefonen 4.1 Byta språk Tryck på...
- Page 168 Använda telefonen Tryck på Ring-knappen. Telefonnumret rings upp automatiskt. Tryck på knappen "lägg på" för att avsluta samtalet. Ring upp det senast uppringda telefonnumret Tryck på Ring-knappen. Tryck på återuppringningsknappen. Det senast uppringda telefonnumret rings upp automatiskt. Tryck på knappen "lägg på" för att avsluta samtalet. Återuppringning av ett av de 3 senast slagna telefonnumren Tryck på...
- Page 169 Använda telefonen Tryck på handsfreeknappen igen för att koppla tillbaka samtalet till handenheten. Viktigt! Batterierna laddas ur snabbare om du använder handsfreeläget under lång tid. 4.5 Stäng ljud (Mute) Du kan stänga av mikrofonen under ett pågående samtal så att du kan prata utan att personen i andra änden av telefonlinjen hör.
- Page 170 Använda telefonen Välj "RINGSIGNAL" (RING TONE) och bekräfta. Välj "INTERN" (INTERNAL) eller "EXTERN" (EXTERNAL) och bekräfta. Välj en ringsignal (1 till 9) och bekräfta. Handenhetens ringvolym Tryck på knappen Meny/OK. Välj "HANDENHET" (HANDSET) och bekräfta. Välj "RINGSIGNAL" (RING TONE) och bekräfta. Välj "VOLUM"...
- Page 171 Använda telefonen Välj "HANDENHETNAM" (HANDSET NAME) och bekräfta. Ta bort det befintliga namnet med hjälp av Ljud av-knappen och skriv in det nya namnet. Tryck för att bekräfta. Tryck på Escape-knappen för att återgå till vänteläget. 4.11 Aktivera/avaktivera knappljud Tryck på knappen Meny/OK. Välj "HANDENHET"...
- Page 172 Bekräfta igen eller tryck på Escape-knappen för att hoppa över. 4.13 Nummerpresentation ( CLIP Sologic B921 visar telefonnumren för de inkommande samtalen. Denna funktion kan endast användas om du har registrerats för tjänsten hos din telefonileverantör. Kontakta din telefonileverantör för mer information.
- Page 173 Använda telefonen Om telefonnumret är längre än 12 siffror kan du bläddra åt höger på displayen för att visa resten av siffrorna. Nya samtal När det finns ett nytt obesvarat samtal i samtalslistan kommer symbolen CLIP att blinka på displayen. Öppna samtalslistan Tryck på...
- Page 174 Använda telefonen Välj "RADERA" (DELETE) för att radera det aktuella numret. ELLER Välj "RADERA ALLA" (DELETE ALL) för att radera alla telefonboksposter och bekräfta. Tryck för att bekräfta eller Escape-knappen för att gå tillbaka. Spara ett nummer från samtalslistan som snabbnummer Tryck på...
- Page 175 Basenhetsinställningar 4.15 Telefonsvararvisning Den här indikeringen fungerar enbart om du har aktiverat röstmeddelande- eller telefonsvarartjänsten och om din telefonoperatör sänder denna information tillsammans med nummerpresentationen. När du får ett nytt meddelande i inkorgen för röstmeddelanden visas symbolen på displayen. Symbolen försvinner när du har lyssnat på...
- Page 176 Välj sedan "LÅNG" (LONG) eller "KORT" (SHORT) och bekräfta. 6 Registrera och avregistrera en handenhet 6.1 Registrera handenheten på basenheten Sologic B921 Du kan registrera upp till 4 handenheter på en basenhet. Alla handenheter är redan registrerade på basenheten vid leverans.
- Page 177 När handenheten väl har registrerats visas dess namn och nummer på displayen. 6.2 Avregistrera en handenhet från basenheten Sologic B921 Tryck på knappen Meny/OK. Välj "TA BORT HE" (DE-REGISTER) och bekräfta. Ange basenhetens PIN-kod (0000 som standard).
- Page 178 Vidarekoppla och ringa interna samtal från en handenhet till en annan Välj "VÄLJ BASENH" (SELECT BASE) och bekräfta. Välj "AUTO" och bekräfta. Info När du har aktiverat automatiskt basenhetsval och handenheten är utom räckvidd för nuvarande basenhet, kommer handenheten bara att leta efter den starkaste basenheten i vänteläge (inte under samtal).
- Page 179 Förkortningar och tekniska termer Håll knappen INT nedtryckt i 3 sekunder. Nu kan du tala med den andra handenheten och den externa linjen samtidigt (konferenssamtal). Tryck på INT-knappen igen för att återgå till det externa samtalet. Tryck på knappen "lägg på" för att avsluta samtalet. 8 Förkortningar och tekniska termer CLIP Med nummerpresentation (Calling Line Identification Presentation –...
- Page 180 Felsökning R-knappen Återuppringningsknappen (se pausknappen). Twin (tvilling) Avser en enhet med två identiska enheter, t.ex. två handenheter. Viloläge "Vilostatus" för en enhet utan att den är helt avstängd. 9 Felsökning Problem Möjlig orsak Lösning Inget syns på Batterierna är inte Kontrollera att båda displayen laddade...
- Page 181 Skötsel Problem Möjlig orsak Lösning Handenheten är inte Registrera registrerad på handenheten på basenheten basenheten Basenheten eller Ringvolymen är Ställ in ringvolymen handenheten avstängd eller för låg ringer inte Ett samtal kan inte Paustiden är för kort Ställ in enheten på vidarekopplas till ett lång paustid annat nummer...
- Page 182 Skötsel 10.2 Rengöring Varning Risk för elektriska stötar eller kortslutning på grund av kontakt med strömförande delar. Se till att vätska inte tränger in i apparaten. Om detta skulle inträffa ska du koppla ur adaptern ur eluttaget och kontakten till telefonsladden ur telefonjacket och ta ut batterierna.
- Page 183 Tekniska specifikationer 11 Tekniska specifikationer Telefonstandard DECT(Digital Enhanced Cordless Telecommunications) GAP ( Generic Access Profile ) Frekvensomfång 1 880 MHz till 1 900 MHz Emission 10 mW (genomsnittlig uteffekt per kanal) Räckvidd Upp till 300 m i öppen terräng och upp till 50 m i byggnader Handenhetens batterier: 2 x 1,2 V, 600 mAh, typ AAA,...
- Page 184 Vid utbyte kan den nya produktens färg och modell skilja sig från den ursprungligen inköpta produktens. Garantiperioden inleds på det ursprungliga inköpsdatumet, och perioden förlängs inte om enheten byts ut eller repareras av Topcom eller något av dess förordnade servicecenter. 12.3 Undantag från garantin Skador eller defekter som har orsakats av felaktig behandling eller användning, och skador som har uppkommit till följd av användning...
- Page 185 Conservare con cura queste istruzioni d'uso e prendersi cura di fornirle, se necessario, ad altri utenti dell'apparecchio. 1.1 Il prodotto: Sologic B921 Questo articolo è prodotto conformemente allo standard digitale per la telefonia wireless (DECT). La tecnologia DECT è caratterizzata da un'elevata sicurezza contro le intercettazioni e da una trasmissione digitale della comunicazione di elevata qualità.
- Page 186 Informazioni generali 1.3 Parole di segnalazione e simboli Simbolo Parola di Significato segnalazio Avviso Avviso di possibile ferita grave ovvero pericolo di morte in caso di inosservanza. Attenzione Avviso di pericolo di possibile ferita lieve in caso di inosservanza. senza Attenzione Pericolo di danni alle cose o all'ambiente.
- Page 187 Disposizioni di sicurezza Avviso Pericolo di soffocamento per bambini! Tenere le pellicole del pacco fuori dalla portata dei bambini. Importante Provvedere al corretto smaltimento del materiale del pacco! 2 Disposizioni di sicurezza Quando si mettono in funzione degli apparecchi elettrici, le seguenti disposizioni di sicurezza fondamentali devono essere assolutamente rispettate in ogni caso.
- Page 188 Disposizioni di sicurezza • Non apportare modifiche o riparazioni all'apparecchio. Lasciar effettuare le riparazioni dell'apparecchio o del cavo solo a personale esperto del centro servizi. Le riparazioni inappropriate possono causare dei seri pericoli per l'utente. • I bambini spesso sottovalutano i pericoli che incorrono nell'uso di apparecchiature elettriche.
- Page 189 Disposizioni di sicurezza Pericolo di esplosione: Avviso Pericolo di ferita a causa di esplosioni! Prestare particolare attenzione ai bambini! • Non gettare mai nel fuoco le batterie e gli accumulatori. • Non applicare mai l'apparecchio in ambienti a rischio di esplosione! Pericolo di avvelenamento: Avviso Pericolo di avvelenamento!
- Page 190 Operazioni iniziali • Utilizzare esclusivamente gli alimentatori di rete a spina forniti in dotazione con l'apparecchio. Non utilizzare mai alimentatori di rete a spina diversi da quelli in dotazione, in quanto questi potrebbero danneggiare le batterie. • La presa a cui collegare l'alimentatore di rete a spina deve trovarsi nei pressi dell'apparecchio ed essere facilmente accessibile.
- Page 191 Operazioni iniziali 3.2 Installazione della stazione di base Installare la stazione di base come indicato di seguito: Collegare l'adattatore di rete prima alla stazione di base e successivamente ad una presa. Collegare un'estremità del cavo telefonico alla presa telefonica a parete e l'altra estremità alla presa sul lato posteriore della stazione di base.
- Page 192 Operazioni iniziali Aprire il vano batterie come illustrato nell'immagine 3B. Inserire le batterie. Prestare attenzione alla corretta polarità (+ e -). Chiudere il vano batterie. Lasciare il portatile in stazione di ricarica per 16 ore. Il LED di ricarica sulla stazione di ricarica si accende. - 3B lato posteriore del telefono portatile - A.Coperchio...
- Page 193 Operazioni iniziali 3.5 Tasti/display Telefono portatile 1. Ripetizione di chiamata / freccia in alto 2. Rubrica del telefono 3. Disattiva microfono / Elimina 4. Riaggancia 5. Tasti alfanumerici 6. Blocco tastiera 7. Pausa 8. Suoneria ACCESA/ ESC/ SPENTA 9. Registro chiamate / Freccia in basso 10.Accetta chiamata / Vivavoce / Tasto chiamata...
- Page 194 3.7 Navigazione menu Il telefono Sologic B921 dispone di una struttura menu di semplice utilizzo. Ogni menu è composto da una serie di opzioni. Di seguito è illustrata una panoramica dei menu del portatile e della base.
- Page 195 Operazioni iniziali Portatile RUBRICA DEL TELEFONO PORTATILE SUONERIA NOME PORTATILE TONI TASTIERA SELEZ. BASE RESET LINGUA REGISTRA PT. RIMUOVI PT. 3.8 Utilizzo della tastiera alfanumerica Attraverso i tasti alfanumerici è possibile digitare un testo. Per selezionare una lettera premere il tasto alfanumerico corrispondente .
- Page 196 Utilizzo del telefono 4 Utilizzo del telefono 4.1 Modifica della lingua Premere menu/tasto OK. Selezionare„PORTATILE“ (HANDSET) e confermare. Selezionare „LINGUA“ (LANGUAGE) e confermare. Selezionare la lingua desiderata e confermare la selezione. Premere il tasto Esc per tornare alla modalità standby. 4.2 Chiamate in uscita Effettuare una telefonata Premere il tasto di chiamata.
- Page 197 Utilizzo del telefono L'ultimo numero chiamato viene selezionato automaticamente. Premere il tasto di fine chiamata per terminare la conversazione. Selezionare uno degli ultimi 3 numeri chiamati Premere il tasto di ripetizione di chiamata. L'ultimo numero selezionato viene visualizzato sul display. Per selezionare uno degli ultimi 3 numeri chiamati, premere più...
- Page 198 Utilizzo del telefono Importante Se si utilizza la funzione vivavoce per un periodo prolungato, le batterie si scaricano più rapidamente! 4.5 Disattivazione microfono Durante una conversazione è possibile disattivare il microfono, in modo da poter parlare senza essere ascoltati dalla persona dall'altra parte della linea.
- Page 199 Utilizzo del telefono Selezionare„SUONERIA“ (RING TONE) e confermare. Selezionare„INTERNO“ (INTERNAL) oppure „ESTERNO“ (EXTERNAL) e confermare. Ora selezionare una suoneria (da 1 a 9) e confermare. Volume suoneria del portatile Premere menu/tasto OK. Selezionare„PORTATILE“ (HANDSET) e confermare. Selezionare„SUONERIA“ (RING TONE) e confermare.
- Page 200 Utilizzo del telefono 4.10 Nome del portatile E' possibile modificare il nome visualizzato sul display (max. 12 caratteri), quando non è in corso alcuna conversazione: Premere menu/tasto OK. Selezionare„PORTATILE“ (HANDSET) e confermare. Selezionare„NOME“ (HANDSET NAME) e confermare. Cancellare il nome precedente con il tasto di disattivazione microfono e inserire un nuovo nome.
- Page 201 Utilizzo del telefono Inserire il numero di telefono desiderato e confermare. Ora l'apparecchio emette un tono di conferma. Selezionare un numero di selezione rapida Premere il tasto rubrica del telefono. Scorrere fino al nome desiderato oppure inserire la prima lettera del nome. Premere il tasto rubrica per visualizzare il numero di telefono.
- Page 202 Esc per ignorare la funzione. 4.13 Riconoscimento chiamate ( CLIP Il telefono Sologic B921 permette di visualizzare i numeri delle chiamate in arrivo. Per poter utilizzare questa funzione è necessario richiedere l'abilitazione del servizio presso il proprio operatore di rete.
- Page 203 Utilizzo del telefono Chiamare un numero del registro chiamate Premere il tasto del registro chiamate. Cercare all'interno del registro chiamate il numero telefonico desiderato. Premere il tasto di chiamata per iniziare la conversazione. Il numero telefonico viene selezionato automaticamente. Premere il tasto di fine chiamata per terminare la conversazione.
- Page 204 Utilizzo del telefono 4.14 Ritornare alle impostazioni di default del portatile Con questa funzione vengono cancellate tutte le modifiche e vengono ristabilite tutte le impostazioni di default (volume suoneria, melodia, ecc.) Inoltre viene cancellato il registro chiamate, l'elenco di riselezione e la rubrica! Premere menu/tasto OK.
- Page 205 Impostaz base 5 Impostaz base Info Questa sezione descrive solo le impostazioni archiviate nella stazione base. 5.1 Selezione della suoneria e impostazione del volume Suoneria del portatile per chiamate interne/esterne Premere menu/tasto OK. Selezionare„BASE“ (BASE) e confermare. Selezionare „SUONERIA“ (RING TONE) e confermare.
- Page 206 6 Registrazione o disattivazione di un portatile 6.1 Registrare un portatile sulla stazione di base Sologic B921 Su ogni stazione di base è possibile registrare fino a 4 portatili. Al momento dell'acquisto ogni portatile è già registrato sulla stazione di base.
- Page 207 Registrazione o disattivazione di un portatile La seguente descrizione si riferisce ai telefoni portatili e alle stazioni di base Sologic B921. Tenere premuto il tasto paging sulla stazione di base per 10 secondi. Premere menu/tasto OK sul portatile. Selezionare„REGISTRA“ (REGISTER) e confermare.
- Page 208 Registrazione o disattivazione di un portatile 6.3 Selezione di una stazione di base Se il telefono portatile è registrato presso più stazioni di base (max. 4), è necessario selezionare una stazione di base poiché il telefono comunica sempre e solo con una stazione di base alla volta. Esistono due possibilità: Selezione automatica Impostando il portatile su ‘Selezione automatica’, il telefono cerca...
- Page 209 Inoltro chiamata e chiamate interne da un portatile all'altro 7 Inoltro chiamata e chiamate interne da un portatile all'altro 7.1 Inoltro chiamata e conferenza telefonica durante una conversazione esterna Durante una conversazione esterna premere il tasto INT e successivamente il numero del portatile (1-4).
- Page 210 Risoluzione problemi Generic Access Profile; Interfaccia tra la stazione di base e il portatile che permette il collegamento senza fili. Utente interno. Ulteriore portatile o postazione all'interno di un impianto telefonico. Selezione a impulsi; vecchia selezione analogica (selezione rumorosa "scrosciante"). Liquid Crystal Display, display a cristalli liquidi.
- Page 211 Risoluzione problemi Problema Possibili cause Soluzione La linea è occupata da Attendere che l'altro un altro portatile. portatile venga riagganciato. La voce Regolare il volume dell'interlocutore è durante la troppo bassa. conversazione con il tasto del volume. La suoneria del Impostare il volume portatile è...
- Page 212 Misure di assistenza tecnica Non apportare modifiche o riparazioni all'apparecchio. Lasciar effettuare le riparazioni dell'apparecchio o del cavo solo a personale esperto del centro servizi. Le riparazioni inappropriate possono causare dei seri pericoli per l'utente. 10 Misure di assistenza tecnica 10.1 Manutenzione L'apparecchio non richiede manutenzione.
- Page 213 Dati tecnici 10.3 Messa fuori servizio e conservazione Se si mette provvisoriamente fuori servizio l'apparecchio, togliere il cavo telefonico dalla presa a muro e dalla presa dal telefono della stazione di base. Togliere gli alimentatori di rete a spina della stazione di base e dei portatili dalle prese a 230 V.
- Page 214 12 Garanzia Topcom 12.1 Periodo di garanzia Le unità Topcom sono coperte da una garanzia di 24 mesi. Il periodo di garanzia decorre dal giorno d'acquisto della nuova unità. Non esiste alcuna garanzia su batterie standard o ricaricabili (tipo AA/AAA).
- Page 215 La data d'acquisto iniziale determina l'inizio del periodo di garanzia. Il periodo di garanzia non sarà esteso se l'unità viene sostituita o riparata da Topcom o dai suoi centri di assistenza autorizzati. 12.3 Decadenza della garanzia Si intendono esclusi dalla garanzia tutti i danni o i guasti dovuti a una cattiva manutenzione o a un errato utilizzo dell'apparecchio, nonché...
- Page 216 Guarde cuidadosamente este manual de instruções e, se necessário, transmita-o a outros utilizadores. 1.1 O produto: Sologic B921 Este produto foi fabricado em conformidade com a norma para telecomunicações digitais europeias sem fios (DECT). A tecnologia DECT caracteriza-se por uma elevada segurança relativamente a escutas, bem como uma transmissão digital de alta qualidade.
- Page 217 Generalidades dados e redes de dados), bem como alterações técnicas e de conteúdo, são reservados. 1.3 Palavras de sinalização e símbolos Símbolo Palavra de Significado sinalização Aviso Aviso de possível perigo de lesão grave ou de vida em caso de não observância. Cuidado Aviso de possível perigo de lesão ligeira em caso de não observância.
- Page 218 Avisos de segurança 1 telefone portátil, incl. 2 pilhas recarregáveis (tipo AAA, 1,2 V / 500 mAh, NiMH), bem como uma tampa do compartimento das pilhas 1 manual de instruções Aviso Perigo de asfixia para crianças! Mantenha as películas de embalagem fora do alcance das crianças.
- Page 219 Avisos de segurança • Não efectue pessoalmente modificações ou reparações no aparelho. As reparações do aparelho ou do cabo apenas devem ser efectuadas por um especialista do centro de assistência. As reparações inadequadas podem causar perigos consideráveis para o utilizador. •...
- Page 220 Avisos de segurança Perigo de explosão: Aviso Perigo de lesão devido a explosão! Preste especial atenção às crianças! • Nunca coloque as pilhas ou pilhas recarregáveis no fogo. • Não utilize o aparelho em ambientes que apresentem risco de explosão! Perigo de intoxicação: Aviso Perigo de lesão devido a intoxicação!
- Page 221 Primeiros passos Possíveis danos: Cuidado Possível dano no aparelho! Observe as notas deste manual de instruções. • Utilize apenas as fontes de alimentação fornecidas. Não utilize fontes de alimentação diferentes, caso contrário, as pilhas recarregáveis poderão ficar danificadas. • A tomada para ligar a fonte de alimentação deve estar próxima do respectivo aparelho e ser de fácil acesso.
- Page 222 Primeiros passos Texto ..„Visor“. Texto apresentado no visor do telefone Tecla a premir 3.2 Instalar a estação de base Instale a estação de base da seguinte forma: Ligue o adaptador de rede primeiro à estação de base e depois a uma tomada.
- Page 223 Primeiros passos Abra o compartimento das pilhas conforme mostrado na figura Insira as pilhas recarregáveis. Observe, se a polaridade está correcta (+ e -). Feche o compartimento das pilhas. Carregue o telefone portátil durante 16 horas na estação de carregamento. O LED de carregamento na estação de carregamento acende.
- Page 224 Primeiros passos 3.5 Teclas/visor Telefone portátil sem fios 1. Remarcação / Para cima 2. Lista telefónica 3. Silenciar / Eliminar 4. Terminar chamada 5. Teclas alfanuméricas 6. Bloqueio de teclado 7. Pausa 8. Toque ACTIVAR/ DESACTIVAR ESC/ 9. Lista de chamadas / Para baixo 10.Atender chamada / Mãos- livres / Tecla de chamada...
- Page 225 3.7 Navegar no menu O Sologic B921 dispõe de um sistema de menu simples de utilizar. Cada menu é composto por uma série de opções. A seguir, encontra- se uma síntese dos menus do telefone portátil e da base.
- Page 226 Primeiros passos Telefone portátil PHONEBOOK HANDSET RING TONE HANDSET NAME KEYPAD BEEP SELECT BASE RESET LANGUAGE REGISTER DE-REGISTER 3.8 Utilizar as teclas alfanuméricas É possível introduzir texto através das teclas alfanuméricas. Para seleccionar uma letra, prima a tecla alfanumérica correspondente Se premir p.
- Page 227 Utilização do telefone 4 Utilização do telefone 4.1 Alterar o idioma Prima a tecla Menu/OK. Seleccione „HANDSET“ e confirme. Seleccione „LANGUAGE“ e confirme. Seleccione o idioma pretendido e confirme a selecção. Prima a tecla Sair, para voltar ao modo de standby. 4.2 Chamadas de saída Efectuar uma chamada Prima a tecla de chamada.
- Page 228 Utilização do telefone Marcar novamente um dos últimos 3 números marcados Prima a tecla de remarcação. O último número marcado será apresentado no visor. Para marcar novamente um dos últimos 3 números marcados, prima várias vezes a tecla de remarcação, até que seja apresentado no visor o número pretendido.
- Page 229 Utilização do telefone 4.5 Silêncio O microfone pode ser silenciado durante uma chamada, para que possa falar, sem que a pessoa do outro lado da linha o ouça. Prima a tecla de silêncio. O microfone está silenciado e é apresentado „MUTED“...
- Page 230 Utilização do telefone Volume do toque do telefone portátil Prima a tecla Menu/OK. Seleccione „HANDSET“ e confirme. Seleccione „RING TONE“ e confirme. Seleccione „VOLUME“ e confirme. Seleccione o volume pretendido (desactivado, 1-5) e confirme. Importante É possível ACTIVAR ou DESACTIVAR o volume do toque de cada telefone portátil individual, mantendo premida a tecla Toque ACTIVAR/ DESACTIVAR...
- Page 231 Utilização do telefone Elimine o nome anterior com a tecla de silêncio e introduza um nome novo. Prima OK para confirmar. Prima a tecla Sair, para voltar ao modo de standby. 4.11 Activar/desactivar o tom das teclas Prima a tecla Menu/OK. Seleccione „HANDSET“...
- Page 232 4.13 Identificação de chamadas ( CLIP O Sologic B921 apresenta o número de telefone das chamadas recebidas. Esta função apenas pode ser utilizada, caso esteja registado nesse serviço junto do operador de rede. Poderá obter mais informações, junto do seu operador de rede.
- Page 233 Utilização do telefone Se o número de telefone tiver mais de 12 dígitos, poderá avançar no visor para a direita, para visualizar os dígitos restantes. Novas chamadas Se existir uma nova chamada na lista de chamadas, o símbolo CLIP fica intermitente no visor. Chamar a lista de chamadas Prima a tecla para a lista de chamadas.
- Page 234 Utilização do telefone Seleccione „DELETE“, para eliminar o número de telefone actual, e confirme. Seleccione „DELETE ALL“, para eliminar todas as entradas da lista telefónica, e confirme. Prima OK para confirmar ou a tecla Sair para voltar para trás. Guardar um número da lista de chamadas como número de marcação rápida Prima a tecla para a lista de chamadas.
- Page 235 Configurações da base Toque interno Toque 1 Tom das teclas Activado 4.15 Indicador de mensagem de voz Esta indicação funciona apenas se o serviço de mensagens de voz ou de mensagens telefónicas estiver activado e o seu operador de telefone transmitir esta informação juntamente com a identificação de chamadas! Se receber uma nova mensagem na caixa de mensagens de voz, é...
- Page 236 Configurações da base Prima a tecla Menu/OK. Seleccione „BASE“ e confirme. Seleccione „DIAL MODE“ e confirme. Seleccione „TONE“ ou „PULSE“ e confirme. 5.3 Definir o número PIN Determinadas funções apenas estão disponíveis, se souber o número PIN da estação de base. O número PIN tem 4 caracteres.
- Page 237 (p. ex. para reiniciar). • pretenda registar outro telefone portátil na estação de base. A seguinte descrição é válida apenas para estações de base e telefones portáteis Sologic B921. Mantenha a tecla de paging da estação de base premida durante 10 segundos.
- Page 238 Registar ou cancelar o registo de um telefone portátil Introduza o número interno do telefone portátil, do qual pretende cancelar o registo (1-4), e confirme. Depois que o registo do telefone portátil tenha sido cancelado com êxito, o telefone volta ao modo de standby.
- Page 239 Reencaminhamento de chamadas e chamadas internas de um telefone portátil para outro Seleccione „MANUAL“ e confirme. Seleccione a estação de base e confirme. Importante Para que possa seleccionar uma estação de base, é necessário que o telefone portátil esteja registado na estação de base em questão. 7 Reencaminhamento de chamadas e chamadas internas de um telefone portátil para outro 7.1 Reencaminhamento de chamadas e teleconferência...
- Page 240 Abreviaturas e termos técnicos Modo ECO Modo económico; modo de funcionamento de baixa radiação na área da telefonia DECT. Tecla Rechamada Provoca uma curta interrupção da ligação, activando características como chamadas em espera ou reencaminhamentos. No caso de centrais telefónicas, a tecla Rechamada ou R é utilizada para consultas internas.
- Page 241 Resolução de problemas 9 Resolução de problemas Problema Causa possível Solução Sem visor. As pilhas recarregáveis Verifique, se ambas as não estão carregadas. pilhas recarregáveis estão inseridas correctamente. Carregue as pilhas recarregáveis. Sem som. O cabo de telefone não Verifique a ligação do está...
- Page 242 Medidas de assistência Problema Causa possível Solução A estação de base O volume do toque Defina o volume do ou o telefone portátil está desactivado ou toque. não toca. demasiado baixo. Não é possível O tempo de rechamada Defina o aparelho reencaminhar uma é...
- Page 243 Medidas de assistência 10.2 Limpeza Aviso Perigo de choque eléctrico ou curto-circuito devido a contacto com componentes que sejam condutores eléctricos. Não permita a infiltração de líquidos no interior do aparelho. Caso aconteça, retire imediatamente a fonte de alimentação da tomada e a ficha do cabo de telefone da tomada de parede ou retire as pilhas recarregáveis.
- Page 244 Dados técnicos usados, contribui de forma importante para a protecção do meio ambiente. Elimine também os materiais de embalagem respeitando o meio ambiente. Contacte as autoridades locais se necessitar de mais informações sobre os pontos de recolha existentes na sua área. 11 Dados técnicos Padrão DECT (Digital Enhanced Cordless...
- Page 245 12 Topcom garantia 12.1 Período de garantia As unidades Topcom têm um período de garantia de 24 meses. O período de garantia entra em efeito a partir da data de compra da unidade. Não há nenhuma garantia em baterias padrão ou recarregáveis (tipo de AA/AAA).
- Page 246 Topcom garantia Qualquer reclamação de garantia não será válida se a unidade tiver sido reparada, alterada ou modificada pelo comprador. Este dispositivo apenas deve ser utilizado com pilhas recarregáveis. Se pretende substituir as pilhas incluídas originalmente, verifique se as pilhas novas são adequadas e recarregáveis. NÃO devem utilizar- se pilhas alcalinas nos terminais portáteis, em quaisquer...
- Page 247 Vždy m jte uživatelskou p íruþku poblíž za ízení. Uložte tuto uživatelskou p íruþku na bezpeþné místo a podle pot eby ji p edejte dalšímu uživateli. 1.1 Výrobek: Sologic B921 Tento výrobek byl vyroben v souladu s jednotným digitálním standardem pro bezdrátové telefony (DECT). DECT technologie obsahuje vysokou úrove bezpeþnosti proti odposlechu a také...
- Page 248 Obecné informace 1.3 Signální slova a symboly Signální Symbol Význam slovo Upozorn ní Upozorn ní na riziko možného vážného poran ní þi smrti, pokud nebudete jednat v souladu s touto informací. Opatrn Upozorn ní na riziko možného mírného poran ní, pokud nebudete jednat v souladu s touto informací.
- Page 249 Poznámky k bezpeþnosti Upozorn ní Riziko udušení d tí! Uchovávejte obalové fólie mimo dosah d tí. D ležité Obalový materiál likvidujte zodpov dným zp sobem pro životní prost edí! 2 Poznámky k bezpeþnosti P i používání elektrických za ízení musí být vždy brán z etel na následující...
- Page 250 Poznámky k bezpeþnosti • Nedovolujte d tem, aby si se za ízením nebo jeho souþástmi hrály. Opatrn Možnost poškození p ístroje. V p ípad nebezpeþí odpojte okamžit p ístroj z nap tí 230 V. • Nepoužívejte p ístroj na vlhkých místech (nap . v koupeln ) nebo ve velmi prašných prostorách.
- Page 251 Poznámky k bezpeþnosti Riziko udušení: Upozorn ní Riziko poran ní zp sobené udušením! Dbejte zvýšené opatrnosti s ohledem na d ti! • Uchovávejte obalové fólie mimo dosah d tí. • Zvažte možná rizika pro d ti (riziko uškrcení), pokud používáte prodlužovací...
- Page 252 První kroky 2.1 Poznámky ohledn provozu p i nízké radiaci Tento bezdrátový telefon (kompatibilní se standardem DECT) umož uje provoz v režimu sníženého vyza ování (ECO mode). B hem hovoru telefon zredukuje rádiový výstup v závislosti na vzdálenosti od základny. Pokud se neprovádí žádný hovor, telefon zredukuje radiový...
- Page 253 První kroky – 3A základna – A. Telefonní zásuvka ve zdi B. Sí ový adaptér s kabelem C. Telefonní kabel 3.3 Telefon Opatrn Riziko poran ní zp sobené explozí! Použijte pouze dodané dobíjecí baterie nebo baterie podobného typu. Nepoužívejte b žné spot ební...
- Page 254 První kroky 3.4 Zobrazení stavu baterií Telefon p estane fungovat, když se baterie vybijí. Když jsou baterie zcela vybité a položíte telefon na krátkou dobu na základnu, indikátor dobíjení baterií ukáže, že jsou nabité. Nicmén baterie nejsou zcela nabité a jejich životnost se rychle zkrátí. Musíte nechat telefon v nabíjeþce po dobu 16 hodin pro úplné...
- Page 255 První kroky Základna 15.Èíselník 16.LED kontrolka nabíjení sluchátka 17.LED kontrolka vyzvánìní – 3D Základna – 3.6 Displej telefonu x = þíslo telefonu HANDSET X Další þísla nebo pohyb Další þísla nebo pohyb v menu doleva v menu doprava Nalezení nebo vytvo ení Zobrazení...
- Page 256 První kroky 3.7 Navigace v menu Sologic B921 má jednoduchý systém menu. Každé menu obsahuje n kolik možností. Seznam menu telefonu a základny najdete níže. Ke vstupu do hlavního menu stiskn te tlaþítko Menu/OK. V menu p ejd te na požadovanou možnost.
- Page 257 Obsluha telefonu Tabulka písmen Mezera+ -/1 A B C 2 D E F 3 G H I 4 J K L 5 M N O 6 P Q R S 7 T U V 8 W X Y Z 9 4 Obsluha telefonu 4.1 Zm na jazyka Stiskn te tlaþítko Menu/OK.
- Page 258 Obsluha telefonu Stiskn te tlaþítko volání. Telefonní þíslo se vytoþí automaticky. Hovor ukonþete op tovným stisknutím tlaþítka zav šení. Opakované vytoþení posledního volaného þísla Stiskn te tlaþítko volání. Stiskn te tlaþítko opakování vytáþení. Poslední telefonní þíslo se vytoþí automaticky. Hovor ukonþete op tovným stisknutím tlaþítka zav šení.
- Page 259 Obsluha telefonu Funkci aktivujte stisknutím tlaþítka hlasitého odposlechu. Stiskn te znovu tlaþítko hlasitého odposlechu a p epojte hovor zp t do telefonu. D ležité P i delším používání hlasitého odposlechu se baterie rychleji vybijí! 4.5 Ztlumení B hem hovoru m žete ztlumit mikrofon, takže m žete hovo it, aniž by vás osoba na druhém konci linky slyšela.
- Page 260 Obsluha telefonu Vyberte „HANDSET“ a potvr te. Vyberte „RING TONE“ a potvr te. Vyberte „INTERNAL“ nebo „EXTERNAL“ a potvr te. Vyberte melodii vyzván ní (1 až 19) a potvr te. Hlasitost vyzván cího tónu telefonu. Stiskn te tlaþítko Menu/OK. Vyberte „HANDSET“ a potvr te. Vyberte „RING TONE“...
- Page 261 Obsluha telefonu 4.10 Název telefonu M žete zm nit jméno, které se objeví na displeji (max. 12 písmen), pokud zrovna neprobíhá žádný hovor. Stiskn te tlaþítko Menu/OK. Vyberte „HANDSET“ a potvr te. Vyberte „HANDSET NAME“ a potvr te. Smažte p edchozí jméno p i použití klávesy ztlumení...
- Page 262 Znovu potvr te nebo stiskn te tlaþítko Esc pro opušt ní. 4.13 ID volajícího ( CLIP Sologic B921 zobrazuje telefonní þísla p íchozích hovor . Tato funkce m že být použita jen v p ípad , že ji máte registrovanou u svého...
- Page 263 Obsluha telefonu poskytovatele telefonních služeb. Další informace získáte u svého telefonního operátora. Když p ijmete hovor, telefonní þíslo se uloží do seznamu hovor . Tento seznam má kapacitu 30 þísel (každé z nich m že mít až 23 þíslic). Jestliže se telefonní þíslo skládá z více než 12 þíslic, m žete p ejet (rolovat) na pravou stranu displeje, aby se zobrazily i ostatní...
- Page 264 Obsluha telefonu Stiskn te tlaþítko Menu/OK. Stiskn te „DELETE“ pro smazání aktuálního telefonního þísla a potvr te. NEBO Vyberte „DELETE ALL“ pro smazání všech záznam telefonního seznamu a potvr te. Stiskn te pro potvrzení nebo Esc pro návrat. Uložení þísla v seznamu volání jako zkrácená þíselná volba Stiskn te tlaþítko seznamu hovor .
- Page 265 Nastavení základny 4.15 Displej hlasové schránky Tento displej funguje pouze tehdy, pokud máte na telefonu schránku nebo zprávy a váš poskytovatel tel.služeb p edává tyto informace spoleþn s ID volajícího! Jakmile obdržíte novou zprávu do schrány, na displeji se objeví symbol .
- Page 266 Nyní vyberte „LONG“ nebo „SHORT“ a potvr te. 6 P ihlášení a odhlášení telefonu 6.1 P ihlášení telefonu na základnu Sologic B921 K jedné základn m že být p ihlášeno až 4 sluchátek. Každý telefon je p ihlášen k základn p i dodání.
- Page 267 Jakmile je telefon p ihlášen, na displeji se objeví jeho þíslo a jméno. 6.2 Odhlášení telefonu na základnu Sologic B921. Stiskn te tlaþítko Menu/OK. Vyberte „DE-REGISTER“ a potvr te. Vložte þíslo PIN základny (standardn je nastaveno 0000).
- Page 268 P edávání hovoru a interní hovory z jednoho telefonu do druhého Informace Pokud umožníte základn automatický výb r a telefon p ejde mimo dosah aktuální základny, telefon vyhledá pouze nejsiln jší základnu v pohotovostním režimu (nikoliv b hem hovoru). Manuální výb r Pokud nastavíte telefon na „Manual Select“...
- Page 269 Zkratky a technické údaje 8 Zkratky a technické údaje CLIP „Calling Line Identification Presentation“ (p edstavení identifikace volané linky) – zobrazí þíslo telefonu volajícího na displeji volaného. DECT Digital Enhanced Cordless Telecommunication – Mezinárodní digitální standard pro bezdrátovou komunikaci; evropský telekomunikaþní standard pro digitální...
- Page 270 Odstra ování problém Dvojþe Oznaþení za ízení, které má dv identická za ízení, nap . dva telefony. 9 Odstra ování problém Problém Možná p íþina ešení Na displeji se nic Baterie nejsou dobité. Zkontrolujte, jestli byly nezobrazuje. ob dobíjecí baterie správn vloženy.
- Page 271 Servis Problém Možná p íþina ešení Hovor nelze p edat Doba p epojení (Flash) Nastavte p ístroj na na jinou linku. je p íliš krátká. delší þasový úsek Flash. Když jsou tlaþítka Provozní chyba. Vyjm te baterie a stisknuta, telefon vložte je znovu.
- Page 272 Technické údaje Vyþist te telefon navlhþeným had íkem, namoþeným ve vlažné vod , nebo antistatickým had íkem. Nikdy nepoužívejte þisticí prost edky nebo abrazivní prost edky. 10.3 Vy azení z provozu, ukládání Pro doþasné vy azené p ístroje z provozu je t eba odpojit telefonní kabel z nást nné...
- Page 273 Maximální spot eba energie Základna: 2,0 W 12 Topcom Záruka Sologic B921 12.1 Záruþní doba Na p ístroje Topcom je poskytována dvouletá záruþní doba. Záruþní doba zaþíná dnem zakoupení nového p ístroje. Na standardní ani dobíjecí baterie (typ AA/AAA) se žádná záruka nevztahuje.
- Page 274 Topcom Záruka Sologic B921 Zaþátek záruþní doby je urþen poþáteþním datem nákupu. V p ípad , že spoleþnost Topcom nebo n které z jejích servisních st edisek p ístroj vym ní nebo opraví, záruþní doba se neprodlužuje. 12.3 Výjimky ze záruky Záruka se nevztahuje na poškození...
- Page 275 : Sologic B921 (Digital Enhanced Cordless Telecommunications, DECT). DECT PBX:...
- Page 277 AAA, 1,2 V / 500 mAh, NiMH) 230 V. • •...
- Page 278 • • • • • • 230 V. • ( . . • • •...
- Page 279 230 V. – – • • • • •...
- Page 280 • • • • •...
- Page 281 DECT) ECO). DECT , ..“ ”.
- Page 282 - 3A...
- Page 283 - 3B...
- Page 284 ESC/ 11. INT / / OK / flash LED, - 3C - 3D...
- Page 285 HANDSET X Sologic B921 /OK. /OK.
- Page 286 PHONE BOOK HANDSET RING TONE HANDSET NAME KEYPAD BEEP SELECT BASE RESET LANGUAGE REGISTER HANDSET DE-REGISTER HANDSET "j'. "a". "a" "b", "a". "b". + - / 1 A B C 2 D E F 3...
- Page 287 G H I 4 J K L 5 M N O 6 P Q R S 7 T U V 8 W X Y Z 9 / OK. "HANDSET" "LANGUAGE"...
- Page 288 " " (...
- Page 289 "MUTED".
- Page 290 (Flash) Flash 3E „ “ 282) . . " " ( (Flash) 100 ms 300 ms. „5.4 R (Flash)“. / OK. "HANDSET" "RING TONE" "INTERNAL" "EXTERNAL" / OK. "HANDSET" "RING TONE" "VOLUME" , 1-5)
- Page 291 4.10 / OK. "HANDSET" "HANDSET NAME"...
- Page 292 4.11 / OK. "HANDSET" "KEYPAD BEEP" "ON" "OFF". 4.12...
- Page 293 / OK. "EDIT ENTRY" / OK. "DELETE ENTRY", "DELETE ALL"...
- Page 294 4.13 CLIP Sologic B921 CLIP "EMPTY" (EMPTY).
- Page 295 / OK. "DELETE", "DELETE ALL" / OK. "SAVE TO PB"...
- Page 296 4.14 / OK. "HANDSET" "RESET" : 0000). HANDSET 4.15...
- Page 297 / OK. "BASE" "RING TONE" / OK. "BASE" "RING VOLUME" , 1-5) - DTMF/ / OK. "BASE" "DIAL MODE" "TONE" "PULSE" "0000".
- Page 298 / OK. "BASE" "SYSTEM PIN" "OLD PIN" "NEW PIN" (Flash) Flash " " ( R (Flash) 100 ms 300 ms. Flash, / OK. "BASE" "RECALL" "LONG" "SHORT" Sologic B921 • ( . .
- Page 299 • Sologic B921. / OK "REGISTER" (1-4) PIN. : 0000). Sologic B921 / OK. "DE-REGISTER" : 0000). (1-4),...
- Page 300 / OK. "HANDSET" "SELECT BASE" "AUTOMATIC"...
- Page 301 / OK. "HANDSET" "SELECT BASE" "MANUAL" (1-4).
- Page 302 INT. CLIP Calling Line Identification Presentation: DECT Digital Enhanced Cordless Telecommunication: ECO, Economic Mode: (DECT), Flash, Flash ( R) Generic Access Profile: INTernal subscriber: LCD, Liquid Crystal Display: LED, Light Emitting Diode: DTMF Dual Tone Multiple Frequency:...
- Page 303 Personal Identification Number: Recall ( . Flash, " "...
- Page 304 „5.2 “ Flash Flash...
- Page 305 10.1 10.2 230 V. 10.3...
- Page 306 230 V. 10.4 DECT(Digital Enhanced Cordless Telecommunications) GAP (Generic Access Profile) 1.880 1.900 MHz 10 mW ( 300 . 50 . NiMh 1,2 V, 500 mAh, : 100~240 V AC / 50-60 Hz : 6 V DC/ 500 mA...
- Page 307 Topcom Sologic B921 45 °C 85 % (DTMF) flash 300 ms / 117 mm x 117 mm x 60 mm / 182 mm x 284 mm x 58 mm 239 g 152 g : 2,0 W Topcom Sologic B921 12.1 Topcom AA/AAA).
- Page 308 Topcom Sologic B921 Topcom 12.3...
- Page 309 Niniejsz instrukcj nale y przechowywaü w bezpiecznym miejscu i przekazaü nast pnemu wáa cicielowi wraz z urz dzeniem. 1.1 Produkt: Sologic B921 Ten produkt zostaá wyprodukowany zgodnie z ujednoliconym standardem cyfrowym telefonów bezprzewodowych (DECT). Technologia DECT zapewnia wysoki poziom zabezpiecze przed przechwyceniem rozmowy, a tak e wysokiej jako ci transmisj cyfrow .
- Page 310 Informacje ogólne 1.3 Sáowa i symbole sygnalizuj ce Sáowo Symbol Znaczenie sygnalizuj ce Ostrze enie Niezastosowanie si do informacji zawartych w tym ostrze eniu mo e doprowadziü do mierci lub powa nych obra e ciaáa. Uwaga Niezastosowanie si do informacji zawartych w tym ostrze eniu mo e doprowadziü...
- Page 311 Uwagi dotycz ce bezpiecze stwa 1 sáuchawka bezprzewodowa z 2 akumulatorkami NiMH typu AAA o napi ciu 1,2 V i pojemno ci 500 mAh oraz pokryw komory akumulatorków 1 instrukcja obsáugi Ostrze enie Ryzyko uduszenia dziecka! Folie z opakowania nale y przechowywaü poza zasi giem dzieci. Wa ne Opakowanie nale y zutylizowaü...
- Page 312 Uwagi dotycz ce bezpiecze stwa • Nie wolno modyfikowaü ani naprawiaü urz dzenia. Urz dzenie lub przewód mog byü naprawiane wyá cznie przez specjalist w centrum serwisowym. Naprawy, które nie zostaáy przeprowadzone prawidáowo, mog byü przyczyn znacznego niebezpiecze stwa dla u ytkownika. •...
- Page 313 Uwagi dotycz ce bezpiecze stwa Zagro enie wybuchem: Ostrze enie Ryzyko obra e w wyniku wybuchu! Nale y zachowaü szczególn ostro no ü w przypadku obecno ci dzieci! • Nigdy nie nale y wrzucaü baterii ani akumulatorków do ognia. • Nie wolno u ywaü urz dzenia w miejscu, gdzie istnieje zagro enie wybuchem! Zagro enie zatruciem: Ostrze enie Ryzyko obra e w wyniku zatrucia!
- Page 314 Pierwsze kroki Niebezpiecze stwo uszkodze : Uwaga Prawdopodobie stwo uszkodzenia urz dzenia! Nale y zapoznaü si z odpowiednimi informacjami w niniejszej instrukcji obsáugi. • Nale y u ywaü tylko zasilacza dostarczonego wraz z urz dzeniem. Nie nale y u ywaü zasilaczy innych firm, poniewa mo e to spowodowaü...
- Page 315 Pierwsze kroki Tekst..„Wy wietlacz”. Tekst pojawiaj cy si na wy wietlaczu telefonu. Klawisz, który nale y nacisn ü 3.2 Instalacja stacji bazowej Zainstaluj stacj bazow w nast puj cy sposób: Podá cz zasilacz sieciowy najpierw do stacji bazowej, a nast pnie do gniazda. Podá...
- Page 316 Pierwsze kroki Otwórz komor akumulatorków, jak pokazano na rysunku 3B. Wáó akumulatorki. Upewnij si , e zostaáa zachowana wáa ciwa biegunowo ü (oznaczenia + i –). Zamknij komor akumulatorków. Umie ü sáuchawk w áadowarce i áaduj j przez 16 godzin. W tym czasie b dzie si wieciü...
- Page 317 Pierwsze kroki 3.5 Klawisze/ wy wietlacz Sáuchawka bezprzewodowa 1. Ponowne wybieranie numeru/do góry 2. Ksi ka telefoniczna 3. Wyciszenie/usuni cie 4. Zako czenie rozmowy 5. Klawisze alfanumeryczne ESC/ 6. Blokada klawiszy 7. Pauza 8. Wá czenie/wyá czenie dzwonka 9. Lista poá cze /w dóá 10.Odebranie poá...
- Page 318 Poá czenie wewn trzne anteny miga. 3.7 Poruszanie si po menu Telefon Sologic B921 ma áatwy w u yciu system menu. W ka dym menu dost pna jest lista opcji. Poni ej przedstawiono podsumowanie opcji menu sáuchawki oraz stacji bazowej.
- Page 319 Pierwsze kroki Sáuchawka PHONE BOOK HANDSET RING TONE HANDSET NAME KEYPAD BEEP SELECT BASE RESET LANGUAGE REGISTER HANDSET DE-REGISTER HANDSET 3.8 U ywanie klawiszy alfanumerycznych Klawisze alfanumeryczne umo liwiaj wprowadzanie tekstu. Naci nij odpowiedni klawisz alfanumeryczny, aby wybraü liter Na przykáad , je li naci niesz klawisz numeryczny 5, na wy wietlaczu pojawi si najpierw litera „j”.
- Page 320 Obsáuga telefonu 4 Obsáuga telefonu 4.1 Zmiana j zyka Naci nij klawisz Menu/OK. Wybierz opcj „HANDSET” i potwierd . Wybierz opcj „LANGUAGE” i potwierd . Wybierz j zyk i potwierd . Naci nij klawisz wyj cia, aby powróciü do trybu gotowo ci. 4.2 Rozmowy wychodz ce Nawi zywanie poá...
- Page 321 Obsáuga telefonu Ponowne wybieranie jednego z trzech ostatnich numerów Naci nij klawisz ponownego wybierania. Na wy wietlaczu pojawi si ostatnio wybrany numer. Aby wybraü jeden z 3 ostatnio wybieranych numerów, naciskaj klawisz ponownego wybierania do momentu pojawienia si odpowiedniego numeru na wy wietlaczu.
- Page 322 Obsáuga telefonu 4.5 Wyciszenie Mikrofon mo na wyciszyü podczas poá czenia, tak aby rozmówca niczego nie sáyszaá. Naci nij klawisz wyciszenia. Mikrofon zostanie wyciszony, a na wy wietlaczu pojawi si komunikat „MUTED”. Jeszcze raz naci nij klawisz wyciszenia, aby z powrotem wá czyü mikrofon. 4.6 Ustawianie gáo no ci sáuchawki i trybu gáo nomówi cego W czasie rozmowy:...
- Page 323 Obsáuga telefonu Wybierz opcj „HANDSET” i potwierd . Wybierz opcj „RING TONE” i potwierd . Wybierz opcj „INTERNAL” lub „EXTERNAL” i potwierd . Wybierz melodi dzwonka (z zakresu od 1 do 9) i potwierd . Gáo no ü dzwonka sáuchawki Naci nij klawisz Menu/OK.
- Page 324 Obsáuga telefonu 4.10 Nazwa sáuchawki Nazw widoczn na wy wietlaczu (maksymalnie 12 znaków) mo na zmieniü, gdy nie jest wykonywane adne poá czenie. Naci nij klawisz Menu/OK. Wybierz opcj „HANDSET” i potwierd . Wybierz opcj „HANDSET NAME” i potwierd . Usu star nazw przy u yciu klawisza wyciszania i wprowad now nazw .
- Page 325 Ponownie potwierd lub naci nij klawisz wyj cia, aby pomin ü ten krok. 4.13 Identyfikacja rozmówcy ( CLIP Telefon Sologic B921 wy wietla numery rozmów przychodz cych. Ta funkcja jest dost pna wyá cznie, je li usáuga zostaáa udost pniona...
- Page 326 Obsáuga telefonu przez operatora linii telefonicznej. Aby uzyskaü wi cej informacji na ten temat, skontaktuj si z operatorem. Gdy odbierasz rozmow , numer telefonu jest zapisywany na li cie poá cze . Lista przechowuje do 30 numerów telefonicznych (ka dy o dáugo ci do 23 cyfr). Je li numer telefoniczny zawiera wi cej ni 12 cyfr, mo esz przewin ü...
- Page 327 Obsáuga telefonu Usuwanie numeru z listy poá cze Naci nij klawisz listy poá cze . Przewijaj list poá cze , a zostanie wy wietlony dany numer. Naci nij klawisz Menu/OK. Wybierz opcj „DELETE”, aby usun ü bie cy numer telefoniczny, i potwierd . Wybierz opcj „DELETE ALL”, aby usun ü...
- Page 328 Base settings Ustawienia domy lne: Nazwa sáuchawki HANDSET Regulacja gáo no ci sáuchawki Poziom 3 Gáo no ü dzwonka Poziom 3 Dzwonek dla poá cze zewn trznych Dzwonek 8 Dzwonek dla poá cze wewn trznych Dzwonek 1 D wi k klawiatury Ustawienia aparatu bazowego 4.15 Ta funkcja wy wietlacza jest dost pna tylko wtedy, gdy wá...
- Page 329 Base settings 5.2 Ustawianie trybu wybierania numeru Dost pne s dwa tryby wybierania numerów telefonów: — DTMF/wybieranie tonowe (najcz ciej stosowany) — Tryb wybierania impulsowego (wymagany tylko w przypadku korzystania z urz dzenia w starszym systemie PBX) Naci nij klawisz Menu/OK. Wybierz opcj „BASE”...
- Page 330 (np. w celu ponownego uruchomienia sáuchawki). • U ytkownik chce zarejestrowaü inn sáuchawk w stacji bazowej. Poni szy opis dotyczy tylko sáuchawek i stacji bazowych Sologic B921. Naci nij i przytrzymaj przez 10 sekund klawisz przywoáywania na stacji bazowej.
- Page 331 Rejestrowanie i wyrejestrowywanie sáuchawki Gdy sáuchawka zostanie pomy lnie wyrejestrowana, powróci do trybu gotowo ci. W przeciwnym razie zostanie wy wietlony monit o ponowne wprowadzenie numeru sáuchawki. Wa ne Sáuchawki mo na wyrejestrowaü tylko wtedy, gdy nie s u ywane. 6.3 Wybieranie stacji bazowej Je li sáuchawka jest zarejestrowana w wielu stacjach bazowych (maksymalnie w 4), nale y wybraü...
- Page 332 Przekazywanie rozmów i poá czenia wewn trzne pomi dzy sáuchawkami Wa ne Sáuchawka mo e nawi zaü poá czenie tylko ze stacj bazow , w której jest zarejestrowana. 7 Przekazywanie rozmów i poá czenia wewn trzne pomi dzy sáuchawkami 7.1 Przekazywanie rozmów i rozmowy konferencyjne podczas rozmowy zewn trznej W czasie rozmowy zewn trznej naci nij klawisz INT, a nast pnie wybierz numer sáuchawki...
- Page 333 Skróty i terminy techniczne Klawisz Flash Powoduje krótkie przerwanie poá czenia w celu wá czenia takich funkcji jak przeá czanie lub przekazywanie poá cze . W systemie PBX klawisz Flash (R) umo liwia przywoáanie poá czenia wewn trznego. Ogólny profil dost pu (Generic Access Profile) — interfejs uáatwiaj cy nawi zanie poá...
- Page 334 Rozwi zywanie problemów 9 Rozwi zywanie problemów Prawdopodobna Problem Rozwi zanie przyczyna Wy wietlacz Akumulatorki nie Sprawd , czy nie dziaáa. s naáadowane. poprawnie wáo ono oba akumulatorki. Naáaduj akumulatorki. Brak d wi ku. Kabel telefoniczny Sprawd podá czenie nie jest poprawnie kabla.
- Page 335 Serwis Prawdopodobna Problem Rozwi zanie przyczyna Sáuchawka nie jest Zarejestruj sáuchawk zarejestrowana w stacji w stacji bazowej. bazowej. Stacja bazowa Dzwonek jest zbyt Dostosuj gáo no ü lub sáuchawka cichy lub zostaá dzwonka. nie dzwoni. wyá czony. Nie mo na Czas przerwania jest Ustaw dáu szy czas przekazaü...
- Page 336 Serwis 10.2 Czyszczenie Ostrze enie Ryzyko pora enia pr dem elektrycznym lub zwarciem w wyniku kontaktu z elementami przewodz cymi pr d. Nale y uwa aü, aby do urz dzenia nie dostaáy si páyny. Je li tak si stanie, nale y odá czyü zasilacz od gniazda sieciowego i odá...
- Page 337 Dane techniczne Opakowanie równie nale y zutylizowaü w sposób nieuci liwy dla rodowiska. Aby uzyskaü informacje na temat punktów zbiórki w okolicy, nale y skontaktowaü si z lokalnymi wáadzami. 11 Dane techniczne Standard DECT (Digital Enhanced Cordless Telecommunications) GAP (Generic Access Profile — ogólny profil dost pu) Zakres cz stotliwo ci 1 880 MHz do 1 900 MHz...
- Page 338 Urz dzenia firmy Topcom s obj te 24-miesi cznym okresem gwarancji. Okres gwarancji rozpoczyna si w dniu zakupu nowego urz dzenia. Firma Topcom nie udziela adnej gwarancji na baterie ani akumulatorki (typu AA/AAA). ci eksploatacyjne i wady niezauwa alnie wpáywaj ce na dziaáanie lub warto ü...
- Page 339 Gwarancja na urz dzenie Topcom Sologic B921 Wszelkie roszczenia gwarancyjne zostan uznane za niewa ne, je li urz dzenie byáo naprawiane, zmieniane lub modyfikowane przez u ytkownika. Urz dzenie to mo e byü u ywane tylko z akumulatorkami. Je li u ytkownik zamierza wymieniü...
- Page 340 SOLOGIC B921 visit our websites www.topcom.net www.sologic.info MD19200366...