
Manuels Connexes pour Pelgrim RSK860


Sommaire des Matières pour Pelgrim RSK860
- Page 1 RSK860 Gebruiksaanwijzing afzuigkappen Mode d’emploi hotte cheminée Bedienungsanleitung Dunstabzugshaube Instructions for use cooker hood...
- Page 2 Handleiding NL 3 - NL 21 Notice dútilisation F 3 - F 21 Anleitung DE 3 - DE 21 Manual GB 3 - GB 21 Gebruikte pictogrammen - Pictogrammes utilisés Benutzte Piktogramme - Pictograms used Belangrijk om te weten - Important à savoir Wissenswertes - Important information Tip - Conseil - Tipp - Tip...
-
Page 3: Table Des Matières
INHOUD Uw schouwkap Beschrijving Inleiding Veiligheid Waar u op moet letten Afvoersystemen Gebruik Bediening Onderhoud Reinigen Vetfilters verwijderen Het koolstoffilter vervangen Lampen vervangen Installatie Algemeen Elektrische aansluiting Montage van de schouwkap Bijlage Verpakking en toestel afvoeren NL 3... -
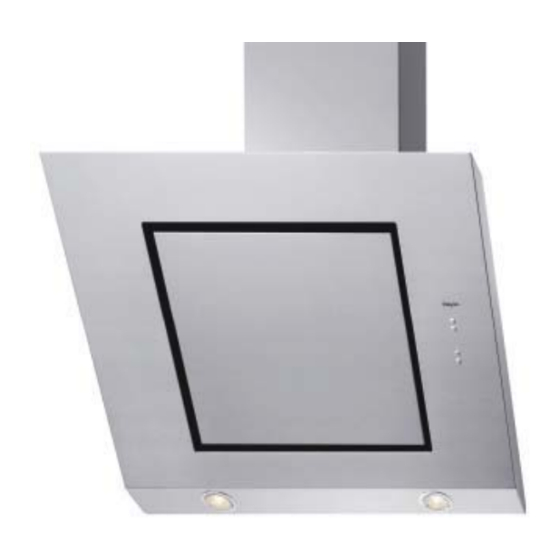
Page 4: Uw Schouwkap
UW SCHOUWKAP Beschrijving Aan-/uittoets Ventilatorstanden Verlichting Timer Indicatielampjes voor snelheid en reiniging Inleiding Als u deze gebruiksaanwijzing doorleest, bent u snel op de hoogte van alle mogelijk heden die dit toestel u biedt. U vindt informatie voor uw veiligheid en over het onderhoud van het toestel. Bewaar de gebruiksaanwijzing en het installatievoorschrift. -
Page 5: Veiligheid
VEILIGHEID Let op! Laat het toestel aansluiten door een erkend installateur (zie hoofdstuk “Installatie”). Sluit het apparaat niet aan op het elektriciteitsnet voordat de installatie volledig is voltooid. • Sluit het toestel aan conform de plaatselijk geldende installatievoorschriften. • In verband met eventuele scherpe randen adviseren wij u tijdens de montage van de afzuigkap werkhandschoenen te gebruiken. -
Page 6: Afvoersystemen
VEILIGHEID Let op! • Haal eerst de stekker uit het stopcontact als u de lampen wilt vervangen! Gebruik uitsluitend dezelfde lampen met aangegeven wattage. Gebruik de afzuigkap alleen met gemonteerde lampjes om het risico van een elektrische schok te verminderen. •... -
Page 7: Gebruik
GEBRUIK Bediening Ventilator inschakelen Druk op toets (1). De afzuigkap schakelt in op stand 1. Druk nogmaals op de toets. De afzuigkap schakelt uit. Snelheid verhogen Druk op toets (2). De afzuigkap schakelt over op een hogere snelheid, oplopend van snelheid 1 tot aan de intensieve snelheid 4. Bij iedere snelheid gaat het betreffende controlelampje aan. - Page 8 GEBRUIK Bediening Verlichting in- en uitschakelen Druk op verlichtingstoets (3). De verlichting gaat branden. Druk nogmaals op de toets. De verlichting gaat uit. Timer inschakelen Druk op toets (4). De timer voor de motor wordt geactiveerd, na afloop van de ingestelde tijd gaat de afzuigkap uit. De tijdsinstelling is op de volgende wijze onderverdeeld: •...
- Page 9 GEBRUIK Bediening Vetfilter reinigingsindicatie Na 40 werkuren brandt het lampje L5. Als deze indicatie verschijnt, moet de vetfilter gereinigd worden. Om de reinigingsindicatie te resetten moet u 3 seconden lang de toets (1) indrukken. Koolstoffilter reinigingsindicatie Na 160 werkuren knippert het lampje L5. Als deze indicatie verschijnt, moet het geïnstalleerde koolstoffilter vervangen worden.
- Page 10 GEBRUIK Bediening Activering van de koolstoffilter reinigingsindicatie Zet de afzuigkap uit en houd tegelijkertijd de toetsen (4) gedurende 3 seconden ingedrukt. De lampjes L1 en L2 knipperen 5 seconden. Uitschakeling van de koolstoffilter reinigingsindicatie: Zet de afzuigkap uit en houd tegelijkertijd de toetsen (4) gedurende 3 seconden ingedrukt.
-
Page 11: Onderhoud
ONDERHOUD Reinigen Attentie! Koppel, voor ieder onderhoud, eerst de afzuigkap van het elektriciteitsnet af door de stekker weg te trekken of door de hoofdschakelaar van de woning uit te schakelen. De kap moet regelmatig schoon gemaakt worden, zowel binnen als buiten (tenminste met dezelfde regelmaat waarmee de vetfilters gereinigd worden). -
Page 12: Vetfilters Verwijderen
ONDERHOUD Reinigen Glazen panelen Reinig de glazen panelen niet in de vaatwasser in verband met het risico op het ontstaan van kleurverschillen. Glazen panelen kunnen het best handmatig, met een sopje gereinigd worden. Raadpleeg www. pelgrimservice.nl voor onderhoudstips. Vetfilters Vetfilters verwijderen Schakel de netspanning uit! Neem de stekker uit het stop contact of zet de schakelaar in de meterkast op nul. -
Page 13: Lampen Vervangen
ONDERHOUD Koolstoffilter Plaatsen van het koolstoffilter • Verwijder het vetfilter. • Plaats het koolstoffilter achter het vetfilter en maak het met twee beugeltjes vast. Verlichting Lampen vervangen Maak het toestel spanningsloos. Attentie! Alvorens de lampjes aan te raken moet u eerst controleren of ze koud zijn. -
Page 14: Installatie
INSTALLATIE Algemeen De aansluiting van dit apparaat op het lichtnet moet worden uitgevoerd door een erkend installateur, die de juiste veiligheidsvoorschriften kent en toepast. Het apparaat voldoet aan de Europese voorschriften. Belangrijk om te weten: • De afstand tussen het laagste punt van de afzuigkap en een gaskookplaat moet minimaal 65 cm bedragen. -
Page 15: Elektrische Aansluiting
INSTALLATIE Aansluiting Elektrische aansluiting De netspanning moet corresponderen met de spanning die vermeld wordt op het etiket met eigenschappen, aan de binnenkant van de afzuigkap. Als de afzuigkap een stekker heeft, moet deze in een stopcontact worden gestoken dat voldoet aan de geldende voorschriften. Heeft de kap geen stekker (rechtstreekse verbinding met het net) of is deze niet goed te bereiken, dan moet er een tweepolige schakelaar worden geplaatst die de volledige ontkoppeling van het net garandeert... - Page 16 INSTALLATIE Montage • Zet een hartlijn op de muur (midden van de kookplaat) en plak de aftekenmal op de gewenste hoogte op de muur. 65 cm 45 cm • Houd de muurbeugel op de aangegeven plaats op de aftekenmal en teken de boorgaten af, boor de gaten en monteer de muurbeugel.
- Page 17 INSTALLATIE Montage • Houd de muurbeugel (voor bevestiging telescooppijp) tegen de muur en teken de boorgaten af. Bevestig de muurbeugel. 2 x Ø 8mm • Hang de afzuigkap aan de muurbeugel, let op dat de lipjes van de muurbeugel op de juiste manier door de gaten in de bovenzijde van de kap steken.
- Page 18 INSTALLATIE Montage • Plaats de stelschroeven en gebruik deze om de afzuigkap uit te lijnen. • • • • • • • • Teken de boorgaten voor de bevestiging van de afzuigkap aan de muur af en verwijder de afzuigkap. Boor nu de gaten, plaats de pluggen en plaats de afzuigkap terug op de muurbeugel.
- Page 19 INSTALLATIE Montage • Schroef de afzuigkap vast aan de muur. Ø 5 x 45mm • Monteer de afvoerflens. • Maak de elektrische aansluiting. • Bevestig het afvoerkanaal aan de afvoer van de afzuigkap. Maak hierbij eventueel gebruik van het bijgeleverde verloopstuk. Ø...
- Page 20 INSTALLATIE Montage • In het geval van recirculatie: bevestig de afvoergeleiding (T-stuk) aan de bovenste muurbeugel. • Plaats de telescooppijp en trek het binnenste deel uit tot aan de muurbeugel. Monteer de telescooppijp aan de muurbeugel. Ø 2,9x6,5 NL 20...
-
Page 21: Bijlage
BIJLAGE Afvoeren Verpakking en toestel afvoeren Bij de vervaardiging van dit toestel is gebruik gemaakt van duurzame materialen. Dit toestel moet aan het eind van zijn levenscyclus op verantwoorde wijze worden afgevoerd. De overheid kan u hieromtrent informatie verschaffen. De verpakking van het toestel is recyclebaar. Gebruikt kunnen zijn: •... - Page 22 NL 22...
- Page 23 CONTENU Votre hotte cheminée Description Introduction Sécurité Recommandations Système d’évacuation Utilisation Commande Entretien Nettoyage Elimination des filtres Remplacement des filtres à charbon Changement d’ampoules Installation Généralités Connexion électrique Montage de la hotte cheminée Annexe Mise au rebut de l’appareil et de l’emballage...
-
Page 24: Votre Hotte Cheminée
VOTRE HOTTE CHEMINÉE Description Marche/arrêt Positions du ventilateur Éclairage Minuterie Voyants de vitesse et de nettoyage Introduction Ce manuel est un aperçu des possibilités offertes par cet appareil. Il vous fournira des renseignements précieux sur le plan de la sécurité. Conservez le mode d’emploi et les directives d’installation. - Page 25 SÉCURITÉ Attention ! Faites brancher l’appareil par un installateur agréé (voir chapitre “Installation”). Ne branchez pas l’appareil sur le réseau avant que l’installation ne soit complètement terminée. • Raccordez l’appareil conformément aux prescriptions d’installation locales. • Les bords de l’appareil pouvant être coupants, nous vous conseillons de porter des gants de travail durant le montage de la hotte aspirante.
-
Page 26: Système D'évacuation
SÉCURITÉ Attention ! • Débrancher la fiche de la prise de courant lors du remplacement des ampoules ! Utilisez, uniquement, des ampoules identiques à celles d’origine et ayant le même voltage. Utilisez, uniquement, la hotte aspirante, lorsque les ampoules sont montées, pour réduire tout risque de choc électrique. -
Page 27: Commande
UTILISATION Commande Mise en service du ventilateur Appuyez sur la touche (1). La hotte se met en marche sur la position 1. Appuyez encore une fois sur la touche. La hotte est hors service. Augmentation de la vitesse Appuyez sur la touche (2). - Page 28 UTILISATION Commande Mise en/hors service de l’éclairage Appuyez sur la touche pour l’éclairage (3). L’éclairage va s’enclencher. Appuyez encore une fois sur la touche pour éteindre la lumière. Activation de la minuterie Appuyez sur la touche (4). La minuterie du moteur est activée. Une fois la durée définie écoulée, la hotte aspirante s’éteint.
- Page 29 UTILISATION Commande Signal de nettoyage du filtre à graisse Le voyant L5 s’allume après 40 heures de fonctionnement. Ce signal indique que le filtre à graisse installé doit être nettoyé. Pour réinitialiser le signal, maintenez la touche (1) enfoncée pendant trois secondes. Signal de nettoyage du filtre à...
- Page 30 UTILISATION Commande Activation du signal de nettoyage du filtre à charbon Désactivez la hotte aspirante et maintenez les touches (4) enfoncées pendant trois secondes. Les voyants L1 et L2 clignotent pendant cinq secondes. Désactivation du signal de nettoyage du filtre à charbon : Désactivez la hotte aspirante et maintenez les touches (4) enfoncées pendant trois secondes.
-
Page 31: Nettoyage
ENTRETIEN Nettoyage Attention! Avant toute opération de nettoyage ou d’entretien, débrancher la hotte du circuit électrique en enlevant la prise ou en coupant l’interrupteur général de l’habitation. La hotte doit être régulièrement nettoyée à l’intérieur et à l’extérieur (au moins à la même fréquence que pour l’entretien des filtres à graisse). Ne pas utiliser de produit contenant des abrasifs. -
Page 32: Elimination Des Filtres
ENTRETIEN Nettoyage Panneaux en verre Les panneaux en verre ne doivent pas être nettoyés dans le lave- vaisselle pour éviter de causer des différences de couleurs. Les panneaux en verre doivent être lavés à la main à l’aide d’une solution savonneuse. -
Page 33: Changement D'ampoules
ENTRETIEN Placez le filtre à charbon • Enlevez les filtres à graisse. • Placez le filtre à charbon derrière le filtre à graisse et fixez-le à l’aide de deux étriers Les lampes Changement d’ampoules Débrancher l’appareil du réseau électrique Attention! Avant de toucher les lampes, assurez-vous qu’elles soient froides. -
Page 34: Généralités
INSTALLATION Généralités Le raccordement électrique de cet appareil doit être effectué par un installateur agréé, qui connaît et applique les normes de sécurité en vigueur. Cet appareil est conformément aux directives Européens. Important: • La distance entre le point le plus bas de la hotte aspirante et la plaque de cuisson doit être d’au moins 65 cm. - Page 35 INSTALLATION Connexion La tension électrique doit correspondre à la tension reportée sur la plaque signalétique située à l’intérieur de la hotte. Si une prise est présente, branchez la hotte dans une prise murale conforme aux normes en vigueur et placée dans une zone accessible. Si aucune prise n’est présente (raccordement direct au circuit électrique), ou si la prise ne se trouve pas dans une zone accessible, appliquez un disjoncteur normalisé...
- Page 36 INSTALLATION Montage • Tracez une ligne sur le mur (au centre de la plaque de cuisson) et placez le schéma sur le mur, à la hauteur souhaitée. 65 cm 45 cm • Placez l’étrier mural à l’emplacement indiqué du schéma, tracez les trous de perçage, percez les trous et installez l’étrier mural.
- Page 37 INSTALLATION Montage • Suspendez la hotte aspirante sur l’étrier mural. Veillez à ce que les rebords de l’étrier mural s’insèrent correctement dans les trous de la partie supérieure de la hotte. Placez les vis de réglage et utilisez- les pour aligner la hotte aspirante. 2 x Ø...
- Page 38 INSTALLATION Montage • Placez les vis de réglage et utilisez-les pour aligner la hotte aspirante. • • Tracez les trous de fixation de la hotte aspirante sur le mur et retirez la hotte aspirante. Percez les trous, placez les chevilles et réinstallez la hotte aspirante sur l’étrier mural.
- Page 39 INSTALLATION Montage • Vissez la hotte aspirante sur le mur. Ø 5 x 45mm • Montez la bride d’évacuation. • Procédez au branchement électrique. • Reliez le canal d’évacuation à l’évacuation de la hotte aspirante. Vous pouvez utiliser le raccord de réduction fourni. Ø...
- Page 40 INSTALLATION Montage • En cas de recirculation : fixez la conduite d’évacuation (pièce en T) sur l’étrier mural du haut. • Placez le tuyau télescopique et tirez la partie intérieure jusqu’à l’étrier mural. Installez le tuyau télescopique sur l’étrier mural. Ø...
- Page 41 ANNEXE Mise au rebut Mise au rebut de l’appareil et de l’emballage Des matériaux solides ont été utilisés pour fabriquer cet appareil. Evacuez ces matériaux correctement et conformément aux dispositions administratives. Les autorités de votre pays pourront vous fournir des informations à...
- Page 42 F 22...
- Page 43 INHALT Ihre Haube Beschreibung Einleitung Sicherheit Worauf Sie achten müssen Abluftsystem Gebrauch Bedienung Pflege Reinigen Fettfilter entfernen Austausch der Kohlefilter Lampen auswechseln Installation Allgemein Elektroanschluss Montage der Haube Anlagen Entsorgung Gerät und Verpackung DE 3...
-
Page 44: Ihre Haube
IHRE HAUBE Beschreibung Ein/Aus Taste Ventilatoreinstellungen Beleuchtung Timer Anzeigelämpchen für Geschwindigkeit und Reinigung Einleitung Wenn Sie diese Gebrauchsanleitung lesen, sind Sie rasch über alle Möglichkeiten informiert, die dieses Gerät Ihnen bieten kann. Sie können sich über Sicherheit und Pflege des Gerätes informieren. Bewahren Sie diese Gebrauchsanweisung und die Installationsanweisungen sorgfältig –... -
Page 45: Sicherheit
SICHERHEIT Achtung! Lassen Sie das Gerät durch einen anerkannten Installateur anschließen (Siehe das Kapitel „Installation“). Schließen Sie das Gerät nicht an das Stromnetz an, bevor die Installation vollständig abgeschlossen ist. • Schließen Sie das Gerät gemäß den vor Ort geltenden Installationsvorschriften an. -
Page 46: Abluftsystem
SICHERHEIT Achtung! • Ziehen Sie den Stecker aus der Steckdose, bevor Sie die Lampen wechseln! Verwenden Sie ausschließlich die gleichen Lampen mit der angegebenen Wattzahl. Verwenden Sie die Dunstabzugshaube nur mit montierten Lampen, um das Risiko eines Stromschlags zu vermindern. •... -
Page 47: Gebrauch
GEBRAUCH Bedienung Gebläse einschalten Drücken Sie Taste (1). Die Dunstabzugshaube schaltet sich auf Stufe 1 ein. Drücken Sie nochmals die Taste. Die Dunstabzugshaube schaltet sich aus. Erhöhen der Geschwindigkeit Drücken Sie auf die Taste (2). Die Dunstabzugshaube schaltet in eine höhere Geschwindigkeit, von Geschwindigkeit 1 bis zur Höchstgeschwindigkeit 4. - Page 48 GEBRAUCH Bedienung Beleuchtung ein- und ausschalten Drücken Sie für die Beleuchtung die Taste (3). Die Beleuchtung ist eingestellt. Drücken Sie nochmals die Taste zur Ausschaltung der Beleuchtung. Einschalten des Timers Drücken Sie auf die Taste (4). Der Timer für den Motor wird aktiviert, und nach Ablauf der eingestellten Zeit wird die Dunstabzugshaube ausgeschaltet.
- Page 49 GEBRAUCH Bedienung Anzeige Reinigung des Fettfilters Nach 40 Betriebsstunden beginnt das Lämpchen L5 zu leuchten. Wenn dieses Signal angezeigt wird, muss der installierte Fettfilter gereinigt werden. Halten Sie die Taste (1) drei Sekunden lang gedrückt, um dieses Signal zurückzusetzen. Anzeige Reinigung des Kohlefilters Nach 160 Betriebsstunden beginnt das Lämpchen L5 zu blinken.
- Page 50 GEBRAUCH Bedienung Aktivierung der Reinigungsanzeige für den Kohlefilter Schalten Sie die Dunstabzugshaube aus, und halten Sie die Tasten (1) und (4) drei Sekunden lang gedrückt. Die Lämpchen L1 und L2 blinken fünf Sekunden lang. Ausschalten der Reinigungsanzeige für den Kohlefilter Schalten Sie die Dunstabzugshaube aus und halten Sie die Tasten (1) und...
-
Page 51: Pflege
PFLEGE Reinigen Achtung! Vor jeder Reinigung und Pflege ist die Dunstabzugshaube durch Ziehen des Netzsteckers oder Ausschalten der Sicherung stromlos zu machen. Die Dunstabzugshaube muss sowohl innen als auch außen häufig gereinigt werden (etwa in denselben Intervallen, wie die Wartung der Fettfilter). Keine Produkte verwenden, die Scheuermittel enthalten. -
Page 52: Fettfilter Entfernen
PFLEGE Reinigen Glasflächen Reinigen Sie die Glasflächen nicht im Geschirrspüler, da es hierdurch zu Verfärbungen kommen kann. Sie können die Glasflächen am besten manuell mit Seifenwasser reinigen. Fettfilter Fettfilter entfernen Netzspannung ausschalten! Den Stecker aus der Wandsteckdose ziehen oder den Schalter im Sicherungskasten auf Null stellen. Kippen Sie die Platte nach oben ab. -
Page 53: Lampen Auswechseln
PFLEGE Einsetzen Kohlefilter • Entfernen Sie die Fettfilter. • Setzen Sie den Kohlefilter hinter den Fettfilter und befestigen Sie ihn mit den zwei Bügeln. Lampen Lampen auswechseln Das Gerät vom Stromnetz nehmen. Hinweis: Vor Berühren der Lampen sich vergewissern, dass sie abgekühlt sind. -
Page 54: Installation
INSTALLATION Allgemein Der Anschluß dieses Gerätes an das Lichtnetz muß durch einen anerkannten Installateur geschehen, der die Sicherheitsvorschriften gut kennt und anwendet. Dieses Gerät entspricht den europäischen Vorschriften. Wichtig zu wissen: • Der Abstand zwischen dem niedrigsten Punkt der Dunstabzugshaube und einem Gaskochfeld muss mindestens 65 cm betragen. -
Page 55: Elektroanschluss
INSTALLATION Anschluss Elektroanschluss Die Netzspannung muss der Spannung entsprechen, die auf dem Betriebsdatenschild im Innern der Haube angegeben ist. Sofern die Haube einen Netzstecker hat, ist dieser an zugänglicher Stelle an eine den geltenden Vorschriften entsprechende Steckdose anzuschließen. Bei einer Haube ohne Stecker (direkter Netzanschluss) oder falls der Stecker nicht zugänglich ist, ist ein normgerechter zweipoliger Schalter anzubringen, der unter Umständen der Überspannung Kategorie III entsprechend den Installationsregeln ein vollständiges Trennen vom... - Page 56 INSTALLATION Montage • Markieren Sie eine Mittellinie (die Mitte der Kochplatte) an der Wand, und befestigen Sie die Schablone in der gewünschten Höhe an der Wand. 65 cm 45 cm • Halten Sie den Wandbügel an die angegebene Stelle auf der Schablone, und zeichnen Sie die Bohrlöcher ein, bohren Sie die Löcher und montieren Sie den Wandbügel.
- Page 57 INSTALLATION Montage • Halten Sie den Wandbügel vor dem Teleskoprohr gegen die Wand und zeichnen Sie die Bohrlöcher ein. Befestigen Sie den Wandbügel. 2 x Ø 8mm • Hängen Sie die Dunstabzugshaube an den Wandbügel; achten Sie dabei darauf, dass die Ränder des Wandbügels korrekt in den Öffnungen der Oberseite der Haube stecken.
- Page 58 INSTALLATION Montage • Setzen Sie die Stellschrauben ein, und richten Sie die Dunstabzugshaube mit ihrer Hilfe korrekt aus. • Zeichnen Sie die Bohrlöcher für die Befestigung der Dunstabzugshaube an der Wand ein, und nehmen Sie die Dunstabzugshaube ab. Bohren Sie jetzt die Löcher, setzen Sie die Dübel ein und setzen Sie die Dunstabzugshaube wieder auf den Wandbügel.
- Page 59 INSTALLATION Montage • Schrauben Sie die Dunstabzugshaube an der Wand fest. Ø 5 x 45mm • Montieren Sie den Ausgangsflansch. • Stellen Sie den elektrischen Anschluss her. • Befestigen Sie den Ausgangskanal am Ausgang der Dunstabzugshaube. Verwenden Sie hierzu eventuell das mitgelieferte Erweiterungsstück.
- Page 60 INSTALLATION Montage • Befestigen Sie bei einer Rezirkulationsvorrichtung die Ausgangsleitung (T-Stück) am oberen Wandbügel. • Setzen Sie das Teleskoprohr ein, und ziehen Sie das Innenteil bis zum Wandbügel heraus. Montieren Sie das Teleskoprohr an den Wandbügel. Ø 2,9x6,5 DE 20...
-
Page 61: Anlagen
ANLAGEN Entsorgung Entsorgung Gerät und Verpackung Bei der Herstellung dieses Gerätes wurden dauerhafte Werkstoffe verwendet. Dieses Gerät ist am Ende seiner Nutzzeit ordnungsgemäß und gemäß den behördlichen Vorschriften zu entsorgen. Sie erhalten hierzu Informationen bei den zuständigen behörden. Die Verpackung des Gerätes ist wiederverwendbar. Verwendet können sein: •... - Page 62 DE 22...
- Page 63 CONTENT Your canopy hood Description Introduction Safety Precautions you must take Extraction systems Controls Maintenance Cleaning Removing the grease filters Replacing the carbon filter Changing the light bulbs Installation General Electrical connection Mounting the canopy hood Appendice Disposal of appliance and packaging GB 3...
-
Page 64: Your Canopy Hood
YOUR CANOPY HOOD Description On/off button Fan settings Lightning Timer Fan speed and cleaning indicators Introduction When you have read these instructions for use, you will quickly be aware of all the facilities the appliance can offer you. You can read about safety and how you should look after the appliance. -
Page 65: Safety
SAFETY Attention! Make sure the appliance is installed by an authorised installer (see “Installation” chapter). Do not connect the appliance to the flow network before completing the installation. • Connect the appliance in accordance with the applicable regulations in your area. •... -
Page 66: Extraction Systems
SAFETY Attention! • First disconnect the appliance from the socket when you replace the lights! • Only use identical lamps with the wattage indicated. Only use the cooker hood with lamps installed to reduce the risk of electrical shock. • The grease filters become hot during operation. -
Page 67: Use
Controls Switching on the fan Press the button (1). The cooker hood switches on at setting 1. Press the button again. The cooker hood switches off. Increasing the speed Press the (2) button. The fan will switch to a higher speed, starting from speed 1 up to intensive speed 4. - Page 68 Controls Switching lighting on and off Press the lighting button (3). The lighting switches on. Press the button again and the lighting goes out. Switching on the timer Press the (4) button. The motor’s timer is activated, and after the set time the fan switches off. The time settings for the fan are as follows: •...
- Page 69 Controls Grease saturation indicator for grease filter After 40 operating hours the L5 indicator switches on. When the indicator lights up, the grease filter that has been installed must be cleaned. To reset the indicator, press and hold the (1) button for 3 seconds. Grease saturation indicator for activated carbon filter After 160 operating hours the L5 indicator will start flashing.
- Page 70 Controls Switching on the grease saturation indicator for the activated carbon filter Switch off the extractor hood and press and hold the (1) and (4) buttons simultaneously for 3 seconds. The L1 and L2 indicators will start to flash for 5 seconds. Switching off the grease saturation indicator for the activated carbon filter Switch off the extractor hood and press and hold the...
-
Page 71: Maintenance
MAINTENANCE Cleaning Attention! Before performing any maintenance operation, isolate the hood from the electrical supply by switching off at the connector and removing the connector fuse. Or if the appliance has been connected through a plug and socket, then the plug must be removed from the socket. -
Page 72: Removing The Grease Filters
MAINTENANCE Cleaning Glass panels Do not clean the glass panels in a dishwasher in connection with the risk of discolouration. Glass panels can best be cleaned by hand with soapsuds. Grease filters Removing the grease filters Switch off the electricity! Remove the plug from the socket or switch the electricity off at the mains. -
Page 73: Changing The Light Bulbs
MAINTENANCE Carbon filter Position the activated carbon filter • Remove the grease filters. • Position the activated carbon filter behind the grease filter and fix with the two fasteners. Light bulbs Changing the light bulbs Disconnect the hood from the electricity. Warning! Prior to touching the light bulbs ensure they are cooled down. -
Page 74: Installation
INSTALLATION General This appliance should be connected to the power supply by a recognized fitter who is familiar with, and works according to the correct safety regulations. This appliance meets the European requirements. Important that you know: • The minimum distance between the supporting surface for the cooking vessels on the gashob and the lowest part of the range hood must be not less than 65 cm. -
Page 75: Electrical Connection
INSTALLATION Connection Electric connection The mains power supply must correspond to the rating indicated on the plate situated inside the hood. If provided with a plug connect the hood to a socket in compliance with current regulations and positioned in an accessible area. If not fitted with a plug (direct mains connection) or if the plug is not located in an accessible area apply a double poled switch in accordance with standards which assures the complete disconnection of the mains... - Page 76 INSTALLATION Mounting • Draw a centre line on the wall (in the middle of the hob) and stick the template to the wall at the desired height. 65 cm 45 cm • Place the fixing bracket against the specified area on the template and mark where to drill the holes, then drill the holes and mount the fixing bracket.
- Page 77 INSTALLATION Mounting • Place the fixing bracket for the telescopic ducting against the wall and mark the drill holes. Mount the fixing bracket to the wall. 2 x Ø 8mm • Attach the extraction hood to the fixing brackets, and make sure the lips of the fixing bracket protrude correctly through the holes in the top of the hood.
- Page 78 INSTALLATION Mounting • Position the levelling screws and use them to level the extractor hood. • • • • • • • • Mark the drill holes for mounting the extractor hood to the wall, and remove the extractor hood. Now drill the holes, put in the wall plugs and put the extractor hood back on the fixing bracket.
- Page 79 INSTALLATION Mounting • Screw the extractor hood to the wall. Ø 5 x 45mm • Mount the exhaust flange. • Continue with the electrical connection. • Connect the air outlet pipe to the outlet of the extractor hood. If necessary use the supplied adapter. Ø...
- Page 80 INSTALLATION Mounting • If using recirculating mode: mount the exhaust pipe (branch pipe) to the top fixing bracket. • Mount the telescopic pipe and pull out the inside up to the fixing bracket. Mount the telescopic pipe to the fixing bracket. Ø...
-
Page 81: Appendice
APPENDICE Disposal Disposal of appliance and packaging By ensuring this product is disposed of correctly, you will help prevent potential negative consequences for the environment and human health, which could otherwise be caused by inappropriate waste handling of this product. The local authorities can provide you with the relevant information. - Page 82 GB 22...