
Manuels Connexes pour ProBoat Westward 18 Segelboot RTR


Sommaire des Matières pour ProBoat Westward 18 Segelboot RTR
- Page 1 Westward 18 Sailboat RTR ™ Owners Manual • Bedienungsanleitung Manuel de l'utilisateur • Manuale dell'utente...
-
Page 2: Table Des Matières
NOTICE WARNINg: Read the ENTIRE instruction All instructions, warranties and other collateral manual to become familiar with the features of the documents are subject to change at the sole discretion product before operating. Failure to operate the of Horizon Hobby, Inc. For up-to-date product literature, product correctly can result in damage to the visit www.horizonhobby.com and click on the support tab for this product. -
Page 3: Contents
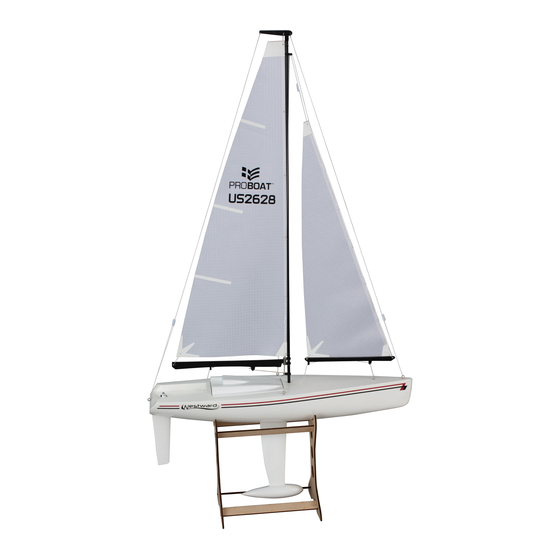
Contents Specifications length 18.125 in (460mm) 4.375 in (111mm) Beam Mast Height 22.75 in (578mm) 22.75” 30.5” Total Height 30.5 in (775mm) Keel Depth 5.827 in (148mm) Transmitter Spektrum 2.4GHz 2-stick Transmitter (DX2M) 18.125” ™ Receiver Spektrum MR200 Hull Material Sail Material Rip-stop nylon 66 in (1676mm) -
Page 4: Battery Installation
Battery Installation 3. Before you sail, connect the holder connector to the + and - BD (bind) port pins on the included Spektrum MR200 receiver. NOTICE: Always attach the red (+) wired connector to the + pin and the black (-) wired connector to the –... -
Page 5: Trimming
Trimming Control Centering Take your time to prepare your sails for the conditions. Before the first voyage, or in the event of an accident, Tip: When there is little wind, tighten the sails so make sure the rudder and sails are centered. they catch more wind. -
Page 6: Binding
Binding Your boat comes bound to the included transmitter. Only 5. When the receiver LED blinks (indicating bind perform the following steps if the boat does not respond is complete), release the bind button on your to the transmitter or you wish to bind the boat to another transmitter. -
Page 7: Repair
Repair Repair this model using CA (cyanocrylate adhesive) glue or clear tape. Line and knot fraying can be decreased by applying a small amount of CA to the end of the line. We do not recommend applying CA to fittings or stays on the boat, but applying CA to knots will keep them from loosening. -
Page 8: Limited Warranty
problem possible Cause Solution Tends to dive in the Sails are rigged too high or low Adjust the tightness of the rigging at water or takes on water on the mast the top corner and bottom of each sail Sails are tied too tight Loosen lines The boat hull is not completely closed Dry out the boat and ensure the hatch is fully... -
Page 9: Limitation Of Liability
limitation of liability without additional protection. Ship via a carrier that provides tracking and insurance for lost or damaged HORIZON SHALL NOT BE LIABLE FOR SPECIAL, parcels, as Horizon is not responsible for merchandise INDIRECT, INCIDENTAL OR CONSEQUENTIAL until it arrives and is accepted at our facility. An Online DAMAGES, LOSS OF PROFITS OR PRODUCTION OR Service Request is available at Horizon Hobby Service COMMERCIAL LOSS IN ANY WAY, REGARDLESS OF... -
Page 10: Parts Contact Information
parts Contact Information Country of Horizon Hobby Address phone Number/Email Address purchase United States of Sales 4105 Fieldstone Rd 800-338-4539 America Champaign, Illinois sales@horizonhobby.com 61822 USA United Kingdom Horizon Hobby Limited Units 1-4 Ployters Rd +44 (0) 1279 641 097 Staple Tye sales@horizonhobby.co.uk Harlow, Essex... -
Page 11: Compliance Information For The European Union
Compliance Information for the European union BE BG GR HU MT NL Declaration of Conformity Instructions for Disposal of WEEE by users in the European union (in accordance with ISO/IEC 17050-1) This product must not be disposed of with other waste. No. -
Page 12: Zusätzliche Sicherheitsvorkehrungen Und Warnhinweise
HINWEIS WARNuNg: Lesen Sie die GESAMTE Bedienungsanleitung durch, um sich vor der Alle Anweisungen, Garantien und anderen Inbetriebnahme mit den Funktionen des Produkts zugehörigen Dokumente können im eigenen Ermessen vertraut zu machen. Wird dieses Produkt nicht von Horizon Hobby, Inc. jederzeit geändert werden. korrekt betrieben, kann dies zu Schäden am Produkt Die aktuelle Produktliteratur finden Sie auf www. -
Page 13: Lieferumfang
Inhaltsverzeichnis Einleitung ..............12 Anlegen ................17 Lieferumfang ............... 13 Reparaturen ..............18 Spezifikationen ............13 Checkliste ..............18 Montage Bootständer ..........13 Vor dem Fahren ............18 Boot Montage ............. 14 Nach dem Fahren............18 Einsetzen der Akkus ........... 14 Problemlösung ............. -
Page 14: Boot Montage
Boot Montage tipp: Für den Transport müssen die Sie Teile der Takelage lösen. Führen Sie dann diese Teile in einer Schlaufe durch die Augenschraube. Für die Verspannung der Takelage lesen Sie bitte die Trimmanweisungen. Ruder Montage Lösen Sie falls notwendig die Madenschraube (C) in dem Steuerarm und ziehen das Ruder (D) heraus. -
Page 15: Steuerkontrolltest
Steuerkontrolltest Führen Sie einen Steuerkontrolltest durch um zu sehen Stellen Sie vor dem Test sicher, das der Sender und wie schnell ihr Segelboot auf Sendereingaben reagiert. Empfänger gebunden sind. (Siehe Binden) Bewegen Sie Bei ungünstigen Windverhältnissen kann das Kennen die Kontrollen auf dem Sender um sicher zu stellen dass dieser Reaktionen den Unterschied zwischen Segeln Ruder und Segel in die richtige Richtung arbeiten. -
Page 16: Trimmen
trimmen Stellen Sie vor der Fahrt oder nach einem Unfall Bitte nehmen Sie sich Zeit um die Segel für die sicher, dass das Ruder und die Segel zentriert sind. Windbedingungen vorzubereiten. 1. Stellen Sie sicher dass die Segel und Ruder tipp: Bei wenig Wind können Sie für eine bessere zentriert (Neutral). -
Page 17: Binden
Binden Das Boot wird bereits an den Sender gebunden 5. Der Empfänger zeigt mit Blinken an, dass der geliefert. Führen Sie die folgenden Schritte nur durch, Bindevorgang erfolgt ist. Sie können nun den falls das Boot nicht mehr auf die Fernsteuerung reagiert Bindeknopf auf ihrem Sender loslassen. -
Page 18: Reparaturen
Reparaturen Nutzen Sie zum Reparieren Sekundenkleber (CA) oder klares Klebeband. Das Ausfransen und lösen der Leinen und Knoten können sie mit einem Tropfen Sekundenkleber verhindern. Wir empfehlen nicht die Stage mit Sekundenkleber zu sichern. Sollten Teile nicht reparabel sein sehen Sie bitte in der Ersatzteilliste für die Bestellnummer nach. - Page 19 problem Mögliche ursache lösung Tendiert zum driften Segel sind nicht zentriert Zentrieren Sie die Segel und Wanten entsprechend den Wind- und Wasserbedingungen Takelage ist abgenutzt oder gebrochen Reparieren oder ersetzen Sie die beschädigte Takelage Tendiert dazu in das Segel sind zu hoch oder zu zu niedrig Stellen Sie die Spannung der Takelage an Wasser einzutauchen am Mast montiert...
-
Page 20: Garantie Und Service Informationen
garantie und Service Informationen Warnung Schadensbeschränkung Ein ferngesteuertes Modell ist kein Spielzeug. Es Horizon ist nicht für direkte oder indirekte Folgeschäden, kann, wenn es falsch eingesetzt wird, zu erheblichen Einkommensausfälle oder kommerzielle Verluste, die in Verletzungen bei Lebewesen und Beschädigungen irgendeinem Zusammenhang mit dem Produkt stehen an Sachgütern führen. -
Page 21: Garantie Und Service Kontaktinformationen
einer Tracking Funktion und Versicherung, da Horizon bis in Rechnung gestellt. Sollten wir nach 90 Tagen keine zur Annahme keine Verantwortung für den Versand des Einverständniserklärung zur Reparatur vorliegen haben, Produktes übernimmt. behalten wir uns vor, das Produkt zu vernichten oder anderweitig zu verwerten. -
Page 22: Konformitätshinweise Für Die Europäische Union
Konformitätshinweise für die Europäische union Entsorgung in der BE BG Europäischen union GR HU Dieses Produkt darf nicht mit anderem Abfall entsorgt werden. Stattdessen ist der Benutzer dafür MT NL verantwortlich, das Abfallgerät an einer bezeichneten Sammelstelle für die Wiederverwertung von Elektro- und Elektronik-Altgeräten abzugeben. -
Page 23: Précautions Et Avertissements Supplémentaires Liés À La Sécurité
REMARQUE AVERTISSEMENT: lisez la TOTALITÉ du La totalité des instructions, garanties et autres manuel d'utilisation afin de vous familiariser avec documents est sujette à modification à la seule les caractéristiques du produit avant de le faire discrétion d'Horizon Hobby, Inc. Pour obtenir la fonctionner. -
Page 24: Contenu
Table des Matières Introduction ..............23 Retour ................. 28 Contenu ..............24 Réparations ..............29 Caractéristiques ............24 Vérifications ..............29 Assemblage du Ber ............ 24 Avant la Navigation ............. 29 Assemblage du Bateau ..........25 Après la Navigation ............. 29 Installation des Batteries .......... -
Page 25: Assemblage Du Bateau
Assemblage du Bateau Conseil: Quelques lignes de gréement ont été détachées pour le transport. Remettez les dans les oeillets. Référez vous à la section des réglages pour tendre les lignes de gréement. Maintenance du gouvernail Si nécessaire, desserrez la vis (C) du bras de direction et retirez l'axe (D) du gouvernail de son fût. -
Page 26: Test Des Commandes
Test des Commandes Effectuez un test des commandes pour voir la vitesse Vérifiez que votre bateau et le récepteur sont bien de réaction du voilier par rapport aux ordres donnés par affectés ensemble (voir section affectation). Bougez les l'émetteur. Par conditions venteuses , il est important manches de l'émetteur pour contrôler que le gouvernail de connaître le temps de réaction du bateau afin de et les voiles fonctionnent dans le bon sens. -
Page 27: Réglage Des Neutres
Réglage des Neutres Astuce: L'émetteur DX2M inclus avec votre bateau possède un réglage de course sur le manche qui contrôle la tension de la voile, course 50/50 ou 70/30. Mise au neutre des commandes Réglez suivant vos désirs, mais vérifiez toujours que la Avant votre première navigation ou après une réparation, voile n'est pas tendue de façon exagérée sinon vous contrôlez le neutre des voiles et du gouvernail. -
Page 28: Affectation
Affectation 5. Quand la DEL du récepteur se met à clignoter Votre bateau est livré affecté à l'émetteur inclus. (indiquant que l'affectation est terminée) Effectuez les étape suivantes uniquement si le bateau ne relâchez le bouton bind de l'émetteur. répond pas aux ordres de l'émetteur ou si vous souhaitez affecter le bateau à... -
Page 29: Réparations
Réparations Vous pouvez effectuer les réparations de ce modèle en utilisant de la colle CA ou du ruban adhésif. Vous pouvez mettre un point de colle sur les noeuds du gréement pour éviter qu'ils se défassent. Nous vous déconseillons de mettre de la colle sur les tendeurs afin de pouvoir les ajuster. -
Page 30: Garantie Et Réparations
Problème Cause Possible Solution Le bateau tend à Les voiles sont réglées trop Ajustez la longueur de gréement du s'enfoncer dans l'eau haute ou trop basses sur le mât coin supérieur et de dessous des voiles Les voiles sont trop tendues Détendez les câbles La coque est mal fermée Séchez le bateau et contrôlez que la trappe est... -
Page 31: Limitation Des Dégâts
Questions, assistance et réparations Horizon se réserve la possibilité de vérifier tous les éléments utilisés et susceptibles d’être intégrés dans le Votre revendeur spécialisé local et le point de vente cas de garantie. La décision de réparer ou de remplacer ne peuvent effectuer une estimation d’éligibilité... -
Page 32: Coordonnées De Garantie Et Réparations
Coordonnées de Garantie et réparations Pays d'achat Horizon Hobby Adresse Numéro de téléphone/Courriel France Horizon Hobby SAS 14 Rue Gustave Eiffel +33 (0) 1 60 47 44 70 Zone d’Activité du Réveil Matin infofrance@horizonhobby.com 91230 Montgeron Garantie et service des coordonnées Pays d'achat Horizon Hobby Adresse... -
Page 33: Ulteriori Precauzioni Per La Sicurezza E Avvertenze
AVVISO AVVeRteNzA: Leggere TUTTO il manuale di Tutte le istruzioni, le garanzie e gli altri documenti istruzioni e familiarizzarsi con le caratteristiche del pertinenti sono soggetti a cambiamenti a prodotto prima di farlo funzionare. Un uso improprio totale discrezione di Horizon Hobby, Inc. del prodotto può... -
Page 34: Contenuto
Indice Introduzione ..............33 Approdo ................38 Contenuto ..............34 Riparazioni ..............39 Caratteristiche ...............34 lista dei controlli ............39 Montaggio del supporto ..........34 Prima di navigare ............39 Montaggio dello scafo ..........35 Dopo la navigazione ............39 Installazione della batteria ..........35 Guida alla soluzione dei problemi .......39 Controllo dei comandi ...........36 Durata della Garanzia ............40 Trimmaggio ..............37... -
Page 35: Montaggio Dello Scafo
montaggio dello scafo tip: Durante la spedizione alcuni cavi di controventatura dell'albero si potrebbero sfilare dagli occhielli. Inserire negli occhielli i cavi che si sono sfilati. Per tendere i cavi di controvento, far riferimento alle istruzioni per il trimmaggio. manutenzione del timone Se necessario, allentare il grano (C) posto sulla squadretta (D) di comando del timone e rimuoverla... -
Page 36: Prova Dei Comandi
Prova dei comandi È necessario fare una verifica della direzione dei comandi Muovere i comandi sul trasmettitore e controllare che il per vedere anche quanto rapidamente la barca risponde timone e le vele si muovano correttamente e nella giusta ai comandi del trasmettitore. In una giornata con vento direzione. -
Page 37: Centrare I Comandi Dopo L'utilizzo
trimmaggio regolare come si vuole badando bene però che non ci sia troppa tensione sui cavi, tale da procurare danni alla barca. Se si usa un trasmettitore computerizzato si Controllo del centraggio hanno maggiori possibilità di regolazione delle corse, Prima di iniziare a navigare o dopo che si è verificato più... -
Page 38: Connessione (Binding)
Connessione (binding) 4. Sul trasmettitore tenere premuto il pulsante per il "bind", mentre lo si accende. La barca viene fornita già connessa con il suo 5. Quando il LED sul ricevitore lampeggia, indicando trasmettitore. Eseguire la seguente procedura solo che la procedura di connessione è completata, se la barca non risponde ai comandi del trasmettitore, rilasciare il pulsante per il "bind"... -
Page 39: Riparazioni
Riparazioni Per riparare questo modello serve della colla cianoacrilica (CA) o del nastro adesivo. Lo sfilacciamento dei cavi e dei nodi diminuisce se si applica una piccola quantità di colla CA alla loro estremità. Raccomandiamo di non applicare la colla CA ai raccordi o alle piastrine della barca, ma di usarla sui nodi per evitare il loro scioglimento. -
Page 40: Durata Della Garanzia
Problema Possibile Causa Soluzione Tende ad entrare in Le vele sono sistemate troppo in Sistemare correttamente le acqua o a imbarcare alto o troppo in basso sull'albero vele sia in alto che in basso acqua Le vele sono legate troppo strette Allentare i cavi Lo scafo non è... - Page 41 Domande, assistenza e riparazioni Horizon si riserva il diritto di controllare qualsiasi componente utilizzato che viene coinvolto nella rivalsa Il vostro negozio locale e/o luogo di acquisto non possono di garanzia. Le decisioni relative alla sostituzione o alla fornire garanzie di assistenza o riparazione senza previo riparazione avvengono solo in base alla discrezione di colloquio con Horizon.
-
Page 42: Garanzia E Revisiona Informazioni Per I Contatti
garanzia e Revisiona informazioni per i contatti Stato in cui il prodotto horizon hobby Indirizzo telefono/Indirizzo e-mail è stato acquistato Germania Horizon Technischer Christian-Junge-Straße 1 +49 4121 2655 100 Service 25337 Elmshorn, Germania service@horizonhobby.de Informazioni di Servizio clienti Stato in cui il prodotto horizon hobby Indirizzo telefono/Indirizzo e-mail... -
Page 43: Replacement Parts
Replacement Parts PRB3481 Hull: Westward 18 Westward 18: Rumpf Westward 18: Coque Scafo: Westward 18 PRB3482 Hatch: Westward 18 Westward 18: Haube Westward 18: Trappe Copertura: Westward 18 PRB3483 Keel: Westward 18 Westward 18: Kiel Westward 18: Quille Deriva: Westward 18 PRB3484 Rudder with Arm: Westward 18: Ruder m. - Page 44 33262 Printed: 3/2012 ©2012 Horizon Hobby, Inc. Westward, Pro Boat, DSM, the Pro Boat logo and the Horizon Hobby logo are trademarks or registered trademarks of Horizon Hobby, Inc. The Spektrum trademark is used with permission of Bachmann Industries, Inc. US 7,391,320.