
Manuels Connexes pour Burkert 6520 NAMUR


Sommaire des Matières pour Burkert 6520 NAMUR
- Page 1 F l u i d C o n t r o l S y s t e m s Ventil / Valve / Vanne Type 6520 NAMUR Betriebsanleitung / Operating Instructions / Instructions de service...
-
Page 2: Table Des Matières
Ventil Typ 6520 NAMUR mit 24 V-Anschluß Ventil Typ 6520 NAMUR mit Profibus-PA- Anschaltung Inhalt: ALLGEMEINE SICHERHEITSHINWEISE ALLGEMEINE BESCHREIBUNG Ventil Typ 6520 NAMUR mit 24 V-Anschluß Ventil Typ 6520 NAMUR mit PROFIBUS-PA-Anschaltung PROFIBUS PA ALLGEMEINE TECHNISCHE DATEN Typ 6520 NAMUR mit 24 V-Anschluß... - Page 3 DARSTELLUNGSMITTEL In dieser Betriebsanleitung werden folgende Darstellungsmittel verwendet: markiert einen Arbeitsschritt, den Sie ausführen müssen ACHTUNG! kennzeichnet Hinweise, bei deren Nichtbeachtung Ihre Ge- sundheit oder die Funktionsfähigkeit des Gerätes gefährdet ist. HINWEIS kennzeichnet wichtige Zusatzinformationen, Tips und Empfehlungen Typ 6520...
-
Page 4: Allgemeine Sicherheitshinweise
ALLGEMEINE SICHERHEITSHINWEISE Beachten Sie die Hinweise dieser Betriebsanleitung sowie die Einsatz- bedingungen und zulässigen Daten gemäß Datenblatt Typ 6520, damit das Gerät einwandfrei funktioniert und lange einsatzfähig bleibt: • Halten Sie sich bei der Einsatzplanung und dem Betrieb des Gerätes an die allgemeinen Regeln der Technik! •... -
Page 5: Allgemeine Beschreibung
ALLGEMEINE BESCHREIBUNG Ventil Typ 6520 NAMUR zur Ansteuerung von Prozeßventilen mit elektrischem Anschluß, wahlweise mit 24 V-Anschluß oder PROFIBUS-PA -Anschaltung nach DIN 19245 T 4 Ventil Typ 6520 NAMUR mit 24 V-Anschluß • hilfsgesteuertes Pneumatikventil mit Piezoventil als Vorsteuerung •... - Page 6 • Fernspeisung und Datenübertragung in Zweileitertechnik mit PROFIBUS-PA • Einsatz von PROFIBUS-PA innerhalb explosionsgefährdeter Bereiche in Explosionsschutzart Eigensicherheit durch Anwendung der Übertragungs- technik nach IEC 1158-2 • Einfache Kopplung der Bussegmente PROFIBUS-DP und PROFIBUS-PA mittels Segmentkoppler Genau wie beim Einsatz außerhalb explosionsgefährdeter Bereiche kann mit PROFIBUS-PA in Zündschutzart Eigensicherheit auch innerhalb des Ex-Bereichs gearbeitet werden.
-
Page 7: Allgemeine Technische Daten
ALLGEMEINE TECHNISCHE DATEN Typ 6520 NAMUR mit 24 V-Anschluß Betriebsspannung: 24 V DC ±10% Druckbereich: 2,5 bis 7 bar Flansch: NAMUR Flansch Ruhestrom: < 150 µA bei 24 V Verlustleistung: < 10 mW Zulässiger Temperaturbereich: Umgebung: - 20 bis +55 ° C Medium: - 20 bis +50 °... -
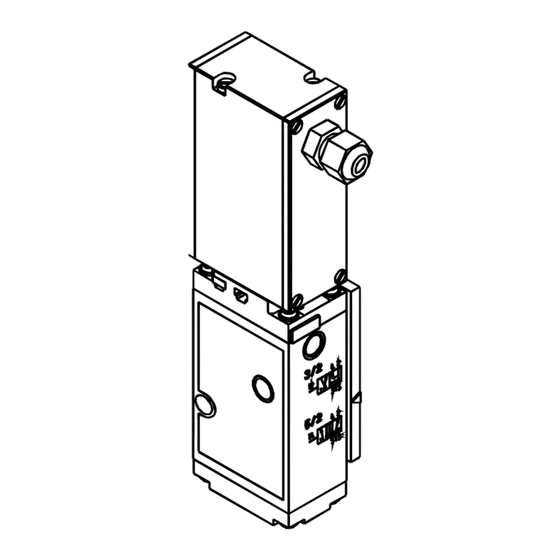
Page 8: Ventilaufbau
Ventilaufbau • Antriebe: - Piezoantrieb, - Profibus PA • Ventilgehäuse mit Membran und Sitzdichtungen (5/2) • Arbeitsanschlüsse 2 (B) / 4 (A) mit Wechselplatte nach Namur Flanschbild sowie Ver- und Entsorgungsanschlüsse 1, 3 und 5 mit G 1/4 - Innengewinde •... -
Page 9: Medium
Medium • Gefilterte Druckluft, geölt oder ungeölt (Partikelgröße max 5 µm) • Dichtwerkstoffe: PB = Polyurethan und Perbunan • Zulässiger Temperaturbereich: - 20 bis +50 ° C • Betriebsdruckbereich: 2,5 bis 7 bar ACHTUNG! Beachten Sie den zulässigen Druckbereich, der auf dem Typenschild angegeben ist. -
Page 10: Montage Und Inbetriebnahme Des Ventils
MONTAGE UND INBETRIEBNAHME DES VENTILS Eingriffe dürfen nur durch Fachpersonal und mit geeignetem Werkzeug erfolgen! Schalten Sie vor Eingriffen in das System in jedem Fall die Spannung ab! Führen Sie die Druckversorgung auch bei vorgeschalteten Geräten wie Druck- reglern, Wartungseinheiten usw. möglichst großvolumig aus; Betriebsdruck ≥... -
Page 11: Befestigung Des Ventils / Pneumatische Stellungsanzeige
Befestigung des Ventils / pneumatische Stellungsanzeige Befestigen Sie das Ventil mit den zwei mitgelieferten M5x35 Schrauben direkt an der NAMUR-Anschlußfläche des pneumatischen Antriebs. HINWEIS Der mitgelieferte Kodierstift stellt sicher, daß das Gerät nur in der vorgesehenen Lage montiert werden kann (Sicherstellung der festgelegten Wirkrichtung des Antriebs). -
Page 12: Elektr. Anschluß Des Ventils Typ 6520 Mit 24 V-Anschaltung
Elektr. Anschluß des Ventils Typ 6520 NAMUR mit 24 V-Anschluß Anschluß: Klemme 11 24 V Klemme 13 0 V / Ground Elektr. Anschluß des Ventils Typ 6520 NAMUR mit Profibus PA-Anschaltung Betriebsanleitung-Nr. 800 608... -
Page 13: Anschlüsse
4.4.1 Anschlüsse Anschluß PROFIBUS-PA unabhängige Polarität 23 - Sensor 2 21 + Sensor 2 13 - Sensor 1 11 + Sensor 1 DIP-Schalter zur Einstellung der Teilnehmeradresse 1 ... niederwertigstes Bit (LSB) 8 ... höchstwertigstes Bit (MSB) 4.4.2 Einstellung der Stationsadressen DIP-Schalter 1 bis 7 Bit 1 bis Bit 7 Die DIP-Schalter werden nur beim Einschalten des Gerätes... -
Page 14: Konfigurieren Des Netzwerkes
Einstellungen: DIP-1 DIP-2 DIP-3 DIP-4 DIP-5 DIP-6 DIP-7 Adresse 126 * * Auslieferungszustand: Adresse 126 KONFIGURIEREN DES NETZWERKES Speicherbelegung für den Nutzdatenverkehr Grundlage: Handbuch für Ihre SPS Um die richtigen Einstellungen des Konfigurationsprogramms vornehmen zu können, kopieren Sie die gerätespezifische Datei (buer6520.GSD) von Bürkert in das Verzeichnis, das die Konfigurations-Software enthält. -
Page 15: Belegung Des Eingangs
5.1.1.1 Belegung des Eingangs Byte 0 Belegung nicht belegt unbedämpft Sensor 2 bedämpft Sensor 1 Byte 1 Belegung nicht belegt inaktiv Leerlauf Sensor 2 aktiv Kurzschluß Sensor 2 Leerlauf Sensor 1 Kurzschluß Sensor 1 5.1.1.2 Belegung des Ausgangs Byte 0 a = 1 Ventil geschaltet a = 0... -
Page 16: Störungen
STÖRUNGEN Störung mögliche Ursache Behebung Überprüfen Sie den elektri- Ventile schalten nicht: keine oder nicht ausreichen- schen Anschluß. de Betriebsspannung; Stellen Sie die Betriebsspan- nung laut Typenschild sicher. Führen Sie die Druckversor- Druckversorgung nicht aus- gung möglichst großvolumig - reichend oder nicht vorhan- aus (auch bei vorgeschalteten den. - Page 17 NOTIZEN Typ 6520...
- Page 18 INSTALLATION AND COMMISSIONING OF THE VALVE Mounting the valve / pneumatic position indicator Measures to be taken before commissioning Electrical connection of the Type 6520 NAMUR valve with the 24 V connection Electrical connection of the Type 6520 NAMUR valve with the PROFIBUS-PA connection 4.4.1...
-
Page 19: Symbols Used
SYMBOLS USED In these Operating Instructions, the following symbols are used: Indicates a working step that you have to carry on. ATTENTION! Indicates information which must be followed. Failure to do this could endanger your health or the functionality of the device.. -
Page 20: General Safety Instructions
GENERAL SAFETY INSTRUCTIONS To ensure that the device functions correctly, and will have a long service life, please comply with the information in these Operating Instructions, as well as the application conditions and permissible data given in the Type 6520 data sheet: •... -
Page 21: General Description
GENERAL DESCRIPTION Type 6520 NAMUR valve for the control of process valves with electrical connections, available with either a 24 V connection or with a PROFIBUS-PA connection to DIN 19245 T 4. Type 6520 NAMUR Valve with 24 V connection •... - Page 22 • Remote supply and data transmission in dual conductor technology with PROFIBUS-PA • Use of PROFIBUS-PA within areas with explosion risk in explosion protection class Intrinsic Safety by the use of transmission techniques according to IEC 1158-2 • Simple linking of the PROFIBUS-DP and PROFIBUS-PA bus segments using segment coupler In the same way as for the use outside areas with explosion risk, the PROFI- BUS-PA can also be used within the Ex area with protection class Intrinsically...
-
Page 23: General Technical Data
GENERAL TECHNICAL DATA Type 6520 NAMUR with 24 V connection Operating voltage: 24 V DC ±10% Pressure range: 2,5 to 7 bar Flange: NAMUR flange Standby current: < 150 µA at 24 V Power dissipation: < 10 mW Permissible temperature range Ambient: - 20 to +55 °... -
Page 24: Valve Construction
Valve construction • Drives: - Piezo drive, - PROFIBUS-PA • Valve housing with membrane and seat seals (5/2) • Service ports 2 (B) / 4 (A) with change-over plate to MAMUR flange layout, plus feed and drain connections 1, 3 and 5 with G 1/4 internal thread •... -
Page 25: Medium
Medium • Filtered compressed air, oiled or unoiled (max. particle size 5 µm) • Sealing material: PB = Polyurethane and perbunan • Permissible temperature range: - 20 to +50 ° C • Operating pressure range: 2,5 to 7 bar ATTENTION! Note the permissible pressure range given on the rating plate. -
Page 26: Installation And Commissioning Of The Valve
INSTALLATION AND COMMISSIONING OF THE VALVE Work on the device should only be carried out by specialist staff using the correct tools! Before carrying out work on the system, always switch off the voltage supply! Implement the pressure supply with as large a volume as possible (even for pilot devices such as pressure regulators, service units etc.);... -
Page 27: Mounting The Valve / Pneumatic Position Indicator
Mounting the valve / pneumatic position indicator Mount the valve directly onto the NAMUR connection flange of the pneumatic drive using the 2 supplied M5 x 35 screws. NOTE The supplied coded pin ensures that the device can only be mounted in the foreseen position. -
Page 28: Electrical Connection Of The Type 6520 Namur Valve With The 24 V Connection
Electrical connection of the Type 6520 NAMUR valve with the 24 V connection Connection: Terminal 11 24 V Terminal 13 0 V / Ground Electrical connection of the Type 6520 NAMUR valve with the PROFIBUS-PA connection Operating instructions no. 800 608... -
Page 29: Connections
4.4.1 Connections Connection PROFIBUS PA with any polarity - Sensor 2 + Sensor 2 - Sensor 1 + Sensor 1 DIP-switches for setting station addresses least significant bit (LSB) most significant bit (MSB) 4.4.2 Setting the Station Addresses DIP switch 1 to 7 Bit 1 to Bit 7 NOTE The DIP switch is only read when the device is switched on. -
Page 30: Configuration Of The Network
Settings: DIP-1 DIP-2 DIP-3 DIP-4 DIP-5 DIP-6 DIP-7 Address 126 * Delivery status: Adress 126 CONFIGURATION OF THE NETWORK Memory configuration for the useful data traffic Basis: Handbook for your PLC In order to be able to carry out the correct settings of the configuration program, copy the device-specific file (buer6520.GSD) from Bürkert into the directory containing the configuration software. -
Page 31: Configuration Of The Input
5.1.1.1 Configuration of the input Byte 0 Configuration not used undamped Sensor 2 damped Sensor 1 Byte 1 Configuration not used undamped Bypass Sensor 2 damped Short-circuit Sensor 2 Bypass Sensor 1 Short-circuit Sensor 1 5.1.1.2 Configuration of the output Byte 0 a = 1 Valve switched... -
Page 32: Faults
Faults Fault Possible cause Remedy Valve does not switch: Insufficient or no operating Check the electrical connetctions voltage; Ensure the operating voltage is as given on the rating plate Pressure supply insuffi- Implement the pressure supply cient or not present. with as large a volume as pos- sible (even for pilot devices such as pressure regulators, service... - Page 33 NOTES Type 6520...
- Page 34 Vanne type 6520 NAMUR avec raccordement 24 V Vanne type 6520 NAMUR avec connexion PROFIBUS-PA TABLE DES MATIÈRES: INDICATIONS GENERALES DE SECURITE DESCRIPTION GENERALE Vanne type 6520 NAMUR avec raccordement 24 V Vanne type 6520 NAMUR avec connexion PROFIBUS-PA PROFIBUS-PA...
-
Page 35: Modes De Représentation
Modes de représentation On utilise dans ces instructions de service les modes de représentation suivants: marque une phase de travail que vous devez exécuter ATTENTION caractérise des indications dont l’observation peut mettre en danger votre santé ou la fonctionnalité de l’appareil. REMARQUE caractérise des indications supplémentaires, des conseils et des recommandations... -
Page 36: Indications Generales De Securite
INDICATIONS GENERALES DE SECURITE Observez les indications de ces instructions de service ainsi que les conditions d’utilisation et les caractéristiques admissibles selon la fiche technique du type 6520, afin que l’appareil fonctionne parfaitement et reste longtemps en état de fonctionnement: •... -
Page 37: Description Generale
DESCRIPTION GENERALE Vanne type 6520 NAMUR pour le pilotage de vannes de processus avec raccordement 24 V ou connexion PROFIBUS-PA selon DIN 19245 T 4. Vanne type 6520 NAMUR avec raccordement 24 V • Vanne pneumatique à commande assistée avec pilote piézo-électrique •... - Page 38 • Alimentation à distance et transmission de données en technique à deux conducteurs avec PROFIBUS-PA • Utilisation du PROFIBUS-PA à l’intérieur de domaines exposés à des ris- ques d’explosion avec le mode de protection antidéflagrant à sécurité in- trinsèque par l’application de la technique de transmission selon IEC 1158-2 •...
-
Page 39: Caracteristiques Techniques Generales
CARACTERISTIQUES TECHNIQUES GENERALES Type 6520 NAMUR avec raccordement 24 V Tension de service: 24 V DC ±10% Plage de pression: 2 á 7 bars Bride: bride NAMUR Courant de repos: < 150 uA sous 24 V Pertes: < 10 mW Plage de température admissible:... -
Page 40: Construction De La Vanne
Construction de la vanne • Actionnement: - piézo-électrique, - PROFIBUS PA • Corps de vanne avec membrane et joints de siège (5/2) • Raccords de travail 2 (B) / 4 (A) avec plaque interchangeable selon bride NAMUR ainsi que raccords d’alimentation et d’évacuation 1, 3 et 5 avec taraudage G 1/4 •... -
Page 41: Fluide
Fluide • Air comprimé filtré, huilé ou non (grandeur max. des particules 5 µm) • Matière du joint: BP = perbunan et polyéthylène • Plage de température admissible: ambiante: - 25 á 55 ° Celsius fluide: - 25 á 50 ° Celsius •... -
Page 42: Montage Et Mise En Service De La Vanne
MONTAGE ET MISE EN SERVICE DE LA VANNE Des interventions ne doivent être effectuées que par un personnel qualifié équipé de l’outillage approprié! Déclencher dans tous les cas la tension avant toute intervention sur le système! Nettoyer les conduites avant le montage de la vanne! Réaliser l'alimentation de la pression à... -
Page 43: Fixation De La Vanne / Affichage Pneumatique De Position
Fixation de la vanne / affichage pneumatique de position Fixer le bloc de vannes avec les 2 vis M5x35 jointes directement contre la surface de raccordement NAMUR de l’entraînement pneumatique. REMARQUE La tige de codage jointe assure que l’appareil ne puisse être monté... -
Page 44: Raccordement Électrique De La Vanne Type 6520 Namur Avec Raccordement
Raccordement électrique de la vanne type 6520 NAMUR avec raccordement 24 V Raccordement: Borne 11 24 V Borne 13 0 V / masse Raccordement électrique de la vanne type 6520 NAMUR avec connexion PROFIBUS-PA Betriebsanleitung-Nr. 800 608... -
Page 45: Raccordements
4.4.1 Raccordements Connexion PROFIBUS PA avec polarité quelconque - détecteur 2 + détecteur 2 - détecteur 1 + détecteur 1 Interrupteurs DIP pour régler l'adresse de l'utilisateur bit de plus basse valeur (LSB) bit de plus haute valeur (MSB) 4.4.2 Réglages des adresses de station Interrupteurs DIP 1 à... -
Page 46: Configuration Du Reseau
Réglages: DIP-1 DIP-2 DIP-3 DIP-4 DIP-5 DIP-6 DIP-7 Adresse 126 * * État de livraison: adresse 126 CONFIGURATION DU RESEAU Connexions de mémoire pour le trafic utile des données Bases: Manuel de votre automate programmable Afin de pouvoir procéder aux réglages corrects du programme de configuration, copiez le fichier spécifique aux appareils (buer6520.GSD) de Bürkert dans le répertoire qui contient le logiciel de configuration. -
Page 47: Connexions De L'entrée
5.1.1.1 Connexions de l’entrée Octet 0 Occupation pas occupé non activé capteur 1 activé capteur 2 Octet 1 Occupation pas occupé inactif capteur 2 à vide actif capteur 2 en court-circuit capteur 1 à vide capteur 1 en court-circuit 5.1.1.2 Connexions de la sortie Octet 0 a = 1... -
Page 48: Dérangements
DÉRANGEMENTS Dérangement Cause possible Remède Les vannes ne Tension de service absente Vérifier le raccordement commutent pas: ou insuffisante; électrique. Assurer la tension de service selon la plaquette signaleétique. Pression d'alimentation Exécuter l'alimentation en absente ou insuffisante. pression avec le plus grand volume (aussi avec les appareils en amont tels que régu-lateurs de pression, unités... - Page 49 NOTES Typ 6520...
- Page 50 Berlin: Tel. (0 30) 67 97 17-0 Dresden: Tel. (03 59 52) 36 30-0 Frankfurt: Tel. (0 61 03) 94 14-0 Steuer- und Regeltechnik Hannover: Tel. (05 11 ) 9 02 76-0 Christian-Bürkert-Str. 13-17 Dortmund: Tel. (0 23 73) 96 81-0 74653 Ingelfingen München: Tel.