Publicité
Les langues disponibles
Les langues disponibles
Liens rapides
Kühlschrank integrierbar
Réfrigérateur intégrables
Frigorifero integrabili Refrigerator for integrated use
GEBRAUCHSANWEISUNG
MODE D'EMPLOI
ISTRUZIONE D'USO
OPERATING INSTRUCTIONS
D
IK 225 10 RE
IK 225 10 LI
F
I
GB
7082 297-00 810
Publicité

Manuels Connexes pour Electrolux IK 225 10 RE


Sommaire des Matières pour Electrolux IK 225 10 RE
- Page 1 Kühlschrank integrierbar Réfrigérateur intégrables Frigorifero integrabili Refrigerator for integrated use GEBRAUCHSANWEISUNG MODE D'EMPLOI ISTRUZIONE D'USO OPERATING INSTRUCTIONS IK 225 10 RE IK 225 10 LI 7082 297-00 810...
- Page 2 Entsorgungshinweis Sicherheits- und Warnhinweise • Verpackungsmaterial ist kein Spielzeug für Kinder - Ersti- • Um Personen- und Sachschäden zu vermeiden, sollte das Gerät ckungsgefahr durch Folien! von zwei Personen ausgepackt und aufgestellt werden. • Bringen Sie die Verpackung zu einer offiziellen Sammelstelle. •...
- Page 3 Aufstellen Temperatur einstellen • Der Aufstellungsraum Ihres Gerätes muß laut der Norm EN 378 Das Gerät ist serienmäßig für den Normalbetrieb eingestellt, im pro 8g Kältemittelfüllmenge R 600a ein Volumen von 1 m auf- Kühlteil sind +5 °C empfehlenswert. weisen, damit im Falle einer Leckage des Kältemittelkreislaufes •...
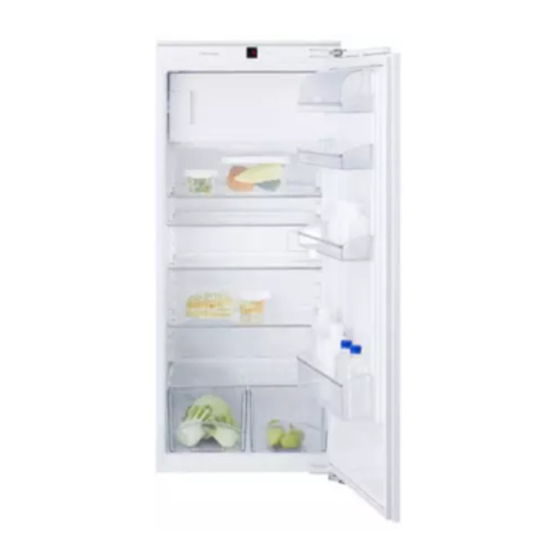
- Page 4 Zusatzfunktionen Ausstattung Über den Einstellmodus können Sie die Kindersicherung nutzen Die Abstellflächen sind je nach und die Leuchtkraft der Anzeige verändern. Kühlguthöhe versetzbar. Glasplatte anheben, Aussparung Einstellmodus aktivieren: über Auflage ziehen und höher oder • Taste ca. 5 sec drücken - die Taste blinkt - das Display zeigt tiefer einsetzen c für Kindersicherung.
- Page 5 Hinweise zum Einfrieren und Lagern Reinigen • Zum Verpacken gefriergeeignetes Material oder Gefäße ver- Vor dem Reinigen grundsätzlich das Gerät außer Betrieb set- wenden. zen. Netzstecker ziehen oder die vorgeschaltete Sicherung • Die Packungen immer mit Datum und Inhalt beschriften und die auslösen bzw.
- Page 6 Türanschlag wechseln Fachtür wechseln • Am Lagerbock die Abdeckung wegklappen. • Den Lagerbock abschrauben, die Fachtür mit dem Lagerbock abnehmen. 1. Abdeckteile abheben. • Verschlussstück abschrauben. 2. Befestigungsschrauben am Gerätekörper nur lösen. • Die freigewordenen Löcher mit den Stopfen verschließen. 3.
- Page 7 Möbeltür montieren 1. Montagehilfen nach oben 8. Möbeltür auf die Gerätetür/ herausziehen und in die Justagebolzen einhän- danebenliegenden Auf- gen, Kontermuttern nahmeöffnungen gedreht cker auf die Justagebolzen einschieben. aufschrauben. 9. Die Möbeltür bündig und fluchtend zu den umlie- genden Möbelfronten aus- richten.Kontermuttern anziehen.
- Page 8 Protection de l'environnement Recommandations et consignes de sécurité • Les matériaux d'emballage ne sont pas des jouets pour • Afin d'éviter tout accident matériel ou corporel, nous vous recom- les enfants ! Danger d'étouffement avec les films plasti- mandons de faire appel à une deuxième personne pour déballer ques ! et mettre en place l'appareil.
- Page 9 Mise en place Réglage de la température • Le site d'installation de votre appareil doit impérativement être Cet appareil est réglé d'usine pour un régime de fonctionnement conforme à la norme EN 378, à savoir un volume de 1 m pour 8 normal.
- Page 10 Fonctions supplémentaires Equipement Le mode de réglage vous permet d’utiliser la sécurité enfants ou Les surfaces de rangement peuvent de modifier la luminosité de l’affichage. être déplacées suivant la place nécessaire. Soulever la tablette en Activer le mode de réglage : verre, tirer la découpe au-dessus •...
- Page 11 Conseils pour la congélation et la conservation Nettoyage • N'utiliser que des emballages ou récipients spécialement Avant de procéder au nettoyage, arrêter impérativement l'ap- prévus pour la congélation. pareil. Débrancher la prise de l'appareil ou retirer le fusible. • Indiquer le contenu et la date sur les paquets à congeler et res- •...
- Page 12 Inversion du sens d'ouverture de la porte Porte du compartiment réversible • Retirer le cache du support en le rabattant. • Dévisser le support , retirer la porte du compartiment avec le support. 1. Enlever les caches • Dévisser le taquet de fermeture 2.
- Page 13 Montage de la porte du meuble 1. Tirer les aides de montage 8. Accrocher la porte du meu- vers le haut, les tourner de ble sur la porte de l'appareil 180° et les enfoncer dans les et sur les pièces d'ajuste- logements qui se trouvent à...
- Page 14 Indicazioni per lo smaltimento Indicazioni ed avvertenze per la sicu rez za • I materiali da imballaggio non sono giocattoli per bam- • L'apparecchio dovrebbe venire sballato ed installato da due bini - le pellicole possono essere pericolose e causare il persone allo scopo di evitare danni a persone o a cose! soffocamento.
- Page 15 Posizionamento Impostare la temperatura • In conformità alla norma EN 378, il locale di installazione dell'ap- L'apparecchio viene predisposto in fabbrica per il funzionamento parecchio deve avere un volume di 1 m per 8 g di refrigerante normale, si raccomandano +5 °C nel vano frigorifero. R 600a, affinché...
- Page 16 Funzioni supplementari Dotazioni Attraverso il modo di programmazione potete utilizzare la sicurezza I ripiani possono essere spostati a bambini e modificare la luminosità del display. seconda delle necessità. Sollevare la lastra di vetro, sfilare i fori dagli Attivare il modo di programmazione: appoggi e infilarla più...
- Page 17 Indicazioni per la congelazione e la conser- Pulizia vazione Disinserire in ogni caso l'apparecchio prima di procedere alla sua pulizia. Estrarre la spina oppure staccare o svitare i • Utilizzare materiali e recipienti adatti per impacchettare le fusibili inseriti a monte. confezioni.
- Page 18 Modificare l'incernieratura sportello Modificare l'incernieratura dello sportello interno • Ribaltare la copertura del supporto cerniera • Svitare il supporto cerniera e togliere lo sportello dello scom- 1. Sollevare i coperchietti parto con il supporto cerniera. 2. Allentare le viti di fissaggio sul corpo dell'apparecchio, •...
- Page 19 Montaggio dello sportello del mobile 1. Estarre gli elementi di mon- 8. Appendere lo sportello del taggio ed inserirli quindi, mobile sui perni di registra- opportunamente girati, nelle zione dello sportello dell'ap- aperture accanto. parecchio . Avvitare in modo lento i controdadi sui perni di registrazione.
- Page 20 Disposal notes Safety instructions and warnings • Keep packaging materials away from children - polythene • To prevent injury or damage to the unit, the appliance should be sheets and bags can cause suffocation! unpacked and set up by two people. •...
- Page 21 Setting up Setting the temperature • Standard EN 378 specifies that the room in which you install The appliance is pre-set for normal operation. We recommend your appliance must have a volume of 1 m per 8 g of R 600a temperatures of +5°C in the refrigerator.
- Page 22 Additional functions Equipment In set-up mode you can set the child-proof lock and adjust the You can re-arrange the storage shelves as required. brightness of the display. Lift the glass shelf, align the recess Activating set-up mode: over the support and replace the shelf •...
- Page 23 Notes on freezing and storage Cleaning • Pack frozen food in standard freezer bags or reuseable plastic, Before cleaning always switch off the appliance. Disconnect metal or aluminium containers. from the mains or unscrew or switch off the fuse. • Always write the date and contents on the pack and do not exeed •...
- Page 24 Changing over door hinges Changing the compartment door • At hinge fold away the cover. • Unscrew hinge and remove the compartment door with the 1. Lift off covers hinge. 2. Loosen attachment screws on the appliance. • Unscrew the closure 3.
- Page 25 Fitting a unit door 1. Lift the fitting aids out to the 8. Suspend the unit door on top, turn round and insert the door of the appliance/ into the adjacent openings. adjusting pins . Screw the counternuts loosely onto the adjusting pins. 9.
- Page 28 KUNDENDIENST Servicestellen Points de service Servizio dopo vendita Point of service 5506 Mägenwil/Zürich Industriestr. 10 9000 St. Gallen Zürcherstrasse 204 e 4052 Basel St. Jakob-Turm Birsstrasse 320B 6020 Emmenbrücke Seetalstrasse 11 7000 Chur Comercialstrasse 19 3018 Bern Morgenstrasse 131 1028 Préverenges Le Trési 6 6916 Grancia Zona Industriale E...