
Manuels Connexes pour Bosch Power Xpress


Sommaire des Matières pour Bosch Power Xpress
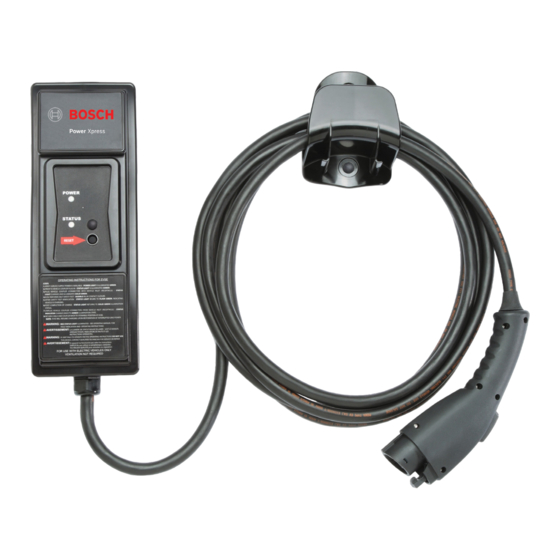
- Page 1 Power Xpress Charge Station en Installation and Operating Instructions fr Instructions d’installation et d’utilisation...
-
Page 2: Technical Support
Copyright © 2015 Bosch Automotive Service Solutions Inc. All rights reserved. The information, specifications, and illustrations in this guide are based on the latest information available at the time of printing. Bosch Automotive Service Solutions Inc. reserves the right to make changes at any time, without notice. -
Page 3: Table Des Matières
Installation and Operating Instructions | Power Xpress Charge Station | 1 | en Table of Contents Safety Regulatory Information Environmental Considerations Product Specification FCC Declaration of Conformity Radio and Television Interference Agency Approvals Features and Specifications Ground-fault protection Automatic reset... -
Page 4: Safety
| 2 | Installation and Operating Instructions | Power Xpress Charge Station Safety WARNING: Disconnect main service Save these instructions. Read all instruction before supply or unplug unit to achieve electrical installing or using the Power Xpress Charge Station. -
Page 5: Regulatory Information
Installation and Operating Instructions | Power Xpress Charge Station | 3 | en Regulatory Information Features and Specifications The Charge Station includes ground-fault protection, automatic reset upon grid power loss, ground assurance Environmental Considerations monitoring, and self-testing capabilities. Manual reset- At the end of service life, the Charge Station ting of the Charge Station is not necessary. -
Page 6: Product Features
| 4 | Installation and Operating Instructions | Power Xpress Charge Station Product Features Technical Specifications Voltage and • 240VAC single-phase: L1, L2, and Output 32A Max, Model Dependent Wiring Amperage safety ground. • (see output spec. label on side of (120V above •... -
Page 7: Package Contents
Installation and Operating Instructions | Power Xpress Charge Station | 5 | en Package Contents Tools Suggested for Installation (1) Charge Station (including attached cord and vehicle Stud finder coupler) (EL -50600-1) Tape measure (1) Wall-mounting bracket (EL -50600-1) 2-ft (61-cm) level... -
Page 8: Applicable Electrical Systems
| 6 | Installation and Operating Instructions | Power Xpress Charge Station Applicable Electrical Systems 208V 3-Phase Wye Connection (North IMPORTANT: Identify the onsite service America) connection before installing the Charge Any two of the legs can be used to provide 208V to the Station. -
Page 9: 230V Above Ground (Europe) 230V Single Phase
Installation and Operating Instructions | Power Xpress Charge Station | 7 | en 240V 3-Phase Delta Connection (North 230V Above Ground (Europe) America) with Center Tap on One Leg 230V Single Phase One leg must be center-tapped, and only the two phas-... -
Page 10: Electrical Requirements For Battery Charging
| 8 | Installation and Operating Instructions | Power Xpress Charge Station Electrical Requirements for Table 1. North American Current-Adjustment Settings Battery Charging Charge NEMA Charge Station Breaker Wire Receptacle Station WARNING: The Charge Station must Current- Required, Required,... -
Page 11: Mounting Template
Installation and Operating Instructions | Power Xpress Charge Station | 9 | en ss01412 Mounting Template See the back cover of this manual for the Charge Sta- tion mounting template. Finished Wall Charge Station Installation ss01410 Align the hash-marked center and lower horizontal lines of the template to the lines drawn on the wall. - Page 12 | 1 0 | Installation and Operating Instructions | Power Xpress Charge Station Note: ss01415 To avoid damage to the front of the Charge Station, place it on a soft or cardboard surface. ss01419 Remove the template from the wall. Using a ham- 10.
- Page 13 Installation and Operating Instructions | Power Xpress Charge Station | 11 | en ss01429 ss01423 L2/N 18. Remove the strain-relief assembly from the wiring chamber. 14. Cover the plastic bushing with the self=adhesive ss01430 foam dust-cover gasket, with the center-slit oriented ss01425 horizontally.
- Page 14 | 1 2 | Installation and Operating Instructions | Power Xpress Charge Station ss01443 ss01434 L2/N 27. Attach the wiring chamber lid with four (4) 3/4-in. (20-mm) square-drive screws. 28. Apply the self-adhesive chamber lid label. 22. Feed the L1 (black) [Europe H (brown)] wire into the L1 [Europe H] terminal slot in the wiring cham- ber.
-
Page 15: Masonry Wall Charge Station Installation
Installation and Operating Instructions | Power Xpress Charge Station | 13 | en ss01451 Masonry Wall Charge Station Installation ss01453 Locate and mark a point 45 in. (114.3 cm) above Using a 1/8-in. (3-mm) drill bit, drill the three (3) the floor surface. - Page 16 | 1 4 | Installation and Operating Instructions | Power Xpress Charge Station Note: 15. Secure the Charge Station to the mounted wall To avoid damage to the Charge Station, place it on a bracket by engaging the tabs on the Charge Station soft or cardboard surface.
- Page 17 Installation and Operating Instructions | Power Xpress Charge Station | 15 | en ss01432 ss01438 L2/N 21. Remove threaded ground lug. ss01434 26. Reinstall strain relief. Note: Select appropriate orientation of insert to achieve prop- er clamping for wire size used.
-
Page 18: Molded Plug-Connected Charge Station Installation (North America Only)
| 1 6 | Installation and Operating Instructions | Power Xpress Charge Station Molded Plug-Connected Charge Station Installation (North America only) ss01478 Install appropriate outlet box (ground-pin at 12-o’clock position) with top- or side-conduit feed. CAUTION: Do not feed the outlet box from Align the hash-marked center and lower horizontal the bottom. - Page 19 Installation and Operating Instructions | Power Xpress Charge Station | 17 | en ss01456 ss01432 L2/N 19. Remove threaded ground lug. 14. Using a 1 1/16-in. (28-mm) hole saw, with the pilot ss01434 hole as a guide, drill out the knockout.
- Page 20 | 1 8 | Installation and Operating Instructions | Power Xpress Charge Station ss01496 ss01438 25. Reinstall strain relief and torque screws to 4 Nm (35 in-lb). Note: Select appropriate orientation of insert to achieve prop- er clamping. CAUTION: Do not overtighten.
-
Page 21: Operating Instructions
Installation and Operating Instructions | Power Xpress Charge Station | 19 | en Operating Instructions Power and Status LED Indications Verify service supply power is available; green POW- ER indicator LED is illuminated. Power LED Status LED Condition Retrieve Charge Station vehicle cable and coupler from rear-mounted holder (stowed position);... -
Page 22: Troubleshooting
| 2 0 | Installation and Operating Instructions | Power Xpress Charge Station Troubleshooting Problem Solution Indicated If there is a charging issue proceed with the following by LED steps. If the issue persists after three attempts call Status Bosch at 1-877-805-EVSE (3873) for assistance. -
Page 23: Maintenance
Installation and Operating Instructions | Power Xpress Charge Station | 21 | en Maintenance Cleaning CAUTION: Always turn off service power WARNING: Do not attempt to service the (supply-side power at the main service Charge Station. The Charge Station has panel) before cleaning the Charge Station no user-serviceable components. -
Page 24: Limited Warranty
| 2 2 | Installation and Operating Instructions | Power Xpress Charge Station Limited Warranty This warranty gives the Purchaser specific legal rights. The Purchaser may also have other rights which vary THIS LIMITED WARRANTY IS EXPRESSLY LIMITED TO from state to state. - Page 25 Installation and Operating Instructions | Power Xpress Charge Station | 23 | en If Bosch confirms a defect covered under this war- ranty, you will: • Obtain a Return Goods Authorization Number (RGA#) number from Bosch; • Directed to ship the Charging Station, at your...
-
Page 29: Station De Charge Power Xpress
Station de charge Power Xpress fr Instructions d’installation et d’utilisation... - Page 30 Tous droits réservés. Les renseignements, spécifications et illustrations dans ce manuel sont basés sur les dernières informations disponibles au moment de la publication. Bosch Automotive Solutions Service Inc. se réserve le droit d'apporter des modifications à tout moment, sans préavis.
- Page 31 Instructions d’installation et d’utilisation | Station de charge Power Xpress | 1 | fr Table des matières Sécurité Renseignements réglementaires Considérations environnementales Spécifications du produit Déclaration de conformité FCC Interférences radio et télévision Approbations des agences Caractéristiques et spécifications Dispositif de protection contre les défauts de terre Réinitialisation automatique...
-
Page 32: Sécurité
| 2 | Instructions d’installation et d’utilisation | Station de charge Power Xpress Sécurité AVERTISSEMENT : Pour obtenir un isolation Conservez ces instructions. Lisez toutes les instructions avant électrique, coupez l'alimentation en courant au d’installer ou d’utiliser la station de charge Power Xpress. -
Page 33: Renseignements Réglementaires
Instructions d’installation et d’utilisation | Station de charge Power Xpress | 3 | fr Renseignements réglementaires Caractéristiques et spécifications La station de charge comprend un dispositif de protection contre les défauts de terre, une réinitialisation automatique Considérations environnementales lors d’un panne de courant, un contrôle de liaison de terre et des capacités de test automatique. -
Page 34: Caractéristiques Du Produit
| 4 | Instructions d’installation et d’utilisation | Station de charge Power Xpress Caractéristiques du produit Spécifications techniques • 240 VCA monophasé : L1, L2 et prise de 32 A max., dépend du modèle Tension et Intensité du terre de sécurité. • câblage courant de (consultez l'étiquette des spécifications de... -
Page 35: Contenu De L'emballage
Instructions d’installation et d’utilisation | Station de charge Power Xpress | 5 | fr Contenu de l’emballage Outils suggérés pour l'installation (1) Station de charge (y compris le cordon et le coupleur Détecteur de montant pour véhicule) (EL -50600-1) Ruban à mesurer (1) Support mural (EL -50600-1) Niveau de 2 pi (61 cm) -
Page 36: Systèmes Électriques Applicables
| 6 | Instructions d’installation et d’utilisation | Station de charge Power Xpress Systèmes électriques applicables Couplage triphasé en étoile de 208 V IMPORTANT Identifiez conducteur (Amérique du Nord) branchement d’électricité sur place avant d'installer Deux des lignes peuvent être utilisées pour fournir du courant la station de charge. -
Page 37: Couplage Triphasé En Triangle De 240 V (Amérique Du Nord) Avec Prise Médiane Sur Une Ligne
Instructions d’installation et d’utilisation | Station de charge Power Xpress | 7 | fr Couplage triphasé en triangle de 240 V (Amérique 230 V au-dessus du sol (Europe) du Nord) avec prise médiane sur une ligne 230 V monophasé Une ligne doit présenter une prise médiane, et seules les deux phases de chaque côté... -
Page 38: Exigences Électriques Pour La Recharge De La Batterie
| 8 | Instructions d’installation et d’utilisation | Station de charge Power Xpress Exigences électriques pour la Tableau 1. Paramètres de réglage de courant en Amérique du Nord recharge de la batterie Paramètre Sortie de Prise NEMA de réglage... -
Page 39: Gabarit De Montage
Instructions d’installation et d’utilisation | Station de charge Power Xpress | 9 | fr ss01412 Remarque : Si la surface murale est inachevée (montants seulement), installez un panneau contreplaqué de 36 × 17,5 × 3/8 po (90 × 45 × 1 cm) entre les montants et fixez-le solidement. Suivez les instructions d’« Installation de la station de charge sur mur... - Page 40 | 10 | Instructions d’installation et d’utilisation | Station de charge Power Xpress Remarque : ss01415 Pour éviter d'endommager l'avant de la station de charge, placez-la sur une surface souple ou en carton. ss01419 Retirez le gabarit du mur. À l'aide d'un marteau, installez 10.
- Page 41 Instructions d’installation et d’utilisation | Station de charge Power Xpress | 11 | fr ss01429 ss01423 L2/N 18. Retirez l'ensemble de réducteur de tension de la chambre de câblage. 14. Couvrez le coussinet en plastique avec le capuchon ss01430 d’étanchéité antipoussière en mousse adhésif en veillant ss01425 à...
- Page 42 | 12 | Instructions d’installation et d’utilisation | Station de charge Power Xpress 20. Dénudez 1 1/4 po (32 mm) de gaine de l’extrémité du 25. Serrez les vis du bornier au couple de conducteur et 3/8 po (10 mm) de gaine des extrémités 1,2 Nm (10,62 po lb). des fils de conducteur individuels.
-
Page 43: Installation De La Station De Charge Au Mur En Maçonnerie
Instructions d’installation et d’utilisation | Station de charge Power Xpress | 13 | fr ss01451 Installation de la station de charge au mur en maçonnerie ss01453 À l’aide d’un foret de 1/8 po (3 mm), percez les trois (3) trous marqués « A » sur le gabarit. - Page 44 | 14 | Instructions d’installation et d’utilisation | Station de charge Power Xpress 15. Fixez la station de charge sur le support mural en insérant Remarque : les pattes de la station de charge dans les fentes du sup- Pour éviter d'endommager la station de charge, placez-la sur...
- Page 45 Instructions d’installation et d’utilisation | Station de charge Power Xpress | 15 | fr 25. Serrez les vis du bornier au couple de ss01432 1,2 Nm (10,62 po lb). ss01438 L2/N 21. Retirez la patte de mise à la terre filetée. ss01434 26. Réinstallez le réducteur de tension.
-
Page 46: Installation De La Station De Charge Avec Fiche Moulée (Amérique Du Nord Seulement)
| 16 | Instructions d’installation et d’utilisation | Station de charge Power Xpress Installation de la station de charge avec fiche moulée (Amérique du Nord seulement) ss01478 Installez une boîte de sortie appropriée (broche de terre à la position de 12 heures) avec passage du conduit en haut ou au côté. - Page 47 Instructions d’installation et d’utilisation | Station de charge Power Xpress | 17 | fr ss01456 ss01434 L2/N 14. À l’aide d’un foret de 1 1/16 po (28 mm), avec le trou pilote comme guide, percez l’alvéole défonçable. 20. Faites passer l'assemblage de fiche/câble/presse-étoupe moulé à travers le trou de 1 1/16 po (28 mm) dans le MISE EN GARDE : Utilisez un réglage de vitesse...
- Page 48 | 18 | Instructions d’installation et d’utilisation | Station de charge Power Xpress ss01496 ss01438 25. Réinstallez le réducteur de tension et serrez les vis au couple de 4 Nm (35 po-lb). Remarque : Sélectionnez l'orientation appropriée de l'insert pour obtenir un serrage approprié.
-
Page 49: Consignes D'utilisation
Instructions d’installation et d’utilisation | Station de charge Power Xpress | 19 | fr Consignes d'utilisation Voyants DEL d’alimentation et d’état Vérifiez l'alimentation en courant du tableau de distribu- tion; le voyant DEL d’ALIMENTATION est allumé en vert. Voyant DEL... -
Page 50: Dépannage
| 20 | Instructions d’installation et d’utilisation | Station de charge Power Xpress Dépannage Déclenchement du disjoncteur différentiel de fuite à S'il y a un problème de charge, procédez comme suit. Si le la terre (DDFT) problème persiste après trois tentatives, appelez Bosch au Si la station de charge détecte un défaut de la mise à... -
Page 51: Maintenance
Instructions d’installation et d’utilisation | Station de charge Power Xpress | 21 | fr Maintenance Nettoyage MISE EN GARDE : Coupez toujours l'alimentation AVERTISSEMENT : N'essayez pas d’entretenir en courant au tableau de distribution avant de la station de charge. La station de charge nettoyer la station de charge et/ou le câble de... -
Page 52: Garantie Limitée
| 22 | Instructions d’installation et d’utilisation | Station de charge Power Xpress Cette garantie donne à l'acheteur des droits légaux spécifiques. Garantie limitée L'acheteur peut également avoir d'autres droits lesquelles CETTE GARANTIE LIMITÉE EST EXPRESSÉMENT LIMITÉE À peuvent varier d'une province ou d'un État à l'autre. Dans la L'ACHETEUR ORIGINAL (« ACHETEUR ») DE LA STATION DE... - Page 53 Instructions d’installation et d’utilisation | Station de charge Power Xpress | 23 | fr Si Bosch confirme un défaut couvert par cette garantie, vous : • obtiendrez un numéro d'autorisation de retour (nº RGA) de Bosch; • serez dirigé à expédier la station de charge à Bosch à...
-
Page 55: Passage De Câbles À L 'Arrière Du Boîtier
PASSAGE DE CÂBLES À L ’ARRIÈRE DU BOÎTIER LIGNE CENTRALE DU (6) TROUS CONDUIT MARQUÉS « B » POUR MONTAGE SUR CLOISON SÈCHE (3) TROUS MARQUÉS « A » POUR MONTAGE SUR MUR EN MAÇONNERIE PLACEZ LA BASE DU SUPPORT À 45 PO DU... - Page 58 Bosch Automotive Service Solutions Inc. 28635 Mound Road Warren, MI 48092 USA Phone: (877) 805-EVSE (3873) www.BoschEVSolutions.com...