Table des Matières
Publicité
Les langues disponibles
Les langues disponibles
Liens rapides
EcoBoost MPPT
Solar Charging System Controller
Installation, Operation and Maintenance Manual
For the most recent manual revisions, see the version at:
MAXIMUM POWER POINT TRACKING
www.morningstarcorp.com
www.morningstarcorp.com
MODELS
EB-MPPT-20
EB-MPPT-30
EB-MPPT-40
TM
EB-MPPT-20M
EB-MPPT-30M
EB-MPPT-40M
Publicité
Table des Matières

Manuels Connexes pour Morningstar EcoBoost MPPT ESSENTIAL Serie


Sommaire des Matières pour Morningstar EcoBoost MPPT ESSENTIAL Serie
- Page 1 EcoBoost MPPT Solar Charging System Controller Installation, Operation and Maintenance Manual For the most recent manual revisions, see the version at: www.morningstarcorp.com www.morningstarcorp.com MODELS EB-MPPT-20 EB-MPPT-20M EB-MPPT-30 EB-MPPT-30M EB-MPPT-40 EB-MPPT-40M MAXIMUM POWER POINT TRACKING...
-
Page 2: Table Des Matières
DIMENSIONS (centimeters) TABLE OF CONTENTS ( 19.6 ) ( 17.0 ) 1.0 Important Safety Instructions ......2.0 General Information ........... Overview ..............5 Features ..............6 Optional Accessories ..........8 (14.8 ) ( 18.1 ) 3.0 Installation .............. General Installation Notes ........9 Configuration ............11 Mounting ..............14... -
Page 3: Important Safety Instructions
IMPORTANT SAFETY INSTRUCTIONS ...Continued SAVE THESE INSTRUCTIONS. 5.0 Troubleshooting...........35 LED Fault Indications...........35 This manual contains important safety, installation, operating and maintenance instructions for the EcoBoost MPPT solar Battery Charging and Performance Issues....39 controller. 6.0 Warranty ............ 40 The following symbols are used throughout this manual to 7.0 Technical Specifications....... - Page 4 • External solar and battery disconnects are required. A means of disconnecting all power supply poles must be provided. These disconnects must be incorporated in the • Disconnect all sources of power to the controller before fixed wiring. installing or adjusting the EcoBoost MPPT. •...
-
Page 5: General Information
• Use tools with insulated handles and avoid placing tools GENERAL INFORMATION or metal objects on top of batteries. • Disconnect charging source prior to connecting or 2.1 Overview disconnecting battery terminals. • Determine if battery is inadvertently grounded. If so, Thank you for choosing the EcoBoost MPPT charge control- remove the source of contact with ground. -
Page 6: Features
7 - Battery Positive and Negative Terminals Power connections for Battery (+) and (-) cable terminations 8 - Remote Temperature Sensor Terminals (RTS) Connection points for a Morningstar RTS to remotely monitor battery temperature 9 - USB Micro-B Data Port (future use) -
Page 7: Optional Accessories
2.3 Optional Accessories INSTALLATION The following accessories are available for purchase 3.1 General Installation Notes separately from your authorized Morningstar dealer: • Read through the entire installation section first before Remote Temperature Sensor (Model: RTS) beginning installation. The RTS measures battery temperature for accurate •... -
Page 8: Configuration
• Do not install in locations where water can enter the WARNING: Solar and battery fuses or DC breakers controller. are required in the system. These protection devices are external to the EcoBoost MPPT controller, and must be a • Loose power connections and /or corroded wires maximum of 25 amps for the EB-20/M, 35 amps for the EB- may result in resistive connections that melt wire 30/M, and 50 amps for the EB-40/M. - Page 9 Switches 2, 3: System Voltage Three (3) system voltage configurations are available as Equalize Absorp. Float Equalize Absorp. Equalize Equalize Equalize Equalize Equalize Equalize Switch Battery Stage Stage Stage Time Time Timeout Interval Interval Interval shown in the table below: Settings Type (volts)
-
Page 10: Mounting
3.3 Mounting 3.4 Wiring Inspect the controller for shipping damage. Mount the Eco- Boost MPPT to a vertical surface (4-#8 self-tapping screws are included). Tighten the mounting screws, using care not to crack the plastic case. Do not install directly over an easily combustible surface since the heat sink may get hot under certain operating conditions. - Page 11 STEP 1: Check Controller Limitations WARNING: Equipment Damage Never place the temperature sensor inside a battery cell. Verify that the highest temperature compensated solar array Both the RTS and the battery will be damaged. open-circuit voltage (Voc), and load current do not exceed the ratings of the EcoBoost MPPT version being installed.
- Page 12 Per IEC 62109, minimum sizes for equipment copper grounding wire are: • EcoBoost MPPT-20 10 mm • EcoBoost MPPT-30 10 mm • EcoBoost MPPT-40 10 mm OR, of the same, or greater, cross-sectional area as the PV wires. For safety, and effective lightning protection, it is recommended, and may be required by code, that the BATTERY (+) negative conductor of the charging system be properly...
- Page 13 If load control is required, contact Morningstar Tech Support for assistance. Next, the green, yellow or red LED will light depending on the battery state-of-charge (SOC). Confirm that one of these Turn the loads off, and connect the load wires to the load LEDs is on before going to the next step.
-
Page 14: Operation
4.1 TrakStar MPPT Technology • the load is not connected, not working, or turned off The EcoBoost MPPT utilizes Morningstar’s TrakStar After all connections have been completed, observe the Maximum Power Point Tracking technology to extract LEDs to make sure the controller is operating normally for system conditions. - Page 15 NOTE: These settings are general guidelines for use at the operator’s discretion. The EcoBoost MPPT can be programmed to satisfy a wide range of charging parameters. Consult the battery manufacturer for optimal battery charge settings. Equalize Equalize Absorp. Float Equalize Absorp.
-
Page 16: Load Control Information
If load control is required, contact Morningstar Tech Support for assistance. General Load Control Notes: Current Compensation: Do not wire multiple EcoBoost MPPT load outputs together All LVD and LVR set-points are current compensated. -
Page 17: Led Indications
4.4 LED Indications NOTES: 1) R flashing is generally a user addressable fault / error KEY: 2) R charging status LED ON with heartbeat blink OFF G = green G - Y - R = flashing sequencially every 5 secs is a critical fault that generally requires service. Y = yellow G / Y = flashing together... -
Page 18: Custom Settings
Heatsink Temperature Sensor Open / Shorted Brightness The heatsink temperature sensor is damaged. Return the Auto Scroll Auto Scroll Timer controller to an authorized Morningstar dealer for service. Auto Return Temp. Units Uncalibrated Language The controller was not factory calibrated. Return the Figure 4-2. -
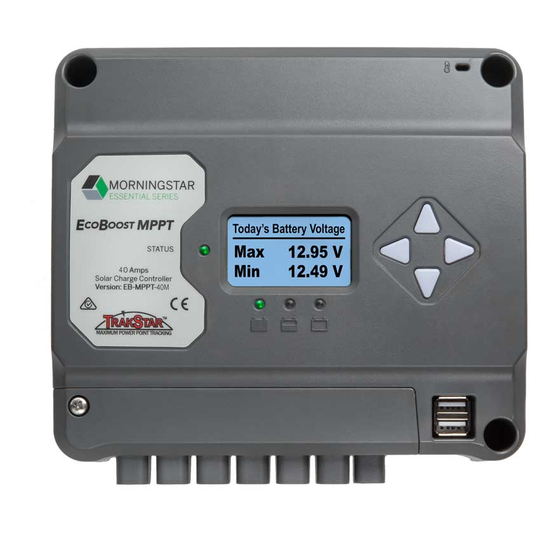
Page 19: Meter Display Operation
For metered models, see the included complete meter 4.8 Auxilliary USB Charging map insert, also available in the EcoBoost MPPT support documents at: 1) The EcoBoost MPPT has two USB-A ports for use as www.morningstarcorp.com charging sources for small electronics. Energy is taken from the system battery, so any auxilliary charging must be bal- 4.6.2 Meter Display Operation anced with other load draws on the system battery. -
Page 20: Troubleshooting
TROUBLESHOOTING Schedule Maintenance Items Re-tighten power terminal WARNING: RISK OF ELECTRICAL SHOCK. 2 weeks after installation connections to specified NO POWER OR ACCESSORY TERMINALS ARE ELEC- torque values. TRICALLY ISOLATED FROM DC INPUT, AND MAY BE ENER- GIZED WITH HAZARDOUS SOLAR VOLTAGE. UNDER CERTAIN FAULT CONDITIONS, BATTERY COULD BECOME OVER- Re-tighten power terminal CHARGED. - Page 21 Load Short Circuit High Heatsink Temperature Error status LED: Flashing red. Battery status LEDs: R/G-Y Error status LED: Flashing red. Battery status LEDs: R-Y sequencing. Fully protected against load wiring short- sequencing. The heatsink temperature has exceeded safe circuits. After two (2) automatic load reconnect attempts (10 limits and the load is disconnected.
-
Page 22: Battery Charging And Performance Issues
Problem: Verify that nothing has been mis-wired. If not, the error is The EcoBoost MPPT is not charging the battery. likely critical. Contact an authorized Morningstar dealer for Solution: support. Check the three (3) battery SOC LEDs. If they are flashing in... -
Page 23: Warranty
10-35 volts (all) material and workmanship for a period of TWO (2) years from the Voltage Accuracy 0.1% +/- 50mV (all) date of shipment to the original end user. Morningstar will, at its Max. Battery Current 20 Amps 30 Amps 40 Amps option, repair or replace any such defective products. - Page 24 Battery Charging Set-points (@ 25°C) Lighting Control (DIP 1 ON): [multiply voltages by (2) for 24 volt systems] Lighting Timer Setting Dusk-Dawn (default) Lighting Test Timer 5 minutes Absorp. Float Equalize Absorp. Equalize Equalize Equalize Equalize Equalize Equalize Equalize Switch Battery Data &...
-
Page 25: Certifications
• Complies with ENs and LVD standards for CE marking • EN 62109-1 • Emissions 55014-1 • Immunity 55014-2 EcoBoost MPPT is a trademark of Morningstar Corporation ©2017 Morningstar Corporation. All rights reserved. www.morningstarcorp.com MODELS EB-MPPT-20 EB-MPPT-20M EB-MPPT-30 EB-MPPT-30M MS-002243 v2.1... - Page 26 DIMENSIONS (centimètres) CONSIGNES DE SÉCURITÉ IMPORTANTES ( 19,6 ) CONSERVEZ CES INSTRUCTIONS. ( 17,0 ) Le présent manuel contient des consignes de sécurité et des instructions d'installation et d'utilisation importantes pour le régulateur de charge solaire EcoBoost MPPT. Les symboles suivants sont utilisés tout au long du présent manuel pour signaler les situations potentiellement dangereuses ( 14,8 ) ( 18,1 )
- Page 27 • L’utilisation d’un sectionneur solaire et d’un sectionneur Un dispositif de sectionnement doit être mis en place pour de batterie externes est requise. l’ensemble des pôles d’alimentation. Ce dispositif doit être incorporé au câblage fixe. • Débranchez toutes les sources d’alimentation du régulateur avant d’installer ou de régler l’EcoBoost MPPT.
- Page 28 • Retirez montres, bagues, bijoux et tout autre objet INFORMATIONS GÉNÉRALES métallique avant de travailler sur des batteries. 2.1 Caractéristiques • Portez des gants et des bottes de caoutchouc. • Utilisez des outils dotés de poignées isolées et éviter Les caractéristiques du EcoBoost MPPT sont illustrées dans la de placer des outils ou des objets métalliques figure 2-1 ci-dessous.
- Page 29 Les accessoires suivants peuvent être achetés séparément 2 – Dissipateur thermique / vis de mise à la terre auprès de votre distributeur Morningstar agréé : (vis M4 pour la mise à la terre du dissipateur thermique) Le dissipateur thermique en aluminium (situé sur la face postérieure) Capteur de température distant (modèle : RTS)
- Page 30 • Les bornes de la batterie de l’EcoBoost MPPT peuvent INSTALLATION être raccordées à une batterie ou à un banc de batteries. Les instructions suivantes mentionnent une batterie 3.1 Remarques générales relatives à l’installation unique, il est toutefois entendu que les bornes de la batterie peuvent être raccordées à...
- Page 31 ATTENTION : les caractéristiques nominales REMARQUE : avant de raccorder la batterie, mesurez la tension en circuit ouvert. Celle-ci doit être supérieure à 10 V pour démarrer le d’interruption du dispositif de protection contre les régulateur. Si les interrupteurs de paramétrage de la tension système surcharges doivent être d’au moins 2 000 A pour les sont réglés sur auto-détection, toute tension de batterie supérieure systèmes 12 V et 4 000 A pour les systèmes 24 V.
- Page 32 Interrupteur 7 : Égalisation de la batterie 3.3 Montage Vérifiez que le régulateur n’a subi aucun dommage pendant Mode Interrupteur 7 le transport. Montez l’EcoBoost MPPT sur une surface Égalisation manuelle verticale (4 vis autotaraudeuses n° 8 incluses). Serrez les vis de fixation en faisant attention à ne pas fissurer le boîtier en Égalisation automatique plastique.
- Page 33 3.4 Raccordement ÉTAPE 1 : Contrôle des limitations du régulateur Assurez-vous que la tension maximale en circuit ouvert du générateur PV (Voc) compensée en température et le courant de charge n'excèdent pas les caractéristiques nominales du modèle EcoBoost MPPT en cours d’installation. Plusieurs régulateurs peuvent être installés en parallèle sur un même banc de batterie afin d’accroître le courant de charge total.
- Page 34 Conformément à la norme CEI 62109, les sections minimales ATTENTION : endommagement de l’équipement Ne placez jamais le capteur de température à l’intérieur pour le câble de mise à terre en cuivre de l’équipement d’une cellule de batterie. Le RTS et la batterie seraient doivent être les suivantes : tous deux endommagés.
- Page 35 Si le contrôle de charge est ouvert supérieure à 120 V DC lorsqu'il est exposé au soleil. requis, contactez l’assistance technique Morningstar. Vérifiez que le sectionneur d'entrée PV ou le disjoncteur est ouvert (déconnecté) avant d'installer les câbles Éteignez les charges et connectez les câbles de charge...
- Page 36 Plusieurs raisons peuvent expliquer un défaut d'allumage de la charge : • l’EcoBoost MPPT est en sectionnement à basse tension (DEL rouge allumée) • la charge présente un court-circuit (les DEL rouge et verte clignotent en alternance avec la DEL jaune) Le calibre des fusibles ou du •...
- Page 37 4 étapes permettant une charge rapide, efficace L’EcoBoost MPPT utilise la technologie de suivi du point et sûre de la batterie. La figure 4-1 illustre le déroulement de puissance maximale (MPPT) TrakStar de Morningstar afin des étapes. d’extraire un maximum d’énergie du ou des module(s) PV.
- Page 38 11,70 13,20 13,50 Si le contrôle de charge est requis, contactez l’assistance on -off -off 5 – Ouverte 14,60 13,50 15,30 11,90 13,40 technique Morningstar. 14,70 15,40 on -off -on 6 – Ouverte 13,50 12,10 13,60 12,30 13,80 on -on -off 7 –...
- Page 39 4.4 Signification des DEL REMARQUES : 1) Le clignotement R correspond généralement à une anomalie LÉGENDE : ou une erreur pouvant être corrigée par l’utilisateur. V = vert V – J – R = clignotent tour à tour 2) Si la DEL d’état R est ALLUMÉE avec pulsations et S’ÉTEINT toutes les 5 secondes, il s’agit d’une anomalie J = jaune V / J = clignotent en même temps...
- Page 40 Retour automatique Non étalonné Unités de température Langue Le régulateur n'a pas été étalonné en usine. Veuillez retourner le régulateur à un distributeur Morningstar agréé Figure 4-2. Structure simplifiée des menus du compteur. pour réparation. Utilisation Manuel de l’utilisateur EcoBoost MPPT...
- Page 41 Pour les modèles équipés de compteurs, veuillez vous 4.8 Charge USB auxiliaire reporter à la notice fournie qui détaille la structure complète des menus du compteur, également disponible dans la 1) L’EcoBoost MPPT est doté de deux ports USB-A documentation relative au EcoBoost MPPT sur : à utiliser comme sources de charge pour de petits appareils www.morningstarcorp.com électroniques.
- Page 42 DÉPANNAGE Calendrier Postes d’entretien Resserrer les raccordements 2 semaines après l’installation des bornes d’alimentation ATTENTION : RISQUE D’ÉLECTROCUTION. selon le couple spécifié. AUCUNE BORNE ACCESSOIRE OU D’ALIMENTATION N’EST ISOLÉE ÉLECTRIQUEMENT DE L’ENTRÉE DC. Resserrer les raccordements 3 mois après l’installation des bornes d’alimentation ELLES PEUVENT DONC ÊTRE SOUMISES À UNE selon le couple spécifié.
- Page 43 120 V, le générateur le cas, cette erreur est probablement critique. Contactez un sera déconnecté jusqu'à ce que la Voc retombe en dessous distributeur Morningstar agréé pour obtenir une assistance. de la tension nominale maximale en toute sécurité. DEL SOC de DEL d'état...
- Page 44 20 A 30 A 40 A de la date d’expédition à l’utilisateur final original. Si les produits Tension maximale en circuit Tous : 120 V susmentionnés s'avèrent défectueux, Morningstar les réparera ou ouvert du système PV 20 A 30 A 30 A les remplacera à sa discrétion. Courant de charge nominal Consommation < 25 mA (sans compteur)
- Page 45 Valeurs de consigne de charge de la batterie (à 25 °C) Données et communications : [multipliez les valeurs de tension par deux (2) pour les systèmes 24 V] Port de données (utilisation future) USB micro-B Enregistrement de données Paramétrage (utilisation future) 30 jours maximum E q u a liz e E q u a liz e E q u a liz e...
- Page 46 *Die Anlagenspannung darf diese Grenze niemals überschreiten. de Morningstar Corporation **Diese Leistungsstufen beziehen sich auf die maximale Leistung, die das PS-MPPT verarbeiten kann. Anlagen mit höherer Leistung © 2017 Morningstar Corporation. Tous droits réservés. können ohne Beschädigung des Reglers verwendet werden. MS-002243-FL v2.1 Certifications...
- Page 47 1.0 WICHTIGE SICHERHEITSANWEISUNGEN • Externe Solar- und Akkutrennschalter sind erforderlich. • Trennen Sie alle Stromquellen vom Regler, bevor Sie den EcoBoost MPPT installieren oder einstellen. BEWAHREN SIE DIESE ANWEISUNGEN AUF. • Es gibt keine Sicherungen oder Trennschalter im Inneren des Dieses Handbuch enthält wichtige Sicherheits-, Installations- sowie EcoBoost MPPT.
- Page 48 • Entfernen Sie Uhren, Schmuck und andere Metallobjekte Es muss eine Einrichtung zum Abschalten der gesamten Stromversorgung vorhanden sein. Diese Trennschalter vor der Arbeit mit Akkus. müssen in die feste Verdrahtung integriert sein. • Tragen Sie Gummihandschuhe und Gummistiefel. • Verwenden Sie Werkzeuge mit isolierten Griffen und Die negativen Anschlussklemmen des EcoBoost MPPT entsprechen allgemeiner Bauform und müssen gemäß...
- Page 49 Stromanschlüsse für Laden (+) und (-) Kabelanschlüsse 7 – Positiv- und Negativ-Anschlussklemmen Akku Stromanschlüsse für Akku (+) und (-) Kabelanschlüsse 8 – Anschlussklemmen Temperatur-Fernsensor (RTS) Anschlusspunkte für einen Morningstar RTS zur Fernüberwachung der Akkutemperatur 9 – USB Micro-B-Datenschnittstelle (zukünftige Verwendung) Micro-B-USB-Schnittstelle für (zukünftige) Datenübertragung 10 –...
- Page 50 2.2 Optionales Zubehör INSTALLATIONSANWEISUNGEN Das folgende Zubehör ist separat bei Ihrem autorisierten 3.1 Allgemeine Hinweise zur Installation Morningstar-Händler erhältlich: • Lesen Sie den gesamten Abschnitt zur Installation Temperatur-Fernsensor (Modell: RTS) durch, bevor Sie die Installation durchführen. Der RTS misst für eine genaue Temperaturkompensation •...
- Page 51 Die folgenden Anweisungen beziehen sich auf einen 3.2 Konfiguration einzelnen Akku, es wird jedoch impliziert, dass der Akkuanschluss an einen einzelnen Akku oder eine Der DIP-Schalterblock in Abbildung 3.1 unten wird Gruppe von Akkus in einer Akkubank erfolgen kann. zum Einstellen der Betriebsparameter des •...
- Page 52 HINWEIS: Messen Sie die Leerlaufspannung, bevor Sie den Akku Schalter 7: Akku-Ausgleich anschließen. Zum Starten des Reglers muss diese mehr als 10 Volt betragen. Wenn die Einstellschalter für Systemspannung auf Modus Schalter 7 Auto-Erkennung eingestellt sind, werden Akkuspannungen von Manueller Ausgleich über 15,5 V als Akku mit 24 V Nennspannung erkannt und das Gerät lädt entsprechend.
- Page 53 3.3 Montage 3.4 Verdrahtung Überprüfen Sie den Regler auf Transportschäden. Montieren Sie den EcoBoost MPPT an einer vertikalen Fläche (4 selbstschneidende Schrauben Nr. 8 liegen bei). Ziehen Sie die Befestigungsschrauben an, aber achten Sie darauf, das Kunststoffgehäuse nicht zu beschädigen. Nicht direkt über einer leicht brennbaren Oberfläche installieren, da der Kühlkörper unter bestimmten Betriebsbedingungen heiß...
- Page 54 SCHRITT 1: Überprüfen der Einschränkungen für den Regler WARNUNG: Geräteschäden Platzieren Sie den Temperatursensor niemals im Stellen Sie sicher, dass die höchste temperaturkompensierte Inneren einer Akkuzelle. Sowohl RTS als auch Akku Leerlaufspannung (Voc) und der Ladestrom der Solaranlage werden beschädigt. die Nennwerte der installierten EcoBoost MPPT Version nicht überschreiten.
- Page 55 Nach IEC 62109 entsprechen die Mindestgrößen der Erdungsleiter aus Kupfer: • EcoBoost MPPT-20 10 mm • EcoBoost MPPT-30 10 mm • EcoBoost MPPT-40 10 mm ODER dem mindestens dem Querschnitt der PV-Kabel. Aus Sicherheitsgründen und für einen wirksamen Blitzschutz wird eine ordnungsgemäße Erdung des negativen Leiters AKKU (+) des Ladesystems empfohlen und ist unter Umständen auch AKKU (-)
- Page 56 Abhängigkeit vom Akku-Ladezustand. Stellen Sie sicher, ist, wenden Sie an den technischen Support von dass eine dieser LEDs leuchtet, bevor Sie mit dem nächsten Morningstar, der Ihnen weiterhelfen kann. Schritt fortfahren. Schließen Sie den Solar-Trennschalter. Wenn der Solareingang Schalten Sie die Last ab und verbinden Sie die Lastleitungen angeschlossen ist, leuchtet bei Sonneneinstrahlung die mit den Lastklemmen.
- Page 57 • der EcoBoost MPPT ist in LVD (rote LED an) Der EcoBoost MPPT nutzt die MPP (Maximum Power Point)- • es gibt einen Kurzschluss im Ladekreis Tracking-Technologie von Morningstar, um maximale Leistung (LEDs blinken Rt/Gn – Ge) (Energie) aus den Solarmodulen zu gewinnen. Der Tracking- •...
- Page 58 4.2 Akku-Ladung Einstellungen für Akkuladung Voreingestellte EcoBoost MPPT Akkuladeoptionen 4-Stufen-Ladung sind in den Tabellen 4-1 und 4-2 unten dargestellt. Alle aufgelisteten Spannungseinstellungen sind für Akkus mit Der EcoBoost MPPT verfügt über einen vierstufigen 12 Volt Nennspannung vorgesehen. Für 24-Volt-Akkus Akkuladealgorithmus für schnelles, effizientes und sicheres multiplizieren Sie die Spannungseinstellungen mit zwei (2).
- Page 59 Ladens am Tag und ist nachts aus. Wenn eine Laststeuerung notwendig ist, wenden Sie an Die Status-LED blinkt rot im Falle von Fehlerbedingung(en). den technischen Support von Morningstar, der Ihnen Tabelle 4.4 listet die Status-LED-Anzeigen auf. weiterhelfen kann.
- Page 60 Die Solaranlage sollte für eine optimale Leistung weniger als die maximale Nenn-Eingangsleistung des EcoBoost Nicht kalibriert MPPT haben. Siehe Abschnitt 7.0 – Technische Daten für Der Regler wurde im Werk nicht kalibriert. Senden Sie den weitere Informationen. Regler zur Reparatur an einen autorisierten Morningstar-Händler. Betrieb EcoBoost MPPT Bedienerhandbuch...
- Page 61 4.6 Benutzerdefinierte Einstellungen Für Modelle mit Messgerät finden Sie den kompletten Plan beigefügt oder in den EcoBoost MPPT Support- 4.6.1 Sollwerteinstellung mit der Messgeräte-Anzeige Dokumenten unter: www.morningstarcorp.com Der EcoBoost MPPT ist verfügbar in Versionen mit und ohne Messgeräte-Anzeige. Das Modell mit Messgerät ermöglicht: 4.6.2 Arbeit mit der Messgeräte-Anzeige •...
- Page 62 4.8 Zusätzliche USB-Ladeanschlüsse Zeitplan Wartungsarbeiten Ziehen Sie die 1) Der EcoBoost MPPT verfügt über zwei USB-A-Schnittstellen, 2 Wochen nach Leistungsanschlüsse wieder die zum Laden kleiner Elektronikgeräte verwendet werden der Installation auf die angegebenen können. Als Energiequelle dient der Systemakku, sodass Drehmomentwerte an.
- Page 63 Solar-Hochspannung getrennt FEHLERSUCHE Ladestatus-LED: Rt blinkt. Keine Akkustatus-Fehler. Wenn die Solareingangs-Leerlaufspannung (Voc) das 120-Volt-Maximum WARNUNG: GEFAHR VON STROMSCHLÄGEN. überschreitet, bleibt die Anlage getrennt, bis die Voc sicher EINSPEISEKLEMME UND ZUBEHÖRANSCHLÜSSE SIND unter das Maximum gefallen ist. NICHT GALVANISCH GETRENNT VOM DC-EINGANG Temperatur-Fernsensor (RTS) UND STEHEN EVENTUELL UNTER GEFÄHRLICHER Fehlerstatus-LED: Blinkt Rot.
- Page 64 ZWEI (2) Jahren ab Datum der Auslieferung an den ursprünglichen Fehler Lade-Status-LED LEDs Endanwender frei von Material- und Verarbeitungsfehlern ist. Rt-Ge-Gn Morningstar wird defekte Produkte nach eigenem Ermessen PV FET Kurzschluss Dauerhaft Rot Reihenfolge reparieren oder ersetzen. Rt-Ge-Gn Last FET Kurzschluss...
- Page 65 TECHNISCHE DATEN Sollwerte Akkuladung (bei 25 °C) [Spannungen mit (2) multiplizieren für 24-Volt-Systeme] EB-MPPT-20M EB-MPPT-30M EB-MPPT-40M Elektrisch: DIP-Schalter- Absorp- Ausgleich Ausgleich Absorp. Aus- Eraltungs- Augleichs- einstellungen Akkutyp tionsstufe Timeout Intervall Zeit gleichszeit stufe (Volt) stufe (Volt) (Volt) (Volt) Akku-Nennspannung 12 Volt oder 24 Volt (alle) 4-5-6 (Volt) (Minuten)
- Page 66 • Störaussendung 55014-1 • Störfestigkeit 55014-2 Solar-Hochspannungstrennung Hohe Kühlkörpertemperatur – Stromabsenkung EcoBoost MPPT ist eine Marke der Morningstar Corporation Hohe Kühlkörpertemperatur – Lasttrennung Last-Kurzschluss © 2017 Morningstar Corporation. Alle Rechte vorbehalten. Last-Überstrom Kühlkörpertemperaturgrenze RTS-Klemmen MS-002243-FL v2.1 EcoBoost MPPT Operator’s Manual Technische Daten...
- Page 67 DIMENSIONES (centímetros) INSTRUCCIONES IMPORTANTES DE SEGURIDAD ( 19.6 ) GUARDE ESTAS INSTRUCCIONES. ( 17.0 ) Este manual contiene instrucciones importantes sobre la seguridad, la instalación, la operación y el mantenimiento del controlador solar EcoBoost MPPT. Los siguientes símbolos se utilizan en todo el manual para ( 14.8 ) ( 18.1 ) indicar condiciones potencialmente peligrosas o señalar...
- Page 68 • Se requieren dispositivos externos de desconexión solar Se debe proporcionar un medio para desconectar todos los y de la batería. polos de la fuente de alimentación. Estos dispositivos de desconexión se deben incorporar en el cableado fijo. • Desconecte todas las fuentes de energía conectadas al controlador antes de instalar o ajustar el EcoBoost MPPT.
- Page 69 • Retire cualquier reloj, anillo, joyería u objeto metálico INFORMACIÓN GENERAL antes de trabajar con las baterías. 2.1 Características • Utilice guantes y botas de goma. • Utilice herramientas con mangos aislados y evite colocar Las características del EcoBoost MPPT se muestran en la herramientas u objetos metálicos sobre las baterías.
- Page 70 8 - Terminales del sensor remoto de temperatura (RTS) Como medida de seguridad, el GFPD-150V detecta fallas Puntos de conexión para un RTS de Morningstar para monitorear en la conexión a tierra de la fuente de energía a distancia la temperatura de la batería e interrumpe la corriente.
- Page 71 instrucciones hacen referencia a una sola batería, pero INSTALACIÓN queda implícito que la conexión de batería puede llevarse a cabo ya sea con una sola o con un grupo de 3.1 Notas generales de instalación ellas contenidas en un banco de baterías. •...
- Page 72 3.2 Configuración NOTA: Antes de conectar la batería, mida el voltaje del circuito abierto. Debe estar por encima de los 10 voltios para arrancar el controlador. Si los interruptores de ajuste de voltaje del sistema El bloque de interruptores DIP que se muestra están ajustados en detección automática, un voltaje de batería por a continuación en la figura 3.1 se usa para ajustar los encima de los 15.5 V será...
- Page 73 Interruptor 7: Ecualización de la batería 3.3 Montaje Inspeccione el controlador para comprobar si presenta Modo Interruptor 7 daños por envío. Instale el EcoBoost MPPT en una superficie Ecualización manual APAGADO vertical (se incluyen 4 tornillos autorroscantes de #8). Apriete Ecualización automática ENCENDIDO los tornillos de montaje con cuidado de no romper la caja...
- Page 74 3.4 Cableado PASO 1: Revise las limitaciones del controlador Verifique que el mayor voltaje de circuito abierto del panel solar compensado por temperatura (Voc) y la corriente de carga no excedan las capacidades de la versión del EcoBoost MPPT que se está instalando. Se pueden instalar múltiples controladores en paralelo en el mismo banco de baterías para lograr una mayor corriente total de carga.
- Page 75 De acuerdo con IEC 62109, los tamaños mínimos para ADVERTENCIA: Daños al equipo Nunca coloque el sensor de temperatura dentro de una cables de conexión a tierra de cobre para el equipo son: celda de batería. Tanto el RTS como la batería se dañarán. •...
- Page 76 120 Vdc cuando está a la de baterías. Si es necesario un control de carga, póngase luz del sol. Verifique que la desconexión o breaker de en contacto con el soporte técnico de Morningstar para entrada solar se ha abierto (desconectado) antes de obtener asistencia.
- Page 77 Si la carga no se encendió, esto podría deberse a varias razones: • el EcoBoost MPPT está en desconexión por bajo voltaje (LVD) (indicador LED rojo encendido) • hay un cortocircuito en la carga (LEDs parpadeando rojo/verde – amarillo) El tamaño del fusible o breaker •...
- Page 78 El EcoBoost MPPT utiliza tecnología de seguimiento del batería. La figura 4-1 muestra la secuencia de las etapas. punto de máxima potencia (MPPT) TrakStar de Morningstar para extraer la máxima potencia del módulo solar o módulos solares. El algoritmo de seguimiento es completamente automático y no requiere ajuste por parte del usuario.
- Page 79 5 - Inundado 14.60 13.50 15.30 11.90 13.40 apagado - apagado encendido - el soporte técnico de Morningstar para obtener asistencia. apagado - 6 - Inundado 14.70 13.50 15.40 12.10 13.60 encendido encendido - 7 - L-16 15.40...
- Page 80 4.4 Indicaciones LED NOTAS: 1) R (rojo) intermitente es generalmente una falla/error CLAVE: atribuible al usuario V = verde V - A - R = parpadeando en secuencia 2) R (rojo) en un LED de estado de carga ENCENDIDO con A = amarillo V / A = parpadeando juntos...
- Page 81 Contraste abierto / en cortocircuito Brillo El sensor de temperatura del disipador de calor está Desplazamiento automático Temporizador de dañado. Envíe el controlador a un distribuidor Morningstar desplazamiento automático autorizado para darle servicio. Retroceso automático Unidades de temp. Sin calibrar Idioma El controlador no estaba calibrado de fábrica.
- Page 82 Para los modelos con medidor, vea el folleto del mapa de 4.8 Carga USB auxiliar medición incluido, también disponible en los documentos de apoyo del EcoBoost MPPT en: 1) El EcoBoost MPPT cuenta con dos puertos USB-A para www.morningstarcorp.com uso como fuentes de carga para aparatos electrónicos pequeños.
- Page 83 RESOLUCIÓN DE PROBLEMAS Agenda Artículos de mantenimiento ADVERTENCIA: RIESGO DE DESCARGA ELÉCTRICA. Vuelva a fijar las conexiones de la 2 semanas después NINGUNA TERMINAL DE ALIMENTACIÓN O ACCESORIO terminal de potencia a los valores de la instalación especificados de torque. DE TERMINAL SE ENCUENTRA ELÉCTRICAMENTE AISLADO DE LA ENTRADA CC Y PUEDE ACTIVARSE Vuelva a fijar las conexiones de la CON VOLTAJE SOLAR PELIGROSO.
- Page 84 (Voc) excede el valor máximo de así, es muy probable que el error sea crítico. Contacte a un 120 voltios, el panel permanecerá desconectado hasta que distribuidor Morningstar autorizado para obtener ayuda. el Voc caiga con seguridad por debajo del valor máximo. Indicadores LED de...
- Page 85 20 Amperios 30 Amperios 40 Amperios batería máxima a partir de la fecha de envío al usuario final original. Morningstar, a su discreción, reparará o reemplazará cualquier producto defectuoso. Voltaje máximo del circuito Todos : 120 V abierto de energía fotovoltaica...
- Page 86 Puntos de ajuste de carga de la batería (@ 25°C) Control de iluminación (DIP 1 ENCENDIDO): [multiplicar los voltajes por (2) para los sistemas de 24 voltios] Ajuste de temporizador de iluminación atardecer-amanecer (predeterminado) Tiempo de Temporizador de prueba de iluminación 5 minutos Ajuste de Etapa de...
- Page 87 • Cumple con los estándares de las Normas Europeas y LVD para el marcado CE • EN 62109-1 • Emisiones 55014-1 • Inmunidad 55014-2 EcoBoost MPPT es una marca registrada de Morningstar Corporation © 2017 Morningstar Corporation. Todos los derechos reservados. MS-002243-FL v2.1 Certificaciones...