Table des Matières
Publicité
Les langues disponibles
Les langues disponibles
Liens rapides
Product Manual
Manuel d'utilisation
Producthandleiding
Manual del producto
Manuale del prodotto
Gebrauchsanleitung
PIG19-16413
Rechargeable In-Ground Fence
System
™
Clôture anti-fugue avec
fil rechargeable
Oplaadbare Omheiningssysteem
met draad
Limitador de zona con
cable recargable
Sistema antifuga con
filo ricaricabile
Wiederaufladbares
Rückhaltesystem mit Draht
Please read this entire product manual before beginning
Veuillez lire ce manuel dʼutilisation dans son intégralité avant de commencer
Gelieve deze producthandleiding volledig door te lezen voordat u begint
Por favor, lea detenidamente este manual del producto antes de empezar
Prima di iniziare, leggere per intero il manuale del prodotto
Bitte vor Gebrauch diese Gebrauchsanleitung durchlesen
Publicité
Chapitres
Table des Matières
Dépannage

Manuels Connexes pour Petsafe PIG19-16413


Sommaire des Matières pour Petsafe PIG19-16413
- Page 1 Product Manual Manuel d’utilisation Producthandleiding Manual del producto Manuale del prodotto Gebrauchsanleitung PIG19-16413 Rechargeable In-Ground Fence System ™ Clôture anti-fugue avec fil rechargeable Oplaadbare Omheiningssysteem met draad Limitador de zona con cable recargable Sistema antifuga con filo ricaricabile Wiederaufladbares Rückhaltesystem mit Draht Please read this entire product manual before beginning Veuillez lire ce manuel dʼutilisation dans son intégralité...
- Page 2 If you have any questions, please don’t hesitate to contact us. Hereinafter Radio Systems Corporation, Radio Systems PetSafe Europe Ltd., Radio Systems Australia Pty Ltd. and any other affiliate or brand of Radio Systems Corporation may be referred to collectively as “We” or “Us.”...
- Page 3 • Wire on top of the ground may be a trip hazard. Be careful when placing wires and testing the system. • This product is not a toy. Keep it away from the reach of children. • This PetSafe Rechargeable In-Ground Fence System is NOT a solid barrier.
-
Page 4: Table Des Matières
Taking Your Pet Out of the Pet Area ............................25 System Test ....................................26 Wire Break Location Test ................................27 Troubleshooting ..................................28 Battery Disposal ..................................29 Important Recycling Advice ..............................29 Terms of Use and Limitation of Liability ........................... 30 Compliance ....................................30 Warranty .......................................31 petsafe.com... -
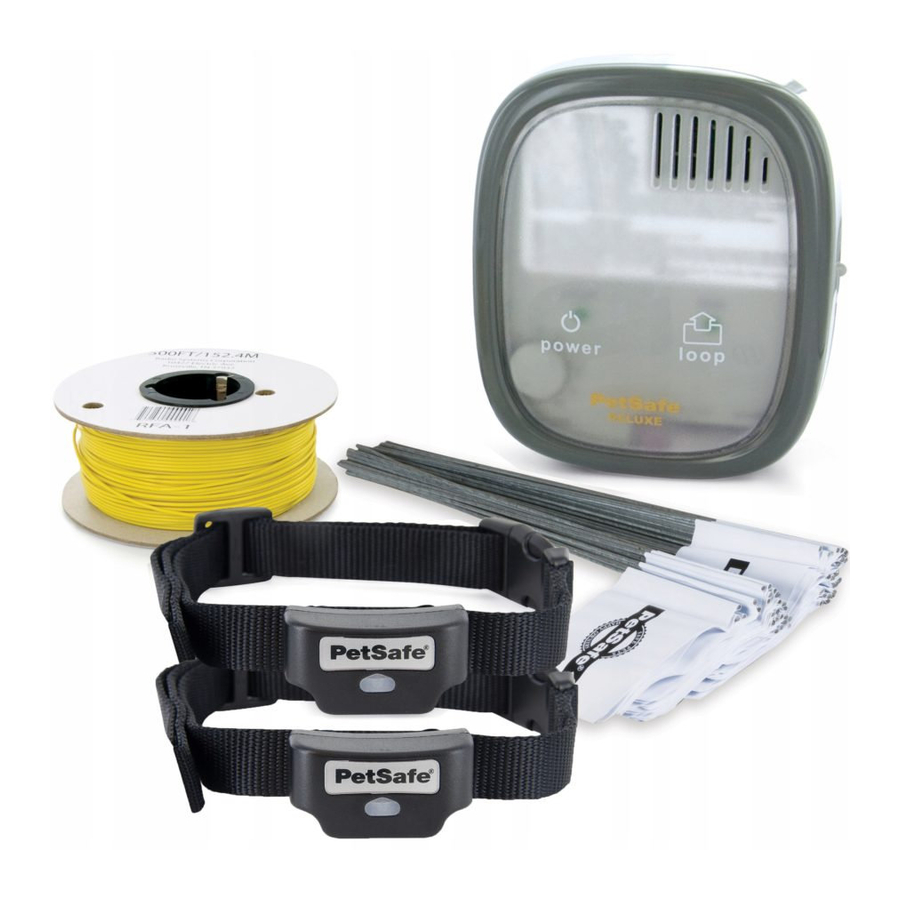
Page 5: In The Box
If he proceeds further, he receives a safe but startling static stimulation. While harmless, the stimulation will persuade him to stay in the containment area you have established. Boundary flags are a temporary visual aid for your pet; remove them after training. This PetSafe Rechargeable In-Ground Fence System ®... -
Page 6: Key Definitions
Fence Transmitter static stimulation zones. Note: Adjusting this knob does not change the level of static stimulation on the receiver collar. Boundary Control Switch Power Light Ground Boundary Width Terminal Control Boundary Wire Terminals Loop Indicator Light Power Jack petsafe.com... -
Page 7: Operating Guide
You should expect hundreds of recharge cycles from your battery. However, do not charge your receiver collar every night. Frequent charging can have a negative effect on the battery. We recommend that the receiver collar be used until the receiver indicator light blinks red. petsafe.com... -
Page 8: Step 3: Install The Fence Transmitter
To protect the transmitter, disconnect the boundary wire and unplug the power adaptor from the outlet when the system will not be used for long periods of time or prior to thunderstorms. This will prevent power surges from damaging the transmitter. petsafe.com... -
Page 9: Step 4: Design Your Boundary Zone
• The receiver collar can be activated inside the house if the boundary wire runs along the outside wall of the house. If this occurs, remove your pet’s receiver collar before bringing him inside, decrease the range using the boundary width control knob or consider an alternate layout. petsafe.com... - Page 10 B and so on (B to C to D to E) all the way around the entire property until back to point A again. The wires from point A will then need to be twisted and connected back to the fence transmitter inside your home. petsafe.com...
- Page 11 (B to C to D to E to F). Next, make a U-turn and follow your path all the way back to point A, keeping the wire separated by at least 1.5 m. Finally, twist the wires from point A back to the fence transmitter. petsafe.com...
-
Page 12: Step 5: Position, Twist And Splice The Boundary Wire
⁄ continuous loop. The table on the right indicates the approximate length of boundary wire needed for a square, single loop layout. The length will vary due to the amount of twisted wire and the layout used. 1012 1372 petsafe.com... -
Page 13: Step 6: Connect The Wires To The Fence Transmitter
To protect the transmitter, disconnect the boundary wire and unplug the power adaptor from the outlet when the system will not be used for long periods of time or prior to thunderstorms. This will prevent power surges from damaging the transmitter. petsafe.com... -
Page 14: Step 7: Prepare The Receiver Collar
Warning tone (3 flashes per second) Fast pulsating red Tone for duration of static Static stimulation being delivered up to 15 seconds (3 flashes per second) stimulation Continuous green No tone Over-stimulation protection; collar locked for 10 seconds (10 seconds) petsafe.com... - Page 15 15 seconds. After 15 seconds, the static stimulation will stop and the green indicator light will stay on for 10 seconds. The receiver collar remains locked out until your pet leaves the static stimulation zone. petsafe.com...
-
Page 16: Step 8: Set The Boundary Width And Test The Receiver Collar
Two seconds after the warning tone, the test light will begin to flash. This flashing light can aid you in identifying the boundary width if you have difficulty hearing the tone. Boundary Wire Boundary Width Control Knob petsafe.com... - Page 17 (8G). If you are satisfied that your system is functioning properly, you are ready to start burying the boundary wire. If the receiver collar did not tone or the test light did not flash, see the troubleshooting section. Boundary Wire Pet Area petsafe.com...
-
Page 18: Step 9: Bury The Boundary Wire
Note: The signal is still active across the gate. Your pet cannot pass through an open gate. Single Loop • Gate (Double Loop) (9B): Bury both boundary wires across the gate opening while keeping them 1.5 m apart. 1.5 m 1.5 m Double Loop petsafe.com... -
Page 19: Step 10: Place The Boundary Flags
Note: If you cannot hear the beep, refer to the test light instructions in Step 8. To prevent an unintended stimulation, after the boundary flags have been placed, be sure to set the static stimulation on the receiver collar back to level 1, which is tone only. Boundary Boundary Wire Wire petsafe.com... -
Page 20: Step 11: Fit The Receiver Collar
2. Check the tightness of the receiver collar by inserting one finger between the end of a contact point and your pet’s neck. The fit should be snug but not constricting (11B). 3. Allow your pet to wear the receiver collar for a few minutes, then check it again. petsafe.com... - Page 21 Use a lighter to seal the cut so that it will not fray (11C). 5. The collar will slip if it is not properly threaded. The slide buckle prevents the collar from becoming loose around your pet’s neck and the ridges must be facing up (11D). Slide Buckle Ridges petsafe.com...
-
Page 22: Training Guide
Important: Proper training of your pet is essential to the success of the Petsafe Rechargeable In-Ground Fence ® ™ System. Read this section completely before beginning to train your pet. Remember that this PetSafe Rechargeable ® In-Ground Fence System is not a solid barrier. - Page 23 Continue to observe whether your pet is looking around in curiosity, scratching at his collar or flicking his ears. 4. Stay at the same flag until your pet resists going into the static stimulation zone. petsafe.com...
- Page 24 7. If your pet does not respond to the static stimulation, confirm that the receiver collar is fitting properly according to the instructions in Step 11. 8. If the receiver collar is fitted properly and if your pet does not respond to the static stimulation, increase the static stimulation level by one setting. petsafe.com...
-
Page 25: Taking Your Pet Out Of The Pet Area
Note: You may also carry your pet out of the pet area. Congratulations! You have now completed the training program. You are both ready to enjoy more freedom. Just make sure to continue to check the tightness of the receiver collar and remove it when it is not in use. petsafe.com... -
Page 26: System Test
14. Return the boundary control switch and the boundary width control knob setting to the position noted earlier. 15. Repeat the boundary width testing from Step 8 until you achieve the desired boundary width between 4 m and 6 m. petsafe.com... -
Page 27: Wire Break Location Test
9. Replace the damaged boundary wire with new boundary wire. 10. Reconnect the boundary wire to the transmitter. 11. Check the loop indicator light. If the loop indicator light is on, test the system with the receiver collar. petsafe.com... -
Page 28: Troubleshooting
• Make sure the boundary wire is not running within 4.5 m of the house. The signal can transmit through the walls of your house. • Make sure the boundary wires are twisted from the boundary to the fence transmitter. petsafe.com... -
Page 29: Battery Disposal
At the end of the product life, please contact our Customer Care Centre to receive instructions on proper disposal of the unit. Please do not dispose of the unit in household or municipal waste. For a listing of Customer Care Centre telephone numbers in your area, visit our website at www.petsafe.com. Important Recycling Advice Please respect the Waste Electrical and Electronic Equipment regulations in your country. -
Page 30: Terms Of Use And Limitation Of Liability
Systems Corporation may violate EU RED regulations, could void the user’s authority to operate the equipment, and will void the warranty. Hereby, Radio Systems Corporation, declares that this PIG19-16413 is in compliance with the essential requirements and other relevant provisions. The Declaration of Conformity can be found at www.petsafe.com/customercare/eu_docs.php. -
Page 31: Warranty
Three Year Non-Transferable Limited Warranty This Product has the benefit of a limited manufacturer’s warranty. Complete details of the warranty applicable to this Product and its terms can be found at www.petsafe.com and/or are available by contacting your local Customer Care Centre. - Page 32 N’hésitez pas à nous contacter si vous avez des questions. Ci-après, « Nous » peut renvoyer collectivement à Radio Systems Corporation, Radio Systems PetSafe Europe Ltd., Radio Systems Australia Pty Ltd., ainsi qu’à toute autre filiale ou marque de Radio Systems Corporation.
- Page 33 • Laissé sur le sol, le fil représente un risque de chute. Placez vos câbles et testez le système avec soin. • Ce produit n’est pas un jouet. Gardez-le hors de portée des enfants. • Cette clôture anti-fugue avec fil rechargeable PetSafe n’est PAS une barrière matérielle. Elle est conçue pour ®...
- Page 34 Test du système .................................... 56 Test de localisation de rupture de fil ............................57 Dépannage ....................................58 Élimination des batteries usagées ............................. 59 Remarque importante concernant le recyclage ........................59 Conditions d’utilisation et limitation de responsabilité ......................60 Conformité ....................................60 Garantie ......................................61 petsafe.com...
-
Page 35: Dans La Boîte
électrostatique sans danger qui le fait sursauter. Cette stimulation ne lui fera pas mal mais le convaincra de rester dans la zone anti-fugue que vous avez établie. Les fanions de délimitation sont une aide visuelle temporaire pour votre animal ; retirez-les après le dressage. Cette clôture anti-fugue avec fil rechargeable de PetSafe est prouvée ®... -
Page 36: Définitions
électrostatique. Remarque : le réglage du bouton ne modifie pas le niveau de stimulation électrostatique du collier-récepteur. Molette de Prise de réglage dela largeurdu terre périmètre Bornes d’attache du fil d’antenne Voyant de boucle Prise électri- petsafe.com... -
Page 37: Guide D'utilisation
En principe, votre batterie peut être rechargée des centaines de fois. Toutefois, ne rechargez pas votre collier-récepteur chaque nuit. Des chargements fréquents peuvent s’avérer nuisibles pour la batterie. Il est recommandé d’utiliser le collier-récepteur tant que le voyant lumineux du récepteur clignote en rouge. petsafe.com... -
Page 38: Étape 3 : Installation De L'émetteur De Clôture
RCD ou GFCI pour rétablir l’alimentation électrique du système. Pour protéger l’émetteur, déconnecter le fil d’antenne et débrancher l’adaptateur de la prise quand le système n’est pas utilisé pendant longtemps ou avant un orage. Cela protégera l’émetteur en cas de surtensions. petsafe.com... -
Page 39: Étape 4 : Conception De La Limite De Votre Zone
• Le collier-récepteur peut être activé à l’intérieur de la maison si le fil d’antenne est installé le long du mur extérieur de la maison. Dans ce cas, enlevez le collier-récepteur de votre animal avant de l’amener à l’intérieur et réduisez la portée à l’aide de la molette de réglage de la largeur du périmètre ou trouvez une configuration alternative. petsafe.com... - Page 40 A, puis vers le point B, etc. (B à C à D à E), tout autour de la propriété, jusqu’à retourner au point A. Les fils partant du point A devront ensuite être torsadés et rebranchés à l’émetteur de clôture à l’intérieur de votre maison. petsafe.com...
- Page 41 (B à C à D à E à F). Faites ensuite demi-tour et suivez à nouveau la trajectoire jusqu’au point A, en tenant le fil à une distance d’au moins 1,5 m. Enfin, torsadez les fils à partir du point A et rebranchez-les à l’émetteur de clôture. petsafe.com...
-
Page 42: Étape 5 : Positionnement, Torsion Et Épissure Du Fil D'antenne
être mis en place en tant que boucle continue. Le tableau à droite indique la longueur approximative de fil d’antenne nécessaire pour créer une configuration carrée en boucle simple. La longueur varie en fonction de 1012 1372 la quantité de fil torsadé et de la configuration utilisée. petsafe.com... -
Page 43: Étape 6 : Connexion Des Fils À L'émetteur De Clôture
• Avant de procéder à l’installation du fil d’antenne, débranchez l’émetteur de clôture. Pour protéger l’émetteur, déconnecter le fil d’antenne et débrancher l’adaptateur de la prise quand le système n’est pas utilisé pendant longtemps ou avant un orage. Cela protégera l’émetteur en cas de surtensions. petsafe.com... -
Page 44: Étape 7 : Préparer Le Collier-Récepteur
Rouge clignotant rapidement Stimulation électrostatique délivrée pendant 15 secondes la durée de la stimulation (3 clignotements par seconde) au maximum électrostatique Vert fixe Protection contre l’excès de stimulation ; collier bloqué Aucun signal sonore (10 secondes) pendant 10 secondes petsafe.com... - Page 45 électrostatique à 15 secondes au maximum. La stimulation électrostatique cesse au bout de 15 et le voyant lumineux vert reste allumé pendant 10 secondes. Le collier-récepteur reste verrouillé jusqu’à ce que votre animal quitte la zone de stimulation électrostatique. petsafe.com...
-
Page 46: Étape 8 : Réglage De La Largeur Du Périmètre Et Test Du Collier-Récepteur
à clignoter. Ce clignotement peut vous aider à identifier la largeur du périmètre si vous avez du mal à entendre le signal sonore. Fil d'antenne Molette de réglage de la largeur du périmètre petsafe.com... - Page 47 (8G). Si vous êtes satisfait(e) du fonctionnement du système, vous pouvez enterrer le fil d’antenne. Si le collier-récepteur n’émet pas signal sonore ou si la clé multifonctions ne clignote pas, reportez-vous à la section Dépannage. Fil d'antenne Zone autorisée petsafe.com...
-
Page 48: Étape 9 : Enfouissement Du Fil D'antenne
• Barrière (Double boucle) (9B) : enfouissez les deux fils d’antenne pour les faire passer 1,5 m 1,5 m Double boucle de l’autre côté de la barrière, tout en vous assurant de conserver un espace d’au moins 1,5 m entre les deux. petsafe.com... -
Page 49: Étape 10 : Installation Des Fanions De Délimitation
Remarque : si le signal sonore est inaudible, reportez-vous aux instructions relatives à la clé multifonctions à l’étape 8. Afin d’éviter toute stimulation involontaire, une fois les fanions de délimitation en place, veillez à régler à nouveau l’intensité de la stimulation électrostatique du collier-récepteur sur le niveau 1 (signal sonore uniquement). Fil d'antenne Fil d'antenne petsafe.com... -
Page 50: Étape 11 : Ajustement Du Collier-Récepteur
2. Vérifiez l’ajustement du collier-récepteur en insérant un doigt entre l’extrémité du contacteur et le cou de votre animal. L’ajustement doit être serré mais ne doit pas comprimer (11B). 3. Laissez le collier-récepteur sur votre animal pendant quelques minutes, puis vérifiez à nouveau son ajustement. petsafe.com... - Page 51 5. Le collier se desserrera s’il n’est pas correctement enfilé dans la boucle. La boucle coulissante empêche le collier de se relâcher autour du cou de votre animal et les rainures doivent être orientées vers le haut (11D). Boucle coulissante Rainures petsafe.com...
-
Page 52: Manuel De Dressage
Petsafe . Lisez l’intégralité de cette section avant de commencer à dresser votre animal. N’oubliez pas ® que cette clôture anti-fugue avec fil rechargeable de PetSafe n’est pas une barrière matérielle. ® • Les animaux domestiques réagissent à nos émotions. Vous devriez rester de bonne humeur et vous amuser avec votre animal tout au long du dressage. - Page 53 électrostatique d’un réglage. Observez à nouveau si votre animal regarde autour de lui avec curiosité, gratte son collier ou bouge ses oreilles. 4. Retournez près du même fanion jusqu’à ce que votre animal résiste lorsque vous l’emmenez vers la zone de stimulation électrostatique. petsafe.com...
- Page 54 7. Si votre animal ne réagit pas à la stimulation électrostatique, assurez-vous que le collier-récepteur est bien ajusté, conformément aux instructions décrites à l’étape 11. 8. Si le collier-récepteur est correctement ajusté et que votre animal ne répond pas aux stimulations électrostatiques, augmentez le niveau de stimulation électrostatique d’un réglage. petsafe.com...
-
Page 55: Faire Sortir Votre Animal Hors De La Zone Autorisée
Félicitations ! Vous avez terminé le programme de dressage. Vous êtes tous les deux prêts à jouir d’une plus grande liberté. Il vous suffit de continuer à vérifier que le collier-récepteur est bien ajusté et de le retirer quand il n’est pas utilisé. petsafe.com... -
Page 56: Test Du Système
14. Réglez de nouveau le sélecteur de longueur de fil et la molette de réglage de la largeur du périmètre sur la position notée précédemment. 15. Répétez le test de largeur du périmètre décrit à l’étape 8 jusqu’à obtenir la largeur désirée, soit 4 m à 6 m. petsafe.com... -
Page 57: Test De Localisation De Rupture De Fil
Assurez-vous de vérifier les deux moitiés de la boucle. 9. Remplacez le fil d’antenne endommagé par un nouveau. 10. Reconnectez le fil d’antenne à l’émetteur. 11. Vérifiez le voyant de boucle. Si le voyant de boucle est allumé, testez le système à l’aide du collier-récepteur. petsafe.com... -
Page 58: Dépannage
• Assurez-vous que le fil d’antenne ne passe pas à moins de 4,5 m de votre maison. En effet, le signal peut passer à travers les murs de votre maison. • Assurez-vous que les fils d’antenne sont torsadés entre le périmètre et l’émetteur de clôture. petsafe.com... -
Page 59: Élimination Des Batteries Usagées
à l’élimination adéquate de ces piles. N’éliminez pas l’unité avec les déchets ménagers ni dans une déchetterie municipale. Pour obtenir la liste des numéros de téléphone de notre service clientèle dans votre région, consultez notre site internet : www.petsafe.com. Remarque importante concernant le recyclage Veuillez vous conformer aux réglementations concernant les déchets des équipements électriques et électroniques de... -
Page 60: Conditions D'utilisation Et Limitation De Responsabilité
RED, et sont susceptibles d’entraîner la révocation de l’autorisation d’utilisation de l’appareil et annulent la garantie. Par la présente, Radio Systems Corporation, déclare que ce PIG19-16413 est conforme aux exigences fondamentales et autres provisions applicables. La déclaration de conformité est disponible à... -
Page 61: Garantie
Ce produit est soumis à une garantie limitée du fabricant. Les détails complets de la garantie applicable pour ce produit de même que ses modalités se trouvent sur le site www.petsafe.com et/ou peuvent être obtenus en contactant votre service clientèle local. - Page 62 Neem gerust contact met ons op indien u vragen hebt. Hierna kunnen Radio Systems Corporation, Radio Systems PetSafe Europe Ltd., Radio Systems Australia Pty Ltd. en andere aangesloten ondernemingen of merken van Radio Systems Corporation gezamenlijk “wij” of “ons”...
- Page 63 • Bovengrondse draden kunnen struikelgevaar opleveren. Wees voorzichtig bij het plaatsen van de draden en bij het testen van het systeem. • Dit product is geen speelgoed. Buiten het bereik van kinderen houden. • Dit PetSafe oplaadbare omheiningssysteem met draad is GEEN solide afscheiding. Het is bedoeld als ®...
- Page 64 Uw huisdier uit de vrije ruimte voor het huisdier halen ......................85 Systeemtest ....................................86 Test voor lokaliseren van draadbreuken ..........................87 Probleemoplossing ..................................88 Wegwerpen van batterijen ................................ 90 Belangrijk advies voor recycling .............................. 90 Gebruiksvoorwaarden en beperking van aansprakelijkheid ....................90 Conformiteit ....................................91 Garantie ......................................91 petsafe.com...
-
Page 65: Inhoud Van De Doos
• Combinatietang • Niet-metalen halsband en riem • Nietpistool Voor hulp bij de voorbereidingen en training, ga naar www.petsafe.com. Zo werkt het systeem Een signaal gaat van de omheiningszender door een ingegraven draad en geeft hiermee de grenzen aan die u voor uw huisdier wilt gebruiken. -
Page 66: Belangrijke Definities
Grensbreedteafstelling: hiermee wordt de breedte van de waarschuwingszone en statische correctiezone aangepast. Opmerking: als u deze afstelling aanpast, wordt het statische correctieniveau op de ontvangerhalsband niet gewijzigd. Aardings- aansluiting Grensbreedteafstelling Grensdraad- aansluitingen Luscontrolelicht Stop- contact petsafe.com... -
Page 67: Gebruiksaanwijzing
Uw batterij kan honderden keren worden opgeladen. Maar laad uw ontvangerhalsband niet iedere avond op. Veelvuldig opladen kan een negatief effect op de batterij hebben. Wij bevelen aan de ontvangerhalsband te gebruiken tot het controlelicht van de ontvanger rood knippert. petsafe.com... -
Page 68: Stap 3: De Omheiningszender Installeren
Koppel de grensdraad los en haal de stroomadapter uit het stopcontact wanneer deze lange tijd niet wordt gebruikt of voorafgaand aan onweersbuien, om de zender te beschermen. Hiermee voorkomt u dat stroompieken uw zender beschadigen. petsafe.com... -
Page 69: Stap 4: Teken Uw Grensgebied
• De ontvangerhalsband kan binnen in huis geactiveerd worden wanneer de grensdraad langs de buitenmuur van het huis loopt. Als dit gebeurt, verwijder dan de ontvangerhalsband van uw huisdier voordat deze binnen komt, verklein het bereik met de knop voor grensbreedteafstelling of overweeg een andere indeling. petsafe.com... - Page 70 A, dan naar punt B en zo verder (B naar C naar D naar E) langs het gehele perceel tot u weer terug bent bij punt A. De draden van punt A moeten dan ineengedraaid worden en weer aangesloten worden op de omheiningszender in uw huis. petsafe.com...
- Page 71 B en zo verder (B naar C naar D naar E naar F). Maak vervolgens een bocht en volg hetzelfde pad terug naar punt A, met een afstand van minimaal 1,5 m tussen de draden. Draai de draden tenslotte vanaf punt A ineen en sluit ze aan op de omheiningszender. petsafe.com...
-
Page 72: Stap 5: De Grensdraad Plaatsen, Ineendraaien En Verbinden
In de tabel aan de rechterzijde vindt u de hoeveelheid grensdraad (bij benadering) die nodig is voor een vierkante, enkele lusindeling. De lengte kan verschillen, afhankelijk van de hoeveelheid ineengedraaid draad en 1012 1372 de indeling die wordt gebruikt. petsafe.com... -
Page 73: Stap 6: De Draden Aansluiten Op De Omheiningszender
• Voordat u de grensdraad gaat plaatsen, moet u de omheiningszender uit het stopcontact halen. Koppel de grensdraad los en haal de stroomadapter uit het stopcontact wanneer deze lange tijd niet wordt gebruikt of voorafgaand aan onweersbuien, om de zender te beschermen. Hiermee voorkomt u dat stroompieken uw zender beschadigen. petsafe.com... -
Page 74: Stap 7: Klaarmaken Van De Ontvangerhalsband
(3 x per seconden) Snel knipperend rood Geluidssignaal voor duur Statische stimulatie wordt maximaal 15 seconden (3 x per seconden) statische stimulatie afgegeven Groen lampje brandt continu Bescherming tegen overstimulatie; halsband is gedurende Geen geluidssignaal (10 seconden) 10 seconden vergrendeld petsafe.com... - Page 75 In het onwaarschijnlijke geval dat uw huisdier “bevriest” in de statische stimulatie, dan wordt de duur van de statische stimulatie door deze functie beperkt tot maximaal 15 seconden. Na 15 seconden stopt de statische stimulatie en blijft het groene controlelicht gedurende 10 seconden aan. De ontvangerhalsband blijft vergrendeld tot uw huisdier de statische stimulatie verlaat. petsafe.com...
-
Page 76: Stap 8: De Grensbreedte Instellen En De Ontvangerhalsband Testen
(statische correctiezone) geïdentificeerd. Twee seconden na het waarschuwingssignaal begint het testlampje te knipperen. Dit knipperend lampje kan uw helpen de grensbreedte te identificeren indien u moeite hebt het geluidssignaal te horen. Grensdraad Knop van de grensbreedteafstelling petsafe.com... - Page 77 (8G). U kunt de grensdraad gaan ingraven als uw systeem goed werkt. Als de ontvangerhalsband geen geluidssignaal afgeeft of het testlampje niet knippert, raadpleeg dan het hoofdstuk Probleemoplossing. Grensdraad Vrije ruimte voor het huisdier petsafe.com...
-
Page 78: Stap 9: De Grensdraad Ingraven
Opmerking: het signaal blijft actief in de opening. 1,5 m 1,5 m Uw huisdier kan niet door de open poort heen. Dubbele lus • Hek (Dubbele lus) (9B): Graaf beide grensdraden onder de poortopening in, waarbij u een tussenruimte van 1,5 m aanhoudt. petsafe.com... -
Page 79: Stap 10: De Grensvlaggetjes Plaatsen
Opmerking: raadpleeg de instructies voor het testlampje in Stap 8 indien u geen piepjes hoort. Om onbedoelde stimulatie te voorkomen, moet u na het plaatsen van de grensvlaggetjes zorgen dat de statische stimulatie op de ontvangerhalsband wordt teruggezet op niveau 1, alleen geluidssignaal. Grensdraad Grensdraad petsafe.com... -
Page 80: Stap 11: De Ontvangerhalsband Pasklaar Maken
2. Controleer hoe strak de ontvangerhalsband zit door één vinger tussen het uiteinde van de contactpunten en de hals van uw huisdier te steken. De halsband moet goed aansluiten, maar niet te strak zitten (11B). 3. Laat uw huisdier de ontvangerhalsband een paar minuten dragen en controleer de pasvorm dan nog een keer. petsafe.com... - Page 81 (11C). 5. De halsband gaat glijden als de gesp niet correct bevestigd is. De schuifgesp voorkomt dat de halsband los komt te zitten rond de hals van uw huisdier en de randen moeten naar boven wijzen (11D). Schuifgesp Richels petsafe.com...
-
Page 82: Trainingshandleiding
Trainingshandleiding Belangrijk: een goede training van uw huisdier is belangrijk voor het succes van het Petsafe oplaadbare ® omheiningssysteem met draad. Lees dit hoofdstuk helemaal door voordat u aan de training van uw huisdier begint. Onthoud dat dit PetSafe oplaadbare omheiningssysteem met draad geen solide afscheiding is. - Page 83 3. Als de ontvangerhalsband goed past en als uw huisdier niet reageert op de statische stimulatie, verhoog het statische stimulatieniveau met één niveau. Blijf goed opletten of uw huisdier nieuwsgierig rondkijkt, aan zijn halsband krabt of schud met zijn oren. 4. Blijf bij hetzelfde vlaggetje totdat uw huisdier de statische stimulatie niet meer wil betreden. petsafe.com...
- Page 84 7. Als uw huisdier niet reageert op de statische stimulatie, controleer dan dat de ontvangerhalsband goed past, in overeenstemming met de instructies in stap 11. 8. Als de ontvangerhalsband goed past en als uw huisdier niet reageert op de statische stimulatie, verhoog het statische stimulatieniveau met één niveau. petsafe.com...
-
Page 85: Uw Huisdier Uit De Vrije Ruimte Voor Het Huisdier Halen
Gefeliciteerd! U hebt nu het trainingsprogramma voltooid. Jullie zijn nu beiden zo ver om te genieten van meer vrijheid. Zorg er wel voor dat u de pasvorm van de ontvangerhalsband blijft controleren en deze verwijdert wanneer deze niet wordt gebruikt. petsafe.com... -
Page 86: Systeemtest
14. Zet de grenscontroleschakelaar en de knop voor de grensbreedteafstelling terug naar de positie die u eerder hebt genoteerd. 15. Herhaal de test voor de grensbreedte vanaf stap 8 totdat u de gewenste grensbreedte tussen 4 en 6 m bereikt. petsafe.com... -
Page 87: Test Voor Lokaliseren Van Draadbreuken
Om zeker te zijn, controleert u beide helften van de gehele lus. 9. Vervang de beschadigde grensdraad met nieuw grensdraad. 10. Sluit de grensdraad opnieuw aan op de zender. 11. Controleer het luscontrolelicht. Als het luscontrolelicht aangaat, test het systeem dan met de ontvangerhalsband. petsafe.com... -
Page 88: Probleemoplossing
• Zorg ervoor dat de grensdraad niet in een straal van 4,5 m vanaf het huis loopt. Het signaal kan door de muren van uw huis heen worden verzonden. • Zorg ervoor dat de grensdraden vanaf de grens naar de omheiningszender ineengedraaid zijn. petsafe.com... - Page 89 • Voer de “systeemtest” uit om te bepalen of de omheiningszender moet worden vervangen. • Als de omheiningszender goed werkt, zit er een breuk in uw grensdraad (Zie het hoofdstuk “Test voor lokaliseren van draadbreuken”). petsafe.com...
-
Page 90: Wegwerpen Van Batterijen
Breng het apparaat terug naar de plaats van aankoop, zodat het kan worden opgenomen in ons recyclingsysteem. Als dit niet mogelijk is, neem dan contact op met de klantenservice voor meer informatie. U vindt een overzicht van telefoonnummers van de klantenservice op onze website www.petsafe.com. Gebruiksvoorwaarden en beperking van aansprakelijkheid 1. -
Page 91: Conformiteit
Drie jaar niet-overdraagbare beperkte garantie Dit product heeft het voordeel van een beperkte fabrieksgarantie. Alle informatie over de garantie die geldt voor dit product en de voorwaarden ervan vindt u op www.petsafe.com en/of zijn verkrijgbaar bij de klantenservice in uw regio. - Page 92 Si tiene preguntas, no dude en ponerse en contacto con nosotros. De ahora en adelante se hará referencia a Radio Systems Corporation, Radio Systems PetSafe Europe Ltd., Radio Systems Australia Pty Ltd. y cualquier otra filial o marca de Radio Systems Corporation colectivamente como “Nosotros”...
- Page 93 • El cable sobre el suelo entraña peligro de tropiezos. Tenga cuidado al colocar los cabes y al probar el sistema. • Este producto no es un juguete. Manténgalo fuera del alcance de los niños. • Este limitador de zona con cable recargable PetSafe NO es una barrera maciza. Está diseñada como medio ®...
- Page 94 Prueba para identificar dónde está cortado el cable ......................117 Resolución de problemas................................118 Eliminación de las baterías ..............................120 Aviso importante sobre el reciclaje ............................120 Términos de uso y limitación de responsabilidad ......................... 120 Conformidad ..................................... 121 Garantía ..................................... 121 petsafe.com...
-
Page 95: En La Caja
La estimulación, aunque es inofensiva, le persuadirá para que permanezca en la zona limitada que usted ha establecido. Los banderines son una ayuda visual temporal para su mascota; retírelos tras adiestrarle. Este limitador de zona con cable recargable PetSafe ha resultado ser seguro, cómodo y eficaz para ®... -
Page 96: Definiciones
Note: al girar la perilla, no se cambia el nivel de estimulación estática del collar receptor. Moleta de Toma de reglaje de la amplitud tierra de los límites Terminales para cables de antena Luz indicadora de bucle Enchufe petsafe.com... -
Page 97: Manual De Funcionamiento
No obstante, no cargue el collar receptor cada noche. La recarga frecuente puede tener un efecto negativo en la batería. Le recomendamos utilizar su collar receptor hasta que la luz indicadora parpadee en rojo. petsafe.com... -
Page 98: Paso 3: Instale El Transmisor De Valla
Para proteger el transmisor, desconecte el cable de antena y desenchufe el adaptador de corriente del tomacorriente cuando el sistema no esté en uso por periodos largos o antes de una tormenta eléctrica. Esto evitará que las sobretensiones dañen al transmisor. petsafe.com... -
Page 99: Paso 4: Diseñe Su Límite De La Zona
En este caso, quite el collar receptor a su mascota antes de hacerlo entrar a la vivienda, reduzca el alcance con la moleta de reglaje de la amplitud de los límites o considere una distribución alternativa. petsafe.com... - Page 100 B y así sucesivamente (de B a C, a D, a E) todo el recorrido alrededor de la propiedad hasta volver de nuevo al punto A. Los cables del punto A deberán trenzarse y volver a conectarse al transmisor de valla dentro de su casa. petsafe.com...
- Page 101 C, a D, a E,a F). Luego, forme una U y siga el recorrido de vuelta hasta el punto A, manteniendo el cable separado al menos 1,5 m. Finalmente, trence los cables del punto A y vuelva a conectarlos al transmisor de valla. petsafe.com...
-
Page 102: Paso 5: Tienda, Trence Y Empalme El Cable De Antena
En la tabla de la derecha se indica la longitud aproximada del cable de antena que necesita para un diseño de bucle simple con distribución cuadrada. La longitud dependerá de la cantidad de cable trenzado y 1012 1372 de la distribución que se utilice. petsafe.com... -
Page 103: Paso 6: Conecte Los Cables Al Transmisor De Valla
RCD. Ante la falta de suministro eléctrico, su mascota puede escaparse. Deberá restaurar el diferencial RCD o el disyuntor GFCI para que el sistema reciba alimentación de nuevo. • Antes de instalar el cable de antena, desenchufe el transmisor de valla. petsafe.com... -
Page 104: Paso 7: Prepare El Collar Receptor
Roja intermitente rápida Señal acústica para la duración Estimulación estática suministrada cada (3 parpadeos por segundo) de la estimulación estática 15 segundos Verde continua Protección contra sobreestimulación; el collar se Sin señal acústica (10 segundos) bloquea durante 10 segundos petsafe.com... - Page 105 15 segundos, como máximo. Después de 15 segundos, la estimulación estática se detendrá y la luz indicadora verde permanecerá encendida durante 10 segundos. El collar receptor permanece bloqueado hasta que su mascota deja la zona de estimulación estática. petsafe.com...
-
Page 106: Paso 8: Ajuste La Amplitud De Los Límites Y Pruebe El Collar Receptor
Dos segundos después de haberse activado la señal acústica de advertencia, la llave multiusos comenzará a parpadear. Esta luz que parpadea puede ayudarle a identificar la amplitud de los límites si tiene dificultad para oír la señal sonora. Cable de antena Mando regulador de amplitud de límites petsafe.com... - Page 107 (8G). Si considera que el sistema funciona correctamente, ya puede soterrar el cable de antena. Consulte la sección Resolución de problemas, si el collar receptor no emite la señal acústica o no parpadea la llave multiusos. Cable de antena Zona autorizada petsafe.com...
-
Page 108: Paso 9: Soterre El Cable De Antena
La mascota no puede pasar por la puerta abierta. 1,5 m 1,5 m Bucle doble • Puerta (bucle doble) (9B): sotierre ambos cables de antena por la abertura de la puerta, manteniéndolos a una distancia de 1,5 m entre sí. petsafe.com... -
Page 109: Paso 10: Colocación De Los Banderines
Note: si no puede oír el beep, consulte las instrucciones de la llave multiusos en el paso 8. Para evitar estimulaciones no intencionadas, después de haber colocado los banderines, asegúrese de ajustar el nivel de estimulación estática en el collar receptor otra vez en el nivel 1 de señal acústica solamente. Cable de Cable de antena antena petsafe.com... -
Page 110: Paso 11: Ajuste Del Collar Receptor
2. Compruebe el apriete del collar receptor introduciendo un dedo entre el extremo de un punto de contacto y el cuello de la mascota. Debe estar bien ajustado, sin estar demasiado apretado (11B). 3. Deje que la mascota lleve el collar receptor durante unos minutos y luego vuelva a comprobar el ajuste. petsafe.com... - Page 111 5. El collar se deslizará si no se pasa correctamente por la hebilla. La hebilla deslizante evita que el collar se afloje en el cuello de su mascota y los surcos deben estar hacia arriba (11D). Hebilla deslizante Pliegues petsafe.com...
-
Page 112: Manual De Adiestramiento
Petsafe . Lea toda esta sección antes de comenzar a adiestrar la mascota. Recuerde que este limitador de ® zona con cable recargable PetSafe no es una barrera maciza. ® • Las mascotas responden a nuestras emociones. Debe tratar de jugar y divertirse con su mascota durante el proceso de adiestramiento. - Page 113 Continúe observando el comportamiento de la mascota, como mirar curioso alrededor, rascarse el collar o sacudir las orejas. 4. Permanezca en el mismo banderín hasta que la mascota se resista a ingresar a la zona de estimulación estática. petsafe.com...
- Page 114 7. Si su mascota no responde a la estimulación estática, asegúrese de que el collar receptor esté bien colocado, según las instrucciones del paso 11. 8. Si el collar receptor está correctamente ajustado y su mascota no responde a la estimulación estática, aumente en un grado la configuración del nivel de estimulación estática. petsafe.com...
-
Page 115: Salida Con La Mascota Fuera De La Zona Autorizada
Note: también puede alzar a la mascota para sacarla de la zona autorizada. ¡Felicitaciones! Ha completado satisfactoriamente el programa de adiestramiento. Ambos están listos para disfrutar de más libertad. Asegúrese de continuar comprobando el ajuste del collar receptor y retírelo cuando no esté en uso. petsafe.com... -
Page 116: Prueba Del Sistema
14. Vuelva a colocar el selector de control de límites y la moleta de reglaje de la amplitud de los límites en la posición mencionada antes. 15. Repita la prueba de amplitud de los límites desde el paso 8 hasta alcanzar la amplitud de los límites deseada de entre 4 m a 6 m. petsafe.com... -
Page 117: Prueba Para Identificar Dónde Está Cortado El Cable
9. Sustituya el cable de antena dañado por un nuevo cable de antena. 10. Vuelva a conectar el cable de antena en el transmisor. 11. Revise la luz indicadora de bucle. Si se enciende la luz indicadora de bucle, pruebe el sistema con el collar receptor. petsafe.com... -
Page 118: Resolución De Problemas
• Asegúrese de que el cable de antena no esté tendido a menos de 4,5 m de la vivienda. La señal puede transmitirse por sus paredes. • Asegúrese de que los cables de antena estén trenzados desde los límites hasta el transmisor de valla. petsafe.com... - Page 119 • Realice la “Prueba del sistema” de la página para de valla. determinar si debe sustituir el transmisor de valla. • Si el transmisor de valla funciona correctamente, el cable de antena está roto (vea la sección “Prueba de localización de rotura del cable”). petsafe.com...
-
Page 120: Eliminación De Las Baterías
No tire la unidad en la basura doméstica o municipal. Visite nuestro sitio web www.petsafe.com para conseguir un listado de los números de teléfono de los centros de atención al cliente. -
Page 121: Conformidad
Corporation pueden infringir las normativas RED de la UE, podrían anular la autoridad del usuario para hacer funcionar el equipo y anular la garantía. Por la presente, Radio Systems Corporation, declara que este PIG19-16413 cumple con los requisitos esenciales y otras disposiciones relevantes. La declaración de conformidad se puede encontrar en www.petsafe.com/customercare/eu_docs.php. - Page 122 In caso di domande, non esitate a contattarci. Di seguito in questo documento, Radio Systems Corporation, Radio Systems PetSafe Europe Ltd., Radio Systems Australia Pty Ltd. e qualunque altra affiliata o marchio di Radio Systems Corporation possono essere indicati collettivamente con “Noi”.
- Page 123 • Deporre il filo per terra può essere pericoloso. Fare attenzione durante la posa dei cavi e quando si testa il sistema. • Questo prodotto non è un giocattolo. Tenerlo lontano dalla portata dei bambini. • Questo sistema antifuga con filo ricaricabile PetSafe NON è una barriera solida. Il sistema è progettato per ®...
- Page 124 Test di localizzazione di interruzione sul filo ........................147 Individuazione e risoluzione dei guasti ..........................148 Eliminazione delle batterie ..............................150 Avviso importante per il riciclaggio ............................150 Limitazione di responsabilità e condizioni di utilizzo ......................150 Conformità ....................................151 Garanzia....................................151 petsafe.com...
-
Page 125: Nella Scatola
• Sega circolare con lama per mattoni • Pistola graffatrice • Collare e guinzaglio non metallici Per impostazione e addestramento visitare www.petsafe.com. Come funziona il sistema Il trasmettitore emette un segnale radio che corre attraverso un filo interrato, delimitando così i confini che si desidera impostare per il proprio animale domestico. -
Page 126: Definizioni Chiave
Nota: la regolazione di questa manopola non modifica il livello di stimolazione statica sul collare ricevitore. Manopola Presa di di regolazione della terra larghezza del perimetro Morsetti Indicatore luminoso Presa di di circuito chiuso alimenta- zione petsafe.com... -
Page 127: Guida All'uso
Le batterie possono sopportare centinaia di cicli di ricarica. Tuttavia, non ricaricare ogni notte il proprio collare ricevitore. La frequente ricaricare può influenzare negativamente la batteria. Si raccomanda di utilizzare il collare ricevitore finché la spia luminosa del ricevitore è rossa lampeggiante. petsafe.com... -
Page 128: Passaggio 3: Installazione Del Trasmettitore
GFCI per ripristinare l’alimentazione elettrica del sistema. Se il sistema rimane a lungo inutilizzato o in caso di temporali, per proteggere il trasmettitore disconnettere il filo di delimitazione e scollegare l’adattatore dalla presa elettrica. Ciò eviterà danni al trasmettitore conseguenti a sbalzi di tensione elettrica. petsafe.com... -
Page 129: Passaggio 4: Progettazione Dell'area Delimitata
Se ciò si verifica, prima di condurre l’animale domestico all’interno della casa, rimuovere il suo collare ricevitore, quindi diminuire la portata utilizzando la manopola di regolazione della larghezza della delimitazione, oppure prendere in considerazione uno schema di disposizione alternativo. petsafe.com... - Page 130 B, e continuare in questo modo (da B a C a D a E) lungo l’intero perimetro della proprietà, fino a ritornare di nuovo in A. I fili devono quindi essere spiralizzati dal punto A e collegati al trasmettitore all’interno dell’abitazione. petsafe.com...
- Page 131 C a D a E a F). Successivamente, fare un’inversione a U e seguire il percorso a ritroso nuovamente fino ad A, mantenendo separati i due fili di almeno 1,5 m. Infine, spiralizzare tra loro i fili dal punto A fino al trasmettitore. petsafe.com...
-
Page 132: Passaggio 5: Posizionare, Spiralizzare E Congiungere Il Filo Di Delimitazione
La tabella a destra indica la lunghezza approssimativa del filo di delimitazione necessario per uno schema a singolo perimetro di forma quadrata. La lunghezza del filo varierà in funzione dell’estensione del filo 1012 1372 spiralizzato e dello schema di disposizione utilizzato. petsafe.com... -
Page 133: Passaggio 6: Collegamento Dei Fili Al Trasmettitore
• Prima di iniziare l’installazione del filo di delimitazione, scollegare il trasmettitore. Se il sistema rimane a lungo inutilizzato o in caso di temporali, per proteggere il trasmettitore disconnettere il filo di delimitazione e scollegare l’adattatore dalla presa elettrica. Ciò eviterà danni al trasmettitore conseguenti a sbalzi di tensione elettrica. petsafe.com... -
Page 134: Passaggio 7: Preparare Il Collare Ricevitore
Luce rossa a pulsazione veloce Segnale acustico per la durata della La stimolazione statica viene erogata fino a (3 lampi al secondo) stimolazione statica 15 secondi Luce verde continua Protezione da sovra-stimolazione; collare bloccato Nessun segnale acustico (10 secondi) per 10 secondi petsafe.com... - Page 135 15 secondi. Dopo 15 secondi, la stimolazione statica si interrompe e la spia luminosa verde rimane accesa per 10 secondi. Il collare ricevitore rimane bloccato fin quando l’animale non lascia la zona di stimolazione statica. petsafe.com...
-
Page 136: Passaggio 8: Impostazione Della Larghezza Della Delimitazione E Test Del Collare Ricevitore
(zona di stimolazione statica). Due secondi dopo l’emissione del segnale acustico di avvertimento, la chiave multiusi inizierà a lampeggiare. Tale luce lampeggiante può aiutare l’utente a identificare la larghezza della delimitazione in caso abbia difficoltà a udire segnale acustico. Filo di delimitazione Manopola di regolazione della larghezza del perimetro petsafe.com... - Page 137 (8G). Nel caso si ritenga che il sistema funzioni correttamente, si avviare l’interramento del filo di delimitazione. Se il collare ricevitore non emette alcun segnale acustico o se la chiave multiusi non lampeggia, consultare la sezione “individuazione e risoluzione dei guasti”. Filo di delimitazione Zona autorizzata petsafe.com...
-
Page 138: Passaggio 9: Interramento Del Filo Di Delimitazione
Nota: il segnale risulta ancora attivo attraverso il cancello. In questo modo l’animale domestico non può passare attraverso un cancello aperto. • Cancello (doppio perimetro) (9B): interrare entrambi i fili di delimitazione attraverso l’apertura del cancello mantenendoli a una distanza di 1,5 m. petsafe.com... -
Page 139: Passaggio 10: Posizionamento Delle Bandierine
Nota: se non si riesce a sentire il segnale acustico, consultare le Istruzioni relative alla chiave multiusi nel passaggio 8. Per evitare stimolazioni indesiderate, dopo il posizionamento delle bandierine, verificare di aver riportato la stimolazione statica sul collare ricevitore sul livello 1, ovvero solo segnale acustico. Filo di Filo di delimitazione delimitazione petsafe.com... -
Page 140: Passaggio 11: Sistemazione Del Collare Ricevitore
2. Controllare che il collare ricevitore non sia troppo stretto inserendo un dito tra l’estremità di un punto di contatto e il collo dell’animale. Il collare deve essere aderente ma non costrittivo (11B). 3. Fare indossare al proprio animale domestico il collare ricevitore per alcuni minuti, quindi controllare di nuovo. petsafe.com... - Page 141 (11C). 5. Il collare scivolerà se non è infilato correttamente. La fibbia scorrevole impedisce al collare di allentarsi intorno al collo dell’animale e i rilievi devono essere rivolti verso l’alto (11D). Fibbia scorrevole Rilievi petsafe.com...
-
Page 142: Manuale Di Addestramento
Petsafe . Prima di iniziare l’addestramento del proprio animale domestico, leggere completamente questa ® sezione. Ricordare che questo sistema antifuga con filo ricaricabile PetSafe non è una barriera solida. ® • Gli animali domestici rispondono alle nostre emozioni. Occorre perciò avere un atteggiamento positivo e divertirsi con il proprio animale durante il processo di allenamento. -
Page 143: Stimolazione Statica
Continuare a osservare se l’animale si guarda intorno con curiosità, si gratta il collare o muovere rapidamente le orecchie. 4. Rimanere in corrispondenza della stessa bandierina finché l’animale persiste a entrare nella zona di stimolazione statica. petsafe.com... - Page 144 7. Se il vostro animale domestico non risponde alla stimolazione statica, confermare che il collare ricevitore sia posizionato correttamente secondo quanto suggerito nel Passaggio 11. 8. Se il collare ricevitore è posizionato correttamente e se il vostro animale domestico non risponde alla stimolazione statica, aumentare il livello di stimolazione statica di una impostazione. petsafe.com...
-
Page 145: Condurre L'animale Al Di Fuori Della Zona Autorizzata
Nota: è anche possibile condurre l’animale fuori dalla zona autorizzata prendendolo in braccio. Complimenti! Il programma di addestramento è stato completato con successo. Siete entrambi pronti per godere di maggiore libertà. Controllate regolarmente l’aderenza al collo dell’animale del collare ricevitore e rimuovetelo quando non è in uso. petsafe.com... -
Page 146: Test Del Sistema
14. Riportare il selettore della lunghezza del filo e la manopola di regolazione della larghezza del perimetro nella posizione annotata in precedenza. 15. Ripetere il test della larghezza della delimitazione indicata nel Passaggio 8 fino a quando non si raggiunga una larghezza della delimitazione compresa tra 4 m e 6 m. petsafe.com... -
Page 147: Test Di Localizzazione Di Interruzione Sul Filo
9. Sostituire il filo di delimitazione danneggiato con un nuovo filo di delimitazione. 10. Ricollegare il filo di delimitazione al trasmettitore. 11. Controllare la spia luminosa di circuito chiuso. Se la spia luminosa di circuito chiuso è accesa, testare il sistema con il collare ricevitore. petsafe.com... -
Page 148: Individuazione E Risoluzione Dei Guasti
• Assicurarsi che il filo di delimitazione non corra entro 4,5 m dalla casa. Il segnale può trasmettersi attraverso le pareti di casa. • Verificare che i fili di delimitazione siano spiralizzati dalla delimitazione fino trasmettitore. petsafe.com... - Page 149 • Eseguire il “Test del sistema” per determinare se sia segnali sonori. necessario sostituire il trasmettitore. • Se il trasmettitore funziona correttamente, l’interruzione si trova lungo il filo di delimitazione (vedere la sezione “Test di localizzazione di interruzione sul filo”). petsafe.com...
-
Page 150: Eliminazione Delle Batterie
Se ciò non fosse possibile, si invita l’utilizzatore a contattare il centro assistenza clienti per informazioni in merito. Per l’elenco dei recapiti telefonici dei nostri centri assistenza clienti, visitate il nostro sito Web www.petsafe.com. Limitazione di responsabilità e condizioni di utilizzo 1. -
Page 151: Conformità
Garanzia limitata non trasferibile di tre anni Questo prodotto è coperto da una garanzia limitata del produttore. Informazioni esaurienti sulla garanzia di questo prodotto e le sue condizioni sono disponibili sul sito Web www.petsafe.com e/o possono essere richieste al centro assistenza clienti di zona. - Page 152 Sicherheitsinformationen durchzulesen. Wenden Sie sich bei Fragen bitte einfach an uns. Im Folgenden bezieht sich „wir“ oder „uns“ auf Radio Systems Corporation, Radio Systems PetSafe Europe Ltd., Radio Systems Australia Pty Ltd. und jegliche anderen Tochtergesellschaften oder Marken von Radio Systems Corporation.
- Page 153 • Ein auf dem Boden liegendes Kabel kann eine Stolpergefahr darstellen. Seien Sie bei der Verlegung der Kabel und beim Testen des Systems vorsichtig. • Dieses Produkt ist kein Spielzeug Außerhalb der Reichweite von Kindern aufbewahren. • Das PetSafe Wiederaufladbare Rückhaltesystem mit Draht ist KEINE feste Barriere. Es ist als Abschreckung ®...
- Page 154 Phase 5: Tag 15 bis 30 – Überwachung Ihres Haustiers ..................... 175 Herausbringen Ihres Haustiers aus dem Aufenthaltsbereich....................175 Systemtest....................................176 Drahtbruchstellen-Test ................................177 Mögliche Probleme und Lösungen ............................178 Batterieentsorgung ................................... 180 Wichtige Recyclinghinweise ..............................180 Nutzungsbedingungen und Haftungsbeschränkung ......................180 Konformität ....................................181 Gewährleistung ..................................181 petsafe.com...
-
Page 155: Inhalt
Reizimpuls. Der Reizimpuls ist harmlos, bringt das Haustier jedoch dazu, innerhalb des Bereichs zu bleiben, den Sie festgelegt haben. Begrenzungsfähnchen sind eine vorübergehende visuelle Hilfe für Ihr Haustier; entfernen Sie sie nach dem Training. Dieses PetSafe ®... -
Page 156: Definitionen
Ausstrahlung des Signals ermöglicht ist. Kontrollregler Sicherheitszone: Regelt die Breite der Warn- und statischen Reizimpulszonen. Anmerkung: Durch Einstellen des Drehknopfs wird nicht die Stärke des statischen Reizimpulses am Empfängerhalsband angepasst. Anschluss für Kontrollregler Erdungsdraht Sicherheitszone Begrenzungs- drahtanschlüsse Kontrollleuchte Begrenzungsdraht Strom- buchse petsafe.com... -
Page 157: Gebrauchsanweisung
überhitzen, explodieren oder in Brand geraten. Die Batterie kann mehrere hundertmal aufgeladen werden. Laden Sie das Empfängerhalsband dennoch nicht jede Nacht auf. Häufige Ladevorgänge können die Leistung der Batterie beeinträchtigen. Wir empfehlen das Empfängerhalsband erst aufzuladen, wenn die LED-Leuchte des Empfängers rot blinkt. petsafe.com... -
Page 158: Schritt 3: Den Transmitter Installieren
Um den Transmitter zu schützen, wenn er für längere Zeit nicht verwendet wird oder kurz vor einem Gewitter, stecken Sie den Begrenzungsdraht aus und nehmen Sie den Stromadapter aus der Steckdose. Dadurch wird eine Beschädigung des Transmitters durch Stromspitzen verhindert. petsafe.com... -
Page 159: Schritt 4: Legen Sie Die Sicherheitszone Fest
• Das Empfängerhalsband kann innerhalb des Hauses aktiviert werden, falls der Begrenzungsdraht entlang der Außenwand des Hauses verläuft. Entfernen Sie in diesem Fall das Empfängerhalsband Ihres Haustiers, bevor Sie es hereinbringen, verringern Sie die Reichweite über den Kontrollregler für die Sicherheitszone oder ziehen Sie einen anderen Entwurf in Betracht. petsafe.com... - Page 160 Punkt B und so weiter (von B zu C, zu D, zu E), bis Sie den Draht um Ihr gesamtes Grundstück herum verlegt haben und wieder an Punkt A angelangen. Die Drähte von Punkt A müssen dann verdrillt werden und wieder an den Transmitter im Haus angeschlossen werden. petsafe.com...
- Page 161 (von B zu C, zu D, zu E, zu F). Dann machen Sie eine Kehrtwendung und verlegen den Draht parallel zurück zu Punkt A, wobei Sie einen Mindestabstand von 1,5 m einhalten müssen. Abschließend verdrillen Sie die Drähte und verlegen diese von Punkt A zurück zum Transmitter. petsafe.com...
-
Page 162: Schritt 5: Positionieren, Verdrillen Und Spleißen Des Begrenzungsdrahts
Die Tabelle auf der rechten Seite zeigt die ungefähre Länge des Begrenzungsdrahts an, der für ein rechteckiges Layout für einfach verlegten Draht erforderlich ist. Die Länge variiert je nach der Menge an gedrilltem Draht und je nach Layout. 1012 1372 petsafe.com... -
Page 163: Schritt 6: Verbinden Der Drähte Mit Dem Transmitter
Um den Transmitter zu schützen, wenn er für längere Zeit nicht verwendet wird oder kurz vor einem Gewitter, stecken Sie den Begrenzungsdraht aus und nehmen Sie den Stromadapter aus der Steckdose. Dadurch wird eine Beschädigung des Transmitters durch Stromspitzen verhindert. petsafe.com... -
Page 164: Schritt 7: Inbetriebnahme Des Empfängerhalsbands
Schnell pulsierende rote Anzeige Tonsignal für die Dauer des Statischer Reizimpuls wird für bis zu 15 Sekunden (blinkt 3-mal pro Sekunde) statischen Reizimpulses abgegeben Dauerhaft grün Schutz vor übermäßigem Reizimpuls; Halsband für Kein Tonsignal (10 Sekunden) 10 Sekunden gesperrt petsafe.com... - Page 165 Funktion die Dauer des statischen Reizimpulses auf maximal 15 Sekunden. Nach 15 Sekunden wird der statische Reizimpuls abgebrochen und die grüne LED-Leuchte leuchtet für 10 Sekunden auf. Das Empfängerhalsband bleibt solange gesperrt, bis Ihr Haustier die statische Reizimpulszone wieder verlässt. petsafe.com...
-
Page 166: Schritt 8: Einrichten Der Sicherheitszone Und Testen Des Empfängerhalsbands
Sie den Abstand der Sicherheitszone identifiziert (statische Reizimpulszone). Zwei Sekunden nach dem Warnton beginnt die Testleuchte zu blinken. Das Blinklicht kann Ihnen bei der Identifizierung der Sicherheitszone helfen, wenn Sie Schwierigkeiten beim Hören des Tonsignals haben. Begrenzungsdraht Kontrollregler Sicherheitszone petsafe.com... - Page 167 Empfängerhalsband sollte einen Ton ausgeben und die Testleuchte sollte heller leuchten, wenn Sie den Durchlaufbereich betreten (8G). Wenn Sie feststellen, dass das System ordnungsgemäß funktioniert, können Sie anfangen, den Begrenzungsdraht einzugraben. Falls das Empfängerhalsband keinen Ton ausgibt oder die Testleuchte nicht blinkt, lesen Sie den Abschnitt „Mögliche Probleme und Lösungen“. Begrenzungsdraht Aufenthaltsbereich petsafe.com...
-
Page 168: Schritt 9: Eingraben Des Begrenzungsdrahts
Anmerkung: Das Signal ist durch das Tor hindurch immer noch aktiv. Ihr Haustier kann kein offenes Tor passieren. • Tor (doppeltes Layout) (9B): Vergraben Sie die Begrenzungsdrähte unter dem Toreingang und lassen Sie dazwischen einen Abstand von 1,5 m. petsafe.com... -
Page 169: Schritt 10: Platzieren Der Begrenzungsfähnchen
Anmerkung: Sollten Sie kein Piepen hören können, ziehen Sie die Anleitung zur Verwendung der Testleuchte in Schritt 8 zu Hilfe. Um einen unbeabsichtigten Reizimpuls zu vermeiden, nachdem die Begrenzungsfähnchen gesetzt sind, stellen Sie den statischen Reizimpuls am Empfängerhalsband wieder auf Stufe 1 mit nur Ton zurück. Begrenzungsdraht Begrenzungsdraht petsafe.com... -
Page 170: Schritt 11: Anpassen Des Empfängerhalsbands
2. Überprüfen Sie, wie straff das Empfängerhalsband sitzt, indem Sie einen Finger zwischen das Ende eines der Kontaktstifte und den Hals Ihres Haustiers einführen. Es sollte gut anliegen, jedoch nicht einschnüren (11B). 3. Lassen Sie Ihr Haustier das Empfängerhalsband einige Minuten lang tragen und überprüfen Sie dann erneut den Sitz. petsafe.com... - Page 171 Halsbands zu vermeiden (11C). 5. Das Halsband rutscht ab, falls es nicht ordnungsgemäß eingefädelt ist. Die Gleitschnalle verhindert, dass das Halsband sich am Hals des Haustiers lockert, wobei die Kanten dabei nach oben zeigen müssen (11D). Gleitschnalle Kanten petsafe.com...
-
Page 172: Trainingsanleitung
Trainingsanleitung Wichtig: Ein ordnungsgemäßes Training Ihres Haustiers ist wesentlich für den Erfolg des Petsafe Wiederaufladbaren ® Rückhaltesystems mit Draht. Lesen Sie diesen Abschnitt vollständig durch, bevor Sie anfangen Ihr Haustier zu trainieren. Denken Sie daran, dass das PetSafe Wiederaufladbare Rückhaltesystem mit Draht keine feste Barriere ist. - Page 173 Sie die statische Reizimpulsstufe um eine Stufe. Beobachten Sie Ihr Haustier weiter, ob es zum Beispiel neugierig herumschaut, am Halsband kratzt oder die Ohren dreht. 4. Bleiben Sie bei demselben Begrenzungsfähnchen, bis Ihr Haustier sich weigert, die statische Reizimpulszone zu betreten. petsafe.com...
- Page 174 7. Falls Ihr Haustier nicht auf den statischen Reizimpuls reagiert, vergewissern Sie sich gemäß Schritt 11 in der Anleitung, dass das Empfängerhalsband ordnungsgemäß sitzt. 8. Wenn das Empfängerhalsband ordnungsgemäß sitzt und wenn Ihr Haustier nicht auf den statischen Reizimpuls reagiert, erhöhen Sie die statische Reizimpulsstufe um eine Stufe. petsafe.com...
-
Page 175: Herausbringen Ihres Haustiers Aus Dem Aufenthaltsbereich
Anmerkung: Sie können Ihr Haustier auch aus dem Aufenthaltsbereich heraustragen. Herzlichen Glückwunsch! Sie haben dieses Trainingsprogramm nun abgeschlossen. Nun können Sie und Ihr Haustier mehr Freiheiten genießen. Überprüfen Sie regelmäßig den Sitz des Empfängerhalsbands und entfernen Sie dieses, wenn es nicht gebraucht wird. petsafe.com... -
Page 176: Systemtest
14. Bringen Sie den Kontrollregler für die Zaunlänge und den Kontrollregler für die Sicherheitszone wieder in die zuvor notierte Position. 15. Wiederholen Sie den Sicherheitszonentest aus Schritt 8, bis Sie die gewünschte Sicherheitszone zwischen 4 m und 6 m erzielen. petsafe.com... -
Page 177: Drahtbruchstellen-Test
9. Ersetzen Sie den beschädigten Begrenzungsdraht durch einen neuen Begrenzungsdraht. 10. Schließen Sie den Begrenzungsdraht wieder am Transmitter an. 11. Überprüfen Sie die LED-Leuchte für den Begrenzungsdraht. Falls die LED-Leuchte für den Begrenzungsdraht an ist, testen Sie das System mit dem Empfängerhalsband. petsafe.com... -
Page 178: Mögliche Probleme Und Lösungen
• Stellen Sie sicher, dass der Begrenzungsdraht nicht innerhalb eines Abstand von 4,5 m zum Haus verläuft. Das Signal kann durch die Wände Ihres Hauses übertragen werden. • Stellen Sie sicher, dass die Begrenzungsdrähte von der Grenze zum Transmitter verdrillt sind. petsafe.com... - Page 179 Begrenzungsdrähte außen am Eingang zum Haus. ist aus und der • Führen Sie den „Systemtest“ durch, um zu bestimmen, ob der Transmitterschleifenalarm Transmitter ausgetauscht werden muss. ertönt. • Falls der Transmitter ordnungsgemäß funktioniert, liegt ein Bruch in Ihrem Begrenzungsdraht vor (siehe Abschnitt „Drahtbruchstellen-Test“). petsafe.com...
-
Page 180: Batterieentsorgung
Kundenbetreuung, um Anweisungen zur richtigen Entsorgung des Geräts zu erhalten. Entsorgen Sie das Gerät bitte nicht im Hausmüll. Eine Liste der Telefonnummern der Kundenbetreuung in Ihrer Nähe finden Sie auf unserer Website www.petsafe.com. Wichtige Recyclinghinweise Bitte beachten Sie die Vorschriften für zu entsorgende elektronische und elektrische Geräte im jeweiligen Land. Dieses Gerät muss recycelt werden. -
Page 181: Konformität
Verstoß gegen die RED-Richtlinien der EU darstellen, die Befugnis für den Betrieb des Geräts aufheben und führen zum Erlöschen der Garantie. Hiermit erklärt Radio Systems Corporation, dass PIG19-16413 den wesentlichen Anforderungen und anderen relevanten Bestimmungen entsprechen. Die Konformitätserklärung finden Sie unter: www.petsafe.com/customercare/eu_docs.php. - Page 182 petsafe.com...
- Page 183 petsafe.com...
- Page 184 Radio Systems Corporation Radio Systems PetSafe Europe Ltd. 10427 PetSafe Way 2nd Floor, Elgee Building, Market Square Knoxville, TN 37932 USA Dundalk, Co. Louth, A91 YR9X Ireland +1 (865) 777-5404 +353 (0) 76 892 0427 petsafe.com L400-2083-19 2018 Radio Systems Corporation...