
Manuels Connexes pour CAME BPT TH/500


Sommaire des Matières pour CAME BPT TH/500
- Page 1 Cronotermostato touch screen FB00805-IT TH/500 - TH/500 230 MANUALE DI INSTALLAZIONE ED USO IT Italiano...
-
Page 2: Avvertenze Generali
Avvertenze generali • Leggere attentamente le istruzioni prima di iniziare l’installazione ed eseguire gli interventi come specificato dal costruttore. • L’installazione, la programmazione, la messa in servizio e la manutenzione del prodotto devono essere effet- tuate soltanto da personale tecnico qualificato ed opportunamente addestrato nel rispetto delle normative vigenti ivi comprese le osservanze sulla prevenzione infortuni e lo smaltimento imballaggi. -
Page 3: Descrizione Dispositivo
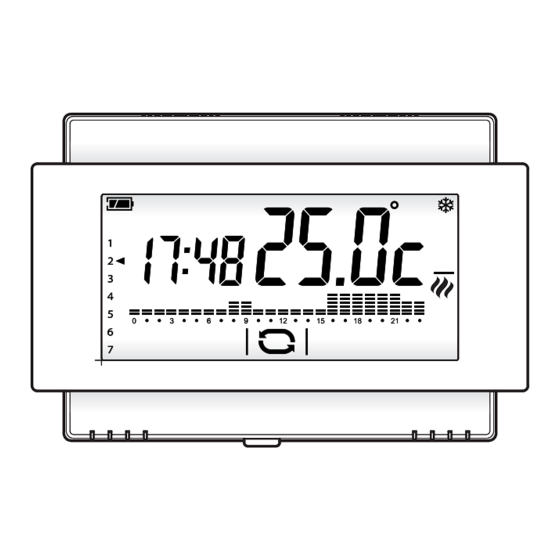
Descrizione dispositivo ⑰ ③ ④ ⑤ ⑨ ⑩ ① ⑪ ⑬ ② ⑮ ⑯ ⑫ ⑱ ⑭ ⑲ ⑦ ⑥ ⑧ Stato di carica della batteria Attivazione da remoto in corso ① ⑩ (solo su versione a pile) (solo su versione a pile) Contatto finestra attivo ②... -
Page 4: Installazione A Parete
Installazione Installare il dispositivo in posizione idonea a rilevare correttamente la temperatura dell’ambiente, possibil- mente in una parete interna, evitando l’installazione in nicchie, dietro a porte, a tende o vicino a sorgenti di calore. Installazione a parete • Aprire il dispositivo premendo il pulsante posto sul fondo B, con il dito ①... -
Page 5: Collegamenti Elettrici
Collegamenti elettrici I collegamenti vanno effettuati in funzio- ne del tipo di apparecchiatura comandata dal cronotermostato. VALVOLA Le figure D e E sono riferite al APERTA cronotermostato alimentato da rete ma sono valide anche per la versione CHIUSA alimentata da pile, limitatamente alla parte dei contatti relè. -
Page 6: Reset Dispositivo
NOTA. Nel dispositivo alimentato da rete, in caso di mancanza di alimentazione, il relè rimane nello stato precedente la caduta di tensione. Inserimento/sostituzione delle pile (solo su modello a pile) Inserire n. 2 pile alcaline LR6 tipo stilo AA da 1,5V (non fornite in dotazione) nell’apposita sede rispettando le polarità... -
Page 7: Funzionamento Del Dispositivo
Funzionamento del dispositivo Alla prima accensione A il cronotermostato si trova in modalità riscaldamento automatico; sul display viene visualizzata la temperatura rilevata. Sul diagramma lampeggia la colonnina corrispondente all'ora corrente e la freccia indica il giorno della settimana. NOTA. Quando il dispositivo si trova in stand-by, il primo tocco sullo schermo accende la retro-illumi- nazione e non esegue alcun comando. - Page 8 Cambiare la modalità di funzionamento dell'impianto Toccare l'area evidenziata nella figura A e mantenere il tocco fino a quando un segnale acustico indica la variazione di modalità tra: Impianto in modalità Riscaldamento Impianto in modalità Raffrescamento Impianto Spento Impianto in modalità Antigelo Quando l'impianto viene spento ( ), per alcuni secondi sullo schermo viene visualiz- zata l'immagine della figura B ad indicare...
- Page 9 Personalizzare la programmazione ③ settimanale della temperatura ② Utilizzare le frecce per visualizzare sul display la temperatura programmata per ① l'ora selezionata A. ① Giorno visualizzato ② Ora selezionata ③ Temperatura programmata Utilizzare le frecce per modificare la programmazione della temperatura per l'ora selezionata B.
- Page 10 Copiare l'andamento termico di una giornata su altri giorni Brevi tocchi sulla parte dello schermo eviden- ziata, permettono di visualizzare l'andamen- to termico giornaliero che si desidera copiare. Mantenere il tocco nell'area evidenziata in figura A fino a quando appare la schermata di figura B.
- Page 11 di modifica del livello di temperatura T2 F. Procedere come precedentemente illustrato per impostare livello di temperatura T3. Uso del programma Jolly Il programma Jolly può essere utilizzato, durante feste infrasettimanali, ferie, ecc.. Può essere avviato in qualsiasi momento del giorno in corso e rimanere attivo fino al termine del giorno stesso, oppure prenotato per uno qualsiasi dei giorni della settimana.
-
Page 12: Modalità Manuale
Modalità manuale Per attivare questa modalità premere il A fino alla comparsa pulsante dell'icona Usare le frecce per impostare la temperatura di zona desiderata B; il valore inserito rimarrà valido fino a quando non verrà cambiata la modalità di funziona- mento o il valore impostato. - Page 13 Esclusione dal controllo termico Per attivare questa modalità premere il A fino alla comparsa pulsante dell'icona Se l'impianto è in modalità "Riscaldamento", la funzione antigelo rimane attiva. Per qualche secondo viene mostrata la temperatura impostata per l'antigelo poi viene visualizzata l'ora corrente e la tempe- ratura rilevata.
- Page 14 Sblocco dello schermo Se il blocco dello schermo è abilitato A, premendo in una qualunque area sensibile dello schermo si accede alla schermata di figura B. Il primo numero lampeggia; usare le frecce per scegliere la prima cifra del codice, la freccia per passare alla cifra successiva;...
- Page 15 Configurazione dei parametri generali del dispositivo A è possibile Quando il dispositivo si trova in modalità Manuale , mantenendo premuto il pulsante accedere alle schermate di configurazione del dispositivo. Nota. Dopo l'accesso alle schermate di configurazione, la pressione del pulsante permette di visualizzare in sequenza i parametri da configurare, il pulsante permette di uscire dalla finestra di configurazione...
-
Page 16: Abilitare / Disabilitare L'anticipo Automatico
Modificare la calibrazione della sonda di rilevamento della temperatura Se la collocazione del dispositivo non consente una corretta rilevazione della temperatura è possibile modificare la temperatura rilevata di ±3 °C con incrementi di un decimo di grado. Usare le frecce per modificare il dato rilevato del valore desiderato e premere il pulsante... - Page 17 Impostare il tipo di algoritmo di gestione termica Il dispositivo permette di scegliere il tipo di algoritmo da applicare per la gestione dell'impianto tra: • Differenziale • Proporzionale Integrale Algoritmo Differenziale A Se alla schermata A, mediante le frecce si è scelto il tipo di algoritmo differenziale, premere il pulsante per personalizzare, B, il valore del...
- Page 18 Il programma P4 può essere compilato secondo necessità. figura E per poter Premere il pulsante F, la inserire, mediante le frecce durata di un ciclo. figura F per poter Premere il pulsante G, il inserire, mediante le frecce tempo minimo di accensione. figura G per poter Premere il pulsante H, il valore...
- Page 19 Impostare l'unità di misura della temperatura Scegliere l'unità di misura della temperatura usando le frecce Premere il pulsante per passare al para- metro successivo da configurare. Utilizzo dei morsetti (solo su modello a pile) Scegliere la funzione associata ai morsetti B tra: usando le frecce = sonda remota compatibile...
- Page 20 Attivazione da remoto mediante contatto telefonico (solo su modello a pile) Collegando ai morsetti un’apposita interfaccia telefonica è possibile eseguire, mediante il proprio telefono, due tipi di attivazione: 1. Attivazione da remoto del programma Manuale a tempo: per l’attivazione di questo programma è...
-
Page 21: Regolare La Luminosità Del Display
Contatto finestra (solo su modello a pile) Collegando ai morsetti un contatto finestra D ( ), è possibile fare in modo che la zona termica venga spenta dopo trenta secondi dall'apertura della finestra nella quale è montato il contatto. Nota. Richiudendo la finestra la zona termica torna nella modalità... -
Page 22: Versione Firmware
Conteggio ore di attività La schermata di figura A riporta le ore di attività del dispositivo. Per azzerare il contatore, premere in maniera prolungata nell'area evidenziata in figura. Premere il pulsante per passare al para- metro successivo da configurare. Versione firmware La schermata di figura B riporta il nu- mero della versione firmware installata nel dispositivo. -
Page 23: Caratteristiche Tecniche
Caratteristiche tecniche TH/500 alimentato da batteria TH/500 230 alimentato da rete • Alimentazione: 2 pile stilo alcaline LR6 tipo AA da • Alimentazione: 230 Vac 50/60Hz. 1,5V (non fornite in dotazione). • Assorbimento: 16mA. • Autonomia batteria: Maggiore di 1 anno. - Page 24 CAME S.p.A. Via Martiri Della Libertà, 15 31030 Dosson di Casier - Treviso - Italy tel. (+39) 0422 4940 - fax. (+39) 0422 4941...
- Page 25 Touch screen FB00805-EN programmable thermostat TH/500 - TH/500 230 INSTALLATION AND USE MANUAL EN English...
-
Page 26: General Notes
General Notes • Read the instructions carefully before beginning the installation and carry out the actions as specified by the manufacturer. • The installation, programming, commissioning and maintenance of the product must only be carried out by qualified technicians, properly trained in compliance with the regulations in force, including health and safety measures and the disposal of packaging. -
Page 27: Description Of Device
Description of device ⑰ ③ ④ ⑤ ⑨ ⑩ ① ⑪ ⑬ ② ⑮ ⑯ ⑫ ⑱ ⑭ ⑲ ⑦ ⑥ ⑧ Battery charge status Remote activation in progress ① ⑩ (only on battery-powered version) (only on battery-powered version) Window contact active ②... -
Page 28: Wall-Mounted Installation
Installation Install the unit in a position which is suitable for cor- rect room temperature measurement, for example on an internal wall. Avoid installation in alcoves, behind doors or curtains, or near heat sources. Wall-mounted installation • Open the device by pressing the button on the bot- tom B, with your finger ①... - Page 29 Electrical connections. The connections are made according to the type of equipment controlled by the programmable thermostat. VALVE Figures D and E refer to the OPEN mains-powered programmable thermo- stat but are also valid for the battery-pow- CLOSED ered version, only for the part relating to the relay contacts.
-
Page 30: Device Reset
NOTE. In the mains-powered device, in the event of there being no power supplied, the relay remains in the state prior to the power outage. Inserting/replacing batteries (only on battery-powered model) Insert 2 AA 1.5V LR6 penlight alkaline batteries (not supplied with purchase) into the relative slot, respecting the polarities shown on the bottom of the housing G. -
Page 31: Setting Date And Time
Operation of device When first turned on, A the programmable thermostat is in automatic heating mode; the temperature detected is shown on the display. On the diagram the column corresponding to the current time is flashing and the arrow indicates the day of the week. NOTE. - Page 32 Changing the system's operating mode Touch the area shown in figure A and continue touching until a beep indicates the mode is changed between: System in Heating mode System in Cooling mode System off System in Frost-protection mode When the system is off ( ), the image in figure B is displayed on the screen for a few seconds, to indicate that the programmable thermostat is off;...
- Page 33 Customising weekly temperature programming ③ ② Use the arrows to view the temperature set for the time selected on the display A. ① ① Day displayed ② Time selected ③ Programmed temperature Use the arrows to change the temperature set for the time selected B. Once the temperature trend for the day has been set, move on to programming the next day by briefly touching the temperature/...
- Page 34 Copying the temperature trend from one day to other days Brief touches on the part of the screen highlighted allow the daily temperature trend that you want to copy to be displayed. Keep touching the area highlighted in figure A until the screen in figure B appears. Brief touches on the highlighted area of the screen allow the arrow that indicates the days of the work to be moved to the day you want...
- Page 35 Proceed as described above to set temper- ature level T3. Use of the all-purpose program The all-purpose program can be used during midweek holidays, public holidays, etc. It can be started up at any time of the day in course and stay on until the end of that day, or be set up in advance for any day of the week.
-
Page 36: Manual Mode
Manual mode To activate this mode press button icon appears B. until the Use the arrows to set the desired zone temperature B; the value entered will remain valid until the operating mode or value set is changed. Note. If no button is pressed for 5 seconds the device goes back to showing the tem- perature detected. - Page 37 Exclusion from thermal control To activate this mode press button icon appears B. until the If the system is in "Heating" mode, the frost-protection function remains on. The frost-protection temperature set is shown for a few seconds, then the current time and temperature detected are displayed.
-
Page 38: Unlocking The Screen
Unlocking the screen If screen lock is enabled A, pressing on any sensitive area of the screen gives access to the window shown in figure B. The first number flashes; use the arrows to choose the first digit of the code, and the arrow to move on to the next digit;... - Page 39 Configuration of general parameters of the device button A gives access to the device's config- When the device is in Manual mode , holding down the uration screens. Note. After accessing the configuration screens, pressing the button lets you display the parameters to be configured in sequence, the button lets you exit the configuration window and go back to the screen in figure A.
- Page 40 Changing the calibration of the temperature detection probe If the location of the device does not permit suitable detection of the temperature, it is possible to change the temperature detected by ±3 °C with increases of a tenth of a degree. Use the arrows to change the data detected by the desired value and press the...
- Page 41 Setting the type of heat management algorithm The device lets you choose the type of algorithm to apply for the management of the system between: • Differential • Proportional Integral Differential Algorithm A If, on screen A, using the arrows, the differential algorithm type has been chosen, press the button to customise the value of...
- Page 42 Program P4 can be made up as required. button in figure E to be able Press the to enter the duration of a cycle, using the arrows F. button in figure F to be able Press the to enter the minimum on time, using the arrows G.
- Page 43 Setting the unit of measurement for the temperature Choose the unit of measurement for the arrows A. temperature using the Press the button to move on to the next parameter to be configured. Use of terminals (only on battery-powered model) Choose the function associated with the termi- arrows B from: nals...
- Page 44 Remote activation via phone (only on battery-powered model) By connecting a suitable telephone interface to the terminals you can carry out two types of activation from your phone: 1. Remote activation of the timed Manual program: to activate this program the input (terminals must be closed for at least 2 secs and not more than 5 secs.
-
Page 45: Adjusting Display Brightness
Window contact (only on battery-powered model) If you have chosen to connect to the terminals a window contact D ( ), you can set it so that the thermal zone is turned off thirty seconds after the window in which the contact is fitted is opened. -
Page 46: Firmware Version
Hours of activity counter The screen in figure A shows the device's hours of activity. To reset the counter to zero, press it for a long time in the area highlighted in the figure. Press the button to move on to the next parameter to be configured. -
Page 47: Technical Features
Technical features Battery-powered TH/500 Mains-powered TH/500 230 • Power supply: 2 alkaline LR6 penlight AA 1.5V • Power supply: 230 Vac 50/60Hz batteries (not supplied). • Consumption: 16mA. • Battery life: More than 1 year. • Autonomous life without power supply: •... - Page 48 CAME S.p.A. Via Martiri Della Libertà, 15 31030 Dosson di Casier - Treviso - Italy tel. (+39) 0422 4940 - fax. (+39) 0422 4941...
- Page 49 Chronothermostat FB00805-FR écran tactile TH/500 - TH/500 230 MANUEL D'INSTALLATION ET D'UTILISATION FR Français...
-
Page 50: Instructions Générales
Instructions générales • Lire attentivement les instructions, avant de commencer l'installation et d'effectuer les interventions comme indiqué par le fabricant. • L'installation, la programmation, la mise en service et l'entretien du produit ne doivent être effectués que par un personnel technique qualifié et convenablement formé, conformément aux normes en vigueur, y compris les dispositions concernant la prévention des accidents et l'élimination des emballages. -
Page 51: Description Dispositif
Description dispositif ⑰ ③ ④ ⑤ ⑨ ⑩ ① ⑪ ⑬ ② ⑮ ⑯ ⑫ ⑱ ⑭ ⑲ ⑦ ⑥ ⑧ État de charge de la batterie Activation à distance en cours ① ⑩ (pour version à piles uniquement) (pour version à piles uniquement) Contact de la fenêtre actif ②... -
Page 52: Installation Murale
Installation Installez le dispositif dans une position en mesure de relever correctement la température ambiante, si possible sur un mur intérieur, en évitant l'installation dans des niches, derrière des portes, des rideaux ou près de sources de chaleur. Installation murale •... -
Page 53: Branchements Électriques
Branchements électriques Les branchements doivent être réalisés en fonction du type d'équipement comman- dé par le chronothermostat. VANNE Les figures D et E se réfèrent au OUVERTE chronothermostat alimenté sur secteur, mais elles sont également valables pour FERMÉE la version alimentée sur piles, mais que pour la partie des contacts relais. -
Page 54: Insertion/Remplacement Des Piles (Pour Modèle À Piles Uniquement)
REMARQUE. Pour le dispositif alimenté sur secteur, en cas de panne de courant, le relais reste dans l'état précédant la chute de tension. Insertion/remplacement des piles (pour modèle à piles uniquement) Introduire 2 piles alcalines LR6 de type AA de 1,5 V (non fournies) dans le logement prévu à... -
Page 55: Fonctionnement Du Dispositif
Fonctionnement du dispositif Lors de première mise en marche A le chronothermostat est en mode Chauffage automatique ; l'afficheur montre la température relevée. Sur le diagramme, la petite barre clignotante indique l'heure courante et la flèche le jour de la semaine. REMARQUE. -
Page 56: Changement Du Mode De Fonctionnement De L'installation
Changement du mode de fonctionnement de l'installation Appuyez sur la zone indiquée dans la figure A jusqu'à ce qu'un bip sonore indique le changement de mode entre : Installation en mode chauffage Installation en mode refroidissement Installation éteinte Installation en mode antigel Lorsque l'installation est éteinte ( ) l'écran affiche pendant quelques secondes l'image de la figure B pour indiquer que le chrono-... -
Page 57: Personnalisation De La Programmation Hebdomadaire De La Température
Personnalisation de la ③ programmation hebdomadaire de ② la température Utilisez les flèches pour visualiser ① sur l'afficheur la température programmée pour l'heure sélectionnée A. ① Jour affiché ② Durée sélectionnée ③ Température programmée Utilisez les flèches pour modifier la programmation de la température pour l'heure sélectionnée B. -
Page 58: Copie De L'évolution Thermique D'une Journée Sur D'autres Jours
Copie de l'évolution thermique d'une journée sur d'autres jours Effleurez brièvement la partie de l'écran grisée pour afficher l'évolution thermique quotidienne que vous souhaitez copier. Main- tenez le contact sur la zone indiquée dans la figure A jusqu'à ce que la page-écran de la figure B apparaisse. -
Page 59: Utilisation Du Programme Jolly
Procédez comme précédemment pour régler le niveau de température T3. Utilisation du programme Jolly Le programme Jolly peut être utilisé pour les jours fériés tombant en milieu de semaine, les périodes de congés, etc. Il peut être exécuté à tout moment de la journée et rester actif jusqu'à... -
Page 60: Mode Manuel
Mode manuel Pour activer ce mode, appuyez sur la touche A jusqu'à ce que l'icône apparaisse. Utilisez les flèches pour définir la température de la zone souhaitée B ; la valeur saisie restera active jusqu'à ce que vous modifiez le mode de fonctionnement ou la valeur définie. -
Page 61: Exclusion Du Contrôle Thermique
Exclusion du contrôle thermique Pour activer ce mode, appuyez sur la touche A jusqu'à ce que l'icône apparaisse. Si l'installation est en mode « Chauffage », la fonction antigel reste active. La température définie pour la protection antigel est affichée pendant quelques secondes puis il sera affiché... -
Page 62: Déverrouillage De L'écran
Déverrouillage de l'écran Si le verrouillage de l'écran est activé A, appuyez sur n'importe quelle zone sensible de l'écran pour accéder à la page-écran de la figure B. Le premier numéro clignote ; utilisez les flèches pour sélectionner le premier chiffre du code, la flèche pour passer au chiffre suivant ;... -
Page 63: Configuration Des Paramètres Généraux Du Dispositif
Configuration des paramètres généraux du dispositif A pour accéder aux Lorsque le dispositif se trouve en mode Manuel , maintenez appuyée la touche pages-écran de configuration du dispositif. Remarque. Après avoir accédé aux pages-écran de configuration, appuyez sur la touche pour afficher en séquence les paramètres à... -
Page 64: Modifier L'étalonnage De La Sonde De Détection De La Température
Modifier l'étalonnage de la sonde de détection de la température Si l'emplacement du dispositif ne permet pas une bonne lecture de la température, vous pouvez modifier la température lue de ± 3° C par incréments d'un dixième de degré. Utilisez les flèches pour modifier la valeur lue de la valeur souhaitée puis appuyez sur la touche... -
Page 65: Définition Du Type D'algorithme De Gestion Thermique
Définition du type d'algorithme de gestion thermique Le dispositif permet de choisir le type d'algorithme à appliquer à la gestion de l'installation, entre : • Différentiel • Proportionnel Intégral Algorithme Différentiel A Si dans la page-écran A, vous avez choisi avec les flèches le type d'algorithme différentiel, appuyez sur la touche pour... - Page 66 Le programme P4 peut être compilé selon vos exigences. de la figure E Appuyez sur la touche F, la pour saisir, à l'aide des flèches durée d'un cycle. de la figure F Appuyez sur la touche G, le pour saisir, à l'aide des flèches temps minimum de mise en marche.
-
Page 67: Sélectionnez L'unité De Mesure De La Température
Sélectionnez l'unité de mesure de la température Choisissez l'unité de mesure de la tempéra- ture en utilisant les flèches Appuyez sur la touche pour passer au paramètre suivant à configurer. Utilisation des bornes (modèle à piles seulement) Choisissez la fonction associée aux bornes B parmi ... -
Page 68: Activation À Distance Via Un Contact Téléphonique (Modèle À Piles Seulement)
Activation à distance via un contact téléphonique (modèle à piles seulement) En connectant aux bornes une interface téléphonique ad hoc, vous pouvez réaliser depuis votre téléphone deux types d'activation : 1. Activation à distance du programme Manuel temporisé : pour l'activation de ce programme, il suffit de fermer l'entrée (bornes ) pour une durée variant de 2 secondes minimum à... -
Page 69: Contact Fenêtre (Modèle À Piles Seulement)
Contact fenêtre (modèle à piles seulement) En connectant aux bornes un contact fenêtre D ( ), vous pouvez faire en sorte que la zone thermique soit éteinte 30 secondes après l'ouverture de la fenêtre sur laquelle le contact est installé. Remarque. -
Page 70: Compter Heures D'activité
Compter heures d'activité La page-écran de la figure A indique le nombre d'heures de fonctionnement du dispositif. Pour réinitialiser le compteur, appuyez de façon prolongée sur la zone indiquée dans la figure. Appuyez sur la touche pour passer au paramètre suivant à configurer. Version du micrologiciel La page-écran montrée dans la figure B indique le numéro de la version du microlo-... -
Page 71: Caractéristiques Techniques
Caractéristiques techniques TH/500 alimenté par piles TH/500 230 alimenté sur secteur • Alimentation : 2 piles alcalines LR6 de type AA • Alimentation : 230 Vca 50/60Hz. 1,5V (non fournies). • Absorption : 16 mA. • Autonomie des piles : supérieure à 1 an. - Page 72 CAME S.p.A. Via Martiri Della Libertà, 15 31030 Dosson di Casier - Treviso - Italy tel. (+39) 0422 4940 - fax. (+39) 0422 4941...
-
Page 73: Touchscreen
Thermostat mit Zeitschaltuhr und FB00805-DE Touchscreen TH/500 - TH/500 230 MONTAGE- UND BETRIEBSANLEITUNG DE Deutsch... -
Page 74: Allgemeine Hinweise
Allgemeine Hinweise • Lesen Sie aufmerksam die Anweisungen, bevor Sie mit dem Einbau beginnen, und führen Sie die vom Hersteller genannten Arbeiten aus. • Die Installation, Programmierung, Inbetriebnahme und Wartung des Produktes dürfen ausschließlich von qualifiziertem und entsprechend geschultem Fachpersonal unter Einhaltung der geltenden Normen, ein- schließlich der Unfallverhütungs- und Abfallentsorgungsvorschriften, durchgeführt werden. -
Page 75: Gerätebeschreibung
Gerätebeschreibung ⑰ ③ ④ ⑤ ⑨ ⑩ ① ⑪ ⑬ ② ⑮ ⑯ ⑫ ⑱ ⑭ ⑲ ⑦ ⑥ ⑧ Batterieladestand Fernaktivierung läuft ① ⑩ (nur bei Modellen mit Batterieversorgung) (nur bei Modellen mit Batterieversorgung) Fensterkontakt aktiv ② ⑪ Anlage im Heizmodus (nur bei Modellen mit Batterieversorgung) Thermische Zone im manuellen ③... -
Page 76: Wandmontage
Installation Installieren Sie das Gerät an einer geeigneten Stelle für das Messen der Raumtemperatur, möglichst an einer Innenwand und nicht in Nischen, hinter Türen oder Gardinen oder in der Nähe von Wärmequellen. Wandmontage • Öffnen Sie das Gerät, indem Sie die Taste B an der Unterseite mit dem Finger eindrücken ①... -
Page 77: Elektrische Anschlüsse
Elektrische Anschlüsse Die Anschlüsse müssen in Abhängigkeit des Gerätetyps, das durch das Thermostat gesteuert werden soll, vorgenommen VENTIL werden; GEÖFFNET Die Abbildungen D und E beziehen sich auf das Thermostat mit Netzversor- GESCHLOSSEN gung, sind aber mit Ausnahme des Teils der Relaiskontakte auch für das Modell mit Batterieversorgung gültig. - Page 78 HINWEIS: Bei Geräten mit Netzversor- gung verbleibt das Relais bei einem Stromausfall in dem Zustand, in dem es sich vor dem Ausfall befunden hat. Einsetzen/Austauschen der Batterien (nur bei Modellen mit Batterieversorgung) Setzen Sie 2 alkaline 1,5 V Mignon-Batterien (LR6, AA, nicht im Lieferumfang enthalten) in den entsprechenden Sitz ein, und achten Sie dabei darauf, dass die dort gezeigten Polaritäten eingehalten werden G.
-
Page 79: Einstellung Von Datum Und Uhrzeit
Gerätebetrieb Beim ersten Einschalten A befindet sich das Thermostat mit Zeitschaltuhr im automatischen Heizmodus ; auf dem Display erscheint die gemessene Temperatur. Im Diagramm blinkt die Spalte der aktuellen Uhrzeit und der Pfeil zeigt den Wochentag an. HINWEIS: Wenn sich das Gerät im Standby-Modus befindet, schaltet sich bei der ersten Berührung des Bildschirms die Hintergrundbeleuchtung ein, ohne dass ein Befehl ausgeführt wird. - Page 80 Ändern des Betriebsmodus der Anlage Berühren Sie den Bereich, der in Abbildung A hervorgehoben ist, solange, bis ein akus- tisches Signal die Änderung des Betriebsmo- dus bestätigt. Folgende Modi sind möglich: Anlage im Heizmodus Anlage im Kühlmodus Anlage aus Anlage im Frostschutzmodus Wenn die Anlage ausgeschaltet wird ( ), erscheint auf dem Bildschirm für einige Se- kunden der Bildschirm aus Abbildung B, der...
- Page 81 Anpassung der Wochenprogrammierung ③ der Temperatur ② Verwenden Sie die Pfeile und , um auf dem Display die programmierte Temperatur für ① die gewählte Uhrzeit A anzeigen zu lassen. ① Angezeigter Tag ② Ausgewählte Uhrzeit ③ Programmierte Temperatur Verwenden Sie die Pfeile , um die Programmierung der Temperatur für die gewählte Uhrzeit B zu ändern.
- Page 82 Kopieren des Temperaturverlaufs von einem Tag auf andere Tage Durch kurzes Tippen auf die entsprechende Stelle im hervorgehobenen Bildschirmbe- reich können Sie den Temperaturverlauf des Tages anzeigen lassen, den Sie kopieren möchten. Berühren Sie den in Abbildung A gezeigten Bereich solange, bis der Bildschirm aus Abbildung B erscheint.
- Page 83 Gehen Sie dann wie zuvor beschrieben vor, um den Temperaturwert T3 einzustellen. Verwendung des Programms Jolly Das Programm Jolly kann verwendet werden, wenn man etwa aufgrund von Feier- tagen, Urlaub o. Ä. unter der Woche zuhause ist. Es kann zu jedem beliebigen Zeitpunkt gestartet werden, wobei es dann bis zum Ende des Tages aktiv bleibt, oder auch im Voraus für einen beliebigen Tag vorgewählt werden.
-
Page 84: Manueller Modus
Manueller Modus Zum Aktivieren dieses Modus tippen Sie auf A, bis das Symbol die Schaltfläche B erscheint. Stellen Sie mithilfe der Pfeile gewünschte Zonentemperatur B ein; der eingegebene Wert bleibt gültig, bis der Betriebsmodus bzw. der eingestellte Wert erneut geändert werden. Hinweis: Wenn 5 Sekunden lang keinerlei Schaltfläche betätigt wird, zeigt das Gerät wieder die gemessene Temperatur an. - Page 85 Ausschluss von der Temperaturregulierung Zum Aktivieren dieses Modus tippen Sie auf A, bis das Symbol die Schaltfläche B erscheint. Wenn sich die Anlage im Heizmodus befin- det, bleibt die Frostschutzfunktion aktiv. Für einige Sekunden wird die eingestellte Frostschutztemperatur angezeigt, und anschließend erscheinen wieder die aktuelle Uhrzeit und die gemessene Temperatur.
- Page 86 Aufheben der Bildschirmsperre Wenn die Bildschirmsperre A aktiv ist, erscheint bei Antippen eines beliebigen be- rührungsempfindlichen Bildschirmbereichs der Bildschirm B. Die erste Ziffer blinkt; wählen Sie nun mithilfe der Pfeile die erste Ziffer des Codes aus und gehen Sie dann mit dem Pfeil nächsten Ziffer über;...
- Page 87 Konfiguration der allgemeinen Geräteparameter Wenn sich das Gerät im manuellen Modus befindet , kann, durch längeres Berühren der Schaltfläche A der Konfigurationsbildschirm des Gerätes aufgerufen werden. Hinweis: Nach dem Zugriff auf den Konfigurationsbildschirm können Sie, durch Antippen der Schaltfläche , nacheinander die konfigurierbaren Parameter anzeigen lassen. Durch Antippen der Schaltfläche können Sie den Konfigurationsbildschirm verlassen und zum Bildschirm in Abbildung A zurückkehren.
- Page 88 Ändern der Kalibrierung der Temperaturmesssonde Wenn die Positionierung des Gerätes nicht die korrekte Messung der Temperatur gestattet, kann die gemessene Temperatur in Schritten von je einem Zehntel Grad um bis zu ±3 °C angepasst werden. Ändern Sie den Messwert mit den Pfeilen , um den Messwert des gewünschten Wer- tes zu ändern.
- Page 89 Einstellen des Algorithmustyps für die thermische Verwaltung Das Gerät gestattet die Auswahl des Algorith- mustyps, der für die Verwaltung der Anlage angewandt werden soll, aus den folgenden: • Differenzial • Proportional Integral Differenzial-Algorithmus A Wenn im Bildschirm A mithilfe der Pfeile der Typ Differenzialalgorithmus ausge- wählt wurde, tippen Sie auf die Schaltfläche , um den Wert des Differenzials mithilfe...
- Page 90 Das Programm P4 kann nach Belieben programmiert werden. Tippen Sie auf die Schaltfläche in Abbildung E. Daraufhin können Sie mithilfe der Pfeile F die Dauer eines Zyklus eingeben. Tippen Sie auf die Schaltfläche in Abbildung F. Daraufhin können Sie mithilfe der Pfeile G die Mindesteinschaltdauer (in Minuten) eingeben.
- Page 91 Einstellen der Maßeinheit der Temperatur Wählen Sie die Maßeinheit der Temperatur mithilfe der Pfeile Drücken Sie die Schaltfläche , um zum nächs- ten zu konfigurierenden Parameter überzugehen. Verwendung der Klemmen (nur bei Modell mit Batterieversorgung) Wählen Sie mithilfe der Pfeile B die Funktion, die sie den Klemmen zuweisen möchten, aus den folgenden: = kompatible Fernsonde...
- Page 92 Fernaktivierung mittels Telefonkontakt (nur bei Modellen mit Batterieversorgung) Durch Anschluss einer entsprechenden Telefonschnittstelle an die Klemmen können mithilfe des eigenen Telefons zwei Arten von Aktivierung ausgeführt werden: 1. Fernaktivierung des manuellen Programms mit Zeitschaltung: Für die Aktivierung dieses Programms muss der Eingang (Klemmen ) für eine Dauer von mindestens 2 s und höchstens 5 s geschlossen werden.
-
Page 93: Einstellen Der Displayhelligkeit
Fensterkontakt (nur bei Modellen mit Batterieversorgung) Durch Anschließen eines Fensterkontaktes ) an die Klemmen kann veranlasst werden, dass die thermische Zone dreißig Sekunden nach Öffnen des Fensters, an dem der Kontakt montiert ist, abgeschaltet wird. Hinweis. Wenn das Fenster wieder ge- schlossen wird, kehrt die thermische Zone in den Modus zurück, in dem sie sich vor der Aktivierung befunden hatte. - Page 94 Betriebsstundenzähler Der Bildschirm aus Abbildung A zeigt die Betriebsstunden des Gerätes. Um den Zähler zurückzusetzen, berühren Sie länger den in der Abbildung gezeigten Bereich. Drücken Sie die Schaltfläche , um zum nächsten zu konfigurierenden Parameter überzugehen. Firmwareversion Der Bildschirm aus Abbildung B zeigt die Versionsnummer der Firmware, die auf dem Gerät installiert ist.
-
Page 95: Technische Eigenschaften
Technische Eigenschaften TH/500 mit Batterieversorgung TH/500 230 mit Netzversorgung • Versorgung: 2 alkaline 1,5 V Mignon-Batterien • Versorgung: 230 Vac 50/ 60Hz (LR6, AA, nicht im Lieferumfang enthalten). • Stromaufnahme: 16mA. • Batterielebensdauer: Über 1 Jahr. • Autonomie bei Stromausfall: ca. 10 h. - Page 96 CAME S.p.A. Via Martiri Della Libertà, 15 31030 Dosson di Casier - Treviso - Italy tel. (+39) 0422 4940 - fax. (+39) 0422 4941...