Table des Matières
Publicité
Les langues disponibles
Les langues disponibles
Liens rapides
welcoming
•
allen + roth
is a registered trademark
®
of LF, LLC. All rights reserved.
ATTACH YOUR RECEIPT HERE
Serial Number
Purchase Date
Questions, problems, missing parts? Before returning to your retailer, call our customer service
department at 1-866-439-9800, 8 a.m. - 8 p.m., EST, Monday - Sunday.
AR19041
sophisticated
•
inspiring
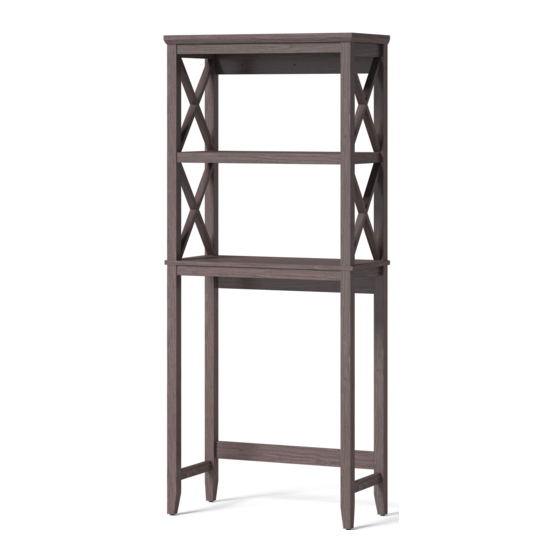
ITEM #1599709
3-TIER OVER-THE-TOILET
SHELF TOWER
MODEL #LWSGSS
1
PACKAGE CONTENTS
PART
DESCRIPTION
A
Top panel
B
Left upper side frame
C
Left lower side frame
D
Right upper side frame
E
Right lower side frame
F
Middle shelf
G
Bottom shelf
Français p. 11
H
Front stretcher
Español p. 21
I
Back upper stretcher
J
Back middle stretcher
K
Middle shelf molding
L
Back bottom stretcher
M
Back crosser
A
M
B
F
K
G
C
J
L
QUANTITY
1
1
1
1
1
1
1
2
1
1
2
1
2
2
I
D
H
E
H
Publicité
Table des Matières

Manuels Connexes pour Allen + Roth LWSGSS


Sommaire des Matières pour Allen + Roth LWSGSS
- Page 1 LF, LLC. All rights reserved. Left lower side frame Right upper side frame SHELF TOWER Right lower side frame Middle shelf MODEL #LWSGSS Bottom shelf Français p. 11 Front stretcher Español p. 21 Back upper stretcher ATTACH YOUR RECEIPT HERE...
-
Page 2: Safety Information
SAFETY INFORMATION HARDWARE CONTENTS (not shown actual size) Please read and understand this entire manual before attempting to assemble, operate or install the product. 1. Do not allow children to climb or play in or around this product. 2. Use this unit for its intended purpose only. Do not use shelves as step ladder. 3. - Page 3 ASSEMBLY INSTRUCTIONS ASSEMBLY INSTRUCTIONS 1. Insert wood dowels (CC) and cam bolts (BB) into 4. Insert wood dowels (CC) and cam bolts (BB) into the both middle shelf moldings (K) and attach them to top panel (A) and attach it to the previous assembly, the middle shelf (F), making sure the top edges are Secure into place with cam locks (AA).
- Page 4 ASSEMBLY INSTRUCTIONS OPERATING INSTRUCTIONS For stability, it is recommended you attach the unit to the wall. For instructions on how to attach the 7. Repeat the same procedure to attach right lower unit directly to the mounting surface, refer to step 1. For instructions on how to attach the tipping side frame (E) at the opposite end.
-
Page 5: Care And Maintenance
CARE AND MAINTENANCE REPLACEMENT PARTS LIST • Periodically check to make certain all components are properly positioned, free from damage PART DESCRIPTION PART # and firmly connected. Back crosser 00LWSGSS-M • Use a soft, clean cloth that will not scratch the surface when dusting. Cam lock 00LWSGSS-AA •... -
Page 6: Niveaux Tour De Rangement Pour Le Dessus De La Toilette
Cadre latéral inférieur gauche Cadre latéral supérieur droit RANGEMENT POUR LE Cadre latéral inférieur droit DESSUS DE LA TOILETTE Tablette centrale Tablette inférieure MODÈLE #LWSGSS Civière avant Civière supérieur arrière JOIGNEZ VOTRE REÇU ICI Civière centrale arrière Numéro de série Date d’achat Moulure d’étagère centrale... -
Page 7: Quincaillerie Incluse (Grandeur Non Réelle)
CONSIGNES DE SÉCURITÉ QUINCAILLERIE INCLUSE (grandeur non réelle) Assurez-vous de lire et de comprendre l’intégralité du présent manuel avant de tenter d’assembler, d’utiliser ou d’installer l’article. 1. Ne laissez pas les enfants grimper ou jouer sur l’article ni autour de celui-ci. 2. -
Page 8: Instructions Pour L'assemblage
INSTRUCTIONS POUR L’ASSEMBLAGE INSTRUCTIONS POUR L’ASSEMBLAGE 1. Insérez des goujons de bois (CC ) et des boulons à 4. Insérez les chevilles à bois (CC) et les boulons à came (BB) dans les deux moulures de l’étagère cen- came (BB) dans le panneau supérieur (A) et fixez-le trale (K) et fixez-les à... - Page 9 INSTRUCTIONS POUR L’ASSEMBLAGE MODE D’EMPLOI Pour plus de stabilité, il est recommandé de fixer l’appareil au mur. Pour des instructions sur la façon 7. Répéter la même procédure pour fixer le cadre de fixer l’unité directement à la surface de montage, reportez-vous à l’étape 1. Pour des instructions latéral inférieur droit (E) à...
- Page 10 SOIN ET ENTRETIEN LISTE DES PIÈCES DE RECHANGE • Vérifi ez périodiquement si les composants sont bien positionnés, en bon état et fermement montés. PIÈCE DESCRIPTION DE PIÈCE • Utilisez un linge doux et propre qui n’égratignera pas la surface lorsque vous époussetterez le meuble.
- Page 11 Marco izquierdo inferior Marco derecho superior PARA COLOCAR SOBRE EL Marco derecho inferior INODORO DE 3 NIVELES Repisa media Repisa inferior MODELO #LWSGSS Soporte frontal Soporte posterior superior ADJUNTE SU RECIBO AQUÍ Soporte posterior medio Número de serie Fecha de compra...
-
Page 12: Información De Seguridad
INFORMACIÓN DE SEGURIDAD CONTENIDOS DE FERRETERÍA (no se muestra el tamaño real) Por favor lea y entienda esté manual completamente antes de intentar el ensamblaje, operación, o instalación del producto. 1. No permita a los niños escalar o jugar en o alrededor de esté producto. 2. -
Page 13: Instrucciones De Ensamblaje
INSTRUCCIONES DE ENSAMBLAJE INSTRUCCIONES DE ENSAMBLAJE 1. Insertar las clavijas de madera (CC) y los pernos de 4. Insertar las clavijas de madera (CC) y los pernos fijación (BB) en ambas molduras de repisa medias de fijación (BB) en el panel superior (A) y adjuntar (K) y adjuntarlas a la repisa media (F), asegurar que al ensamble previo. - Page 14 INSTRUCCIONES DE ENSAMBLAJE INSTRUCCIONES DE OPERACIÓN Para estabilidad, se recomienda que adjunte la unidad a la pared. Para instrucciones de como adjuntar 7. Repetir el mismo procedimiento para adjuntar el la unidad directamente a la superficie de montaje, consultar el paso 1. Para instrucciones de como marco derecho inferior (E) al lado opuesto.
- Page 15 MANTENIMIENTO Y CUIDADOS LISTA DE PARTES DE REPUESTO • Checar periódicamente para asegurar de que todos los componentes están posicionados, libres PARTE DESCRIPCIÓN # DE PARTE de daños, y conectados. Soporte posterior 00LWSGSS-M • Use una toalla suave y limpia que no rayara la superficie al limpiar el polvo. Tuerca de fijación 00LWSGSS-AA •...