Publicité
Les langues disponibles
Les langues disponibles
Liens rapides
welcoming
ATTACH YOUR RECEIPT HERE
Serial Number
Purchase Date
Please call for replacement parts or assistance: 1-866-942-5362
Pacific Standard Time: 8:30 am – 4:30 pm PST Monday to Friday
Or visit our web site: www.whalenfurniture.com
•
sophisticated
•
inspiring
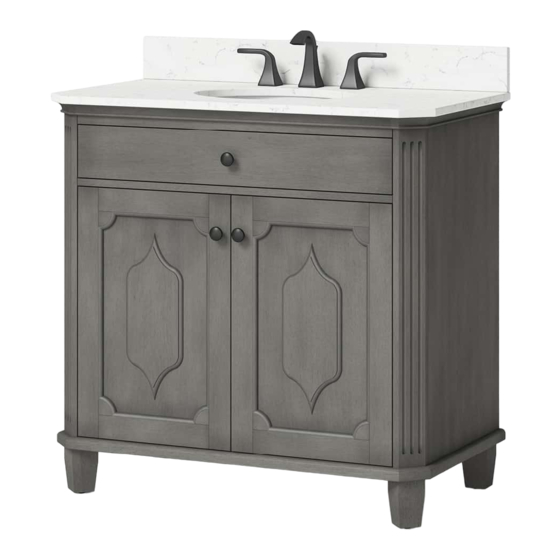
VANITY WITH TOP
MODEL #LWS36DVAG
Français p. 7
Español p. 13
1
PACKAGE CONTENTS
C
PART
A
B
D
HARDWARE CONTENTS (not shown actual size)
AA
BB
CC
Touch-up Pen
Bolt
Lock Washer
x 1
x 8+1 extra
x 8+1 extra
SAFETY INFORMATION
Please read and understand this entire manual before attempting to assemble or install the product.
WARNING
Do not stand on vanity. Use vanity on level ground. Base
vanity supports a maximum weight of 200 lbs. Exceeding
maximum weight limit will compromise the integrity of the
vanity structure and could cause the vanity to fail.
CAUTION
Failure to follow cautions could result in serious injury.
Do not hang from the vanity.
Do not taking off the vanity top to avoid damaging the vanity.
Clean all fluids from the stone surface to prevent stains. Wipe off the soap or toothpaste immediately to prevent
permanent damage to the stone surface.
PREPARATION
Before beginning assembly of product, make sure all parts are present. Compare parts with package contents list and
hardware contents list. If any part is missing or damaged, do not attempt to assemble the product.
Estimated Assembly Time: 25 minutes
Tools Required (not included): Silicone compound, Phillips screwdriver, Level, Stud Finder, Pencil, Variable Speed Drill.
DESCRIPTION
QUANTITY
A
Vanity Top (preassembled)
1
B
Vanity Base
1
C
Backsplash
1
D
Vanity Feet
4
DD
EE
Flat Washer
Wood Dowel
Hex Wrench
x 8+1 extra
x 8+1 extra
Maximum load 200 lb. (90.71 kg)
Maximum load 10 lb. (4.5 kg)
Maximum load 30 lb. (13.6 kg)
2
FF
x 1
Publicité

Manuels Connexes pour Allen + Roth LWS36DVAG


Sommaire des Matières pour Allen + Roth LWS36DVAG
- Page 1 Do not taking off the vanity top to avoid damaging the vanity. Clean all fluids from the stone surface to prevent stains. Wipe off the soap or toothpaste immediately to prevent MODEL #LWS36DVAG permanent damage to the stone surface. Français p. 7...
- Page 2 ASSEMBLY INSTRUCTIONS ASSEMBLY INSTRUCTIONS Step 1: Step 4: Insert wood dowel (EE) into vanity feet (D). Attach vanity Install faucet, drain and supply lines (none included) to feet (D) to the vanity base (B) by inserting the bolts (BB) vanity top (A) according to the instructions supplied with through lock washers (CC) and flat washers (DD).
- Page 3 ASSEMBLY INSTRUCTIONS REPLACEMENT PARTS LIST Step 7: For replacement parts, call our customer service department at 1-866-439-9800, 8 a.m. - 8 p.m., EST, Monday - Friday. If the door preassembled to vanity base (B) require adjustment, follow the below options as needed: PART DESCRIPTION PART #...
- Page 4 Ne retirez pas le comptoir de meuble-lavabo afin d’éviter d’endommager le meuble-lavabo. Nettoyer tous les liquides de la surface de la pierre pour éviter les tâches. Essuyer immédiatement le savon et le MODÈLE #LWS36DVAG dentifrice pour éviter d’endommager la surface de la pierre.
- Page 5 INSTRUCTIONS POUR L’ASSEMBLAGE INSTRUCTIONS POUR L’ASSEMBLAGE Étape 1: Étape 4: Insérez les goujons de bois (EE) dans les pieds du meuble- Installez le robinet, le drain et les conduites d’alimentation lavabo (D). Fixez les pieds du meuble-lavabo (D) à la base (non inclus) au comptoir de meuble-lavabo (A) selon les du meuble-lavabo (B) en insérant les boulons (BB) dans instructions pour l’installation fournies avec ces articles.
- Page 6 INSTRUCTIONS POUR L’ASSEMBLAGE LISTE DES PIÈCES DE RECHANGE Étape 7: Pour obtenir des pièces de rechange, communiquez avec notre service à la clientèle au 1 866 439- 9800, entre 8 h et 20 h (HNE), du lundi au vendredi. Si le réglage des portes préassemblées à la base du meuble-lavabo (B) s’avère nécessaire, choisissez l’une PIÈCE DESCRIPTION...
- Page 7 No saque la cubierta para tocador para evitar dañarlo. Limpie todos los fluidos de la superficie de piedra para evitar las manchas. Limpie el jabón o la pasta de dientes MODELO #LWS36DVAG inmediatamente para evitar daños permanentes a la superficie de piedra.
- Page 8 INSTRUCTIVO DE ENSAMBLE INSTRUCTIVO DE ENSAMBLE Paso 1: Paso 4: Introduzca las espigas de madera (EE) en los patas del Conecte el grifo, el desagüe y las tuberías de suministro tocador (D). Fije las patas del tocador (D) a la base del (ninguna de estas piezas se incluye) a la cubierta para tocador (B) al insertar los pernos (BB) a través de las tocador (A) de acuerdo con las instrucciones provistas...
- Page 9 INSTRUCTIVO DE ENSAMBLE LISTA DE PARTES DE REPUESTO Paso 7: Para obtener piezas de repuesto, llame a nuestro Departamento de Servicio al Cliente al 1-866-439- 9800, de lunes a viernes de 8 a.m. a 8 p.m., hora estándar del Este. Si las puertas preensambladas a la base del tocador (B) requieren ajustes, siga las opciones a continuación según PARTE...