LAS 11807 Manuel De L'opérateur
Masquer les pouces
Voir aussi pour 11807:
- Manuel de l'opérateur (16 pages) ,
- Instructions de montage (40 pages)
Table des Matières
Publicité
Les langues disponibles
Les langues disponibles
Liens rapides
Art.-Nr.: 11807
Deichselträger Alu
Bedienungsanleitung . . . . . . . . . . . . . . . . . . . . . . . . . . . . . . . 2
Article number 11807
Towbar rack
Operating instructions . . . . . . . . . . . . . . . . . . . . . . . . . . . . . . 8
Réf. 11807
Porte-velos sur timon
Manuel de l'opérateur . . . . . . . . . . . . . . . . . . . . . . . . 13
Cod. art. 11807
Portabiciclette da timone
Istruzioni per l'uso . . . . . . . . . . . . . . . . . . . . . . . . . . . . 18
1
Publicité
Chapitres
Table des Matières

Manuels Connexes pour LAS 11807


Sommaire des Matières pour LAS 11807
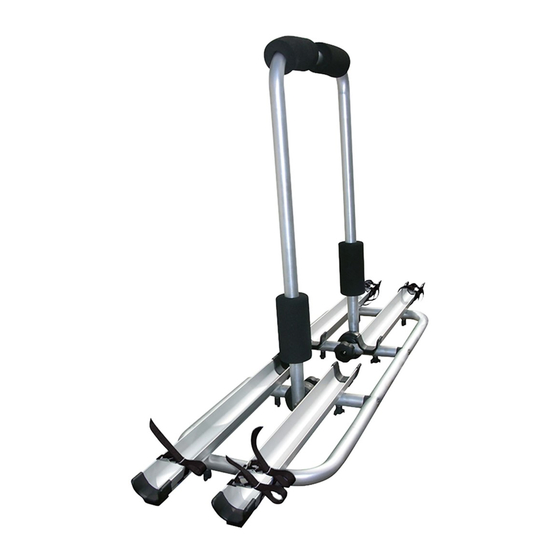
- Page 1 Bedienungsanleitung ....... 2 Manuel de l‘opérateur ......13 Article number 11807 Cod. art. 11807...
- Page 2 Verpackungsinhalt Contenu du paquet Contents Contenuto dell’imballaggio Grundrahmen Basic frame Cadre de base Telaio di base U-Bügelbefestigung U-bolt fastenings Fixations pour l’ é trier en forme d’U Ferro di fissaggio a U Befestigungsgurte + Sicherheitsgurt Fastening straps + Safety straps Ceintures de fixation et ceinture de sécurité...
-
Page 3: Table Des Matières
DEICHSELTRÄGER ALU INHALT TECHNISCHE DATEN MONTAGEANLEITUNG U-BÜGELBEFESTIGUNG BEFESTIGEN DER FAHRRÄDER AUF DEM DEICHSELTRÄGER EXPLOSIONSZEICHNUNG KONTAKTINFORMATIONEN WARNUNG Lesen Sie die Bedienungsanleitung vor Inbetriebnahme sorgfältig durch und beachten Sie alle Sicherheitshinweise! Nichtbeachtung kann zu Personenschäden, Schäden am Gerät oder Ihrem Eigentum führen! Bewahren Sie die Originalverpackung, den Kaufbeleg sowie diese Anleitung zum späteren Nachschlagen auf! Bei der Weiterga- be des Produkts geben Sie auch diese Anleitung weiter. -
Page 4: U-Bügelbefestigung
Bild 2 BENÖTIGTE TEILE U-BÜGEL Bohrungen U-BÜGELBEFESTIGUNG Den U-Bügel montieren Sie wie folgt. Die Schutzgummis sind schon auf dem U-Bügel angebracht. Setzen Sie die Zahnscheiben um 90° versetzt wie in der Detailansicht zu sehen an die inneren Distanzrohre außen an. Den U-Bügel einsetzen und mit den Schloss-Schrauben M6 x 100 zuerst durch den U-Bügel dann durch die Zahnscheibe und als letztes durch das Distanzrohr die Schraube setzen. -
Page 5: Befestigen Der Fahrräder Auf Dem Deichselträger
Bild 3 BENÖTIGTE TEILE Befestigungsgurte und Sicherheitsgurt Deichselbefestigung Fixier-Schrauben Kunststoff-Block DIE MONTAGE: Mit Hilfe der mitgelieferten Deichselhalterungen befestigen Sie den Deichselträger auf die Deichsel Ihres Wohnwagens. Dabei sitzen die Kunststoffblöcke unter dem Deichselträger auf die Wohnwagendeichsel auf, damit der U-Bügel des Deichselträgers sich frei bewegen kann und weder aufliegt noch anstoßen kann. Die Befestigungs-Bügel werden von unten um das Profil der Deichsel gelegt und mit den Rohrschellen, Scheiben und Muttern der Deichselbefestigung gesichert. - Page 6 ACHTUNG: Legen Sie den Sicherheitsgurt durch die Fahrradrahmen und um den U-Bügel herum und ziehen den Sicherheitsgurt fest an. Sicherheitsgurt Radbefestigung ACHTUNG: SICHERHEITSHINWEISE UNBEDINGT BEACHTEN! • Beachten Sie unbedingt die max. Stützlast Ihrer Anhängerkupplung, bei Beladung des Deichselträgers. Achtung: Der Lenkeinschlag darf nicht behindert werden.
-
Page 7: Explosionszeichnung
Dieser Deichselträger wurde auf Vollständigkeit hin überprüft. Der Deichselträger ist aus Aluminium mit einem Eigengewicht von ca. 4 kg (ohne Befestigungsteile). Mit Befestigungsteile besitzt der Träger ein Eigengewicht von ca. 6 kg. Die Befestigungsteile sind aus Edelstahl und Kunststoff! EXPLOSIONSZEICHNUNG Rohrschelle Kunststoff-Block Befestigungs-Bügel... -
Page 8: Technical Data
TOWBAR RACK CONTENTS TECHNICAL DATA ASSEMBLY INSTRUCTIONS U-BOLT FASTENINGS FASTEN BICYCLES ON THE DRAWBAR CARRIER EXPLODED VIEW CONTACT INFORMATION WARNING Please read the operating instructions carefully prior to use and observe all safety instructions! Retain the original packaging, the proof of purchase as well as these instructions for subsequent reference! When passing on the rack, please include these operating instructions as well. -
Page 9: U-Bolt Fastenings
Picture 2 REQUIRED PARTS U-BOLT Boreholes U-BOLT FASTENINGS Mount the U-bolt as follows: The protective rubbers are already fixed on the U-bolt. Place the lock washers at an angle of 90° to each other on the outside of the interior distance tube as shown on the detailed view. Insert the U-bolt and put the carrier bolts M6 x 100 at first through the U-bolt, then through the lock washer and finally through the distance tube. -
Page 10: Fasten Bicycles On The Drawbar Carrier
Picture 3 REQUIRED PARTS Fastening straps and Safety straps Drawbar fastening Locking screws Plastic bloc MOUNTING: With the aid of the drawbar attachments supplied, attach the drawbar carrier to the drawbar of your caravan. The plastic blocks are positioned under the drawbar carrier on the caravan drawbar, so that the U-clamp of the drawbar carrier can move freely and does not come into contact. - Page 11 CAUTION: Feed the safety strap through the bicycle frames and around the U-clamp, and then tighten the safety strap firmly. Safety strap Wheel attachments CAUTION: IT IS VITAL TO MIND THE SAFETY INSTRUCTIONS! • When loading your drawbar carrier, it is vital to follow the maximum loading capacity of your towbar. Attention: the steering angle must not be hindered. •...
-
Page 12: Exploded View
This drawbar carrier was checked for completeness. The aluminium drawbar carrier has a dead weight of approx. 4 kg without fastening parts and approx. 6 kg with fastening parts. The fastening parts are made of stainless steel and plastics ! EXPLODED VIEW Pipe clamp Plastic bloc... -
Page 13: Données Techniques
PORTE-VELOS SUR TIMON SOMMAIRE DONNÉES TECHNIQUES INSTRUCTIONS DE MONTAGE FIXATIONS POUR L’ÉTRIER EN FORME D’U COMMENT ATTACHER LES BICYCLETTES SUR LE PORTEUR POUR TIMON SCHÉMA ÉCLATÉ DONNÉES DE CONTACT AVERTISSEMENT Lisez attentivement la notice d‘utilisation avant la mise en service et respectez toutes les consignes de sécurité ! Conservez l‘emballage d‘origine, le justificatif d‘achat et la présente notice pour vous y référer ultérieurement ! Si vous transmettez cet attelage à... -
Page 14: Fixations Pour L'étrier En Forme D'u
Image no 2 ELÉMENTS NÉCESSAIRES ETRIER EN FORME D’U Taraudages FIXATIONS POUR L’ÉTRIER EN FORME D’U Montez l’ é trier en U comme décrit si-dessous: Les caoutchoucs de protection ont déjà été montés sur lui. Mettez d’abord les disques dentés de l’ e xtérieur dans les entretoises d’... -
Page 15: Comment Attacher Les Bicyclettes Sur Le Porteur Pour Timon
Image no 3 ELÉMENTS NÉCESSAIRES Ceintures de fixation et ceinture de sécurité Fixation pour le timon Vis d’arrêt Bloc en plastique LE MONTAGE: Le support pour timon fourni se monte sur le timon de votre caravane à l‘aide des fixations appropriées. Positionnez le support pour timon de sorte que les blocs en plastique soient entre le timon et le support proprement dit, ce qui laissera de l‘espace libre à... - Page 16 ATTENTION : Enfilez la sangle de sécurité dans le cadre du vélo et mettez-la autour de l‘étrier en U puis serrez la sangle de sécurité fermement. Sangle de sécurité Fixations des roues ATTENTION : VEUILLEZ ABSOLUMENT OBSERVER CES INSTRUCTIONS DE SÉCURITÉ SUIVANTES ! •...
-
Page 17: Schéma Éclaté
Ce porte vélos a été contrôlé et nous pouvons garatir qu’il est complet. Le porteur est fabriqué d’aluminium. Son poids propre s’ é lève à env. 4 kg sans éléments de fixation, et à env. 6 kg avec ces éléments. Ils consis-tent en acier inoxydable et en plastique. SCHÉMA ÉCLATÉ... -
Page 18: Dati Tecnici
PORTABICICLETTE DA TIMONE INDICE DATI TECNICI ISTRUZIONI PER IL MONTAGGIO FISSAGGIO DEL FERRO A U FISSAGGIO DELLA BICICLETTE SUL PORTABICICLETTA PER IL TIMONE DEL CARRO VISTA ESPLOSA COME CONTATTARCI AVVERTENZA Leggere attentamente le istruzioni per l‘uso prima della messa in funzione e osservare tutte le avvertenze sulla sicurezza! Conservare la confezione originale, la prova d‘acquisto e queste istruzioni come riferimento futuro! In caso di cessione del prodotto, consegnare anche le presenti istruzioni. -
Page 19: Fissaggio Del Ferro A U
Immagine 2 PEZZI OCCORRENTI FERRO A U Fori FISSAGGIO DEL FERRO A U Il ferro a U si monta nel seguente modo. Le protezioni in gomma si trovano già sul ferro a U. Inserire i dischi dentati sfalzati di 90°, come mostrato nella visualizzazione dei dettagli all’interno dei tubi distanziali. -
Page 20: Fissaggio Della Biciclette Sul Portabicicletta Per Il Timone Del Carro
Immagine 3 PEZZI OCCORRENTI Cinture di fissaggioe cintura di sicurezza Fissaggio al timone del carro Viti di fissaggio Blocco di plastica IL MONTAGGIO: Fissare il portabiciclette sul timone della roulotte con l’aiuto dei supporti in dotazione. Affinché la staffa a U del portabiciclette possa muoversi liberamente e non poggi ne urti, i blocchi di plastica appoggiano sotto il porta-biciclette sul timone della roulotte. - Page 21 ATTENZIONE: Far passare la cinghia di sicurezza attraverso il telaio delle biciclette e attorno alla staffa a U, quindi stringerla saldamente. Cinghia di sicurezz Fissaggio delle ruote ATTENZIONE: PRESTARE ASSOLUTAMENTE ATTENZIONE ALLE NORME DI SICUREZZA! • Prestare assolutamente attenzione alla portata massima dell’attacco di carico, durante l’ o perazione di carico del portabicicletta per il timone del carro. Attenzione: l’angolo di sterzata non deve venire ostacolato! •...
-
Page 22: Vista Esplosa
L’integrità di questo portabicicletta è stata controllata. Il portabicicletta è in alluminio e pesa circa 4 kg non contando i pezzi di fissaggio. Con i pezzi di fissaggio pesa ca. 6 kg. I pezzi di fissaggio sono di acciaio inossidabile e di materia plastica! VISTA ESPLOSA Staffa per tubi Blocco di plastica... - Page 24 EAL GmbH Otto-Hausmann-Ring 107 +49 (0)202 42 92 83 0 info@eal-vertrieb.com 42115 Wuppertal, Deutschland +49 (0) 202 42 92 83 – 160 www.eal-vertrieb.com © EAL GmbH, 11807, 02. 2020...