Table des Matières
Publicité
Les langues disponibles
Les langues disponibles
Liens rapides
BC 85
D Blutdruckmessgerät
Gebrauchsanweisung .............................................. 2 – 16
G Blood pressure monitor
Instructions for use ................................................ 17 – 29
F Tensiomètre
Mode d'emploi ........................................................30 – 43
E Tensiómetro
Instrucciones de uso ..............................................44 – 57
I Misuratore di pressione
Istruzioni per l'uso .................................................. 58 – 71
T Tansiyon ölçme cihazı
Kullanım kılavuzu ....................................................72 – 84
r Прибор для измерения артериального
давления на запястье
Инструкция по применению ................................85 – 99
Q Ciśnieniomierz
Instrukcja obsługi ............................................... 100 – 113
Electromagnetic Compatibility Information
.......... 114 – 116
Publicité
Chapitres
Table des Matières

Manuels Connexes pour Beurer medical BC 85


Sommaire des Matières pour Beurer medical BC 85
- Page 1 BC 85 D Blutdruckmessgerät Gebrauchsanweisung ..........2 – 16 G Blood pressure monitor Instructions for use ..........17 – 29 F Tensiomètre Mode d’emploi ............30 – 43 E Tensiómetro Instrucciones de uso ..........44 – 57 I Misuratore di pressione Istruzioni per l’uso ..........58 – 71 T Tansiyon ölçme cihazı...
-
Page 2: Table Des Matières
Typschild des Geräts und des Zubehörs werden folgende Mit freundlicher Empfehlung Symbole verwendet: Ihr Beurer-Team 1. Kennenlernen Vorsicht Überprüfen Sie das Beurer BC 85 Blutdruckmessgerät auf äußere Unversehrtheit der Verpackung und auf die Vollstän- Hinweis digkeit des Inhalts. Hinweis auf wichtige Informationen Das Handgelenk-Blutdruckmessgerät dient zur nichtinvasiven... - Page 3 Gebrauchsanweisung beachten Zertifizierungszeichen für Produkte, die in die Russische Föderation und in die Länder der GUS exportiert werden. Anwendungsteil Typ BF Hinweise zur Anwendung Gleichstrom • Um eine Vergleichbarkeit der Werte zu gewährleisten, mes- Entsorgung gemäß Elektro- und Elektronik- sen Sie Ihren Blutdruck immer zu gleichen Tageszeiten. Altgeräte EG-Richtlinie WEEE (Waste Electri- •...
- Page 4 gelenksmessung eingeschränkt. Weichen Sie in diesem Fall Behandlung sind, z.B. intravaskulärer Zugang bzw. eine in- auf ein am Oberarm messendes Blutdruckmessgerät aus. travaskuläre Therapie oder ein arteriovenöser (A-V-) Neben- • Dieses Gerät ist nicht dafür bestimmt, durch Personen (ein- schluss. schließlich Kinder) mit eingeschränkten physischen, senso- •...
- Page 5 – Benutzen Sie das Gerät nicht in der Nähe von starken Hinweise zu Reparatur und Entsorgung elektromagnetischen Feldern, halten Sie es fern von Funk- • Batterien gehören nicht in den Hausmüll. Bitte entsorgen anlagen oder Mobiltelefonen. Sie die verbrauchten Batterien an den dafür vorgesehenen •...
-
Page 6: Gerätebeschreibung
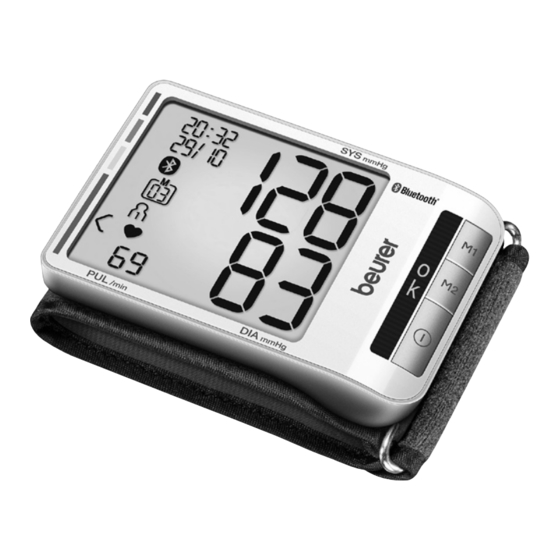
3. Gerätebeschreibung Anzeigen auf dem Display: 1. Einstufung der Messergebnisse 1. Skala zur Einstufung der Messergebnisse 2. Uhrzeit und Datum 2. USB-Schnittstelle 3. Systolischer Druck 3. Display 4. Diastolischer Druck 4. Positionierungsanzeige (Herzhöhe) 5. Symbol Herzrhythmusstörung 5. Speichertaste M1 Symbol Puls 6. -
Page 7: Messung Vorbereiten
4. Messung vorbereiten Stundenformat, Datum und Uhrzeit einstellen In diesem Menü haben Sie die Möglichkeit folgende Funktio- Batterie einlegen nen nacheinander einzustellen. • Entfernen Sie den De- ckel des Batteriefaches Stundenformat ➔ Datum ➔ Uhrzeit auf der rechten Seite des Sie sollten Datum und Uhrzeit unbedingt einstellen. -
Page 8: Blutdruck Messen
5. Blutdruck messen Im Display blinkt die Tagesanzeige. • Wählen Sie mit den Speichertasten M1/M2 Ihren ge- Manschette anlegen wünschten Tag und bestätigen Sie mit der START/ STOPP-Taste Wenn als Stundenformat 12h eingestellt ist, ist die Reihen- folge der Tages- und Monatsanzeige vertauscht. Uhrzeit Im Display blinkt die Stundenzahl. - Page 9 den Boden. Stützen Sie Ihren Arm unbedingt ab und win- • Die Messergebnisse systolischer keln ihn an. Achten Sie in jedem Fall darauf, dass sich die Druck, diastolischer Druck und Puls Manschette in Herzhöhe befindet. Ansonsten kann es zu werden angezeigt. erheblichen Abweichungen kommen.
- Page 10 • Wenn nach 30 Sekunden keine Verbindung zur App her- Selbst diagnose und -behandlung aufgrund der Messergeb- ® gestellt werden kann, erlischt das Bluetooth Symbol und nisse können gefährlich sein. Befolgen Sie unbedingt die An- das Blutdruckmessgerät schaltet sich nach 3 Minuten au- weisungen Ihres Arztes.
-
Page 11: Messwerte Abrufen Und Löschen
Verbindung mit der App aufzubauen. Wenn Sie während- Bereich der Systole Diastole Maßnahme dessen die M1-Taste drücken, wird die Übertragung abge- Blutdruckwerte (in mmHg) (in mmHg) brochen und die Durchschnittswerte der Morgen-Messung Stufe 1: regelmäßige Kon- werden angezeigt. leichte 140 – 159 90 – 99 trolle beim Arzt Hypertonie Wenn Sie die M2-Taste drücken, wird die Übertragung abge-... -
Page 12: Übertragung Der Messwerte
Im Display blinkt PM. Auf dem Display erscheint CL und 00. Es wird der Durchschnittswert der letzten Alle Werte des gegenwärtigen Benutzer- 7 Tage der Abend-Messungen angezeigt speichers werden gelöscht. (Abend: 18.00 Uhr – 20.00 Uhr). Anschließend schaltet sich das Gerät au- tomatisch aus. - Page 13 Auf dem Display wird PC angezeigt. Starten Sie Schritt 1: BC 85 die Datenübertragung in der PC-Software ® Aktivieren Sie Bluetooth an Ihrem Gerät (siehe „HealthMana ger“. Während der Datenübertra- ® Kapitel „4. Messung vorbereiten, Bluetooth “). gung wird im Display eine Animation angezeigt.
-
Page 14: Fehlermeldung/Fehlerbehebung
Inhaber. 10. Technische Angaben 8. Fehlermeldung/Fehlerbehebung Bei Fehlern erscheint auf dem Display die Fehlermeldung E_. Modell BC 85 Fehlermeldungen können auftreten, wenn BC 80 • der Puls nicht erfasst werden konnte: E 1; Messmethode Oszillometrisch, nicht invasive Blut- •... - Page 15 nikationseinrichtungen dieses Gerät beeinflussen können. Abmessungen L 97 mm x B 68 mm x H 22 mm Genauere Angaben können Sie unter der angegebenen Gewicht Ungefähr 108 g (ohne Batterien) Kundenservice-Adresse anfordern oder am Ende der Ge- Manschettengröße 135 bis 230 mm brauchsanweisung nachlesen.
-
Page 16: Garantie
11. Garantie Wir leisten 3 Jahre Garantie ab Kaufdatum für Material- und Fabrikationsfehler des Produktes. Die Garantie gilt nicht: • Im Falle von Schäden, die auf unsachgemäßer Bedienung beruhen. • Für Verschleißteile. • Bei Eigenverschulden des Kunden. • Sobald das Gerät durch eine nicht autorisierte Werkstatt geöffnet wurde. -
Page 17: Getting To Know Your Device
ENGLISH Contents 1. Getting to know your device ..........17 7. Transferring measurements ..........27 2. Important notes ..............17 8. Error messages/troubleshooting ........28 3. Unit description ..............20 9. Cleaning and storing the device and cuff .......28 4. Preparing for the measurement ........21 10. - Page 18 Observe the instructions for use Notes on use • In order to ensure comparable values, always measure your blood pressure at the same time of day. Application part, type BF • Before every measurement, relax for about five minutes. • If you want to perform several measurements on the same Direct current person, wait five minutes between each measurement.
- Page 19 to use the device. Supervise children around the device to • To conserve the batteries, the monitor switches off auto- ensure they do not play with it. matically if you do not press any buttons for 2 minutes. • Cardiovascular diseases may lead to incorrect measure- •...
-
Page 20: Unit Description
• Risk of explosion! Never throw batteries into a fire. • For environmental reasons, do not dispose of the • Do not charge or short-circuit batteries. device in the household waste at the end of its use- • If the device is not to be used for a long period, take the ful life. -
Page 21: Preparing For The Measurement
4. Preparing for the measurement Information on the display: 1. Classification of measurements Inserting the batteries 2. Time and date • Remove battery 3. Systolic pressure compartment lid on the 4. Diastolic pressure left side of the device. 5. Cardiac arrhythmia symbol •... -
Page 22: Bluetooth
Setting the hour format, date and time The day flashes on the display. • Select the day using the M1/M2 memory buttons This menu allows you to set the following functions, one after and confirm with the START/STOP button another. If the hour format is set as 12h, the day/month dis- Hour format Date... -
Page 23: Measuring Blood Pressure
5. Measuring blood pressure your arm and the palm of your hand. An O.K. symbol bar is integrated into the device to additionally assist you. It sig- Attaching the cuff nals the correct position of the blood pressure monitor. You are in the right position if you can see O.K. - Page 24 • Now select the desired user memory by pressing the M1 or Evaluating results M2 memory buttons. If you do not select a user memory, Cardiac arrhythmia: the measurement is stored in the most recently used user This device can identify potential disruptions of the heart memory.
-
Page 25: Displaying And Deleting Measurements
The classification on the display and the scale on the unit • Select the desired user memory ( ) using the M1 or M2 show which category the recorded blood pressure values fall memory buttons if the device is switched off. into. - Page 26 • Press the relevant memory button (M1 or M2). Deleting measured values • To clear the memory of the relevant user memory, you AM flashes on the display. must first select a user memory. The average value of the morning meas- •...
-
Page 27: Transferring Measurements
In the Beurer “HealthManager” app, add the PC is shown on the display. Begin the data BC 85 under “Settings/My devices”. transfer in the “HealthManager” PC software. During the data transfer, an animation is shown on the display. A successful data trans-... -
Page 28: Error Messages/Troubleshooting
Beurer “HealthManager” app. 10. Technical specifications ® The Bluetooth word mark and logos are registered trade- Model BC 85 ® marks owned by Bluetooth SIG, Inc. and any use of such Type BC 80 marks by Beurer GmbH is under license. Other trademarks Measurement method Oscillometric, non-invasive blood pres- and trade names are those of their respective owners. - Page 29 pressure measuring systems) and IEC 80601-2-30 (Medical Battery life For approx. 300 measurements, de- electrical equipment – Part 2-30: Particular requirements for pending on levels of blood pressure the basic safety and essential performance of automated and pump pressure non-invasive sphygmomanometers). Accessories Instructions for use, 2 x 1.5V AAA bat- •...
-
Page 30: Présentation
Les symboles suivants sont utilisés sur le mode d’emploi, sur Votre équipe Beurer l’emballage et sur la plaque signalétique de l’appareil et des 1. Présentation accessoires : Vérifiez que l’emballage du tensiomètre BC 85 de Beurer est Attention intact et que tous les éléments sont inclus. - Page 31 Remarque Le sigle CE atteste de la conformité aux exi- Indication d’informations importantes gences fondamentales de la directive 93/42/ EEC relative aux dispositifs médicaux. Respectez les consignes du mode d’emploi Marque de certification pour les produits, qui sont exportés en Fédération de Russie et dans les pays de la CEI Appareil de type BF Conseils d’utilisation...
- Page 32 • En cas de limitation de la circulation sanguine dans un bras • Évitez des mesures trop fréquentes ou une pression conti- en raison de maladies chroniques ou aiguës des vaisseaux nue du brassard. Elles entraînent une réduction de la circu- (entre autres vasoconstriction), l’exactitude de la mesure au lation sanguine et constituent un risque de blessure.
- Page 33 – Ne laissez pas tomber l’appareil. Consignes de réparation et d’élimination – N’utilisez pas l’appareil à proximité de champs électroma- • Les piles ne doivent pas être jetées avec les ordures ména- gnétiques puissants, tenez-le éloigné des installations de gères. Veuillez jeter les piles usées dans les points de col- radio et des téléphones mobiles.
-
Page 34: Description De L'appareil
3. Description de l’appareil Données affichées à l’écran : 1. Classement des résultats de mesure 1. Échelle pour classement des résultats de mesure 2. Heure et date 2. Interface USB 3. Pression systolique 3. Écran 4. Pression diastolique 4. Indication de position (au niveau du coeur) 5. -
Page 35: Préparation De La Mesure
4. Préparation de la mesure Régler le format de l’heure, la date et l’heure Dans ce menu, vous avez la possibilité de régler successive- Insertion des piles ment les fonctions suivantes. • Retirez le couvercle du compartiment à piles sur Format de Date ➔... -
Page 36: Bluetooth
5. Mesurer la tension Le jour clignote à l’écran. • À l’aide des touches mémoire M1/M2, sélection- Positionnement de la manchette nez le jour que vous souhaitez et confirmez avec la touche MARCHE/ARRÊT Si le format de l’heure est réglé sur 12h, l’ordre d’affichage du jour et du mois est inversé. - Page 37 bien à plat sur le sol. Soutenez impérativement votre bras • E_ s’affiche lorsque la mesure n’a pas pu être effectuée cor- et pliez-le. Faites attention, dans tous les cas, à ce que la manchette se trouve au niveau du cœur. Sinon, cela pour- rectement.
- Page 38 Si vous oubliez d’éteindre l’appareil, il s’éteindra automatique- Ces valeurs ne doivent être utilisées qu’à titre indicatif car la ment après environ 3 minutes. Dans ce cas, la valeur est attri- tension artérielle varie selon les personnes, les âges, etc. buée à l’utilisateur de la mémoire choisie ou utilisée en dernier. Il est important de consulter votre médecin de manière régu- Attendez au moins 5 minutes avant d’effectuer lière.
-
Page 39: Récupérer Et Supprimer Les Valeurs De Mesure
6. Récupérer et supprimer les valeurs de Si vous avez sélectionné la mémoire utilisateur 2, vous devez actionner la touche mémoire M2. mesure Valeurs moyennes Mémoire utilisateur A clignote à l’écran. Le résultat de chaque mesure réussie est enregistré avec la date et l’heure. -
Page 40: Transfert Des Valeurs Mesurées
• Si vous appuyez de nouveau sur la touche mémoire (M1 • Si vous souhaitez supprimer d’autres valeurs, répétez la ou M2), vous pouvez consulter vos mesures individuelles. procédure décrite ci-dessus. Vous pouvez éteindre l’appareil à tout moment en appuyant •... -
Page 41: Message D'erreur/Résolution Des Erreurs
L’application Beurer « HealthManager » doit être activée « HealthManager » pour le transfert. Ajoutez le BC 85 dans l’application Beurer Afi n de garantir une transmission sans perturbations, veuillez « HealthManager » à la section « Réglages/ retirer la housse de votre smartphone. Lancez le transfert de Mes appareils ». -
Page 42: Nettoyage Et Rangement De L'appareil Et De La Manchette
Retirez les piles. électrique 10. Caractéristiques techniques Durée de vie des piles Environ 300 mesures, selon l’élévation de la tension artérielle ainsi que la Modèle BC 85 pression de gonflage Type BC 80 Accessoires Mode d’emploi, 2 x piles AAA 1,5V, Mode de mesure Mesure de la tension artérielle au poi-... - Page 43 les moyens appropriés. Pour obtenir des informations pré- ® Transfert de données Le tensiomètre utilise Bluetooth cises sur la vérification de la précision de l’appareil, vous par technologie sans fil energy technology, ® pouvez faire une demande par courrier au service après- Bluetooth bande de fréquence 2,4 GHz, compatible smartphones/tablettes Blue-...
-
Page 44: Indicaciones Importantes
El equipo de Beurer 1. Introducción Precaución Compruebe que el embalaje del tensiómetro Beurer BC 85 esté intacto y que su contenido esté completo. Nota El tensiómetro para muñeca sirve para la medición y el control Indicación de información importante... - Page 45 Observe las instrucciones de uso Indicaciones de utilización • Para garantizar la comparabilidad de los valores, tómese la tensión siempre a la misma hora del día. Pieza de aplicación tipo BF • Repose unos 5 minutos antes de cada medición. •...
- Page 46 que esta persona les indique cómo se debe utilizar el apa- • Coloque el brazalete exclusivamente en la muñeca. No co- rato. Se debe vigilar a los niños para asegurarse de que no loque el brazalete en otras zonas del cuerpo. jueguen con el aparato.
-
Page 47: Descripción Del Aparato
• Para proteger el medio ambiente no se debe • ¡Peligro de asfixia! Los niños pequeños podrían tragar- desechar el aparato al final de su vida útil junto con se las pilas y asfixiarse. Guarde las pilas fuera del alcance la basura doméstica. -
Page 48: Preparación De La Medición
4. Preparación de la medición Indicaciones en la pantalla: 1. Clasificación de los resultados de medición Colocación de las pilas 2. Hora y fecha • Retire la tapa del com- 3. Presión sistólica partimento de las pilas, 4. Presión diastólica situado en el lado dere- 5. - Page 49 • Estos símbolos se encuentran en pilas que La indicación del mes parpadea en la pantalla. contienen sustancias tóxicas: • Seleccione con las teclas de memorización M1/ Pb = la pila contiene plomo, M2 el mes deseado y confirme con la tecla de Cd = la pila contiene cadmio, INICIO/PARADA Hg = la pila contiene mercurio.
-
Page 50: Medición De La Presión Arterial
La duración de la batería se reduce por la transmisión de Apoye bien los pies en el suelo. Apoye el brazo y dóblelo. ® datos a través de Bluetooth Cerciórese siempre de que el brazalete se encuentra a la altura del corazón. De lo contrario, podrían producirse 5. - Page 51 En cuanto se detecta el pulso, se muestra el símbolo de pulso transfieren automáticamente a la aplicación Una vez ha fina- lizado la transferencia de datos, el aparato se apaga. • Aparecen los resultados de las • Si después de 30 s no ha sido posible establecer una cone- ®...
-
Page 52: Consultar Y Borrar Los Valores Medidos
se. Si el símbolo aparece con frecuencia, consulte a su Rango de los Sístole Diástole Medida médico. Realizar un autodiagnóstico e iniciar un tratamiento valores de la (en mmHg) (en mmHg) por su cuenta puede ser peligroso. Es imprescindible seguir presión arterial las indicaciones de un médico. - Page 53 – Si desea consultar los datos medidos En la pantalla parpadea AM. del registro de usuario pulse la tecla Se muestra la media de los 7 últimos días de memorización M1. en las mediciones matinales (por la ma- – Si desea consultar los datos medidos ñana: de las 5.00 a las 9.00 horas).
-
Page 54: Transmisión De Los Valores De Medición
7. Transmisión de los valores de medición Eliminar valores de medición • Para borrar la memoria del registro de usuario correspon- Transmisión por interfaz USB diente, deberá seleccionar primero un registro de usuario. Conecte el tensiómetro al PC con el cable USB. •... -
Page 55: Mensajes De Error/Solución De Problemas
Bluetooth comenzará de Beurer usuario con la tecla INI- forma automática. Añada el dispositivo BC 85 en la opción "Einste- CIO/PARADA llungen/Meine Geräte" (Ajustes/Mis dispositivos) de la aplicación "HealthManager" de Beurer. La aplicación „HealthManager“ de Beurer debe estar activada para realizar la transmisión de datos. -
Page 56: Limpiar Y Guardar La Unidad Y El Brazalete
1,5 V 10. Características técnicas Vida útil de las pilas Para unas 300 mediciones, según el ni- vel de la presión sanguínea y la presión Modelo BC 85 de inflado Tipo BC 80 Accesorios Instrucciones de uso, 2 pilas AAA de Método de medición... - Page 57 Si se utiliza el aparato en el ejercicio de la medicina debe- ® Transferencia de da- El tensiómetro utiliza Bluetooth rán realizarse controles metrológicos con los medios ade- ® tos por Bluetooth energy technology, cuados. Puede solicitar información más precisa sobre la wireless technology banda de frecuencia de 2,4 GHz, comprobación de la precisión de los valores de medición...
-
Page 58: Indicazioni Importanti
Team Beurer 1. Introduzione Attenzione Controllare l’integrità esterna della confezione e del contenuto del misuratore di pressione BC 85 di Beurer. Nota Il misuratore di pressione da polso consente la misurazione Indicazione di importanti informazioni e il monitoraggio non invasivi dei valori di pressione arteriosa... - Page 59 Rispettare le istruzioni per l’uso. Indicazioni per l’uso • Misurare la pressione sempre allo stesso orario della giorna- ta, affinché i valori siano confrontabili. Parte applicativa tipo BF • Prima di ogni misurazione rilassarsi per ca. 5 minuti! • Per effettuare più misurazioni su una stessa persona, atten- Corrente continua dere 5 minuti tra una misurazione e l’altra.
- Page 60 • In caso di patologie del sistema cardiovascolare possono • Il misuratore di pressione può essere utilizzato esclusiva- verificarsi errori di misurazione o una riduzione della pre- mente a batterie. cisione di misurazione. Gli stessi problemi si possono ve- • Se per 2 minuti non vengono utilizzati pulsanti, il dispositivo rificare in caso di pressione molto bassa, diabete, disturbi di arresto automatico spegne l’apparecchio per preservare della circolazione e del ritmo cardiaco nonché...
-
Page 61: Descrizione Dell'apparecchio
• Prestare attenzione alla polarità positiva (+) e negativa (-). chio secondo la direttiva europea sui rifiuti di apparecchia- • In caso di fuoriuscita di liquido dalla batteria, indossare ture elettriche ed elettroniche (RAEE). Per eventuali chia- guanti protettivi e pulire il vano batterie con un panno asciut- rimenti, rivolgersi alle autorità... -
Page 62: Preparazione Della Misurazione
4. Preparazione della misurazione Indicatori sul display: 1. Classificazione dei risultati di misurazione Inserimento della batteria 2. Ora e data • Rimuovere il coperchio 3. Pressione sistolica del vano batterie sul lato 4. Pressione diastolica sinistro dell’apparecchio. 5. Icona disturbo del ritmo cardiaco •... -
Page 63: Bluetooth
Impostazione del formato dell’ora, della data e dell’ora Sul display lampeggia l’indicazione del giorno. • Con i pulsanti per la memorizzazione M1/M2 sele- In questo menu è possibile impostare in sequenza le seguenti zionare il giorno desiderato e confermare con il pul- funzioni. -
Page 64: Misurazione Della Pressione
5. Misurazione della pressione misurazioni potrebbero essere molto imprecise. Rilassare il braccio e le mani. Per maggiore sicurezza, l’apparecchio è Applicazione del manicotto dotato di una barra di conferma, che indica la corretta po- sizione del misuratore di pressione. Quando sull’indicatore compare OK, è... - Page 65 • L’icona E_ compare se la misurazione non è stata eseguita Attendere almeno 5 minuti prima di effettuare una nuova misurazione! correttamente. Consultare il capitolo Messaggi di errore/Soluzioni delle presenti Istruzioni per Interpretazione dell’esito l’uso e ripetere la misurazione. Disturbi del ritmo cardiaco •...
-
Page 66: Ricerca E Cancellazione Dei Valori Misurati
6. Ricerca e cancellazione dei valori misurati Tali valori standard costituiscono tuttavia solo un riferimento generale in quanto la pressione individuale presenta differenze Memoria utente a seconda della persona e dell’età. Gli esiti di ogni misurazione corretta vengono memorizzati con È... - Page 67 Se è stata selezionata la memoria utente 2, occorre • Premendo nuovamente il pulsante per la memorizzazione premere il pulsante per la memorizzazione M2. corrispondente (M1 o M2), è possibile visualizzare i singoli valori misurati. Valori medi Sul display lampeggia l’indicazione A. •...
-
Page 68: Trasmissione Dei Valori Misurati
App "HealthManager" di Beurer Fig. 1 è visualizzata nella Fig. 1. Se la trasmissione Aggiungere il BC 85 nell’app HealthManager di dei dati non viene eseguita, viene visualizzato Beurer in "Impostazioni/Miei dispositivi". il messaggio di errore mostrato nella Fig. 2. In questo caso, interrompere il collegamento del PC e avviare di nuovo la trasmissione dei dati. -
Page 69: Messaggi Di Errore/Soluzioni
• si è verificato un errore durante la misurazione: E4; Fase 4 BC 85: Fase 4 BC 85: • la pressione di gonfiaggio è superiore a 300 mmHg: E5; Trasmissione dei dati diret- Trasmissione dei dati in un • le batterie sono quasi esaurite... - Page 70 Precisione sistolica ±3 mmHg, Trasmissione dei dati Il misuratore di pressione utilizza la dell’indicazione diastolica ±3 mmHg, ® ® tramite Bluetooth tecnologia Bluetooth low energy pulsazioni ±5% del valore indicato wireless technology technology, Tolleranza Scostamento standard massimo con banda di frequenza 2,4 GHz, ammesso rispetto a esame clinico: compatibile con smartphone/tablet sistolica 8 mmHg / diastolica 8 mmHg...
- Page 71 Se l’apparecchio viene utilizzato a scopo professionale, è necessario effettuare controlli tecnici con gli strumenti ade- guati. Richiedere informazioni dettagliate sulla verifica della precisione all’indirizzo indicato del servizio assistenza. • Con la presente garantiamo che il prodotto è conforme alla direttiva europea R&TTE 1999/5/CE.
-
Page 72: Ürün Özellikleri
Beurer Ekibiniz 1. Ürün özellikleri Dikkat Beurer BC 85 tansiyon ölçme cihazının ambalajının dıştan ha- sar görmemiş ve içeriğin eksiksiz olduğundan emin olun. Açıklama El bileğine takılan tansiyon ölçme cihazı, yetişkinlerin atarda- Önemli bilgilere yönelik açıklama marlarındaki tansiyon değerlerini, invazif olmayan bir şekilde... - Page 73 Kullanım kılavuzunu dikkate alın Kullanım ile ilgili bilgiler • Değerleri karşılaştırabilmek için tansiyonunuzu her zaman günün aynı saatlerinde ölçün. Uygulama parçası tip BF • Her ölçümden önce yakl. 5 dakika dinlenin! • Bir kişide birden fazla ölçüm yapmak istiyorsanız, ölçümler Doğru akım arasında 5 dakika bekleyin.
- Page 74 olmadan kullanmamalıdır. Çocuklar cihazla oynamamaları • Otomatik kapatma özelliği, 2 dakika içinde hiç bir tuşa basıl- için gözetim altında tutulmalıdır. madığı takdirde pil tasarrufu sağlamak için tansiyon ölçme • Kalp ve kan dolaşımı sistemindeki hastalıklar nedeniyle aletini kapatır. hatalı ölçümler meydana gelebilir veya ölçüm doğruluğu •...
-
Page 75: Cihaz Açıklaması
3. Cihaz açıklaması • Pilleri aşırı ısıya karşı koruyun. • Patlama tehlikesi! Pilleri ateşle atmayın. 1. Ölçüm değerlerini kademelendirme skalas • Piller şarj edilmemeli veya kısa devre yaptırılmamalıdır. 2. USB bağlantı noktası • Cihazı uzun süre kullanmayacağınız durumlarda pilleri pil 3. -
Page 76: Ölçüme Hazırlık
4. Ölçüme hazırlık Ekrandaki göstergeler: 1. Ölçüm sonuçları kademelendirmesi Pilleri yerleştirme 2. Saat ve tarih • Cihazın sağ tarafındaki 3. Sistolik tansiyon pil yuvasının kapağını çı- 4. Diyastolik tansiyon karın. 5. Kalp ritmi bozukluğu sembolü • İki adet 1,5 V mikro tip Nabız sembolü... -
Page 77: Bluetooth
Saat formatının, tarihin ve saatin ayarlanması Saat Bu menüde aşağıdaki fonksiyonlar sırayla ayarlanabilir. Ekranda saat yanıp söner. • M1/M2 hafıza tuşu ile istediğiniz saati seçin ve Saat formatı Tarih Saat ➔ ➔ START/STOP tuşu ile onaylayın Tarihi ve saati mutlaka ayarlamalısınız. Yalnızca ayarı yaptığı- Ekranda dakika yanıp söner. -
Page 78: Tansiyon Ölçme
5. Tansiyon ölçme Daha fazla yardım için cihaza, tansiyon ölçme aletinin doğru konumunu gösteren bir O.K. sembol çubuğu entegre Manşeti takma edilmiştir. Göstergede O.K. görüyorsanız doğru konuma ulaşmışsınız demektir. • Ölçümde yanlışlık olmaması için, ölçüm sırasında sakin dur- mak ve konuşmamak önemlidir. Tansiyon ölçümünü... - Page 79 • M1 veya M2 hafıza düğmelerine basarak, istediğiniz kulla- Bu, ritim bozukluğu (aritmi) göstergesi olabilir. Ritim bozuklu- nıcı hafızasını seçin. Kullanıcı hafızası seçimi yapmazsanız, ğu (aritmi), kalp atışına kumanda eden biyoelektrik sistemde ölçüm sonucu, en son kullanılmış olan kullanıcı hafızasına hatalar nedeniyle kalp ritminin anormal olduğu bir hastalıktır.
-
Page 80: Ölçüm Değerlerini Görüntüleme Ve Silme
– kullanıcı hafızasının ölçüm verilerine Tansiyon değer- Sistol Diyastol Önlem bakmak istiyorsanız M1 hafıza düğme- lerinin aralığı (mmHg olarak) (mmHg olarak) sine basın. Kademe 3: Bir doktora – kullanıcı hafızasının ölçüm verilerine şiddetli hiper- ≥ 180 ≥ 110 başvurun bakmak istiyorsanız M2 hafıza düğme- tansiyon sine basın. - Page 81 Ekranda AM işareti yanıp söner. Ölçüm değerlerini sil • İlgili kullanıcı hafızasındaki kayıtları silmek için önce bir Sabah ölçümlerinin son 7 güne ait kullanıcı hafızası seçin. ortalaması gösterilir (Sabah: saat 5.00 • Ortalama değerler sorgusunu başlatın. – 9.00). • M1 / M2 hafıza düğmelerini 5 saniye basılı tutun •...
-
Page 82: Ölçüm Değerlerinin Aktarılması
Adım 2: Beurer “HealthManager” uygulaması „HealthManager“ bilgisayar yazılımında veri Beurer HealthManager uygulamasında “Ayar- aktarımını başlatın. Veri aktarımı sırasında lar / Cihazlarım” altından BC 85’yi ekleyin. ekranda bir animasyon gösterilir. Veri aktarı- mının başarıyla tamamlandığı şekil 1’deki gibi şekil 1 gösterilir. Veri aktarımı başarılı olmadığında şekil 2’deki gibi hata iletisi gösterilir. -
Page 83: Hata Iletisi/Arıza Giderme
Diğer ticari markalar ve ticari adlar ilgili sahiplerinin mülkiye- tindedir. 10. Teknik veriler 8. Hata iletisi/Arıza giderme Model BC 85 Hata olduğunda ekranda E_ hata iletisi görüntülenir. BC 80 Şu durumlarda hata iletileri görüntülenebilir: Ölçüm yöntemi El bileğinden, titreşimli, invazif olmayan •... - Page 84 siyon ölçme cihazları bölüm 1: Genel şartlar), EN1060-3 İzin verilen kullanım +5 °C -ilâ +40 °C, %15-93 bağıl nem (invazif olmayan tansiyon ölçme cihazları bölüm 3: Elektro- şartları (yoğuşmasız) mekanik tansiyon ölçme cihazları için tamamlayıcı şartlar) İzin verilen saklama -25 °C ilâ +70 °C, %15-93 bağıl nem, ve IEC80601-2-30 (Tıbbi elektrikli cihazlar bölüm 2-30: koşulları...
-
Page 85: Для Ознакомления
РУССКИЙ Оглавление 1. Для ознакомления ............85 7. Передача результатов измерения .......96 2. Важные указания ............85 8. Сообщение об ошибке/устранение ошибок ....97 3. Описание прибора ............89 9. Очистка и хранение прибора и манжеты ....97 4. Подготовка к измерению ..........90 10. Технические данные .............98 5. - Page 86 Осторожно! Символ CE подтверждает соответствие основным требованиям директивы о ме- дицинских изделиях 93/42/EEC. Указание Сертификационный знак для изделий, Важная информация экспортируемых в Российскую Федера- цию и страны СНГ Соблюдайте инструкцию по применению Указания по применению Рабочая часть типа BF • Чтобы обеспечить сопоставимость данных, всегда из- меряйте...
- Page 87 преэклампсией. Перед использованием прибора для • Обратите внимание на то, что во время накачивания измерения кровяного давления во время беременности может быть нарушена подвижность соответствующей рекомендуется проконсультироваться с врачом. части тела. • В случае ограничений кровоснабжения на одной руке в •...
- Page 88 • Опасность взрыва! Не бросайте батарейки в огонь. Указания по хранению и уходу • Не заряжайте и не замыкайте батарейки накоротко. • Прибор для измерения кровяного давления состоит из • Если прибор длительное время не используется, извле- прецизионных и электронных компонентов. Точность ките...
-
Page 89: Описание Прибора
ходам электрического и электронного оборудова- Индикация на дисплее: ния – WEEE (Waste Electrical and Electronic Equipment). 1. Оценка результатов измерений При появлении вопросов обращайтесь в местную ком- 2. Время и дата мунальную службу, ответственную за утилизацию отхо- 3. Систолическое давление дов. 4. Диастолическое давление 5. -
Page 90: Подготовка К Измерению
4. Подготовка к измерению • Следующие знаки предупреждают о наличии в батарейках токсичных веществ: Установка батарейки Pb = свинец, • Снимите крышку от- Cd = кадмий, деления для батареек с Hg = ртуть. правой стороны прибо- Настройка часового формата, времени и даты ра. -
Page 91: Bluetooth
® На дисплее замигает индикация месяца. Во время переноса данных через Bluetooth расходу- • С помощью кнопок сохранения M1/M2 выбе- ется заряд аккумулятора. рите нужный месяц и подтвердите выбор на- 5. Измерение кровяного давления жатием кнопки START/STOP Накладывание манжеты На дисплее замигает индикация дня. •... - Page 92 • Измерение можно проводить Измерение осуществляется во время накачивания манже- сидя или лежа. Для изме- ты воздухом. рения кровяного давления Измерение можно прервать в любой момент, нажав займите удобное положение кнопку START/STOPP сидя. Спина и руки должны Как только прибор распознает пульс, отобразится иметь...
- Page 93 Если активирована функция передачи данных через ждевременное сердцебиение, медленный или слишком ® Bluetooth , то после нажатия кнопки ВКЛ./ВЫКЛ. нач- быстрый пульс) могут быть вызваны заболеваниями серд- нется передача данных. ца, возрастом, предрасположенностью к соответствующим ® • На дисплее замигает символBluetooth .
-
Page 94: Просмотр И Удаление Результатов Измерения
ческое — нормальное), то графическое деление на прибо- сохраненных результатов измерения превышает 60, более ре всегда будет отображать более высокие пределы, как ранние данные перезаписываются. в описанном примере: высокое в допустимых пределах. • С помощью кнопок сохранения M1 или M2 выберите нужную пользовательскую память ( ), когда... - Page 95 Средние значения • Если еще раз нажать кнопку сохранения (M1 или M2), можно просмотреть результаты отдельных измерений. На дисплее замигает A. • Для выключения прибора нажмите кнопку START/ Отобразится среднее значение всех STOP сохраненных в данной ячейки памяти результатов измерений данного Из...
-
Page 96: Передача Результатов Измерения
ция. В случае успешной передачи данных появится сообщение, как показано на рис. Шаг 2: Приложение Beurer HealthManager 1. Если во время передачи данных произо- Добавьте BC 85 в приложении Beurer шла ошибка, на дисплее появится соответ- HealthManager в разделе «Настройки/Мои ствующее сообщение, представленное на... -
Page 97: Сообщение Об Ошибке/Устранение Ошибок
8. Сообщение об ошибке/устранение Шаг 4: BC 85 Шаг 4: BC 85 ошибок Передача данных сразу Передача данных в другое При возникновении ошибок на дисплее появляется со- после измерения: время: общение об ошибке E_. • Если активирована • Перейдите в режим вы- функция... -
Page 98: Технические Данные
10. Технические данные Допустимые условия От -25 до +70 °C, относитель- хранения ная влажность воздуха 15–93 %, Модель BC 85 давление окружающей среды Тип BC 80 700–1060 гПа Метод измерения Осциллометрическое неинвазивное Электропитание 2 батарейки типа ААА 1,5 В измерение кровяного давления на Срок службы... -
Page 99: Гарантия
11. Гарантия работу данного прибора. Более точные данные можно запросить по указанному адресу сервисной службы или Мы предоставляем гарантию на дефекты материалов и из- найти в конце инструкции по применению. готовления этого прибора на срок 36 месяцев со дня про- •... -
Page 100: Informacje O Urządzeniu
POLSKI Spis treści 1. Informacje o urządzeniu ..........100 7. Przenoszenie danych pomiarowych ......110 2. Ważne wskazówki ............100 8. Komunikaty błędów/usuwanie błędów ......111 3. Opis urządzenia ..............103 9. Czyszczenie i dbałość o urządzenie oraz mankiet ..111 4. Przygotowanie do pomiaru ..........104 10. - Page 101 Należy przestrzegać instrukcji obsługi. Wskazówki dotyczące użytkowania • Mierz ciśnienie zawsze o tej samej porze dnia, aby zmierzo- ne wartości były porównywalne. Część aplikacyjna typ BF • Przed każdym pomiarem odpocznij ok. 5 minut! • Jeśli chcesz wykonać kilka pomiarów u jednej osoby, za- Prąd stały chowaj 5-minutowe przerwy między pomiarami.
- Page 102 nia urządzenia został im wyjaśniony przez te osoby. Należy • Urządzenie jest przeznaczone wyłącznie do używania w uważać, aby dzieci nie bawiły się urządzeniem. celu określonym w niniejszej instrukcji obsługi. Producent • Choroby układu krążenia mogą powodować błędy pomiaru nie ponosi odpowiedzialności za szkody wynikłe z niewła- lub zaburzać...
-
Page 103: Opis Urządzenia
• Jeśli z baterii wyciekł elektrolit, należy założyć rękawice odpowiednim punkcie zbiórki w danym kraju. Urządzenie ochronne i wyczyścić przegrodę na baterie suchą szmatką. należy zutylizować zgodnie z dyrektywą o zużytych urzą- • Baterie należy chronić przed nadmiernym działaniem wyso- dzeniach elektrycznych i elektronicznych –... -
Page 104: Przygotowanie Do Pomiaru
4. Przygotowanie do pomiaru Informacje na wyświetlaczu: 1. Stopniowanie wyników pomiarów Wkładanie baterii 2. Godzina i data • Zdejmij pokrywę prze- 3. Ciśnienie skurczowe grody baterii z prawej 4. Ciśnienie rozkurczowe strony urządzenia. 5. Symbol zaburzeń rytmu serca • Włóż dwie baterie typu Symbol tętna 1,5 ... - Page 105 Ustawienie formatu godziny, daty i czasu Na wyświetlaczu zacznie migać wskazanie dnia. • Za pomocą przycisków pamięci M1/M2 ustaw od- W tym menu można po kolei ustawić poniższe funkcje. powiedni dzień, a następnie potwierdź przyciskiem Format godziny ➔ Data ➔ Godzina START/STOP Koniecznie ustaw datę...
-
Page 106: Pomiar Ciśnienia Tętniczego
5. Pomiar ciśnienia tętniczego W przeciwnym razie mogą wystąpić duże niedokładności pomiaru. Ręka i dłoń powinny być rozluźnione. Dodatko- Zakładanie mankietu na nadgarstek wą pomoc stanowi zintegrowany z urządzeniem pasek z symbolem OK, który wskazuje prawidłową pozycję ciśnieniomierza. Pojawienie się na wyświetlaczu wskazania OK oznacza osiągnięcie prawidłowej pozycji. - Page 107 • Symbol E_ zostanie wyświetlony, jeśli pomiar był nieprawi- Przed rozpoczęciem kolejnego pomiaru odczekaj co najmniej 5 minut! dłowy. Przeczytaj rozdział „Komunikaty błędów/ usuwanie błędów” w niniejszej instrukcji obsługi, Interpretacja wyników a następnie powtórz pomiar. Zaburzenia rytmu serca: • Następnie naciśnij przycisk pamięci M1 lub M2 i wybierz Podczas pomiaru urządzenie może rozpoznać...
-
Page 108: Odczyt I Usuwanie Wyników Pomiaru
Klasyfikacja wyników pomiarów: Zakres wartości Ciśnienie Ciśnienie Rozwiązanie Wyniki pomiarów można klasyfikować i oceniać zgodnie z po- ciśnienia skur- rozkur- czowe czowe niższą tabelą. (w mmHg) (w mmHg) Podane wartości standardowe służą jedynie jako ogólne wy- tyczne, ponieważ indywidualne wartości ciśnienia u różnych normalne 120–129 80–84... - Page 109 Jeśli naciśniesz przycisk M2, transmisja zostanie przerwa- Pojedyncze wyniki pomiaru na i wyświetlą się dane pomiarowe pamięci użytkownika • Jeśli ponownie naciśniesz odpowiedni Symbol nie będzie wyświetlany. Kiedy występuje połączenie przycisk pamięci (M1 lub M2), na wy- i dane są przesyłane, przyciski są nieaktywne. świetlaczu pojawi się...
-
Page 110: Przenoszenie Danych Pomiarowych
(patrz rozdział 7. Przenoszenie danych pomiarowych 4 — Przygotowanie do pomiaru). Transmisja danych poprzez złącze USB Krok 1: BC 85 Podłącz ciśnieniomierz za pomocą kabla USB do komputera. ® Aktywuj funkcję Bluetooth w swoim urzą- Podczas pomiaru nie można rozpocząć transmisji danych. -
Page 111: Komunikaty Błędów/Usuwanie Błędów
• mankiet jest zbyt ciasno lub zbyt luźno założony: E3; • wystąpił błąd podczas pomiaru: E4; • ciśnienie pompowania jest wyższe niż 300 mmHg: E5; Krok 4: BC 85 Krok 4: BC 85 • baterie są prawie wyczerpane Transmisja danych bezpo- Transmisja danych w póź-... - Page 112 Transmisja danych za Ciśnieniomierz wykorzystuje Dokładność wska- ciśnienie skurczowe ±3 mmHg, zania ciśnienie rozkurczowe ±3 mmHg, ® pomocą technologii technologię Bluetooth low energy tętno ±5% wyświetlanej wartości bezprzewodowej technology, ® Odchylenia pomiaru maks. dopuszczalne odchylenie stan- Bluetooth pasmo częstotliwości 2,4 GHz, dardowe zgodnie z kontrolą kliniczną: kompatybilną...
- Page 113 • Dokładność niniejszego ciśnieniomierza została starannie sprawdzona i dostosowana do długiego okresu użytkowa- nia. W przypadku korzystania z urządzenia w praktyce lekarskiej należy przeprowadzać kontrole pomiarowe za pomocą od- powiednich środków. Dokładne dane dotyczące sprawdza- nia dokładności można uzyskać, kontaktując się z działem obsługi klienta.
-
Page 114: Electromagnetic Compatibility Information
Electromagnetic Compatibility Information Guidance and manufacture’s declaration – electromagnetic emissions – for all EQUIPMENT and SYSTEMS Guidance and manufacture’s declaration – electromagnetic emission The BC85 blood pressure monitor is intended for use in the electromagnetic environment specified below. The customer of the user of the BC85 blood pressure monitor should assure that it is used in such and environment. - Page 115 Guidance and manufacture’s declaration – electromagnetic immunity – for EQUIPMENT and SYSTEMS that are not LIFE-SUPPORTING Guidance and manufacture’s declaration – electromagnetic immunity The BC85 blood pressure monitor is intended for use in the electromagnetic environment specified below. The customer or the user of the BC85 blood pressure monitor should assure that it is used in such an environment.
- Page 116 Recommended separation distances between portable and mobile RF communications equipment and the EQUIPMENT or SYSTEM – for EQUIPMENT or SYSTEM that are not LIFE-SUPPORTING Recommended separation distances between portable and mobile RF communications equipment and the BC85 blood pressure monitor The BC85 blood pressure monitor is intended for use in an electromagnetic environment in which radiated RF disturbances are control- led.