Table des Matières
Publicité
Les langues disponibles
Les langues disponibles
Liens rapides
Publicité
Table des Matières

Manuels Connexes pour ROSIERES RHP90TX


Sommaire des Matières pour ROSIERES RHP90TX
- Page 1 RHP90TX Cooker Hood Instruction Manual ENGLISH(EN)--------------------------------------------------------------------------------page 001 FRENCH(FR) --------------------------------------------------------------------------------page 013...
- Page 2 RHP90TX Hood Instruction Manual...
- Page 3 Content 1…………………………………..………………………………Safety instructions 2…………………………………..………………………………Installation 3…………………………………..………………………………Start using your cooker hood 4…………………………………..………………………………Troubleshooting 5…………………………………..………………………………Maintenance and cleaning 6…………………………………..………………………………Environment protection...
-
Page 4: Safety Instructions
SAFETY INSTRUCTIONS his manual explains the proper installation and use of your cooker hood, please read it carefully before using even if you are familiar with the product. The manual should be kept in a safe place for future reference. Never to do: Always to do: ●... - Page 5 Always to do: Always to do: ● ● lways put lids on pots and pans aution: The appliance and its when cooking on a gas cooker. accessible parts can become hot during operation. Be careful to avoid ● hen in extraction mode, air in the touching the heating elements.
-
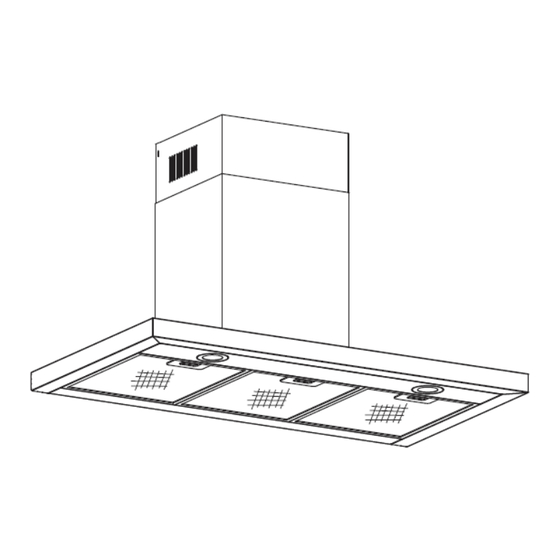
Page 6: Installation (Vent Outside)
INSTALLATION (VENT OUTSIDE) If you have an outlet to the outside, your cooker hood can be connected as below picture by means of an extraction duct (enamel, aluminum, flexible pipe or non- flammable material with an interior diameter of 150mm) 1. - Page 7 4. Put the cooker hood on the hook. See Pic 5. 5. Adjust the height of the inside chimney to the position of the inside chimney bracket and fix on it by screw, after adjusting the position, fix the body with safety screw. See Pic 6.
- Page 8 loss. • Failure to observe these basic instructions will reduce the performance and increase noise levels of the cooker hood. • Any installation work must be carried out by a qualified electrician or competent person. •Do not connect the ducting system of the hood to any existing ventilation system which is being used for any other appliance ,such as warmer tube, gas tube , hot wind tube.
- Page 9 2. Press the button “Speed” time after time, the motor runs as low / mid / high / low / mid…, the speed runs circularly; and the LED display will indicate as 1-2-3-1-2… circularly. 3. Press “Light” button, the light is on, press this button again, the light is off, keep pressing this button, the lights are on/off circularly. Please note the Lamp is not under control of the on/off button.
-
Page 10: Maintenance And Cleaning
NOTE: Any electrical repairs to this appliance must conform to your local, state and federal laws.Please contact the service centre if in any doubt before undertaking any of the above. CUSTOMER ASSISTANCE SERVICE If you cannot identify the cause of he operating anomaly;switch off the appliance (do not subject it to rought treatment.) and contact the Assistance Service. -
Page 11: Carbon Filter
Important Using neutral detergents and avoid using harsh cleaning chemicals, strong household detergents or products containing abrasives,as this will affect the appliance appearance and potentially remove any printing of artwork on the control panel and will void manufactures warrantee. GREASE MESH FILTERS The mesh filters can be cleaned by hand. - Page 12 When handling globes hold with a cloth or gloves to ensure perspiration does not come in contact with the globe as this can reduce the life of the globe. Changing a lamp bulb for LED 1. Switch the unit off and pull out the plug first. 2.
-
Page 13: Environmental Protection
ENVIRONMENTAL PROTECTION: This product is marked with the symbol on the selective sorting of waste electronic equipment. This means that this product must not be disposed of with household waste but must be supported by a system of selective collection in accordance with Directive 2012/19/EU. - Page 14 RHP90TX Hotte Manuel d’instruction...
- Page 15 Sommaire 1…………………………………..………………………………Consignes de sécurité 2…………………………………..………………………………Installation 3…………………………………..………………………………Commencez à utiliser votre hotte aspirante 4…………………………………..………………………………Dépannage 5…………………………………..………………………………Entretien et nettoyage 6…………………………………..………………………………Protection de l’environnement...
-
Page 16: Consignes De Sécurité
CONSIGNES DE SÉCURITÉ Ce manuel explique comment installer et utiliser correctement votre hotte aspirante. Veuillez le lire attentivement avant toute utilisation même si vous connaissez bien le produit. Le manuel doit être conservé en lieu sûr pour pouvoir le consulter en cas de besoin. - Page 17 À toujours faire : À toujours faire : ●Placez toujours le couvercle sur les ● Attention : L’appareil et ses parties casseroles et les poêles quand vous accessibles peuvent devenir chauds durant cuisinez sur une cuisinière à gaz. le fonctionnement. Évitez de toucher les ●En mode extraction, l’air de la pièce éléments qui chauffent.
-
Page 18: Installation (Évent À L'extérieur)
INSTALLATION (ÉVENT À L’EXTÉRIEUR) Si vous avez une sortie vers l'extérieur, votre hotte peut être raccordée comme indiqué ci-dessous avec une conduit d'extraction (émail, aluminium, tuyau flexible ou matériau ininflammable d'un diamètre intérieur de 150 mm) 1. Avant l’installation, éteignez l’unité et débranchez-la de la prise. 2. - Page 19 extensible. Après cela, installez la gaine extensible et la cheminée sur la hotte aspirante. Voir fig. 3/fig. 4. 4. Placez la hotte aspirante sur le crochet. Voir fig. 5. 5. Réglez la hauteur de la cheminée intérieure sur la position de l’étrier de la cheminée intérieure et fixez-la au moyen d’une vis, après avoir réglé...
-
Page 20: Astuces Pour L'installation Du Conduit D'évacuation
ASTUCES POUR L’INSTALLATION DU CONDUIT D’ÉVACUATION Vous devez suivre ces règles strictement pour obtenir une extraction optimale de l’air : • Maintenez la gaine extensible courte et droite ; • Ne réduisez pas la taille de la gaine extensible et ne la rétrécissez pas ; •... -
Page 21: Depannage
Commencez à utiliser votre hotte aspirante Écran tactile avec affichage LED 1. Appuyez sur le bouton “Power”, le bouton contrôle le “on” et le “off” de la hotte 2. Appuyez plusieurs fois sur le bouton «Speed», le moteur fonctionne en mode bas / moyen / haut / bas / moyen…, la vitesse est circulaire;... -
Page 22: Entretien Et Nettoyage
La distance entre la hotte Aspiration aspirante et la plaque de Remontez la hotte aspirante à la insuffisante cuisson au gaz est trop bonne distance. importante La hotte aspirante La vis de fixation n’est pas Serrez la vis de suspension et est inclinée suffisamment serrée placez-la à... -
Page 23: Surface Du Panneau De Commande
SURFACE DU PANNEAU DE COMMANDE Le panneau de commande peut être nettoyé avec de l’eau savonneuse chaude. Vérifiez que le chiffon est propre et bien essoré avant d’effectuer le nettoyage. Utilisez un chiffon doux et sec pour éliminer l’excès d’humidité restant après le nettoyage. Important Utilisez des détergents neutres et évitez les produits chimiques agressifs, les détergents ménagers puissants ou les produits contenant des abrasifs, car cela... -
Page 24: Remplacement De L'ampoule
Quand le filtre à charbon actif est fixé, la puissance d’aspiration diminue. REMPLACEMENT DE L’AMPOULE Important : L’ampoule doit être remplacée par le fabricant, le service après-vente d’autres personnes qualifiées. Coupez toujours le courant avant d’effectuer toute opération sur l’appareil. -
Page 25: Changer L'éclairage À Led
B. Changer l’éclairage à LED 1. Éteignez l’unité et débranchez d’abord la fiche. 2. Desserrez les 4 vis 4x10 mm au dos du boîtier puis ôtez le verre extérieur. 3. Desserrez les 2 vis sur l’étrier de la lampe puis remplacez l’éclairage à LED. Voir fig. -
Page 26: Protection De L'environnement
PROTECTION DE L’ENVIRONNEMENT Le symbole de la poubelle barrée est apposé sur ce produit. Cela veut dire que ce produit ne doit pas être jeté avec les ordures ménagères mais doit être apporté à un centre de collecte sélective conformément à la Directive 2012/19/UE. Il sera ensuite recyclé ou démonté...