
Manuels Connexes pour ProFurl spinex 0.9


Sommaire des Matières pour ProFurl spinex 0.9
- Page 1 MANUEL DE MONTAGE ® INSTALLATION MANUAL Emmagasineur de spi asymétrique Top down spinnaker furler spinex 0.9 spinex 1.5 spinex 2.5 spinex 5.0 spinkit 0.9 spinkit 1.5 spinkit 2.5 spinkit 5.0 www.profurl.com Indice B...
- Page 2 Lexique / Glossary Emerillon NEX / NEX swivel Cosse pour transfilage / Terminaison supérieure du câble Sail lashing point Upper end terminal - fitting Sphères / Balls Séparateurs / Bearing lock Terminaison inférieure du câble Emerillon d’amure libre Lower end terminal - fitting Tack swivel Manille - point d’amure / Shackle - tack point...
- Page 3 TABLE DES MATIERES / CONTENTS Composition du système p. 4 Spinex components Outillage nécessaire p. 4 Tools needed for fitting Installation du câble p.5-9 Cable installation Installation de la voile p.10 Sail installation Installation du système NEX p.11 NEX installation Première utilisation p.11 First use...
-
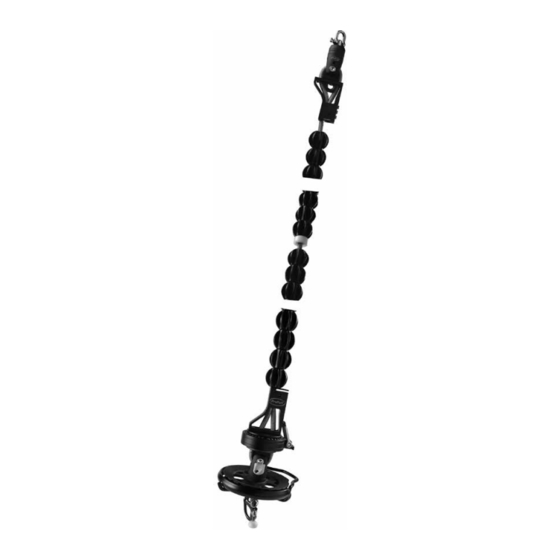
Page 4: Composition D'un Système Spinex
Composition d’un systèmE spinEx spinex components SPINEX inclut la tourelle, l’émerillon, le câble anti-torsion, les terminaisons, le point d’amure libre etc.. Hormis la mise à longueur du câble, SPINEX est plug and play et prêt à être utilisé. SPINEX includes the spool, the swivel, the anti-torsion rope with balls, the terminals and the swivel tack point. The cable must be cut at length. -
Page 5: Installation Du Cable
INSTALLATION Du cABLE: Déterminer la longueur iNSTAllATiON Of THE CABlE: determining the correct length on the cable Etape 1 / Step 1 La procédure consiste à déterminer la longueur du câble anti-torsion nécessaire. Pour cela il faut installer la terminaison supérieure sur le mécanisme inférieur. The procedure for determining your CABLE length and terminating, will start by installing the cable UPSIDE DOWN : top fitting is inserted into the spool and bottom fitting with swivel is hoisted with the halyard. - Page 6 Etape 2 /Step 2 Approcher la partie inférieure du câble avec ses sphères le plus proche du mécanisme de tourelle Approch the lower end of the cable Seq. 5 near to the spool while pulling down Repérer / marquer la sphère alignée avec le haut de la terminaison.
- Page 7 Profurl visible. Feed the cable inside, starting Take the top fitting in your hand on the left. facing the Profurl logo. Seq. 7 Seq. 6 >120 mm (5 inches) Attention, assu- rez vous d’avoir au minimum 120 mm de câble en...
- Page 8 Etape 4 /Step 4 Attacher la terminaison au mécanisme de tourelle. Connect the fitting as before to the spool. Si le câble n’est pas ten- du, enlever des sphères supplementaires. Retourner à l’étape 3. Le but est d’avoir le connecteur le plus proche possible de la sortie de drisse de spi et le maximum Hisser le câble en tête.
- Page 9 Etape 5 /Step 5 A Pendant que le câble est sous tension: 1 : Mettre de la colle frein filet et visser la vis inférieure . IL ESt IMPoRtANt QuE CEttE VIS SoIt MISE EN 1ER 2: Enlever la vis à bois 3: Mettre de la colle frein filet et visser la 2nd vis 4: Mettre de la colle frein filet et visser la 3ème vis While the cable is under tension :...
-
Page 10: Mise En Place Du Spinex Et De La Voile
MISE EN pLAcE Du SpINEx ET DE LA vOILE SpiNEx ANd SAil iNSTAllATiON Etape 6 /Step 6 Attacher la tétière de votre spinnaker . Mettre le système dans la bonne position en frappant la Lash the head point of the sail to the terminaison sur l’émerillon et le point d’amure libre sur le top fitting. -
Page 11: Installation Du Systeme Nex
INSTALLATION Du SYSTEME NEx NEx iNSTAllATiON Pour l’installation du mécanisme de tourelle et de l’émerillon NEX ainsi que pour la mise en place de la drosse épis- sée et des terminaisons - merci de vous référer à la notice NEX livrée avec celui-ci. To install the NEX mechanisms (spool and swivel) as well as to fit the terminals and the spliced furling line, PLEASE read the manual delivered together with the NEX. -
Page 12: Conditions De Garantie - Spinkit
Your PROFURL SPINKIT top down furler is warranted for a period of 3 (year) year from the date of purchase against parts and materials. This warranty do not cover the usual wear of the anti-twist cable. The cable has a one-year long guarantee against any manufacturing defect.