Table des Matières
Publicité
Les langues disponibles
Les langues disponibles
Liens rapides
Publicité
Table des Matières

Sommaire des Matières pour Muller licht tint 404010
- Page 1 s o s m a r t . s o s i m p l e . BLACK Control your lights 404010 simply via remote control. WHITE 404011 REMOTE CONTROL BEDIENUNGSANLEITUNG ab Seite 2 MODE D‘EMPLOI à partir de la page 17 INSTRUCTION MANUAL from page 33...
-
Page 2: Bestimmungsgemäßer Gebrauch
BEDIENUNGSANLEITUNG Bestimmungsgemäßer Gebrauch Dieser Artikel ist für Beleuchtungszwecke in trockenen Innenräumen konzipiert. Für die gewerbliche Nutzung ist der Artikel ungeeignet. Sicherheitshinweise Wichtige Hinweise • Dieser Artikel kann von Kindern ab 8 Jahren und darüber sowie von Personen mit verringerten physischen, sensorischen oder mentalen Fähigkeiten oder Mangel an Erfahrung und Wissen benutzt werden, wenn sie beaufsichtigt oder bezüglich des sicheren Gebrauchs des Artikels unterwiesen wurden und die daraus resultierenden Gefahren verstehen. -
Page 3: Lieferumfang
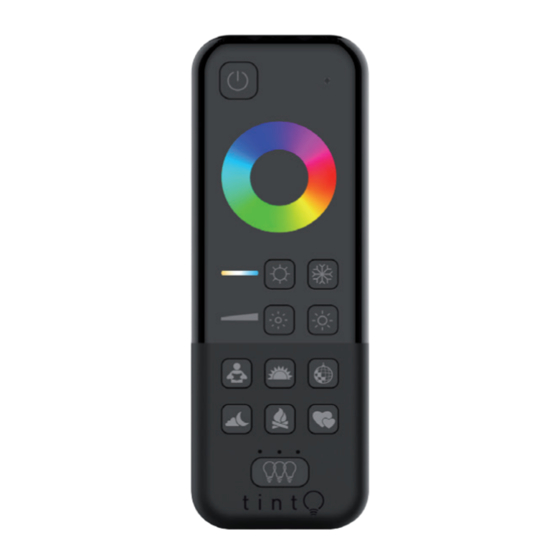
Wasser und suchen Sie umgehend einen Arzt auf. VORSICHT vor Sachschäden • Nehmen Sie die Batterien aus der tint-Fernbedienung heraus, wenn diese verbraucht ist oder wenn Sie den Artikel länger nicht benutzen. So vermeiden Sie Schäden, die durch Auslaufen entstehen können. •... - Page 4 tint-Fernbedienung 1 Standby-Taste 2 Resonanzanzeige 3 Farbsteuerung 4 Weißsteuerung 5 Helligkeits- steuerung 6 Szenen-Taste 8 Szenen-Taste „Arbeitslicht“ „Party“ 11 Szenen-Taste 9 Szenen-Taste „Romantik“ „Nachtlicht“ 10 Szenen-Taste 7 Szenen-Taste „Lagerfeuer“ „Sonnenuntergang“ 12 Gruppenanzeige 13 Gruppentaste „3 Leuchtdioden“ tint-REMOTE CONTROL ANLEITUNG...
-
Page 5: Batterien Einlegen
14 Reset-Taste 15 Batteriefach für 2 Batterien LR03 (AAA) Inbetriebnahme Batterien einlegen 1. Öffnen Sie das Batteriefach auf der Rückseite der tint-Fernbedienung. 2. Legen Sie 2 Batterien des Typs LR03 (AAA) / 1,5 V so ein, wie auf dem Boden des Batteriefachs abgebildet. Beachten Sie die richtige Polarität der Batterien (+/-). - Page 6 Wandhalterung nutzen (optional) Die zum Lieferumfang gehörende Wandhalterung können Sie für die sichere Lagerung der tint-Fernbedienung nutzen. Ein Magnet in der Halterung hält dabei die tint- Fernbedienung sicher auf der Halterung. Die Halterung kann mit Klebestreifen oder mit Schrauben und ggf. Dübeln auf ihrem Untergrund montiert werden.
-
Page 7: Helligkeit Einstellen
Grundfunktionen Ein- /Ausschalten Drücken Sie die Standby-Taste, um die Leuchten ein- und wieder auszuschalten. Die Memory-Funktion merkt sich den letzten „Beleuchtungszustand“ und startet damit beim nächsten Einschalten automatisch. Farben einstellen Wählen Sie durch Drücken die gewünschte Farbe: Kurzes Drücken: Die Farbe verändert sich in die gewünschte Richtung der Farbskala. - Page 8 Szenen Unter Szenen versteht man fest vordefinierte Lichteinstellungen. Eine Szene wird durch einen kurzen Druck auf die jeweilige Taste aktiviert. Szene „Arbeitslicht“: 100% neutrale, helle Beleuchtung Szene „Sonnenuntergang“: Startet bei warmweißem Licht (50%) und dimmt dann nach 15 Minuten weiter herunter. Nach weiteren 10 Minuten schaltet sich das Licht aus.
- Page 9 Beachten Sie: • Was eine Gruppe letztlich ist, bestimmen Sie selbst. Sie können z.B. auch die Leuchtmittel eines Zimmers oder einer Etage zusammenfassen. • Eine Gruppe kann erweitert oder verkleinert werden und es können auch Leuchtmittel von einer Gruppe zu einer anderen Gruppe verschoben werden. •...
- Page 10 Neues Leuchtmittel einbinden • Achten Sie beim Kauf neuer Leuchtmittel auf dessen technische Spezifikationen. Wir empfehlen tint-Leuchtmittel der Firma Müller-Licht. Bei der Verwendung von Leuchtmitteln anderer Hersteller ist nicht sichergestellt, dass alle Funktionen unterstützt werden bzw. einwandfrei funktionieren. • Wenn Sie ein tint-Leuchtmittel white verwenden, dass lediglich weißes Licht bietet, stehen die Farblicht-Funktionen nicht zur Verfügung.
- Page 11 3. Halten Sie die Gruppentaste ca. 5 Sekunden gedrückt. Die Resonanzanzeige blinkt rot/grün. 4. Wählen Sie durch wiederholtes Drücken der Gruppentaste das gewünschte Leuchtmittel aus. Durch An- und Abschwellen der Helligkeit signalisiert das Leuchtmittel, dass es ausgewählt wurde. 5. Halten Sie ca. 5 Sekunden die Standby-Taste gedrückt. Das Leuchtmittel signalisiert anschließend durch ein Aufblinken und anschließendes Abdimmen, dass es aus der Gruppe entfernt wurde und der Vorgang ist abgeschlossen.
- Page 12 Reset der tint-Fernbedienung Ein Reset ist nur im Ausnahmefall erforderlich, z.B. wenn die Leuchtmittel auch nach dem Entfernen und Wiedereinlegen der Batterien nicht mehr auf die tint-Fernbedie- nung reagieren. Bei einem Reset gehen alle vordefinierten Gruppeneinstellungen verloren und Sie müssen danach tint-Fernbedienung und auch die Leuchtmittel wieder miteinander verbinden.
- Page 13 Fehlersuch-Tabelle Problem Mögliche Ursache Keine Funktion. Die Batterien in der tint-Fernbedienung sind leer und müssen gewechselt werden. Die Leuchtmittel selbst sind ausge- schaltet oder die Netzstecker sind nicht eingesteckt. Sie haben über die Gruppentaste eine falsche bzw. gar keine Gruppe ausgewählt. Wählen Sie die richtige Gruppe aus oder wählen Sie über die Gruppentaste durch wiederholtes Drücken „Alle Gruppen“...
- Page 14 Fehlersuch-Tabelle Problem Mögliche Ursache Das Leuchtmittel hat sich in die Stellen Sie sicher, in welcher Gruppe falsche Gruppe eingebunden. sich das Leuchtmittel befindet. Gehen Sie vor wie in „Leuchtmittel aus einer Gruppe in eine andere Gruppe einbinden“ beschrieben. Das Leuchtmittel lässt sich nicht Bitte prüfen Sie, ob sich das Leuchtmittel in ein fremdes System einbinden.
- Page 15 Fehlersuch-Tabelle Problem Mögliche Ursache Das Leuchtmittel lässt sich nicht Das Leuchtmittel ist bereits einer Fern- hinzufügen. bedienung oder einem Gateway zugeteilt. Bitte entfernen Sie es aus dem bestehen- den Netzwerk Verringern Sie die Entfernung zur Fern- bedienung Schalten Sie naheliegende Zigbee Geräte spannungslos Die Standby-Taste muss mehr- Wenn die Leuchtmittel vorher über den...
-
Page 16: Konformitätserklärung
Konformitätserklärung Hiermit erklärt Müller-Licht International GmbH, dass dieses Produkt den notwendigen Anforderungen und sonstigen Bestimmungen der Richtlinien 2014/53/EU, 2011/65/EU sowie 2009/125/EC erfüllt. Die Konformitätserklärung kann unter service@mueller-licht.de angefragt werden. Entsorgen Altgeräte dürfen nicht im normalen Hausmüll entsorgt werden. Entspre- chend Richtlinie 2012/19/EU ist das Gerät am Ende seiner Lebensdauer einer geordneten Entsorgung zuzuführen. -
Page 17: Utilisation Conforme
MODE D‘EMPLOI Utilisation conforme Le présent article est conçu afin d’assurer l‘éclairage dans des espaces intéri- eurs secs. L‘article ne convient pas pour un usage industriel. Consignes de sécurité Consignes importantes • Le présent article peut être utilisé par des enfants à partir de 8 ans, ainsi que par des personnes présentant des capacités physiques, sensorielles ou mentales diminuées, ou un manque d’expérience et de connaissances si elles sont sous surveillance ou ont été... - Page 18 ATTENTION aux dommages matériels • Retirez les piles de la télécommande si celle-ci est usée ou si vous n‘utilisez plus l‘article. Vous évitez ainsi des dommages susceptibles de survenir par écoulement. N‘exposez pas les piles à des conditions extrêmes, en entrepo sant celles-ci par exemple sur des radiateurs ou sous le rayonnement direct du soleil.
-
Page 19: Télécommande Tint
Télécommande tint 2 Affichage de la 1 Touche de résonance mise en veille 3 Commande de la couleur 4 Commande du blanc 5 Commande de la luminosité 6 Touche de la 8 Touche de la scène « Éclairage de scène « Fête » travail »... -
Page 20: Mise En Service
14 Touche de remise à zéro 15 Compartiment pour 2 piles LR03 (AAA) Mise en service Insérer les piles 1. Ouvrez le compartiment pour piles au dos de la télécommande tint. 2. Insérez les 2 piles de type LR03 (AAA)/1,5 V comme l‘indique l‘illustration figurant sur le fond du compar- timent pour piles. - Page 21 Collage du support mural 1. Tirez sur le film de protection des deux patins adhésifs. 2. Appuyez sur le support en faisant légèrement pression sur le socle propre, sec et exempt de poussières. Vissage du support mural ATTENTION Assurez-vous que l’emplacement prévu ne comporte ni tuyaux, ni conduites. Selon le socle, vous pouvez également visser le support mural sur un mur au moyen de vis et, si nécessaire, de chevilles.
-
Page 22: Utilisation
Utilisation La télécommande tint est une télécommande radio. • Vous n’avez pas besoin de « viser » les ampoules avec la télécommande tint pour les commander. • La télécommande tint pénètre également au travers de matériaux durs, tels que murs, portes et fenêtres. •... - Page 23 Par une pression courte, réglez des niveaux de luminosité définis : 100 %, 80 %, 50 %, 20 %, 10 % et 5 %. Par une pression longue, réglez vous-même le niveau de luminosité souhaité. Scènes Les scènes désignent les réglages d’éclairage prédéfinis. Une scène est activée par une courte pression sur la touche correspondante.
-
Page 24: Fonctions Du Groupe
Fonctions du groupe Il s’agit d‘un groupe Les ampoules du kit de démarrage figurent au départ dans le premier groupe. Ainsi, d’une pression sur un bouton, vous pouvez commander plusieurs ampou- les simultanément. Ce dispositif est pratique, par exemple, si plusieurs « situations d’éclairage » cohabitent au sein d‘un même espace. - Page 25 • Vous vous trouvez dans le groupe suivant lorsque le voyant suivant au-dessus de la touche du groupe est allumé : ° Voyant 1 pour le premier groupe ° Voyant 2 pour le deuxième groupe ° Voyant 3 pour le troisième groupe °...
- Page 26 couleur. Si cela ne se produit pas, allumez et éteignez l‘ampoule 5 fois de suite. 4. Maintenez la télécommande tint tout près (< 5 cm) de la nouvelle ampoule. 5. Maintenez la touche du groupe enfoncée jusqu‘à ce que l’ampoule commence à...
- Page 27 Raccordement de l’ampoule d’un groupe avec un autre groupe 1. Éteignez au besoin les ampoules au moyen de la télécommande tint (veille). 2. Au moyen de la touche du groupe, sélectionnez le groupe que vous souhaitez modifier. (Par exemple, si vous souhaitez ajouter une ampoule du groupe 2 au groupe 1, appuyez de manière répétée sur la touche du groupe jusqu‘à...
- Page 28 3. Procédez comme le décrit la section « Réinitialisation de l‘ampoule tint », puis selon la description présente dans la section « Raccordement d‘une nouvelle ampoule ». Chaque ampoule est intégrée individuellement l‘une après l‘autre. Si par exemple trois ampoules appartiennent au groupe, vous devez répéter le processus «...
- Page 29 Tableau de recherche des erreurs Problème Cause possible Sans fonction. Les piles de la télécommande tint sont déchargées et doivent être remplacées. Les ampoules sont désactivées ou la prise secteur n’est pas branchée. Au moyen de la touche du groupe, vous avez sélectionné...
- Page 30 Tableau de recherche des erreurs Problème Cause possible Vous voulez intégrer une nouvelle Éteignez l‘ampoule déjà connectée ou ampoule. Cependant, celle qui éloignez-vous quelque peu du produit déjà est déjà intégrée clignote. connecté. L‘ampoule a été intégrée au Vérifiez le groupe dans lequel l'ampoule mauvais groupe.
- Page 31 Spécification WiFi : Bande de fréquence du module RF sans fil : 2400-2483,5 MHz Puissance maximale de radio-fréquence : < 8,8 dBm Puissance de réserve < 0,5W Smart Home Ready: Les produits tint de MÜLLER-LICHT peuvent être commandés au moyen de la dernière norme radio Zigbee 3.0 et sont compatibles avec de nombreux systèmes de commande de l‘éclairage, par exemple Philips Hue (sans Hue Entertainment and HomeKit), l‘assistant linguistique d‘Amazon, Osram Lightify...
-
Page 32: Élimination
Élimination Les appareils usagés ne peuvent pas être éliminés avec les ordures ménagères. Selon la directive 2012/19/UE, l‘appareil en fin de durée de vie doit être soumis à une élimination contrôlée. Les matériaux contenus dans l‘appareil sont soumis à un recyclage et l‘environnement n‘est pas pollué. Déposez l‘ancien appareil sans frais auprès d‘un point de collecte pour déchets électroniques ou d‘un centre de recyclage. -
Page 33: Intended Use
INSTRUCTION MANUAL Intended use This item is designed for lighting purposes in dry interiors. The item is unsuitable for commercial use. Safety information Important information • This item may be used by children over the age of 8 and persons with reduced physical, sensory or mental abilities or lack of experience and knowledge if they have been super-vised or instructed in the safe use of the item and understand the resulting dangers. - Page 34 CAUTION against damage to property • Remove the batteries from the remote control when they are drained or if you are not using the item for a long time. In this way, you avoid damage that can result from leakage. •...
- Page 35 tint remote control 1 Standby 2 Feedback display button 3 Colour control 4 White control 5 Brightness control 6 “Working light” 8 “Party” scene button scene button 11 “Romantic” 9 “Night lights” scene button scene button 10 “Campfire” 7 “Sunset” scene button scene button »...
-
Page 36: Inserting The Batteries
14 Reset button 15 Battery compartment for 2 batteries LR03 (AAA) Setup Inserting the batteries 1. Open the battery compartment at the rear of the tint remote control. 2. Insert 2 LR03 (AAA) / 1.5v batteries as shown on the bottom of the battery compartment. - Page 37 Screwing in the wall bracket ATTENTION Make sure there are no pipes or wires in the wall where you intend to drill. Depending on the surface, the wall bracket can be attached to the wall with screws and wall plugs if required. Screws and wall plugs are included with the bracket.
-
Page 38: Basic Functions
Basic functions Switching on/off Press the standby button to switch the bulbs on and off again. The memory function will store the last “illumination state” and will start again auto- matically the next time the bulb is switched on. Set colours Press to select the desired colour: Short press: The colour will switch in the desired direction on the colour scale. -
Page 39: Group Functions
Scenes ‘Scenes’ are pre-defined light settings. Activate a scene by short-pressing the corresponding button on the remote control. “Working light” scene: 100% neutral, bright light “Sunset” scene: Starts at warm-white light (50%) and then dims further after 15 minutes. After another 10 minutes, the light switches off. “Party”... - Page 40 Please note: • You define yourself what a group actually is. You could group together the bulbs in a room or on a floor, for example. • A group can be expanded or made smaller and bulbs can be moved from one group to another.
- Page 41 Adding a new bulb • Take note of the technical specifications when purchasing new bulbs. We recommend tint bulbs from Müller-Licht. When using bulbs made by other manufacturers, it is not guaranteed that all features will be supported or will work as intended. •...
- Page 42 Remove a bulb from the tint remote control 1. Switch the bulb off (i.e. to standby) with the tint remote control if necessary. 2. Select the group you would like to change using the group button. 3. Hold down the group button for approx. 5 seconds. The feedback display will blink red/green.
- Page 43 Resetting the tint remote control A reset will only be required in exceptional cases, such as when the bulb no longer responds to the tint remote control after removing and reinserting the batteries. Resetting the remote control will delete all pre-defined group settings and you will have to connect the tint remote control and the bulbs again afterwards.
- Page 44 Troubleshooting Problem Possible causes Bulb is not working. The batteries in the tint remote control are dead and must be replaced. The bulb itself is switched off or the mains plug is not plugged in. You have selected the wrong group, or have not selected a group, using the group button.
- Page 45 Troubleshooting Problem Possible causes I cannot add the bulb. The bulb is already assigned to a remote control or a gateway. Please remove it from the existing network. Bring it closer to the remote control Switch off any nearby Zigbee devices I have to press the standby button If the bulb has previously been switched off several times.
- Page 46 ° 404000 LED bulb white+color 806 2200-6500 + color 60x120 404001 LED bulb dimming 2700 60x120 404004 LED bulb white 2700-6500 60x120 404006 LED reflector GU10 GU10 2700-6500 50x54 >50 white 404008 LED candle white 2700-6500 38x110 404010 tint remote control 45x25 Zigbee 3.0 black 404011 tint remote control...
- Page 47 Discover the whole world of tint... 404013 404006 404010 404011 404015 404001 404000 COMING 404014 404008 SOON...
- Page 48 www.mueller-licht.de/tint MÜLLER-LICHT International GmbH Goebelstr. 61/63 D-28865 Lilienthal Tel. +800 44003311 service@mueller-licht.de 404010-011_tint-FB-BDA_004.pdf tint-REMOTE CONTROL INSTRUCTION MANUAL...