Hotpoint Ariston FHS 83 C IX/HA S Mode D'emploi
Masquer les pouces
Voir aussi pour FHS 83 C IX/HA S:
- Mode d'emploi (81 pages) ,
- Mode d'emploi (12 pages) ,
- Mode d'emploi (68 pages)
Publicité
Les langues disponibles
Les langues disponibles
Liens rapides
FD 83.1 /HA S
FHS 83 C IX/HA S
FH 83 /HA S
FH 83 IX/HA S
FH 82 C IX/HA S
FH 82 C /HA S
FH 831 C IX /HA S
FH 831 C /HA S
FH 83 C /HA S
FH 83 C IX /HA S
FHS 83 C IX/HA
FH 832 J IX/HA
Italiano
Istruzioni per l'uso
FORNO
Sommario
Istruzioni per l'uso,1
Avvertenze,3
Assistenza,7
Descrizione dell'apparecchio,9
Descrizione dell'apparecchio,11
Installazione,13
Avvio e utilizzo,15
Il programmmatore di cottura elettronico*,15
Programmi,16
Precauzioni e consigli,19
Manutenzione e cura,19
English
Operating Instructions
OVEN
Contents
Operating Instructions,1
Warnings,3
Assistance,7
Description of the appliance,9
Description of the appliance,11
Installation,21
Start-up and use,23
The electronic programmer,23
Cooking modes,24
Precautions and tips,27
Maintenance and care,27
Français
Mode d'emploi
FOUR
Sommaire
Mode d'emploi,1
Avertissements,4
Assistance,7
Description de l'appareil,9
Description de l'appareil,11
Installation,29
Mise en marche et utilisation,31
Le programmateur électronique*,31
Programmes,32
Précautions et conseils,35
Nettoyage et entretien,35
Español
Manual de instrucciones
HORNO
Sumario
Manual de instrucciones,1
Advertencias,4
Asistencia,7
Descripción del aparato,9
Descripción del aparato,11
Instalación,37
Puesta en funcionamiento y uso,39
El programador electrónico*,39
Programas,40
Precauciones y consejos,43
Mantenimiento y cuidados,43
Portuges
Instruções para a utilização
FORNO
Índice
Instruções para a utilização,1
Advertências,5
Assistência,8
Descrição do aparelho,9
Descrição do aparelho,11
Instalação,45
Início e utilização,47
O programador electrónico*,47
Programas,48
Precauções e conselhos,51
Manutenção e cuidados,51
Publicité

Manuels Connexes pour Hotpoint Ariston FHS 83 C IX/HA S


Sommaire des Matières pour Hotpoint Ariston FHS 83 C IX/HA S
- Page 1 FD 83.1 /HA S FHS 83 C IX/HA S FH 83 /HA S FH 83 IX/HA S FH 82 C IX/HA S FH 82 C /HA S FH 831 C IX /HA S FH 831 C /HA S FH 83 C /HA S Français...
- Page 2 Deutsch Bedienungsanleitung BACKOFEN Inhaltsverzeichnis Bedienungsanleitung,2 Hinweise,5 Kundendienst,8 Beschreibung Ihres Gerätes,10 Beschreibung Ihres Gerätes,12 Installation,53 Inbetriebsetzung und Gebrauch,55 Der elektronische Garzeitprogrammierer*,55 Programme,56 Vorsichtsmaßregeln und Hinweise,59 Reinigung und Pflege,59 Nederlands Gebruiksaanwijzing OVEN Inhoud Gebruiksaanwijzing,2 Belangrijk,6 Service,8 Beschrijving van het apparaat,10 Beschrijving van het apparaat,12 Het installeren,61 Starten en gebruik,63 Elektronische programmering*,63...
- Page 3 Avvertenze Warnings ATTENZIONE: Questo apparecchio e le WARNING: The appliance and its sue parti accessibili diventano molto caldi accessible parts become hot during use. durante l’uso. Bisogna fare attenzione ed Care should be taken to avoid touching evitare di toccare gli elementi riscaldanti. heating elements.
- Page 4 Avertissements Advertencias ATTENTION : Cet appareil ainsi que ATENCIÓN: Este aparato y sus partes ses parties accessibles deviennent très accesibles se vuelven muy calientes chauds pendant leur fonctionnement. durante el uso. Por lo tanto, es importante Il faut faire attention à ne pas toucher evitar tocar los elementos calentadores.
- Page 5 Advertências Hinweise ATENÇÃO: Este aparelho e as suas ZUR BEACHTUNG: Bei Gebrauch wird partes acessíveis aquecem muito durante dieses Gerät und alle zugänglichen a utilização. É preciso ter atenção e evitar Teile sehr heiß. Es ist darauf zu achten, tocar os elementos que aquecem. Manter dass die Heizelemente nicht berührt afastadas as crianças com menos de 8 werden.
- Page 6 Belangrijk Предупреждения PAS OP: Dit apparaat en zijn bereikbare ВНИМАНИЕ: Данное изделие и его onderdelen worden tijdens gebruik zeer доступные комплектующие сильно heet. Zorg ervoor de verwarmende нагреваются в процессе эксплуатации. elementen niet aan te raken. Zorg ervoor Будьте осторожны и не касайтесь dat kinderen die kleiner dan 8 jaar oud zijn нагревательных...
- Page 7 Assistenza Assistance ! Non ricorrere mai a tecnici non autorizzati. ! Never use the services of an unauthorised technician. Comunicare: Please have the following information to hand: • Il tipo di anomalia; • The type of problem encountered. • Il modello della macchina (Mod.) •...
- Page 8 Llame al 902.133.133 y nuestros técnicos intervendrán con rapidez y eficacia, devolviendo el electrodoméstico a sus condiciones óptimas de funcionamiento. En el SAT encontrará recambios, accesorios y productos Сервисное обслуживание específicos para la limpieza y mantenimiento de su electrodoméstico a precios competitivos. ! Никогда...
- Page 9 Descrizione dell’apparecchio Descripción del aparato Vista d’insieme Vista en conjunto 1 POSIZIONE 1 1 POSICIÓN 1 2 POSIZIONE 2 2 POSICIÓN 2 3 POSIZIONE 3 3 POSICIÓN 3 4 POSIZIONE 4 4 POSICIÓN 4 5 POSIZIONE 5 5 POSICIÓN 5 6 GUIDE di scorrimento dei ripiani 6 GUÍAS de deslizamiento de las bandejas 7 Ripiano LECCARDA...
- Page 10 Beschreibung Ihres Gerätes Geräteansicht 1 EINSCHUBHÖHE 1 2 EINSCHUBHÖHE 2 3 EINSCHUBHÖHE 3 4 EINSCHUBHÖHE 4 5 EINSCHUBHÖHE 5 6 GLEITFÜHRUNGEN für die Einschübe 7 Einschub FETTPFANNE 8 Einschub BACKOFENROST 9 Bedienfeld Beschrijving van het apparaat Algemeen aanzicht 1 POSITIE 1 2 POSITIE 2 3 POSITIE 3 4 POSITIE 4...
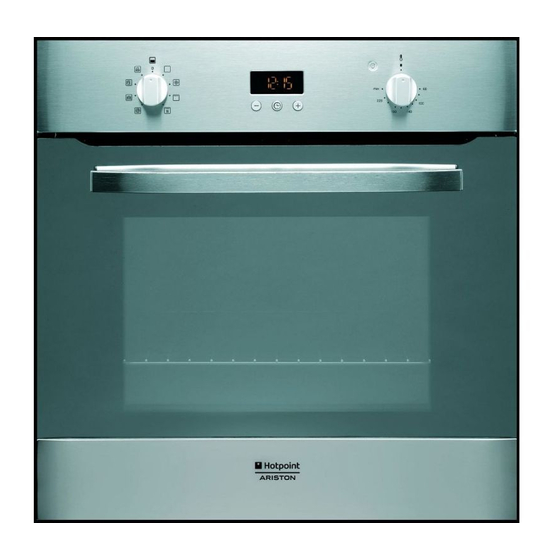
- Page 11 Descrizione dell’apparecchio Descripción del aparato Pannello di controllo Panel de control 1 Spia TERMOSTATO 1 Spia TERMOSTATO 2 Manopola PROGRAMMI 2 Mando PROGRAMAS 3 Programmatore ELETTRONICO * 3 Programador ELECTRÓNICO * 4 Manopola TERMOSTATO 4 Piloto TERMOSTATO 5 Manopola TIMER DI FINE COTTURA * 5 Mando TEMPORIZADOR DE FIN DE COCCIÓN * Presente solo in alcuni modelli.
- Page 12 Beschreibung Ihres Gerätes Bedienfeld 1 Kontrollleuchte THERMOSTAT 2 Drehknopf PROGRAMME 3 ELEKTRONISCHER Pogrammierer * 4 Drehknopf THERMOSTAT 5 Drehknopf TIMER ZUR EINSTELLUNG DES GARZEITENDES * Nur bei einigen Modellen. Beschrijving van het apparaat Bedieningspaneel 1 Controlelampje THERMOSTAAT 2 Knop PROGRAMMA’S 3 ELEKTRONISCHE programmering * 4 THERMOSTAATKNOP 5 Knop TIMER EINDE KOOKTIJD *...
- Page 13 Installazione ! È importante conservare questo libretto per poterlo consultare in ogni momento. In caso di vendita, di cessione o di trasloco, assicurarsi che resti insieme all’apparecchio per informare il nuovo proprietario sul funzionamento e sui relativi avvertimenti. ! Leggere attentamente le istruzioni: ci sono importanti informazioni sull’installazione, sull’uso e sulla sicurezza.
- Page 14 • la presa sia compatibile con la spina dell’apparecchio. In caso contrario sostituire la presa o la spina; non usare prolunghe e multiple. ! Ad apparecchio installato, il cavo elettrico e la presa della corrente devono essere facilmente raggiungibili. ! Il cavo non deve subire piegature o compressioni. Collegamento elettrico ! Il cavo deve essere controllato periodicamente e sostituito solo da tecnici autorizzati (vedi Assistenza).
- Page 15 Avvio e utilizzo 3. A tempo scaduto emette un segnale acustico e spegne il forno. 4. Quando il forno è spento il timer di fine cottura può essere ATTENZIONE ! Il forno usato come un normale contaminuti. è dotato di un sistema di arresto griglie che consente ! Per utilizzare il forno in funzionamento manuale, di estrarle senza che queste...
- Page 16 Programmare la cottura Programma LIEVITAZIONE Il forno raggiunge e mantiene una temperatura di 40°C a ! La programmazione è possibile solo dopo aver selezionato prescindere dalla posizione della manopola TERMOSTATO. un programma di cottura. Questo programma è ideale per la lievitazione degli impasti contenenti lievito naturale.
- Page 17 Girarrosto* Per azionare il girarrosto (vedi figura) procedere come segue: 1. mettere la leccarda in posizione 1; 2. mettere il sostegno del girarrosto in posizione 3 e inserire lo sp i ed o nell’apposito foro posto sulla parete posteriore del forno; 3.
- Page 18 Tabella cottura Programmi Alimenti Peso Posizione Preriscaldamento Temperatura Durata (Kg) dei ripiani (minuti) consigliata cottura (minuti) Lievitazione degli impasti con lievito naturale Lievitazione (brioche, pane, torta allo zucchero, croissant, ecc.) Anatra 65-75 Arrosto di vitello o manzo 70-75 Forno Arrosto di maiale 70-80 Tradizionale Biscotti (di frolla)
- Page 19 Precauzioni e consigli Smaltimento • Smaltimento del materiale di imballaggio: attenersi alle norme locali, così gli imballaggi potranno essere ! L’apparecchio è stato progettato e costruito in conformità riutilizzati. alle norme internazionali di sicurezza. • La direttiva Europea 2012/19/CE sui rifiuti di Queste avvertenze sono fornite per ragioni di sicurezza e apparecchiature elettriche ed elettroniche (RAEE), devono essere lette attentamente.
- Page 20 Pulire la porta ! Non utilizzare la lampada forno per e come illuminazione di ambienti. Pulire il vetro della porta con spugne e prodotti non abrasivi e asciugare con un panno morbido; non usare materiali ruvidi Montaggio del Kit Guide Scorrevoli abrasivi o raschietti metallici affilati che possono graffiare la superficie e causare la frantumazione del vetro.
- Page 21 Installation ! Please keep this instruction booklet in a safe place for future reference. If the appliance is sold, given away or moved, please make sure the booklet is also passed on to the new owners so that they may benefit from the advice contained within it.
- Page 22 • The appliance is earthed and the plug is compliant with the law. • The socket can withstand the maximum power of the appliance, which is indicated on the data plate. • The voltage is in the range between the values indicated on the data plate.
- Page 23 Start-up and use 4. When the oven is off the cooking timer can be used as a normal timer. WARNING! The oven is ! To use the oven manually, in other words when you do not provided with a stop system wish to use the end of cooking timer, turn the COOKING to extract the racks and TIMER knob until it reaches the...
- Page 24 Programming cooking LEAVENING mode ! A cooking mode must be selected before programming The oven reaches and maintains a temperature of 40°C can take place. irrespective of the position of the THERMOSTAT knob. This mode is ideal for leavening dough made with yeast. Programming the cooking duration 1.
- Page 25 The Rotisserie * To operate the rotisserie (see diagram) proceed as follows: 1. Place the dripping pan in position 1. 2. Place the rotisserie support in position 3 and insert the spit in the hole provided on the back panel of the oven.
- Page 26 Cooking advice table Cooking Foods Weight Rack Position Pre-heating Recommended Cooking modes (in kg) time temperature time (minutes) (minutes) Leavening process of dough made with Leavening yeast or baking powder (brioches, bread, sugar pie, croissants, etc.) Duck 65-75 Roast veal or beef 70-75 Traditional Pork roast...
- Page 27 Precautions and tips Disposal • When disposing of packaging material: observe local legislation so that the packaging may be reused. ! This appliance has been designed and manufactured • The European Directive 2012/19/EC on Waste in compliance with international safety standards. The Electrical and Electronic Equipment (WEEE), requires following warnings are provided for safety reasons and that old household electrical appliances must not...
- Page 28 Cleaning the oven door Replacing the light bulb Clean the glass part of the oven door using a sponge and a non-abrasive cleaning product, then dry thoroughly with a To replace the oven light soft cloth. Do not use rough abrasive material or sharp metal bulb: scrapers as these could scratch the surface and cause the 1.
- Page 29 Installation ! Conservez ce mode d’emploi pour pouvoir le consulter à tout moment. En cas de vente, de cession ou de déménagement, veillez à ce qu’il suive l’appareil pour informer le nouveau propriétaire sur son fonctionnement et lui fournir les conseils correspondants. ! Lisez attentivement les instructions : elles contiennent Centrage et fixation des conseils importants sur l’installation, l’utilisation et la...
- Page 30 • la tension d’alimentation est bien comprise entre les valeurs indiquées sur la plaquette signalétique; • la prise est bien compatible avec la fiche de l’appareil. Si ce n’est pas le cas, remplacez la prise ou la fiche, n’utilisez ni rallonges ni prises multiples. ! Après installation de l’appareil, le câble électrique et la prise de courant doivent être facilement accessibles Raccordement électrique...
- Page 31 Mise en marche et utilisation 3. Une fois le temps écoulé, un signal sonore retentit et le four s’éteint. 4. Quand le four est éteint, le programmateur fin de cuisson ATTENTION ! Le four peut être utilisé comme une simple minuterie. est équipé...
- Page 32 Comment programmer une cuisson Programme ETUVE Le four atteint et maintient une température de 40°C ! La programmation n’est possible qu’après avoir quelle que soit la position du bouton THERMOSTAT. Ce sélectionné un programme de cuisson. programme est idéal pour le levage de pâtes à base de levure de boulanger.
- Page 33 Tournebroche* P o u r a c t i o n n e r tournebroche (voir figure), procéder comme suit : 1. placer la lèchefrite au niveau 1 ; 2. placer le berceau au niveau 3 et encastrer le bout arrière de la broche dans le trou situé...
- Page 34 Tableau de cuisson Programmes Aliments Poids Niveau Préchauffage Température Durée (Kg) enfournement (minutes) préconisée cuisson (minutes) Levage de pâtes à base de levure de étuve boulanger (brioches, pain, tarte au sucre, croissants, etc.) Canard 65-75 Rôti de veau ou de bœuf 70-75 Four Rôti de porc...
- Page 35 Précautions et conseils Mise au rebut • Mise au rebut du matériel d’emballage : conformez-vous aux réglementations locales, les emballages pourront ! Cet appareil a été conçu et fabriqué conformément aux ainsi être recyclés. normes internationales de sécurité. Ces conseils sont •...
- Page 36 Nettoyage de la porte ! Ne pas utiliser la lampe du four comme éclairage de la pièce. Nettoyer la vitre de la porte avec des produits non abrasifs et des éponges non grattantes, essuyer ensuite avec un Montage du Kit glissières chiffon doux.
- Page 37 Instalación Aireación Para garantizar una buena aireación es necesario eliminar la pared posterior del hueco para el horno. Es preferible ! Es importante conservar este manual para poder instalar el horno apoyado sobre dos listeles de madera o consultarlo en todo momento. En caso de venta, de cesión sobre una superficie continua que tenga una abertura de o de mudanza, verifique que permanezca junto al aparato 45 x 560 mm.
- Page 38 • la toma sea capaz de soportar la carga máxima de potencia de la máquina indicada en la placa de características; • la tensión de alimentación eléctrica esté comprendida dentro de los valores indicados en la placa de características; • la toma sea compatible con el enchufe del aparato. Si no es así, sustituya la toma o el enchufe;...
- Page 39 Puesta en funcionamiento y uso 3. Una vez cumplido el tiempo, se emitirá una señal sonora y el horno se apagará. 4. Cuando el horno está apagado, el temporizador de fin de la ATENCIÓN! El horno está cocción se puede utilizar como un normal contador de minutos. dotado de un sistema de bloqueo de las parrillas que ! Para utilizar el horno con funcionamiento manual, o sea,...
- Page 40 Programar la cocción Programa LEUDADO ! La programación es posible sólo después de haber El horno alcanza y mantiene una temperatura de 40ºC seleccionado un programa de cocción. independientemente de la posición en la que se encuentra la perilla TERMOSTATO. Este programa es ideal para Programar la duración de la cocción leudar los amasijos que contienen levadura natural.
- Page 41 Asador giratorio* Para accionar el asador rotativo (ver la figura) proceder del siguiente modo: 1. coloque la grasera en la posición 1; 2 . c o l o q u e e l s o p o r t e del asador rotativo en la posición 3 e introduzca el espetón en el orificio...
- Page 42 Tabla de cocción Programas Alimentos Peso Posición de Precalenta- Temperatura Duración (Kg) los estantes miento aconsejada de la (minutos) cocción (minutos) Leudado de los amasijos con levadura Leudado natural (brioche, pan, torta de azúcar, croissant, etc. Pato 65-75 Asado de ternera o de vaca 70-75 Horno Asado de cerdo...
- Page 43 Precauciones y consejos Eliminación • Eliminación del material de embalaje: respete las normas locales, de esta manera los embalajes podrán ser ! El aparato ha sido proyectado y fabricado en conformidad reutilizados. con las normas internacionales de seguridad. • En base a la Norma europea 2012/19/CE de Residuos Estas advertencias se suministran por razones de seguridad de aparatos Eléctricos y Electrónicos (RAEE), los y deben ser leídas atentamente.
- Page 44 Limpiar la puerta Sustituir la bombilla Limpie el vidrio de la puerta con esponjas y productos no abrasivos y séquelo con un paño suave; no utilice Para sustituir la bombilla de materiales ásperos abrasivos o raederas metálicas afiladas iluminación del horno: que puedan rayar la superficie y quebrar el vidrio.
- Page 45 Instalação ! É importante guardar este folheto para poder consultá-lo a qualquer momento. No caso de venda, cessão ou mudança, assegure-se que o mesmo permanece com o aparelho para informar o novo proprietário sobre o funcionamento e sobre as respectivas advertências. ! Leia com atenção as instruções: há...
- Page 46 • a tomada tenha a capacidade de suportar a carga máxima de potência da máquina, indicada na placa de identificação; • a tensão de alimentação seja entre os valores da placa de identificação; • a tomada seja compatível com a ficha do aparelho. Em caso contrário, substitua a tomada ou a ficha;...
- Page 47 Início e utilização 2. Volte na direcção contrária aos ponteiros do relógio, para configurar o tempo que desejar, faça coincidir os minutos indicados no selector do TIMER DE FIM DE COZEDURA ATENÇÃO! O forno está com a referência fixa do painel de comandos. equipado com um sistema 3.
- Page 48 Programação da cozedura Programa de FERMENTAÇÃO ! É possível programar somente depois de ter seleccionado O forno chega à uma temperatura de 40°C que mantém- um programa de cozedura. se independentemente da posição do selector do TERMÓSTATO. Este programa é ideal para a fermentação Programação da duração da cozedura de massas que contêm lêvedo natural.
- Page 49 Deste modo impede-se a queimadura da superfície dos alimentos ao aumentar-se o poder de penetração do calor. Coza com a porta do forno fechada. Espeto giratório* Para accionar o espeto rotativo (veja a figura) realize as seguintes operações: 1 . c o l o q u e a b a n d e j a pingadeira na posição 1;...
- Page 50 Tabela de cozedura Programmas Alimentos Peso Posição das Pré Temperatura Duração (Kg) prateleiras aquecimento aconselhada (minutos) cozedura (minutos) Fermentação das massas com lêvedo Levitação natural (bolos, pão, tortas doces, croissant etc.) Pato 65-75 Carne de vitela ou vaca assada 70-75 Forno Carne de porco assada 70-80...
- Page 51 Precauções e conselhos Eliminação • Eliminação do material de embalagem: obedeça as regras locais, de maneira que as embalagens possam ! Este aparelho foi projectado e fabricado em conformidade ser reutilizadas. com as normas internacionais de segurança. Estas • A directiva Europeia 2012/19/CE relativa aos resíduos advertências são fornecidas por razões de segurança e de equipamentos eléctricos e electrónicos (REEE) prevê...
- Page 52 Limpeza da porta Substituição da lâmpada Limpe o vidro da porta com esponjas e produtos não abrasivos e enxugue com um pano macio; não use Para substituir a lâmpada de materiais ásperos, abrasivos ou espátulas metálicas afiadas iluminação do forno: que podem arranhar a superfície e quebrar o vidro.
- Page 53 Installation Zentrieren und Befestigen Bringen Sie die 4 seitlich am Backofen befindlichen Klampen mit den 4 Löchern des Rahmens in Übereinstimmung. ! Bewahren Sie diese Bedienungsanleitung bitte sorgfältig Achten Sie dabei darauf, dass bei einer Stärke der auf, damit Sie sie jederzeit zu Rate ziehen können. Sorgen Umbauschrankwand von:* Sie dafür, dass sie im Falle eines Verkaufs, eines Umzugs oder einer Übergabe an einen anderen Benutzer das Gerät...
- Page 54 Elektroanschluss • die Netzsteckdose mit dem Netzstecker kompatibel ist. Sollte dies nicht der Fall sein, wechseln Sie bitte die Die mit einem Dreileiterkabel ausgerüsteten Backöfen Netzsteckdose oder den Netzstecker aus; verwenden sind für den Betrieb mit Wechselstrom bei der auf dem Sie keine Verlängerungen und Mehrfachsteckdosen.
- Page 55 Inbetriebsetzung und Gebrauch Einsatz des TIMERS ZUR EINSTELLUNG DES GARZEITENDES* ACHTUNG! Der Ofen ist mit 1. In erster Linie muss das Läutewerk durch eine fast komplette einem Arretierungssystem Umdrehung (nach rechts) des Drehknopfes TIMER ZUR der Roste ausgestattet. EINSTELLUNG DES GARZEITENDES aufgezogen werden. Damit lassen diese sich 2.
- Page 56 Einstellung des Kurzzeitweckers dafür, dass eine Programmierung durchgeführt worden ist. ! Diese Funktion beeinflusst weder den Garvorgang, noch Auf dem DISPLAY wird abwechselnd die als Garzeitende den Gebrauch des Backofens. Sie weist ausschließlich programmierte Uhrzeit und die Garzeit-Dauer eingeblendet. durch ein akustisches Signal darauf hin, dass die •...
- Page 57 Praktische Back-/Brathinweise Programm ECHTE HEISSLUFT ! Verwenden Sie beim Heißluftgaren nicht die Einschubhöhen Es schalten sich alle Heizelemente (oberes, unteres 1 und 5: sie sind der Heißluft zu direkt ausgesetzt, wodurch und rundes Heizelement) ein, und das Gebläse wird in empfindliche Gerichte leicht verbrennen könnten.
- Page 58 Tabelle der Garzeiten Programme Speisen Gew. (kg) Einschubhöhe Vorheizzeit Empfohlene Garzeit (Minuten) Temperatur (Minuten) Hefeteig- Hefeteig gehen lassen (Brioche, Brot, Funktion süße Kuchen, Croissants usw.) Ente 65-75 Kalbs- oder Rinderbraten 70-75 Standard Schweinebraten 70-80 Plus Gebäck 15-20 Torten 30-35 Torten 20-30 Obstkuchen 2 oder 3...
- Page 59 Vorsichtsmaßregeln und Hinweise Entsorgung • Entsorgung des Verpackungsmaterials: Befolgen Sie die lokalen Vorschriften; Verpackungsmaterial kann ! Das Gerät wurde entsprechend den strengsten wiederverwertet werden. internationalen Sicherheitsvorschriften entworfen und gebaut. • Gemäß der Europäischen Richtlinie 2012/19/EC Nachstehende Hinweise werden aus Sicherheitsgründen über Elektro- und Elektronik-Altgeräte (WEEE) dürfen geliefert und sollten aufmerksam gelesen werden.
- Page 60 Backofentür reinigen Lampenaustausch Reinigen Sie die Backofentür aus Glas bitte nur mit einem weichen Schwamm und mildem Spülmittel und trocknen Sie sie Verfahren Sie zum Austausch abschließend mit einem weichen Tuch. Verwenden Sie keine der Backofenlampe wie folgt: rauen, scheuernden Materialien oder scharfkantige, metallische D r e h e n S i e d i e...
- Page 61 Het installeren ! Bewaar dit boekje zorgvuldig voor eventuele verdere raadpleging. Wanneer u het product weggeeft, verkoopt, of wanneer u verhuist, dient u dit boekje bij het apparaat te bewaren zodat alle nodige informatie voorhanden blijft. ! Lees de gebruiksaanwijzingen zorgvuldig door: er staat belangrijke informatie in over installatie, gebruik en veiligheid.
- Page 62 • het stopcontact in staat is het maximale vermogen van het apparaat te dragen, zoals aangegeven op het typeplaatje; • de spanning zich bevindt tussen de waarden die staan aangegeven op het typeplaatje; • het stopcontact en de stekker overeenkomen. Als dat niet zo is, dient u ofwel de stekker ofwel het stopcontact te vervangen;...
- Page 63 Starten en gebruik de knop TIMER EINDE KOOKTIJD samenvallen met de vaste aanwijzer op het bedieningspaneel. 3. Als de tijd verstreken is hoort u een geluidssignaal en BELANGRIJK! De oven gaat de oven uit. i s u i t g e r u s t m e t e e n 4.
- Page 64 Nu verschijnt het terugtellen, aan het einde waarvan u een geluidssignaal zult horen. Programma’s De bereiding programmeren ! U kunt voor alle programma’s een temperatuur instellen tussen de 60°C en MAX, behalve voor: ! De programmering is alleen mogelijk wanneer een kookprogramma is geselecteerd.
- Page 65 BARBECUE Programma BARBECUE • Plaats de grill op stand 3 of 4, plaats de gerechten op Het bovenste verwarmingselement gaat aan en het het midden van de grill. braadspit (waar aanwezig) gaat draaien. Het koken onder • We raden u aan het energieniveau op de hoogste de grill is vooral aan te raden voor gerechten die een hoge stand te zetten.
- Page 66 Kooktabel Programma's Gerechten Gewicht Roosterstanden Voorverwar Aangeraden Kooktijd (kg) ming temperatuur (minuten) (minuten) Rijzen van deeg met bakkersgist Rijzen (brioches, brood, suikertaart, croissants, enz.) Eend 65-75 Braadstuk 70-75 Traditionele Varkensrollade 70-80 Oven Koekjes (kruimeldeeg) 15-20 Vruchtentaart 30-35 Taarten 20-30 Vruchtentaart 2 of 3 40-45 Plum-cake...
- Page 67 Voorzorgsmaatregelen en Afvalverwijdering • Verwijdering van het verpakkingsmateriaal: houd u aan advies de plaatselijke normen, zodat het verpakkingsmateriaal hergebruikt kan worden. • De Europese Richtlijn 2012/19/EC over Vernietiging van Dit apparaat is ontworpen en vervaardigd volgens de Electrische en Electronische Apparatuur (WEEE), vereist geldende internationale veiligheidsvoorschriften.
- Page 68 De ovendeur reinigen Vervangen van het lampje Reinig het glas van de deur met een spons en niet schurende producten. Droog met een zachte doek. Gebruik Voor het vervangen van het geen ruwe schurende materialen of scherpe schrapertjes ovenlampje: die het oppervlak zouden kunnen krassen waardoor als 1 .
- Page 69 Установка Вентиляция Для обеспечения надлежащеи вентиляции необходимо снять заднюю панель ниши кухонного элемента. ! Важно сохранить данное руководство для его Рекомендуется установить духовои шкаф на два последующих консультации. В случае продажи, деревянных бруска или на сплошное основание с передачи изделия или при переезде на новое место отверстием...
- Page 70 ! Электромонтер несет ответственность за правильное 3. Прикрепить скобы и уголки к краю боковой панели мебельного элемента при помощи шурупов “D”. подключение изделия к электрическои сети и за 4. Прикрепить духовой шкаф к мебельному элементу соблюдение правил безопасности. при помощи шурупов и пластмассовых шайб “E”. Перед...
- Page 71 ПАСПОРТНАЯ ТАБЛИЧКА а 43,5 Га а а 32,4 а а 40,6 О а 45,5 Га а а 32,4 а а 40,6 О а 220-240В ~ 50Г Э . Па а ), а а а а а 2800 В Д а 2002/40/CE МАРКИРОВКА...
- Page 72 Включение и эксплуатация Программирование окончания приготовления при помощи таймера* 1. Прежде всего необходимо завести таймер, повернув ВНИМАНИЕ! Д уховой рукоятку ТАЙМЕР ОКОНЧАНИЯ ПРИГОТОВЛЕНИЯ по шк аф ук омпле к то ва н часовой стрелке почти на один полный оборот. системой бл окировки 2.
- Page 73 Отмена программирования 1. Нажмите несколько раз кнопку до тех пор, пока Порядок отмены запрограммированного значения: на ДИСПЛЕЕ не замигает символ и три цифровые • нажимать на кнопку до тех пор, пока на дисплее значения; не начнет мигать символ установки, который нужно отменить, и...
- Page 74 Практические советы по приготовлению Можно одновременно использовать не более двух уровней в духовке. ! В режиме вентилируемого приготовления не используйте 1-ый и 5-ый уровни: они подвергаются прямому воздействию горячего воздуха, который может Программа ПИЦЦА сжечь деликатные продукты. Включаются нижний и круглый нагревательные элементы...
- Page 75 Та а П а П В У В Р а П а а а а Ра а а ( Ра а а а . .) У а 65-75 Жа 70-75 Т а а а Жа 70-80 а П 15-20 П а...
- Page 76 Предосторожности и • В случае неисправности категорически запрещается открывать внутренние механизмы изделия с целью рекомендации их самостоятельного ремонта. Обращайтесь в Центр Сервисного обслуживания (см. Сервисное обслуживание). ! Изделие спроектировано и изготовлено в соответствии • Не ставьте предметы на открытую дверцу духового с...
- Page 77 Техническое обслуживание 3. возьмитесь за дверцу руками и уход с двух сторон, плавно закройте ее, но не полностью; Нажмите на упоры F, затем потяните дверцу Отключение электропитания на себя, снимая ее с петель (см. Перед началом какой-либо операции по обслуживанию рисунок).* или...
- Page 78 2. Замените шурупы А на шурупы и распорные э л е м е н т ы ( В + С ) и з комплекта. 3. Завинтите новые шурупы В и с оответствующие распорные детали С , восстанавливая на место также самочистящиеся панели.
- Page 80 195102314.04 01/2013 - XEROX FABRIANO...