Table des Matières
Publicité
Les langues disponibles
Les langues disponibles
Liens rapides
Royal Appliance International GmbH
Itterpark 5-7
40724 Hilden
Germany
℡
+49 (0) 2103 - 20 07 10
+49 (0) 2103 - 20 07 77
info@dirtdevil.de
Roya-10392 • A5 • 20.03.2009
DE
GB
FR
NL
www.dirtdevil.de
Centrixx TS
Staubsauger
Aspiradora
ES
Bedienungsanleitung
Manual de instrucciones
пылесос
Vacuum cleaner
RUS
Инструкция по эксплуатации
Operating Manual
Aspirateur
Elektrikli süpürge
TR
Mode d'emploi
Kullanma Talimatı
Vysávac
Stofzuiger
CZ
Bedieningshandleiding
Návod k obsluze
Vysávac
SK
Návod na obsluhu
Sesalnik
Sl
Navodila za uporabo
Usisavac
HR
Uputa za upotrebu
Porszívó
HU
Kezelési útmutató
Publicité
Chapitres
Table des Matières

Manuels Connexes pour Dirt Devil Centrixx TS


Sommaire des Matières pour Dirt Devil Centrixx TS
- Page 1 Centrixx TS Staubsauger Aspiradora Vysávac Bedienungsanleitung Manual de instrucciones Návod na obsluhu пылесос Vacuum cleaner Sesalnik Инструкция по эксплуатации Operating Manual Navodila za uporabo Royal Appliance International GmbH Itterpark 5-7 Aspirateur Elektrikli süpürge Usisavac 40724 Hilden Mode d‘emploi Kullanma Talimatı...
- Page 2 Bedienungsanleitung ................4 - 23 Operating Manual ..................24 - 41 Mode d'emploi ..................... 42 - 59 Bedieningshandleiding ................60 - 77 Manual de instrucciones ................78 - 95 Инструкция по эксплуатации ..............96 - 113 Kullanma Talimatı ..................114 - 131 Návod k obsluze..................
- Page 3 Abb. 1...
-
Page 4: Technische Daten
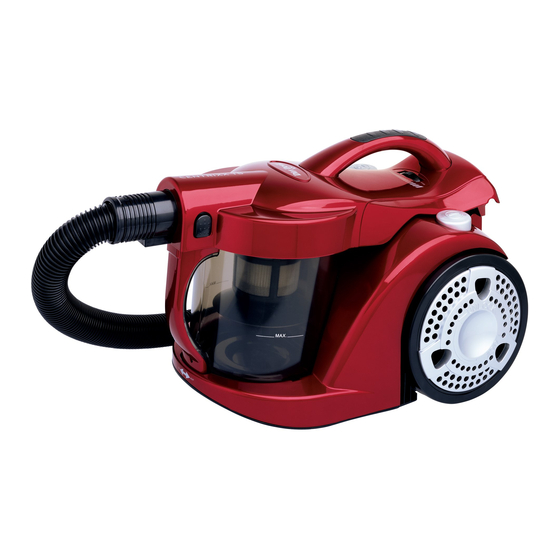
Übersicht über Ihren Centrixx TS Übersicht über Ihren Centrixx TS Vielen Dank! Wir danken Ihnen für den Kauf des Centrixx TS und das entgegengebrachte Vertrauen. Geräteteile/Lieferumfang 1 Bodendüse 13 Umschalter „Teppich/Hartboden“ 2 Verstauhaken 14 Ausblasfilter-Abdeckung 3 Teleskoprohr-Arretierung 15 Verstauhalterung 4 Teleskoprohr... -
Page 5: Table Des Matières
Inhaltsverzeichnis 1 Sicherheitshinweise ..............6 zur Bedienungsanleitung ..................... zu den verwendeten Hinweisen................... zur Stromversorgung ....................zu Kindern ........................zur bestimmungsgemäßen Verwendung ..............bei defektem Gerät ...................... 2 Auspacken und Montieren ............9 Auspacken........................Montieren........................Weitere Düsen (Zubehör) verwenden ................. 10 3 Bedienung ................. -
Page 6: Sicherheitshinweise
Sicherheitshinweise Sicherheitshinweise 1.1 zur Bedienungsanlei- Lesen Sie diese Bedienungsanleitung vollständig durch, tung bevor Sie mit dem Gerät arbeiten. Bewahren Sie die Anleitung gut auf. Falls Sie das Gerät an Dritte weitergeben, geben Sie die Bedienungsanleitung mit. Nichtbeachtung dieser Anleitung kann schweren Verletzungen oder Schäden am Gerät füh- ren. -
Page 7: Zur Stromversorgung
Sicherheitshinweise 1.3 zur Stromversorgung Das Gerät wird mit elektrischem Strom betrieben, dabei besteht grundsätzlich die Gefahr eines elektrischen Schlags. Achten Sie daher besonders auf Folgendes: - Fassen Sie den Stecker nie mit nassen Händen an. - Wenn Sie den Stecker aus der Steckdose herauszie- hen wollen, ziehen Sie immer direkt am Stecker. -
Page 8: Bei Defektem Gerät
Sicherheitshinweise Jede weitere Verwendung gilt als nicht bestimmungsge- mäß und ist untersagt. Verboten ist insbesondere: Das Saugen von: - Haaren, Fingern und anderen Körperteilen. Sie könnten eingezogen und verletzt werden. - Kleidungsstücken (z. B. Schuhbänder, Schals usw.). Sie könnten eingezogen werden und Verletzungen hervorrufen. -
Page 9: Auspacken Und Montieren
2. Überprüfen Sie den Inhalt auf Vollständigkeit und Un- versehrtheit. Informationen Lieferumfang Seite 4, „Übersicht über Ihren Centrixx TS“. ACHTUNG: Transportieren/versenden Sie das Gerät grundsätzlich immer in der Originalverpackung, damit es keinen Scha- den nimmt. Heben Sie dazu die Verpackung auf. -
Page 10: Weitere Düsen (Zubehör) Verwenden
Auspacken und Montieren 4. Stellen Sie die Länge des Teleskoprohrs ein. Drücken Sie dazu die Teleskoprohr-Arretierung (Abb. 4/1) nach unten (Abb. 4/a). Ziehen Sie dann das Teleskoprohr auf die gewünschte Länge (Abb. 4/b). Zum Verriegeln las- sen Sie die Teleskoprohr-Arretierung beim Ziehen los. Sie hören ein deutliches Klicken. - Page 11 Auspacken und Montieren Optional erhältlich sind weiterhin: - Turbobürste (Abb. 7/1) Zur Tiefenreinigung von Teppichen mittels rotie- rendem Bürstenkopf. HINWEIS: Bei der Verwendung der Turbobürste entsteht durch die hohe Drehzahl der Bürste ein lautes Geräusch. - Parkettbürste (Abb. 7/2) Abb. 7 Zum Absaugen besonders empfindlicher Oberflä- chen (z.
-
Page 12: Bedienung
Bedienung Bedienung 3.1 Staubsaugen WARNUNG: Verletzungsgefahr! Prüfen Sie den Bodenstaubsauger und das Stromkabel vor jeder Benutzung. Ein beschä- digtes Gerät darf nicht verwendet werden. WARNUNG: Verletzungsgefahr! Achten Sie insbesondere beim Sau- gen von Treppen/Stufen darauf, dass Sie sich stets ober- halb des Geräts befinden. - Page 13 Bedienung 1. Stecken Sie die gewünschte Düse auf, Kapitel 2.2, „Montieren“ bzw. Kapitel 2.3, „Weitere Düsen (Zubehör) verwenden“. 2. Ziehen Sie das Stromkabel am Stecker bis zur gelben Markierung (Abb. 9/1) heraus. WARNUNG: Gefahr eines elektrischen Schlags! Falls die rote Markie- Abb.
-
Page 14: Ausschalten Und Stromkabel Aufrollen
Bedienung 3.2 Ausschalten und 1. Schalten Sie den Bodenstaubsauger am Ein-/Aus- Stromkabel aufrollen Schalter (Abb. 13/1) aus und ziehen Sie den Stecker aus der Steckdose. 2. Behalten Sie den Stecker in der Hand. WARNUNG: Verletzungsgefahr! Beim Einziehen des Stromkabels kann dieses umherschlingern, zur Stolperfalle werden oder Gegenstände umreißen. -
Page 15: Staubbehälter Leeren
Bedienung 3.4 Staubbehälter leeren Leeren Sie den Staubbehälter spätestens, wenn die „Max“-Markierung (Abb. 16/1) erreicht ist oder die Saugwir- kung nachlässt. ACHTUNG: Bevor Sie den Staubbehälter leeren, schalten Sie das Gerät aus und ziehen Sie den Netzstecker. Anderenfalls zerstört weiterhin angesaugter Staub das Gerät. 1. -
Page 16: Pflege Und Reinigung
Pflege und Reinigung Pflege und Reinigung 4.1 Übersicht über die Fil- Ihr Bodenstaubsauger besitzt die folgenden 3 Filter: - Lamellen-Zentralfilter (Abb. 18/1) Staub und Schmutzpartikel können sich im Lamellen- Zentralfilter festsetzen und den Luftstrom reduzieren. Reinigen: Um die Saugleistung zu erhalten, reini- gen Sie den Filter nach jedem Saugvorgang (siehe Kapitel 4.2,... -
Page 17: Lamellen-Zentralfilter Und Motorschutzfilter Reinigen/Wechseln
Pflege und Reinigung 4.2 Lamellen-Zentralfilter 1. Schalten Sie das Gerät aus und beachten Sie die Hin- und Motorschutzfilter weise unter Kapitel 3.2, „Ausschalten und Stromkabel reinigen/wechseln aufrollen“. 2. Entleeren Sie den Staubbehälter, Kapitel 3.4, „Staubbehälter leeren“. 3. Nehmen Sie den Deckel vom Staubbehälter ab, indem Sie ihn über einem Mülleimer vom Staubbehälter abzie- hen. - Page 18 Pflege und Reinigung 8. Entnehmen Sie bei dieser Gelgeneheit sogleich den Motorschutzfilter (Abb. 23/1). 9. Klopfen Sie auch ihn über einem Mülleimer aus. HINWEIS: Sollten das Motorschutzfilter-Element (Abb. 24/1), das Lamellen-Zentralfilter-Element (Abb. 24/2) sowie das Fil- tersieb (Abb. 24/3) nach der gründlichen Trockenreini- gung immer noch verschmutzt sein, spülen Sie es mit Abb.
-
Page 19: Hygiene-Ausblasfilter Wechseln
Pflege und Reinigung 4.3 Hygiene-Ausblasfilter 1. Schalten Sie das Gerät aus und beachten Sie die Hin- wechseln weise unter Kapitel 3.2, „Ausschalten und Stromkabel aufrollen“. 2. Drehen Sie die Ausblasfilter-Abdeckung (Abb. 28/1) zum Öffnen im Uhrzeigersinn und entnehmen Sie die Abdeckung. -
Page 20: Problembehebung
Problembehebung Problembehebung 5.1 Bevor Sie das Gerät einsenden Bevor Sie das Gerät an den Royal Appliance-Kundendienst einschicken, überprüfen Sie anhand der folgenden Tabelle, ob Sie das Problem selbst beseitigen können. WARNUNG: Verletzungsgefahr! Verwenden Sie niemals ein defektes Gerät! Bevor Sie auf Problemsuche gehen, schalten Sie das Gerät aus und ziehen Sie den Netzstecker Kapitel 3.2, „Ausschalten und Stromkabel aufrollen“. -
Page 21: Ersatzteile
Problembehebung 5.2 Ersatzteile Zubehörteile sowie Ersatzteile können nachbestellt werden. Artikel-Nr. Beschreibung 2610001 Filterset 5-teilig, bestehend aus 1 Lamellen-Zentralfilter, 1 Motorschutzfilter, 1 Hygiene-Ausblasfilter sowie 2 Filterhülsen Diese erhalten Sie bei den Firmen: Zubehör-Ersatzteile-Service-Versand Service Center Feuerbach KG Ina Riedmüller Corneliusstr. 75 Frankenstraße 34 40215 Düsseldorf 89233 Neu-Ulm... -
Page 22: Garantie
Garantie Garantie Wir übernehmen für dieses Gerät eine Garantie von 24 Monaten ab Kaufdatum. Innerhalb der Garantiezeit beseitigen wir nach unserer Wahl durch Reparatur oder Austausch des Gerätes oder des Zubehörs (Schäden an Zubehörteilen führen nicht automatisch zum Umtausch des kompletten Gerätes) unentgeltlich alle Mängel, die auf Material- oder Herstellungsfehlern beru- hen. -
Page 24: Technical Data
Overview of your Centrixx TS Overview of your Centrixx TS Thank you! Thanks for purchasing the Centrixx TS and for your confidence in us. Appliance parts/scope of delivery 1 Floor nozzle 13 "Carpet/hard floor" switch 2 Storage hook 14 Exhaust filter cover... - Page 25 List of contents 1 Safety notices................26 Re: Operating Manual ....................26 Re: The Notices Given ....................26 Re: Power supply ......................27 Re: Children......................... 27 Re: Appropriate Use ....................28 If the appliance is defective ..................28 2 Unpacking and assembling ............. 29 Unpacking........................
-
Page 26: Safety Notices
Safety notices Safety notices 1.1 Re: Operating Manual Read this operating manual completely before working with the appliance. Keep the operating manual for reference. Include the operating manual if you pass the appliance on to someone else. Non-compliance with these instructions can lead to serious injuries or damage to the appliance. -
Page 27: Re: Power Supply
Safety notices 1.3 Re: Power supply The appliance runs on electricity -- that means there is a general risk of electric shock. So please especially observe the following: - Never touch the plug with wet hands. - Always pull directly at the plug if you want to disconnect the appliance from the mains. -
Page 28: Re: Appropriate Use
Safety notices 1.5 Re: Appropriate Use This appliance may only be used in households. It is not suitable for commercial or industrial use. Use the cylinder vacuum cleaner only for cleaning dry, normally soiled floors. With the proper brush attachment the appliance may also be used to clean furniture, at reduced power even for vacuuming curtains. -
Page 29: Unpacking And Assembling
1. Unpack the appliance and all its accessories. 2. Check the contents for completeness and possible damages. Information regarding the scope of delivery Page 24, "Overview of your Centrixx TS". ATTENTION: Always transport/send the appliance in its original packaging to avoid transport damages. Keep the packaging for such an event. -
Page 30: Using Further Nozzles (Accessories)
Unpacking and assembling 4. Adjust the length of the telescopic tube. To do this, press the telescopic tube lock (Fig. 4/1) down (Fig. 4/a). Then extend the telescopic tube to the desired length (Fig. 4/b). Let go of the release catch while pulling until it locks in place. - Page 31 Unpacking and assembling Optionally available are: - Turbo brush (Fig. 7/1) For thoroughly deep cleaning of carpets with the revolving brush head. NOTE: The brush rotating at high speed causes a loud noise during operation. - Parquet brush (Fig. 7/2) Fig.
-
Page 32: Operation
Operation Operation 3.1 Vacuum cleaning WARNING: Danger of injury! Check the cylinder vacuum cleaner and the power cord before each use. A damaged appliance must never be used. WARNING: Danger of injury! Especially when vacuum-cleaning stairs make sure that you are always higher up than the appliance. - Page 33 Operation 1. Attach the desired nozzle Chapter 2.2, "Assembly" or Chapter 2.3, "Using further nozzles (accessories)". 2. Pull out the cord by the plug up to the yellow mark (Fig. 9/1). WARNING: Danger of electric shock! If the red marking (Fig. 9/2) shows, retract the cord by pressing the cord retracting Fig.
-
Page 34: Switching Off And Retracting The Power Cord
Operation 3.2 Switching off and 1. Switch off the cylinder vacuum cleaner with the on/off retracting the power switch (Fig. 13/1) and pull the plug from the mains cord. socket. 2. Keep the plug in your hand. WARNING: Danger of injury! During retraction the power cord can whip around, become an obstacle or overthrow objects. -
Page 35: Emptying The Dust Container
Operation 3.4 Emptying the dust Empty the dust container at the latest when the "Max" container mark (Fig. 16/1) has been reached or when the vacuum cleaner is losing suction power. ATTENTION: Before you clean the dust container, switch off the appliance and remove the mains plug. -
Page 36: Cleaning And Care
Cleaning and care Cleaning and care 4.1 Overview of the filters Your cylinder vacuum cleaner is equipped with the following filters: - Central laminar filter (Fig. 18/1) Dust and dirt particles can become attached to the central laminar filter and reduce the airflow. Cleaning: To maintain suction performance, clean the filter after each vacuuming session (see Chapter 4.2, "Cleaning or changing the central... -
Page 37: Cleaning Or Changing The Central Laminar Filter And Motor Protection Filter
Cleaning and care 4.2 Cleaning or changing 1. Switch the appliance off and observe the instructions the central laminar under Chapter 3.2, "Switching off and retracting the filter and motor power cord.". protection filter. 2. Empty the dust container, Chapter 3.4, "Emptying the dust container". - Page 38 Cleaning and care 8. On this occasion, also take out the motor protection filter (Fig. 23/1). 9. Tap the dirt out of this filter over a dustbin. as well. NOTE: If the motor protection filter element (Fig. 24/1), the central laminar filter element (Fig. 24/2) and the filter screen (Fig.
-
Page 39: Changing The Hygienic Exhaust Filter
Cleaning and care 4.3 Changing the hygienic 1. Switch the appliance off and observe the instructions exhaust filter under Chapter 3.2, "Switching off and retracting the power cord.". 2. Turn the exhaust filter cover (Fig. 28/1) clockwise to open and remove the cover. 3. -
Page 40: Troubleshooting
Troubleshooting Troubleshooting 5.1 Before you send in the appliance Before sending the appliance to Royal Appliance Customer Services, use the following table to check whether you can solve the problem yourself. WARNING: Danger of injury! Never use a defective appliance! Always switch off the appliance and disconnect it from the mains before starting troubleshooting Chapter 3.2, "Switching off and retracting the power cord.". -
Page 41: Spare Parts
Warranty 5.2 Spare parts You can order accessories and spare parts from: Item number Description 2610001 5-piece filter set, consisting of 1 central laminar filter, 1 motor protection filter, 1 hygienic exhaust filter and 2 filter elements You can get these: Page 224, "Royal Appliance Int. -
Page 42: Parties De L'appareil / Matériel Fourni À La Livraison
Aperçu de votre Centrixx TS Aperçu de votre Centrixx TS Merci beaucoup ! Nous vous remercions pour votre confiance ainsi que de l'achat de ce Centrixx TS. Parties de l'appareil / matériel fourni à la livraison 1 Suceur universel 13 Commutateur « Tapis / sols durs »... - Page 43 Sommaire Sommaire 1 Consignes de sécurité.............. 44 relatives à ce mode d'emploi ..................44 à propos des indications mentionnées ................ 44 par rapport à l’alimentation électrique ................. 44 Remarques relatives aux enfants ................45 Utilisation conforme aux instructions ................45 En cas de défectuosités de l'appareil ................
-
Page 44: Consignes De Sécurité
Consignes de sécurité Consignes de sécurité 1.1 relatives à ce mode Veuillez lire attentivement et intégralement ce mode d'emploi d'emploi avant de vous servir de l'appareil. Conservez précieusement ce mode d'emploi. Remettez toujours le mode d'emploi à toute personne se servant de l'appareil. -
Page 45: Remarques Relatives Aux Enfants
Consignes de sécurité - N'exploitez l'appareil que si la tension indiquée sur la plaque signalétique correspond bien à celle de votre prise. Une tension différente pourrait rendre l'appareil définitivement inutilisable. 1.4 Remarques relatives Les personnes (y compris les enfants) qui ne sont pas aux enfants en mesure de se servir de manière sûre de l'appareil, en raison de leurs capacités physiques ou sensorielles, de... -
Page 46: En Cas De Défectuosités De L'appareil
Consignes de sécurité Cette interdiction concerne en particulier : L'aspiration de : - toners (par ex. pour des imprimantes laser, des copieurs, etc.). Il y a un risque d'incendie et d'explosion. - les cendres incandescentes, les cigarettes ou les allumettes non éteintes. Il y a un risque d'incendie. - les objets pointus comme des bris de verre, des clous etc. -
Page 47: Déballage Et Montage
Déballage et montage Déballage et montage 2.1 Déballage 1. Déballez l'appareil et tous les accessoires. 2. Vérifiez si le contenu est bien complet et ne présente aucuns dommages. Informations relatives au contenu de la livraison Page 42, „Aperçu de votre Centrixx TS“. -
Page 48: Utilisation Des Autres Suceurs (Accessoires)
Déballage et montage 4. Réglez la longueur du tube télescopique. Appuyez pour cela vers le bas l'arrêt du tube télescopique (ill. 4/1) (ill. 4/a). Tirez ensuite le tube télescopique jusqu'à atteindre la longueur souhaitée (ill. 4/b). Pour procéder au verrouillage, relâchez l'arrêt du tube télescopique pendant que vous le tirez. - Page 49 Déballage et montage En option, vous pouvez également vous procurer : - une turbo brosse (ill. 7) Pour un nettoyage en profondeur des tapis avec une brosse à tête rotative. REMARQUE: Vous remarquerez, lorsque vous utiliserez turbobrosse, que celle-ci est bruyante (vitesse rapide de rotation).
-
Page 50: Emploi
Emploi Emploi 3.1 Utilisation de l'aspirateur AVERTISSEMENT: Risque de blessures ! Avant tout emploi, vérifiez l'aspirateur et le cordon d'alimentation. N'utilisez jamais un appareil qui est endommagé. AVERTISSEMENT: Risque de blessures ! Lors d'une aspiration dans des escaliers ou des sols dénivelés, prenez garde à ce que vous vous trouviez toujours au-dessus de l'appareil. - Page 51 Emploi 1. Emboîtez le suceur ou la brosse voulu, Chapitre 2.2, „Montage“ et Chapitre 2.3, „Utilisation des autres suceurs (accessoires)“ 2. tirez le cordon d'alimentation au niveau de la prise jusqu'à voir la marque jaune (ill. 9/1). AVERTISSEMENT: Risques d'électrocution ! Si la marque rouge (ill. 9/2) est Ill.
-
Page 52: Arrêt Et Rangement Du Cordon D'alimentation
Emploi 3.2 Arrêt et rangement du 1. Éteignez l'aspirateur au moyen du bouton marche-arrêt cordon d'alimentation (ill. 13/1), puis débranchez-le. 2. Gardez la fiche en main. AVERTISSEMENT: Risque de blessures ! En s'enroulant, le cordon d'alimentation peut faire trébucher des personnes ou arracher des objets. -
Page 53: Videz Le Bac À Poussière
Emploi 3.4 Videz le bac à Videz le bac à poussière au plus tard lorsque poussière l'indicateur "Max" (ill. 16/1) est atteint ou lorsque l'efficacité de l'aspirateur diminue. ATTENTION: Avant de vide la bac à poussière, éteignez l'appareil et débranchez-le. Autrement, poussière aspirée... -
Page 54: Maintenance Et Entretien
Maintenance et entretien Maintenance et entretien 4.1 Vue d'ensemble des Votre aspirateur est équipé des 3 filtres suivants : filtres - Filtre central à lamelles (ill. 18/1) La poussière et les particules de saleté peuvent rester accrochées aux lamelles du filtre central et réduire le flux d'air. -
Page 55: Nettoyage/Changement Du Filtre Central À Lamelles Et Du Filtre De Protection Du Moteur
Maintenance et entretien 4.2 Nettoyage/changement 1. Éteignez l'appareil respectez consignes du filtre central à énoncées sous Chapitre 3.2, „Arrêt et rangement du lamelles et du filtre de cordon d'alimentation“. protection du moteur 2. Videz le bac à poussière, Chapitre 3.4, „Videz le bac à... - Page 56 Maintenance et entretien 8. Retirez par la même occasion le filtre de protection du moteur (ill. 23/1). 9. Tapotez légèrement le filtre au dessus d'une poubelle. REMARQUE: Si, après un nettoyage à sec approfondi, l'élément du filtre de protection du moteur (ill. 24/1), l'élément du filtre central à...
-
Page 57: Remplacement Du Filtre Hygiénique De Sortie D'air
Maintenance et entretien 4.3 Remplacement du filtre 1. Éteignez l'appareil respectez consignes hygiénique de sortie énoncées sous Chapitre 3.2, „Arrêt et rangement du d’air cordon d'alimentation“. 2. Pour ouvrir le couvercle du filtre de sortie d'air (ill. 28/1), tournez-le dans le sens des aiguilles d'une montre, puis retirez-le. -
Page 58: Élimination Des Anomalies
Élimination des anomalies Élimination des anomalies 5.1 Avant d'envoyer l'appareil Avant d'expédier l'appareil au service après-vente de Royal Appliance, veuillez vérifier, en vous aidant du tableau ci-dessous, si vous ne pouvez pas remédier vous-même à l'anomalie. AVERTISSEMENT: Risque de blessures ! N'utilisez jamais un appareil défectueux ! Avant de rechercher la cause de l'anomalie, arrêtez l'appareil et débranchez-le Chapitre 3.2, „Arrêt et rangement du cordon d'alimentation“. -
Page 59: Pièces De Rechange
Garantie 5.2 Pièces de rechange Vous pouvez commander ultérieurement les pièces détachées et les accessoires. No. d'art. Description 2610001 Jeu de filtres de 5 pièces, comprenant 1 filtre central à lamelles, 1 filtre de protection du moteur 1 filtre hygiénique de sortie d'air et 2 gaines pour filtres Vous pouvez acheter celles-ci auprès de : Page 224, „Royal Appliance Int. - Page 60 Fax: +420 - 28 68 85 064 dirtdevil@zesgoes.nl servis@lce.cz Royal Appliance Espana, SL OOO RTC „Sovinservice“ ООО РТЦ "Совинсервис", Royal, Dirt Devil, Stellar 127081 MOSCOW 127081 г. МОСКВА, C/ Jazmin, 66 - 3° Jasny proezd, 10 Ясный проезд, д. 10...
- Page 61 Záručný list Garancialevél Centrixx TS Stempel und Unterschrift des Händlers / Stamp and sign of dealer / Cachet et signatur du vendeur / Stempel en handtekening van de handelaar / Sello y firma del distribuidor / Печать и подпись продавца / Satıcının mührü ve imzası / Razítko a podpis prodejce / Pečiatka a podpis predajcu / Žig in podpis trgovca / Pečat i potpis trgovca / A kereskedés bélyegzője és aláírása...