Publicité
Les langues disponibles
Les langues disponibles
Liens rapides
Betriebsanleitung Präzisionswaagen
Operating instruction Precision balances
Mode d'emploi Balances de précision
KERN EW/EG-N
Typ EG 200-3AM
Typ EG 400-3AM
Typ EG 600-3AM
Typ EG 2000-2AM
Typ EG 4000-2AM
Version 2.8
2017-11
KERN & Sohn GmbH
Ziegelei 1
D-72336 Balingen
E-Mail: info@kern-sohn.com
Tel: +49-[0]7433- 9933-0
Fax: +49-[0]7433-9933-149
Internet: www.kern-sohn.com
EW/EG-BA-def-1728
Publicité

Manuels Connexes pour KERN EW-N Serie


Sommaire des Matières pour KERN EW-N Serie
- Page 1 KERN & Sohn GmbH Ziegelei 1 Tel: +49-[0]7433- 9933-0 D-72336 Balingen Fax: +49-[0]7433-9933-149 E-Mail: info@kern-sohn.com Internet: www.kern-sohn.com Betriebsanleitung Präzisionswaagen Operating instruction Precision balances Mode d’emploi Balances de précision KERN EW/EG-N Typ EG 200-3AM Typ EG 400-3AM Typ EG 600-3AM Typ EG 2000-2AM Typ EG 4000-2AM Version 2.8...
- Page 2 Weitere Sprachversionen finden Sie online unter www.kern-sohn.com/manuals Další jazykové verze najdete na webu pod adresou www.kern-sohn.com/manuals Más versiones de idiomas se encuentran online bajo www.kern-sohn.com/manuals Vous trouverez d’autres versions de langue online sous www.kern-sohn.com/manuals Further language versions you will find online under www.kern-sohn.com/manuals Trovate altre versioni di lingue online in www.kern-sohn.com/manuals...
- Page 4 Positionierung der Wägeplatte ..................... 15 5.2.4 Windschutz-Montage ......................15 5.2.5 Windschutz – optional ......................16 5.2.6 Windschutz mit Glas-Schiebetüren (nur Modell KERN EW 120-4NM serienmäßig) ..16 Netzanschluss ........................17 Akkubetrieb (optional) ....................... 17 Anschluss von Peripheriegeräten ..................18 Erstinbetriebnahme ......................18 5.6.1 Power-Anzeige ........................
- Page 5 Funktionen ....................45 Zugang und Änderung zahlreicher Funktionen: ............. 45 Liste der Funktionsparameter ..................46 7.2.1 Parameter bei Wägungen mit Toleranzbereich (nicht bei Modell KERN EW120-4NM) ..48 7.2.2 Parameter für die serielle Schnittstelle ................49 Datenausgang................... 50 Beschreibung des serienmäßigen Datenausgangs (RS 232C) ........50 Technische Daten der Schnittstelle .................
- Page 6 1 Technische Daten KERN (Typ) EG 200-3AM EG 400-3AM EG 600-3AM Markenbezeichnung EG 220-3NM EG 420-3NM EG 620-3NM Ablesbarkeit (d) 0,001 g 0,001 g 0,001 g Eichwert (e) 0,01 g 0,01 g 0,01 g Wägebereich (Max) 220 g 420 g...
- Page 7 KERN (Typ) EG 2000-2AM EG 4000-2AM Markenbezeichnung EG 2200-2NM EG 4200-2NM Ablesbarkeit (d) 0,01 g 0,01 g Eichwert (e) 0,1 g 0,1 g Wägebereich (Max) 2200 g 4200 g Genauigkeitsklasse Tarierbereich (subtraktiv) 2200 g 4200 g Mindestlast (Min) 0,5 g 0,5 g Mindeststückgewicht...
- Page 8 KERN EW 120-4NM EW 220-3NM EW 420-3NM Ablesbarkeit (d) 0,0002 g 0,001 g 0,001 g Eichwert (e) 0,001 g 0,01 g 0,01 g Wägebereich (Max) 120 g 220 g 420 g Genauigkeitsklasse Tarierbereich (subtraktiv) 120g 220g 420 g Mindestlast (Min)
- Page 9 KERN EW 620-3NM EW 820-2NM EW 2200-2NM Ablesbarkeit (d) 0,001 g 0,01 g 0,01 g Eichwert (e) 0,01 g 0,01 g 0,1 g Wägebereich (Max) 620 g 820 g 2200 g Genauigkeitsklasse Tarierbereich (subtraktiv) 620 g 820 g 2200 g...
- Page 10 KERN EW 4200-2NM EW 6200-2NM EW 12000-1NM Ablesbarkeit (d) 0,01 g 0,01 g 0,1 g Eichwert (e) 0,1 g 0,1 g Wägebereich (Max) 4200 g 6 200 g 12 000 g Genauigkeitsklasse Tarierbereich (subtraktiv) 4200 g 6 200 g 12 000 g...
- Page 11 1.1 Ablesbarkeit der verschiedenen Wägeeinheiten Wägeeinheit EW 120-4NM EG 220-3NM / EG 420-3NM / EW 420-3NM EW 220-3NM 0.0002 0.001 0.001 0.001 0.01 0.01 (ct) 0.00001 0.0001 0.0001 (oz) 0.00001 0.00001 0.00001 (lb) 0.00001 0.0001 0.0001 (ozt) 0.0002 0.001 0.001 (dwt) 0.01 (grain)
- Page 12 1.2 Umrechnungstabellen der Wägeeeinheiten Wägeeinheit Gramm Karat Unze Pound Feinunze Penny weight 0.03527 0.00220 0.03215 0.64301 0.00705 0.00044 0.00643 0.12860 28.34952 141.74762 0.06250 0.91146 18.22917 453.59237 2267.96185 14.58333 291.66667 1ozt 31.10348 155.51738 1.09714 0.06857 1dwt 1.55517 7.77587 0.05486 0.00343 0.05 0.06480 0.32399 0.00229...
- Page 13 Die Waage darf nicht konstruktiv verändert werden. Dies kann zu falschen Wägeer- gebnissen, sicherheitstechnischen Mängeln sowie der Zerstörung der Waage führen. Die Waage darf nur gemäß den beschriebenen Vorgaben eingesetzt werden. Abwei- chende Einsatzbereiche/Anwendungsgebiete sind von KERN schriftlich freizugeben. 2.3 Gewährleistung Gewährleistung erlischt bei - Nichtbeachten unserer Vorgaben in der Betriebsanleitung - Verwendung außerhalb der beschriebenen Anwendungen...
- Page 14 3.1 Hinweise in der Betriebsanleitung beachten Lesen Sie diese Betriebsanleitung vor der Aufstellung und Inbetriebnahme sorgfältig durch, selbst dann, wenn Sie bereits über Erfahrungen mit KERN-Waagen verfügen. 3.2 Ausbildung des Personals Das Gerät darf nur von geschulten Mitarbeitern bedient und gepflegt werden 4 Transport und Lagerung 4.1 Kontrolle bei Übernahme...
- Page 15 5 Auspacken, Aufstellung und Inbetriebnahme 5.1 Aufstellort, Einsatzort Die Waagen sind so konstruiert, dass unter den üblichen Einsatzbedingungen zuver- lässige Wägeergebnisse erzielt werden. Exakt und schnell arbeiten Sie, wenn Sie den richtigen Standort für Ihre Waage wäh- len. Beachten Sie deshalb am Aufstellort folgendes: Waage auf eine stabile, gerade Fläche stellen;...
- Page 16 5.2.1 Aufstellen Die Waage mit Fußschrauben nivellieren, bis sich die Luftblase in der Libelle im vor- geschriebenen Kreis befindet. 5.2.2 Lieferumfang Serienmäßiges Zubehör: (1) Waage (2) Wägeplatte (3) Träger für Wägeplatte (4) Windsschutz (5) Stecker-Set für Schnittstelle (6) Betriebsanleitung (7) Netzgerät EW-EG-BA-d-1728...
- Page 17 5.2.3 Positionierung der Wägeplatte Träger lt. Zeichung festschrauben, danach Wägeplatte aufsetzen. 5.2.4 Windschutz-Montage (nur für Geräte d = 0,001 g serienmäßig) EW-EG-BA-d-1728...
- Page 18 Nun den Windschutz passend auf das Gehäuse aufsetzen und mit den beiden Schrauben durch die geöffneten Schiebetüren befestigen. Den Träger lt. Zeichnung festschrauben und danach die Wägeplatte aufsetzen. 5.2.6 Windschutz mit Glas-Schiebetüren (nur Modell KERN EW 120-4NM serienmäßig) EW-EG-BA-d-1728...
- Page 19 5.3 Netzanschluss Die Stromversorgung erfolgt über das externe Netzgerät. Der aufgedruckte Span- nungswert muss mit der örtlichen Spannung übereinstimmen. Verwenden Sie nur KERN- Originalnetzgeräte. Die Verwendung anderer Fabrikate bedarf der Zustimmung von KERN. Anschluss Netzadapter: Anschluss Netzadapter 5.4 Akkubetrieb (optional) Wägeplatte abnehmen und den Träger durch Lösen der Schraube entfernen.
- Page 20 Waage unbedingt vom Netz getrennt werden (Schnittstellenbeschrei- bung Kap. 8). Verwenden Sie mit Ihrer Waage ausschließlich Zubehör und Peripheriegeräte von KERN, diese sind optimal auf Ihre Waage abgestimmt. 5.6 Erstinbetriebnahme Eine Anwärmzeit von 10 Minuten nach dem Einschalten stabilisiert die Messwerte.
- Page 21 5.6.3 Stabilitäts-Anzeige ο 0 I I I F 0.000 Stabil 0 I I I F 0.000 Instabil Erscheint im Display die Stabiltätsanzeige [ο] ist die Waage in einem stabilen Zu- stand. Bei instabilem Zustand verschwindet die [ο]–Anzeige. Stabile Umgebungsbe- dingungen erreichen sie durch den Einsatz ein Windschutzes (Montage siehe Kap.
- Page 22 Messwerte zu erhalten, empfiehlt es sich zudem, die Waage auch im Wägebetrieb periodisch zu justieren. 5.8 Justieren 5.8.1 Justierung mit externem Gewicht (nur KERN EW-N) Bei geeichten Waagen ist die Justierung per Schalter gesperrt (außer Genauigkeits- klasse I). Um die Justierung durchführen zu können (außer Genauigkeitsklasse I) Eichschalter umlegen (siehe Kap.
- Page 23 -Taste und -Taste gleichzeitig drücken WAit und gleichzeitig loslassen, [WAIt]] wird kurz angezeigt. Danach wird [CAL.0] blinkend angezeigt, CAL. 0 es erfolgt die Speicherung des Nullpunktes. Danach erscheint [CAL.on]. CAL. on Drehen Sie den Drehknopf an der rechten Sei- te der Waage in die Position CAL. CAL.
- Page 24 Die Waage kehrt automatisch in den Wäge- modus zurück. 5.8.3 Justierung mit externem Gewicht (nur KERN EW) Justierung mit dem empfohlenen Justiergewicht (siehe Kap. 1 „Techn. Daten“) durch- führen. Die Justierung ist aber auch mit Gewichten anderer Nennwerte (siehe nach- folgende Tabelle) möglich, messtechnisch aber nicht optimal.
- Page 25 Vorgehen bei der Justierung: Stabile Umgebungsbedingungen beachten. Eine Anwärmzeit von ca. 10 Minuten zur Stabilisierung ist erforderlich. Bedienung Anzeige Waage mit -Taste einschalten Func -Taste drücken und gedrückt halten, bis [CAL] erscheint, dann loslassen. Bei gedrückter -Taste die -Taste drü- cken.
- Page 26 5.9 Eichung Allgemeines: Nach der EU-Richtlinie 2014/31/EU müssen Waagen geeicht sein, wenn sie wie folgt verwendet werden (gesetzlich geregelter Bereich): a) Im geschäftlichen Verkehr, wenn der Preis einer Ware durch Wägung be- stimmt wird. b) Bei der Herstellung von Arzneimitteln in Apotheken sowie bei Analysen im medizinischen und pharmazeutischen Labor.
- Page 27 5.10 Eichschalter und Siegelmarke Vor der Eichung muss der Eichschalter aus der angezeichneten Position (siehe Pfeil- richtung) in die Eichposition verschoben werden. In dieser Stellung erscheint im Dis- play eine Klammer um die letzte Anzeigenstelle. Nach dem Eichvorgang wird die Waage an den markierten Positionen versiegelt. Die Eichung der Waage ist ohne die „Siegelmarken“...
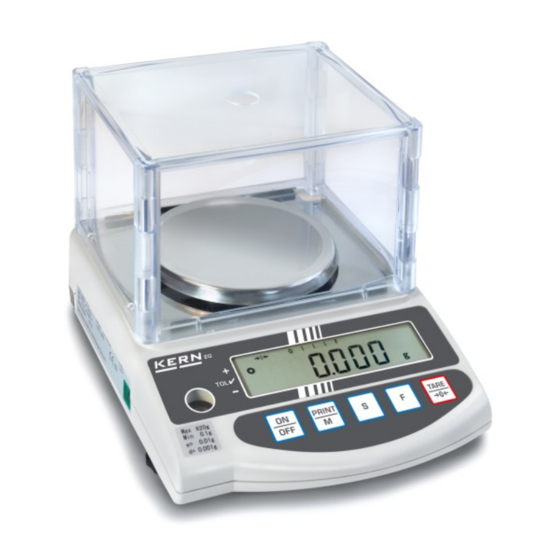
- Page 28 6 Betrieb 6.1 Bedienungselemente Windschutz Libelle Anzeige Tastatur verstellbare Gerätefüße Anschluss Schnittstelle RS232C (nicht bei EWB-Modellen) Justierschalter Anschluss Netzadapter (KERN EG) EW-EG-BA-d-1728...
- Page 29 6.1.1 Tastaturübersicht Auswahl Funktion • Ein-/Ausschalten • Ausgabe des Gewichtswertes auf externem Gerät (Drucker) oder PC • Speichern der Einstellungen in der jeweiligen Betriebsart (Stückzählung, Prozentwägung, Toleranzwägung) • Im Stückzähl- und Prozentmodus: Auswahlmenü für Stück und % • Speichern von Funktionsparametern •...
- Page 30 6.1.2 Anzeigenübersicht Anzeige Beschreibung Gramm →0← Nullstellanzeige ο Stabilitätsanzeige Poweranzeige (Stand by) Anzeige für Stückzählung (nicht bei EW 120-4NM) Anzeige für Prozentwägung (nicht bei EW 120-4NM) Anzeige für die Toleranzwägung (nicht bei EW 120-4NM) Momme Waage führt eine Waagenfunktion durch z. B. Stückzählung/ Anzeige eines Speicherwertes Anzeige für Justierung.
- Page 31 6.2 Betriebsarten 6.2.1 Wägen Anzeigesymbol: g Bedienung Anzeige Zum Einschalten der Waage drücken Sie -Taste. Die Waage führt einen Selbsttest durch. Sobald die Gewichtsanzeige „0.000" anzeigt, ο ist Ihre Waage wägebereit. 0 I I I F Wägegut auflegen, der Gewichtswert wird an- 0.000 gezeigt.
- Page 32 6.2.1.1 Unterflurwägung Gegenstände, welche aufgrund ihrer Größe oder Form nicht auf die Waagschale ge- stellt werden können, können mit Hilfe einer Unterflurwägung gewogen werden. Gehen Sie wie folgt vor: • Schalten Sie die Waage aus. • Drehen Sie die Waage um. •...
- Page 33 6.2.1.2 Tarawägung (Tarieren) Das Eigengewicht beliebiger Wägebehälter lässt sich auf Knopfdruck wegtarieren, damit bei nachfolgenden Wägungen das Nettogewicht des Wägegutes angezeigt wird. Bedienung Anzeige Leeren Tarabehälter auf die Wägeplatte stellen. Das Gesamtgewicht des aufge- legten Behälters wird angezeigt. 0 I I I F 23.456 Drücken Sie die -Taste um den Ta-...
- Page 34 Der Tariervorgang kann beliebige Male wiederholt werden, beispielsweise beim Ein- wiegen von mehreren Komponenten zu einer Mischung (zuwiegen). Drücken Sie die -Taste um die An- zeige auf „0.000" zu stellen. →0← 0 I I I F 0.000 Das Gesamtgewicht des Behälters wird wegtariert.
- Page 35 6.2.2 Stückzählung (nicht bei Modell KERN EW120-4NM) Anzeigesymbol: PCS Bei der Stückzählung können Sie entweder Teile in einen Behälter einzählen oder Teile aus einem Behälter herauszählen. Um eine größere Menge von Teilen zählen zu können, muss mit einer kleinen Menge (Referenzstückzahl) das durchschnittliche Gewicht pro Teil ermittelt werden.
- Page 36 4. Durch Mehrfachbetätigung der -Taste können weitere Referenz- stückzahlen 10, 30, 50 und 100 aufgeru- fen werden. Wichtig: Je größer die Referenzstück- zahl, desto genauer die Stückzählung. 5. Legen so viele Zählteile auf die Waa- ge, wie die eingestellte Referenzstück- zahl verlangt.
- Page 37 6.2.2.1 Addiermodus Mit dieser Funktion erhöhen Sie die Zählgenauigkeit durch Erhöhung der Referenz- menge. Dadurch wird vermieden, dass keine zu kleine Referenzstückzahl verwendet wird, da dies zu ungenauen Resultaten führen könnte. Bei Anwendung dieser Funktion wird bei kleinen Teilen automatisch die erforderliche Minimalstückzahl sichergestellt.
- Page 38 4. Wieder verdoppeln (siehe Punkt 3). Hinweis: Jede weitere hinzu gegebene Stückzahl erhöht die Referenz und verbessert die Zählgenauigkeit. Die Referenzstückzahl muss bei kleinen Teilen oder Teilen mit stark unterschied- lichem Eigengewicht besonders hoch gewählt werden. 5. Betätigen Sie die -Taste.
- Page 39 6.2.3 Prozentwägung (nicht bei Modell KERN EW120-4NM) Anzeigesymbol: Das Prozentwägen ermöglicht die Gewichtsanzeige in Prozent, bezogen auf ein Re- ferenzgewicht. Der angezeigte Gewichtswert wird als fest vorgegebener Prozentwert übernommen (Standardeinstellung: 100%). Bedienung Anzeige 1. Waage mit der -Taste einschal- ο...
- Page 40 • Die Referenz von 100% bleibt erhalten, bis die Waage vom Netz getrennt wird. 6.2.4 Wägen mit Toleranzbereich (nicht bei Modell KERN EW120-4NM) Diese Waage kann sowohl als Dosier- wie Sortierwaage verwendet werden, wobei die jeweilige Toleranzuntergrenze sowie Toleranzobergrenze programmierbar ist.
- Page 41 6.2.4.1 Grundeinstellungen bei Wägungen mit Toleranzbereich Bedienung Anzeige ο 0 I I I F 1. Waage mit der -Taste einschalten. 0.000 Funktionsmenü aufrufen: Solange die -Taste drücken bis Func [Func] erscheint, dann loslassen. Der erste Modus der Waage erscheint: 1 b.G. 1 2.
- Page 42 4. Einstellung des Toleranzbereiches 0 I I I F Betätigen Sie die -Taste. 0.000 Die Toleranzmarke wird in allen Berei- chen angezeigt. 22.L ı. 1 Änderung der Einstellung mit der 22.L ı. 0 TARE-Taste: Toleranzmarke wird nur oberhalb eines Nullpunktbereiches angezeigt (+5). 5.
- Page 43 6.2.4.2 Eingabe der Grenzwerte durch Wägung Wichtiger Hinweis! Immer zuerst den unteren Grenzwert, erst dann den oberen Grenzwert eingeben. Bedienung Anzeige ο 0 I I I F 1. Waage mit der -Taste einschalten. 0.000 Toleranzwägung einstellen: Solange die -Taste drücken bis L.
- Page 44 4. Bei 2 Toleranzmarken muss nun der obere Grenzwert festgelegt werden. H. SEt Die Toleranzmarke blinkt [ + ], der obere Grenzwert kann eingestellt wer- den. 0000 Probe für den oberen (also größeren) Grenzwert auf die Wägeplatte legen: 5. Mit der -Taste speichern.
- Page 45 6.2.4.3 Eingabe der Grenzwerte über die Tastatur Bedienung Anzeige ο 0 I I I F 1. Waage mit der -Taste einschalten. 0.000 Toleranzwägung einstellen: Solange die -Taste drücken bis L. SEt [L. SEt] erscheint, dann loslassen. 2. Nun blinkende Anzeige entweder 000.000 000.000 oder des aktuell gespeicherten unteren Grenzwertes.
- Page 46 7. Bei 2 Toleranzmarken muss nun der obere Grenzwert festgelegt werden. H. SEt Dazu verfahren Sie, wie ab Punkt 2 be- schrieben, begonnen mit der letzen An- 000.000 zeigestelle. 8. Oberen Grenzwert eingeben und speichern. EW-EG-BA-d-1728...
- Page 47 7 Funktionen 7.1 Zugang und Änderung zahlreicher Funktionen: Die Waage ist werksseitig auf eine bestimmte Standard-Konfiguration eingestellt. Diese Konfiguration ist mit ☆ gekennzeichnet. Die Konfiguration kann wie folgt geändert werden: Bedienung Anzeige 1. Zugang zu den Funktionen: ο 0 I I I F Waage einschalten: 0.000 -Taste etwa 4 Sekunden drücken, bis...
- Page 48 7.2 Liste der Funktionsparameter Die Waage ist werksseitig auf eine bestimmte Standard-Konfiguration eingestellt. Diese ist mit ☆ gekennzeichnet. Aus- Funktion Anzeige wahl Beschreibung der Auswahlmöglichkeiten Bar graph 0 Aus ☆1 Ein ☆0 Aus Toleranzwägung (nicht bei EW 120-4NM) 1 Ein (Kap. 7.2.1) Nullabgleich 0 Keine Nullpunktkorrektur ☆1 Automatische Nullpunktkorrektur ist...
- Page 49 Gewichtseinheiten- 1☆01 umschaltung (nur aus- (ct) 2☆14 wählbar, wenn Eichschal- (oz) ter nicht in Eichposition (lb) siehe Kap. 5.10) (ozt) (dwt) (grain), (nicht bei EWB-Modellen) ↓ (tl Hong Kong) S.u. (tl Singapore,Malaysia) (tl Taiwan) (mom) (to) nicht bei 3☆20 (Pcs) EW 120-4NM nicht bei 4☆IF...
- Page 50 7.2.1 Parameter bei Wägungen mit Toleranzbereich (nicht bei Modell KERN EW120-4NM) Einstellungen 21. Co. bis 23. P . können nur eingestellt werden, wenn die Toleranzwägefunktion aktiviert ist. Funktion Anzeige Auswahl Beschreibung der Auswahlmöglichkeiten Anzeigebedingungen ☆ Toleranzmarke wird immer ange- zeigt, auch wenn Stillstandskon- Toleranzmarke trolle noch nicht angezeigt ist.
- Page 51 7.2.2 Parameter für die serielle Schnittstelle (nicht bei EWB-Modellen) Funktion Anzeige Auswahl Beschreibung der Auswahlmöglichkeiten Ausgabeformat an I.F. Schnittstelle nicht aktiv der Schnittstelle ☆ 6-stelliges Datenformat 7-stelliges Datenformat Ausgabebedingung o.c. Keine Datenausgabe. an der Schnittstelle (Nur bei Menüeinstellung Fortlaufende serielle Ausgabe. „7 I.F.
- Page 52 8 Datenausgang (nicht bei EWB-Modellen) Die Waage ist serienmäßig mit einer RS 232C Schnittstelle ausgerüstet. 8.1 Beschreibung des serienmäßigen Datenausgangs (RS 232C) Der Datenausgang befindet sich auf der Rückseite des Gerätes. Hierbei handelt es sich um eine 5-polige Norm-Buchse. Die Pin-Belegung ist dem Bild zu entnehmen: - Systemintern - TXD - Systemintern...
- Page 53 Daten sind negativ 20 H Daten sind 0 oder positiv 8.4.3 Daten D 1 bis D 7 7 Wörter mit 6-stelligem Format (nicht bei Modell KERN EW 120-4NM) D 1 bis D 8 8 Wörter mit 7-stelligem Format Code Bedeutung 0 - 9 30 H –...
- Page 54 8.4.4 Einheiten U 1, U 2 = 2 Wörter als ASCII-Codes Code Bedeutung Symbol (SP) Gramm Karat Unze Pound Feinunze Pennyweight Grain (oben rechts) Tael (Hong Kong) Tael (Singapore, Malaysia) (oben rechts) Tael (Taiwan) (unten rechts) Momme Tola (SP) Prozent nicht EW 120-4NM) Menge Pcs (...
- Page 55 8.5 Eingabebefehle 8.5.1 Befehlseingabeformat Besteht aus 4 Zeichen, CR=0DH, LF=0AH 8.5.2 Externer Tarierbefehl Code Inhalt Tarierbefehl 8.5.3 Fernsteuerbefehle Code Bedeutung Keine Datenausgabe Ständige Datenausgabe Ständige Datenausgabe stabilber Wägewerte Ausgabe stabiler und instabiler Wägewerte nach Drücken der PRINT-Taste Eine Ausgabe bei stabilem Wägewert, nach vorheriger Entlastung der Waage Eine Ausgabe bei stabilem Wägewert.
- Page 56 Lose Probenreste/Pulver können vorsichtig mit einem Pinsel oder Handstaubsauger entfernt werden. Verschüttetes Wägegut sofort entfernen. 9.2 Wartung, Instandhaltung Das Gerät darf nur von geschulten und von KERN autorisierten Servicetechnikern geöffnet werden. Vor dem Öffnen vom Netz trennen. 9.3 Entsorgung Die Entsorgung von Verpackung und Gerät ist vom Betreiber nach gültigem nationa- lem oder regionalem Recht des Benutzerortes durchzuführen.
- Page 57 10 Kleine Pannenhilfe Bei einer Störung im Programmablauf sollte die Waage kurz ausgeschaltet und vom Netz getrennt werden. Der Wägevorgang muss dann wieder von vorne begonnen werden. Hilfe: Störung Mögliche Ursache • Die Waage ist nicht eingeschaltet. Die Gewichtsanzeige leuchtet nicht. •...
- Page 58 11 Konformitätserklärung Die aktuelle EG/EU-Konformitätserklärung finden Sie online unter: www.kern-sohn.com/ce Bei geeichten Waagen (= konformitätsbewerteten Waagen) ist die Konformitätserklärung im Lieferumfang enthalten. EW-EG-BA-d-1728...
- Page 60 5.2.5 Draft shield installation – optional ..................16 5.2.6 Draft shield with glass sliding doors (only model KERN EW 120-4NM standard) ....16 Mains supply ........................17 Operation using a rechargeable battery (optional) ............17 Connecting peripheral equipment ..................18 Initial start-up ........................
- Page 61 Access and changing of numerous functions: ............... 45 List of the function parameters ..................46 7.2.1 Parameters when weighing with a tolerance range (excl. model KERN EW120-4NM)..49 7.2.2 Parameters for the serial interface ..................50 Data output ....................51 Description of the serial data output (RS 232C) .............
- Page 62 1 Technical data KERN (Type) EG 200-3AM EG 400-3AM EG 600-3AM Trademark EG 220-3NM EG 420-3NM EG 620-3NM Readout 0,001 g 0,001 g 0,001 g Verification value (e) 0,01 g 0,01 g 0,01 g Weighing range (max.) 220 g 420 g...
- Page 63 KERN (Type) EG 2000-2AM EG 4000-2AM EW 120-4NM Trademark EG 2200-2NM EG 4200-2NM Readout 0,01 g 0,01 g 0,0002 g Verification value (e) 0,1 g 0,1 g 0,001 g Weighing range (max.) 2200 g 4200 g 120 g Class of accuracy...
- Page 64 KERN EW 220-3NM EW 420-3NM EW 620-3NM Readout 0,001 g 0,001 g 0,001 g Verification value (e) 0,01 g 0,01 g 0,01 g Weighing range (max.) 220 g 420 g 620 g Class of accuracy Taring range (subtractive) 220g 420 g...
- Page 65 KERN EW 820-2NM EW 2200-2NM EW 4200-2NM Readout 0,01 g 0,01 g 0,01 g Verification value (e) 0,01 g 0,1 g 0,1 g Weighing range (max.) 820 g 2200 g 4200 g Class of accuracy Taring range (subtractive) 820 g...
- Page 66 KERN EW 6200-2NM EW 12000-1NM Readout 0,01 g 0,1 g Verification value (e) 0,1 g Weighing range (max.) 6 200 g 12 000 g Class of accuracy Taring range (subtractive) 6 200 g 12 000 g Minimum load (Min) Minimum weight for counting...
- Page 67 1.1 Read-off of the various weighing units Weighing unit EW 120-4NM EG 220-3NM / EG 420-3NM / EW 220-3NM EW 420-3NM 0.0002 0.001 0.001 0.001 0.01 0.01 (ct) 0.00001 0.0001 0.0001 (oz) 0.00001 0.00001 0.00001 (lb) 0.00001 0.0001 0.0001 (ozt) 0.0002 0.001 0.001...
- Page 68 1.2 Weighing unit conversion charts Fine Weighing unit Gramm Carat Ounze Pound Penny weight ounze 0.03527 0.00220 0.03215 0.64301 0.00705 0.00044 0.00643 0.12860 28.34952 141.74762 0.06250 0.91146 18.22917 453.59237 2267.96185 16 14.58333 291.66667 1ozt 31.10348 155.51738 1.09714 0.06857 1dwt 1.55517 7.77587 0.05486 0.00343...
- Page 69 The balance may only be used in compliance with the described guidelines. Varying areas of application/planned use must be approved by KERN in writing. 2.3 Guarantee The guarantee is not valid following...
- Page 70 Information is available on KERN’s home page (www.kern- sohn.com) with regard to the monitoring of balance test substances and the test weights required for this.
- Page 71 5 Unpacking, installation and commissioning 5.1 Place of installation, place of use The balance is constructed in such a way that reliable weighing results can be achieved under normal application conditions. By selecting the correct location for your balance, you will be able to work quickly and precisely.
- Page 72 5.2 Unpacking Carefully remove the balance from its packaging, remove the plastic wrapping and position the balance in its intended working location. 5.2.1 Installation Use the foot screws to level the balance until the air bubble in the bubble level is in the prescribed circle.
- Page 73 5.2.3 Positioning the weighing plate Screw the bracket on tightly according to the drawing and subsequently attach the weighing plate. 5.2.4 Serial draft shield installation (Only for models with readout d = 0,001 g standard) EW/EG-N-e-1728...
- Page 74 Now place the draft shield to fit on the housing and and secure through the opened sliding doors using both screws. Screw the bracket on tightly according to the drawing and subsequently attach the weighing plate. 5.2.6 Draft shield with glass sliding doors (only model KERN EW 120-4NM standard) EW/EG-N-e-1728...
- Page 75 Electric power supply is by means of the external mains supply circuit. The printed voltage level must comply with the local voltage. Only use original KERN mains supply circuits. The use of other makes is subject to approval by KERN.
- Page 76 The balance must be disconnected from the mains before connecting or disconnect- ing additional equipment (printer, PC) to or from the data interface (see chap. 8.) Only use KERN accessories and peripheral equipment with your balance. These have been ideally coordinated to your balance.
- Page 77 5.6.3 Stability indication ο 0 I I I F 0.000 Stable 0 I I I F 0.000 Unstable The balance is in a stable condition if the [ο] stability indication appears on the dis- play. The [ο] indication disappears if the condition is unstable. Stable ambient condi- tions can be achieved by using the draft shield (See chap.
- Page 78 5.8 Adjusting 5.8.1 Adjusting with externall weight (only KERN EW-N) For verified balances the verification switch is locked (except for class of accuracy I). In order to proceed with the verification, please unlock the verification switch (except for class of accuracy I).
- Page 79 Press buttons at the same time WAit and release at the same time, [WAIt]] is briefly displayed. After that [CAL.0] will appear flashing, CAL. 0 Zero point will be saved. After that [CAL.on] will appear. CAL. on Rotate the turn knob on the right side of the balance in to position CAL.
- Page 80 The balance will automatically return to weigh- ing mode. 5.8.3 Adjusting with external weight (only KERN EW) Carry out adjustment with the recommended adjusting weight (see Chapter 1 „Tech- nical Data“). The adjustment can also be carried out with different adjusting weights (see table), but not ideal from a metrological point of view.
- Page 81 Adjustment procedure: Check that the surrounding conditions are stable. A short warm-up time of about 10 minutes is recommended for stabilisation. Operation Display Switch on the balance using the Func Press and hold the key until [ CAL] appears. Now release the key. Press the key while holding down the key.
- Page 82 5.9 Verification General: According to the EU guideline 2014/31/EU balances must be verified if they are to be used as follows (legally regulated area): a) For commercial transactions if the price of goods is determined by weighing b) For the production of medines in pharmacies as well as for analyses in the medical and pharmaceutical laboratory c) For official purposes d) For the production of finished packages...
- Page 83 5.10 Verification switch and official seal Prior to verification the verification switch must be moved from the displayed position (see direction of arrow) to verification position. Once in this position, a parenthesis will be displayed around the last display point. Following calibration the balance is sealed at the marked position.
- Page 84 6 Operation 6.1 Operating elements Draft shield Bubble level Display Keyboard Adjustable device feet RS232C interface connection (excl. EWB models) Adjusting switch (KERN EG) Mains adaptor connection EW/EG-N-e-1728...
- Page 85 6.1.1 Overview of the keypad Choice Function • Switch on and off • Output of weight value on an external device (printer) or PC • Save the respective mode settings (unit counter, percent weighing, tolerance weighing) • Unit counter and percent mode: Choice menu for unit and % •...
- Page 86 6.1.2 Overview of display Display Description Gramme →0← Zero setting display ο Stability indication Power display (standby) Unit counter display (excl. EW 120-4NM) Percent weighing display (excl. EW 120-4NM) Tolerance weighing display (excl. EW 120-4NM) Momme Balance carry out balance function, e.g. unit count / display of stored value Calibration display.
- Page 87 6.2 Operation 6.2.1 Weighing Display symbol: g Operation Display Press the key to switch on the balance. balance will carry self-test. Your balance is ready to weigh as soon as the ο “0.000" display appears. 0 I I I F Apply the item to be weighed.
- Page 88 6.2.1.1 Underfloor weighing Objects which, because of their size or shape, cannot be put on the scale, can be weighed by means of underfloor weighing. Proceed as follows: • Switch off the balance. • Turn the balance over. • Open the cover plate (1) on the base of the balance. •...
- Page 89 6.2.1.2 Tare weighing (tare) The empty weight of any weighing container can be tared at the push of a button, so that the net weight of the item to be weighed is displayed during subsequent weigh- ings. Operation Display Place the empty tare container on the weighing plate.
- Page 90 The tare procedure can be repeated as often as desired, for example when weighing several components into a mixture (weighing in). Press the key to set the display to ”0.000". →0← 0 I I I F 0.000 The total weight of the container is re- moved by taring.
- Page 91 6.2.2 Piece counting (excl. model KERN EW120-4NM) Display symbol: PCS When counting units you can either count items into or out of the container. In order to be able to count a substantial number of items, the average weight per item must be determined using a small quantity (reference units).
- Page 92 4. Further reference units of 10, 30, 50 and 100 can be called up by repeatedly operating the key. Important: The greater the reference unit, the more accurate the unit count. 5. Place as many items to be counted on the balance as required by the set reference unit.
- Page 93 6.2.2.1 Add mode This function is used to increase the counting accuracy by increasing the reference quantity. It can thereby be avoided that an inadequate reference unit is used, as this could lead to inaccurate results. When applying this function, the necessary minimum number of items is automatical- ly ensured.
- Page 94 4. Double again (see item 3) Information: Every additionally applied number of items increases the reference and im- proves the counting accuracy. A particularly high quantity of reference units must be chosen for small items or items with greatly varying own weight. 5.
- Page 95 6.2.3 Percent weighing (excl. model KERN EW120-4NM) Display symbol: Percent weighing allows the weight to be displayed as a percentage in relation to a reference weight. The displayed weight value is adopted as a fixed prescribed per- cent value. (Standard setting: 100%).
- Page 96 • The 100% reference is preserved until the balance is disconnected from the mains. 6.2.4 Weighing using a tolerance range (excl. model KERN EW120-4NM) This balance can be used as a measuring and sorting balance, whereby the respec- tive lower and upper tolerance limits are programmable.
- Page 97 6.2.4.1 Basic settings when weighing using a tolerance range Operation Display ο 0 I I I F 1. Use the key to switch the balance 0.000 Call up the function menu: Func Press the key until [Func] appears, then release. 1 b.G.
- Page 98 4. Setting the tolerance range 0 I I I F Operate the 0.000 The tolerance mark is displayed in all ranges. 22.L ı. 1 Use the key to change the setting: 22.L ı. 0 Tolerance mark is only displayed above a zero point range (+5).
- Page 99 6.2.4.2 Entering the limit values by weighing Important information ! Always begin by entering the lower limit value, followed by the upper limit value. Operation Display ο 0 I I I F 1. Use the key to switch the balance 0.000 Set to tolerance weighing: Press the...
- Page 100 4. If 2 tolerance marks have been se- lected, the upper limit value must now be determined. H. SEt The tolerance mark is flashing [ + ], and the upper limit value can be set. Place a sample for the upper (i.e. larger) 0000 limit value on the weighing plate: 5.
- Page 101 6.2.4.3 Entering the limit values using the keyboard Operation Display ο 0 I I I F 1. Use the key to switch the balance 0.000 Set tolerance weighing: Press the key until [L. SEt] appears L. SEt and then release. 2.
- Page 102 7. If 2 tolerance marks have been selected, the upper limit value must now H. SEt be determined. Please proceed as described in item 2, 000.000 starting with the last display digit. 8. Enter the upper limit value and store. EW/EG-N-e-1728...
- Page 103 7 Functions 7.1 Access and changing of numerous functions: The balance has been set to a certain standard configuration in the factory. This con- figuration is marked by a ☆ The configuration can be changed as follows: Operation Display 1. Access to the functions. ο...
- Page 104 7.2 List of the function parameters The balance has been set to a certain standard configuration in the factory. This is marked by a ☆ Function Display Choice Description of the choice possibilities Bar graph b.G. 0 Off ☆1 On ☆0 Off Tolerance weighing (excl.
- Page 105 Weight unit 1☆01 (g) (only selectable, if the cali- 2☆14 (ct) bration switch is not in the 15 (oz) calibration position see 16 (lb) Ch. 5.10) 17 (ozt) 18 (dwt) 19 (grain), (excl. EWB models) ↓ 1A (tl Hong Kong) S.u.
- Page 106 Not documented Not documented ☆1 Always use this setting. Data-out PrF. No printout possible, if the last display location (only selectable, if the cali- is enclosed in brackets. bration switch is not in the calibration position see Ch. 5.10) ☆2 Printout possible, even if the last display loca- tion is enclosed in brackets.
- Page 107 7.2.1 Parameters when weighing with a tolerance range (excl. model KERN EW120-4NM) Settings 21. Co. to 23. P . can only be set if the tolerance weighing function has been activated. Function Display Choice Description of the choice possibilities Display conditions of ☆...
- Page 108 7.2.2 Parameters for the serial interface (excl. EWB models) Function Display Choice Description of the choice pos- sibilities Output format at inter- I.F. Interface not active face 6-digit data format ☆ 7-digit data format Output condition at o.c. No data issued. interface (Menu setting “7 I.F.
- Page 109 8 Data output (excl. EWB models) The balance is supplied as standard with an interface RS 232C. 8.1 Description of the serial data output (RS 232C) The data output is placed at the rear side of the balance. It is a 5-pole standard socket.
- Page 110 Data are negative 20 H Date are 0 or positive 8.4.3 Data D 1 to D 7 7 words with 6-digit format (excl. model KERN EW-120-4NM) D 1 to D 8 8 words with 7-digit format Code Meaning 0 - 9 30 H –...
- Page 111 8.4.4 Units U 1, U 2 = 2 words as ASCII codes Code Meaning Symbol (SP) Gramme Carat Ounze Pound Fine ounze Pennyweight Grain (upper right) Tael (Hong Kong) Tael (Singapore, Malaysia) (upper right) Tael (Taiwan) (lower right) Momme Tola (SP) Percent (excl.
- Page 112 8.5 Data input commands 8.5.1 Command input format is made up of 4 characters, CR=0DH, LF=0AH 8.5.2 External taring command Code Content Tare out command 8.5.3 External control commands Code Meaning No data output Continuous data output Continuous output of stable weight value data Output of stable and unstable weight values after pressing the PRINT button Data output upon stable weight value, having previously unloaded...
- Page 113 Remove any spilt material to be weighed immediately. 9.2 Maintenance, upkeep The device may only be opened by trained service engineers authorised by KERN. Disconnect from the mains supply before opening. 9.3 Disposal The operating company shall dispose of the packaging and the device in compliance with the valid national or regional law of the operating location.
- Page 114 10 Troubleshooting The balance should be switched off for a short time following an interruption in the programme sequence and disconnected from the mains supply. It is then necessary to repeat the weighing process from the beginning. Help: Interruption Possible cause •...
- Page 115 11 Declaration of Conformity To view the current EC/EU Declaration of Conformity go to: www.kern-sohn.com/ce The scope of delivery for verified weighing balances (= conformity- rated weighing balances) includes a Declaration of Conformity. EW/EG-N-e-1728...
- Page 116 Pesage sous la balance ....................... 30 6.2.1.2 Pesée de tare (tarer) ......................31 6.2.2 Comptage de pièces (sauf modèle KERN EW 120-4NM) ........... 33 6.2.2.1 Mode additif .......................... 35 6.2.3 Pesée en pourcentage (sauf modèle KERN EW 120-4NM) ..........37...
- Page 117 Accès à de nombreuses fonctions et modification de ces dernières : ......45 Liste des paramètres de fonctionnement ................ 46 7.2.1 Paramètres en pesée avec plage de tolérance (sauf modèle KERN EW 120-4NM) ..48 7.2.2 Paramètres pour l’interface sérielle ..................49 Sortie de données ..................
- Page 118 1 Données techniques KERN (Type) EG 200-3AM EG 400-3AM EG 600-3AM Marque déposée EG 220-3NM EG 420-3NM EG 620-3NM Lecture (d) 0,001 g 0,001 g 0,001 g Échelon de vérification (e) 0,01 g 0,01 g 0,01 g Portée (Max) 220 g...
- Page 119 KERN EG 2000-2AM EG 4000-2AM EW 120-4NM Marque déposée EG 2200-2NM EG 4200-2NM Lecture (d) 0,01 g 0,01 g 0,0002 g Échelon de vérification (e) 0,1 g 0,1 g 0,001 g Portée (Max) 2200 g 4200 g 120 g Classe de tolérance Portée de tarage...
- Page 120 KERN EW 220-3NM EW 420-3NM EW 620-3NM Lecture (d) 0,001 g 0,001 g 0,001 g Échelon de vérification (e) 0,01 g 0,01 g 0,01 g Portée (Max) 220 g 420 g 620 g Classe de tolérance Portée de tarage 220g...
- Page 121 KERN EW 820-2NM EW 2200-2NM EW 4200-2NM Lecture (d) 0,01 g 0,01 g 0,01 g Échelon de vérification (e) 0,01 g 0,1 g 0,1 g Portée (Max) 820 g 2200 g 4200 g Classe de tolérance Portée de tarage 820 g...
- Page 122 KERN EW 6200-2NM EW 12000-1NM Lecture (d) 0,01 g 0,1 g Échelon de vérification (e) 0,1 g Portée (Max) 6 200 g 12 000 g Classe de tolérance Portée de tarage 6 200 g 12 000 g (soustractive) Charge minimale Poids par pièce min.
- Page 123 1.1 Lecture des différentes unités de pesée Unité de pesée EW 120-4NM EG 220-3NM / EG 420-3NM / EW 220-3NM EW 420-3NM 0.0002 0.001 0.001 0.001 0.01 0.01 (ct) 0.00001 0.0001 0.0001 (oz) 0.00001 0.00001 0.00001 (lb) 0.00001 0.0001 0.0001 (ozt) 0.0002 0.001...
- Page 124 1.2 Tableaux de conversion des unités de pesée Unité de pesée Gramme Karat Onze Livre Onze fine Penny weight 0.03527 0.00220 0.03215 0.64301 0.00705 0.00044 0.00643 0.12860 28.34952 141.74762 0.06250 0.91146 18.22917 453.59237 2267.96185 16 14.58333 291.66667 1ozt 31.10348 155.51738 1.09714 0.06857 1dwt...
- Page 125 La balance ne doit être utilisée que selon les prescriptions indiquées. Les domaines d´utilisation/d´application dérogeant à ces dernières doivent faire l´objet d´une autori- sation écrite délivrée par KERN. 2.3 Garantie La garantie n´est plus valable en cas - de non-observation des prescriptions figurant dans notre mode d´emploi...
- Page 126 3.1 Observez les indications du mode d´emploi Lisez attentivement la totalité de ce mode d´emploi avant l´installation et la mise en service de la balance, et ce même si vous avez déjà utilisé des balances KERN. 3.2 Formation du personnel L´appareil ne doit être utilisé...
- Page 127 5 Déballage, installation et mise en service 5.1 Lieu d´installation, lieu d´utilisation La balance a été construite de manière à pouvoir obtenir des résultats de pesée fiables dans les conditions d´utilisation d´usage. Vous pouvez travailler rapidement et avec précision à condition d´installer votre ba- lance à...
- Page 128 5.2.1 Installation Procéder à la mise à niveau de la balance à l´aide des vis des pieds, jusqu´à ce que la bulle d´air du niveau se trouve dans le cercle prescrit. 5.2.2 Contenu livré Accessoires série: (1) Balance (2) Plateau de pesée (3) Support du plateau de (4) Cage de pesée pesée...
- Page 129 5.2.3 Positionnement du plateau de pesée Visser à fond le support selon le schéma et poser ensuite le plateau de pesée. 5.2.4 Montage de la chambre de protection (Seulement pour modèles avec lecture d = 0,001 g série) EW/EG-N-BA-f-1728...
- Page 130 Visser à fond le support se- lon le schéma et poser ensuite le plateau de pesée. 5.2.6 Chambre de protection avec portes coulissantes en verre (uniquement modèle KERN EW 120-4NM standard) EW/EG-N-BA-f-1728...
- Page 131 L´alimentation en courant s´effectue au moyen du bloc externe d´alimentation sec- teur. La valeur de tension imprimée sur l´appareil doit concorder avec la tension lo- cale. N´utilisez que des blocs d´alimentation secteur livrés par KERN. L´utilisation d´autres marques n´est possible qu´avec l´autorisation de KERN. Raccord adaptateur secteur: Raccord adapter secteur 5.4 Fonctionnement sur accu (optionnel)
- Page 132 (chap. 8). N´utilisez avec votre balance que des accessoires et des périphériques livrés par KERN, ces derniers étant adaptés de manière optimale à votre balance. 5.6 Première mise en service Un temps de chauffe de 10 minutes intervenant après la mise en marche stabilise les valeurs de mesure.
- Page 133 5.6.3 Affichage de stabilité ο 0 I I I F 0.000 Stable 0 I I I F 0.000 Instable Lorsque l’affichage de stabilité [o] apparaît à l’écran de visualisation, la balance se trouve dans un état stable. En état instable, l’affichage [o] disparaît. Vous obtiendrez des conditions ambiantes stables en utilisant une cage de pesée (montage voir chap.
- Page 134 (sauf pour la classe de tolérance I). Afin de pouvoir exécuter un ajus- tage, il suffit de faire basculer cet interrupteur (voir chapitre 5.10). 5.8.2 Ajustage avec poids interne (uniquement KERN EG) Ajustez la balance avant chaque mise en service.
- Page 135 Appuyer sur les touches au même WAit temps et les relâcher au même temps, [WAIt]] est brièvement affiché. Après [CAL.0] est affiché clignotant, CAL. 0 l’enregistrement du point zéro est démarré. Après apparaît [CAL.on]. CAL. on Mettez le bouton tournant situé sur le côté droit de la balance en position CAL.
- Page 136 La balance revient automatiquement en mode de pesée. 5.8.3 Ajustage avec poids externe (uniquement KERN EW) Nous vous recommandons d’utiliser le poids prévu á cet effet. (Voir au chapitre 1 „données techniques“). Cependant vous pouvez utiliser un poids de valeur différent.
- Page 137 Procédure d’ajustage: Il faut vérifier que les conditions de l’environnement sont stables. Pour la stabilisa- tion, un temps de chauffage court est approprié, d’environ 10 minutes. Commande Affichage Allumer la balance avec la touche Func Presser et maintenir enfoncée la touche jusqu’à...
- Page 138 5.9 Vérification Généralités: D´après la directive UE 2014/31/EU, les balances doivent faire l´objet d´un vérifica- tion lorsqu´elles sont utilisées tel qu´indiqué ci-dessous (domaine régi par la loi): a) Dans le cadre de relations commerciales, lorsque le prix d´une marchandise est déterminé par pesée. b) Dans le cas de la fabrication de médicaments dans les pharmacies ainsi que pour les analyses effectuées dans les laboratoires médicaux et pharmaceu- tiques.
- Page 139 5.10 Interrupteur d’étalonnage et cachets Avant l’étalonnage, l’interrupteur d’étalonnage doit être déplacé de la position repé- rée (voir sens de la flèche) à la position d’étalonnage. Dans cette dernière, une pa- renthèse apparaît à l’écran de visualisation autour de la dernière position d’affichage. Après l’opération d’étalonnage, la balance est scellée au niveau des positions repé- rées.
- Page 140 6 Fonctionnement 6.1 Eléments de commande Cage de pesée Niveau à bulle d’air Affichage Clavier Pieds réglables Raccord interface RS232C (sauf modèles EWB) Interrupteur d’étalonnage Raccord KERN EG d’adaptateur secteur EW/EG-N-BA-f-1728...
- Page 141 6.1.1 Vue d’ensemble du clavier Sélection Fonction • Allumer/éteindre • Sortie de la valeur du poids sur un appareil externe (imprimante) ou PC • Enregistrement des réglages dans le type de fonction- nement sélectionné (comptage de pièces, pesée en pourcentage, pesée avec tolérance) •...
- Page 142 6.1.2 Vue d’ensemble des affichages Affichage Description Gramme →0← Affichage de mise à zéro ο Affichage de stabilité Affichage de puissance (en veille) Affichage pour comptage de pièces (sauf EW 120-4NM) Affichage pour pesée en pourcentage (sauf EW 120-4NM) Affichage pour pesée avec tolérance (sauf EW 120-4NM) Momme La balance exécute une fonction balance, par ex.
- Page 143 6.2 Utilisation 6.2.1 Pesage Symbole affiché: g Commande Affichage Pour allumer la balance, appuyez sur la touche La balance effectue un contrôle automatique. Dès que l’affichage de poids affiche „0.000", ο votre balance est prête pour la pesée. 0 I I I F Poser les matières à...
- Page 144 6.2.1.1 Pesage sous la balance Des objets, qui par leur taille ou leur forme ne peuvent être déposés sur le plateau de la balance, peuvent être pesés grâce au système de pesage sous la balance. Procédez de la manière suivante: •...
- Page 145 6.2.1.2 Pesée de tare (tarer) Le poids d’un récipient de pesée quelconque peut être taré et retiré en pressant sur un bouton, afin que soit affiché le poids net des matières pesées ultérieurement. Commande Affichage Poser le récipient à tarer vide sur le pla- teau de pesée.
- Page 146 Le processus de tarage peut être répété autant de fois que souhaité, par exemple lors de la pesée de plusieurs composants qui sont mélangés (pesée par addition). Appuyez sur la touche pour mettre l’affichage à „0.000". →0← 0 I I I F 0.000 Le poids total du récipient est taré...
- Page 147 6.2.2 Comptage de pièces (sauf modèle KERN EW 120-4NM) Symbole affiché: PCS Lors du comptage de pièces, il vous est possible, soit d’additionner le nombre de pièces placées dans un récipient, soit de soustraire le nombre de pièces retirées d’un récipient.
- Page 148 3. En appuyant à plusieurs reprises sur la touche , il est possible d’appeler d’autres nombres de pièces de référence 10, 30, 50 et 100. Important: plus le nombre de pièces de référence est important, plus la précision de comptage est élevée. 4.
- Page 149 6.2.2.1 Mode additif Cette fonction vous permet d’augmenter la précision de comptage en augmentant la quantité de référence, ce qui permet d’éviter l’utilisation d’un nombre de pièces de référence trop petit susceptible de provoquer des résultats imprécis. L’utilisation de cette fonction permet, dans le cas de petites pièces, d’être sûr d’atteindre le nombre de pièces minimum nécessaire.
- Page 150 4. Doubler à nouveau la quantité (voir point 3). Indication: chaque quantité de pièces ajoutée aug- mente la référence et améliore la préci- sion de comptage. Dans le cas de petites pièces ou de pièces fortement différentes, veillez à ce que le nombre de pièces de référence soit particulièrement élevé.
- Page 151 6.2.3 Pesée en pourcentage (sauf modèle KERN EW 120-4NM) Symbole affiché: La pesée en pourcentage permet d’afficher le poids en pourcentage en se fondant sur un poids de référence. La valeur de poids affichée est appliquée en tant que va- leur en pourcentage fixe prescrite (réglage standard: 100%).
- Page 152 6.2.4 Pesée avec plage de tolérance (sauf modèle KERN EW 120-4NM) Cette balance peut être utilisée aussi bien en tant que balance de dosage qu’en tant que balance de triage, la valeur seuil inférieure ainsi que la valeur seuil supérieure de tolérance pouvant être alors programmées.
- Page 153 6.2.4.1 Réglages de base en pesée avec plage de tolérance Commande Affichage ο 0 I I I F 1. Allumer la balance avec la touche 0.000 Appeler le menu des fonctions: Maintenir enfoncée la touche jusqu’à Func ce que [Func] apparaisse, puis relâcher la touche.
- Page 154 0 I I I F 4. Réglage de la plage de tolérance Ac- 0.000 tionnez la touche La marque de tolérance s’affiche dans 22.L ı. 1 toutes les plages. Modification du réglage avec la 22.L ı. 0 Touche la marque de tolérance ne s’affiche qu’au-dessus d’une plage de point zéro (+5).
- Page 155 6.2.4.2 Saisie des valeurs seuils par pesée Indication importante! Toujours saisir la valeur seuil inférieure, et seulement après la valeur seuil supérieure. Commande Affichage ο 0 I I I F 1. Allumer la balance avec la touche 0.000 Réglage de la pesée avec tolérance: maintenir enfoncée la touche jusqu’à...
- Page 156 4. Pour 2 marques de tolérance, la va- leur seuil supérieure doit maintenant H. SEt être déterminée. La marque de tolérance clignote [ + ], la valeur seuil supérieure peut être ré- glée. 0000 Poser l’échantillon pour la valeur seuil supérieure (donc la plus grande) sur le plateau de pesée: 5.
- Page 157 6.2.4.3 Saisie des valeurs seuils au moyen du clavier Commande Affichage ο 0 I I I F 1. Allumer la balance avec la touche 0.000 Réglage de la pesée avec tolérance: maintenir enfoncée la touche jusqu’à L. SEt ce que [L. SEt] apparaisse, puis relâcher la touche.
- Page 158 7. Pour 2 marques de tolérance, la va- H. SEt leur seuil supérieure doit maintenant être déterminée. Pour cela, procédez comme décrit à par- 000.000 tir du point 2, en commençant par la der- nière position d’affichage. 8. Saisir puis enregistrer la valeur seuil supérieure.
- Page 159 7 Fonctions 7.1 Accès à de nombreuses fonctions et modification de ces dernières : La balance est réglée en usine selon une configuration standard déterminée. Cette configuration est repérée par un ☆ La configuration peut être modifiée comme suit: Commande Affichage 1.
- Page 160 7.2 Liste des paramètres de fonctionnement La balance est réglée en usine selon une configuration standard déterminée. Celle-ci est repérée par un ☆ Fonction Affichage Séletion Description des possibilités de sélection Barre graphique Arrêt ☆1 Marche ☆0 Pesée avec tolérance Arrêt (sauf EW 120-4NM)) Marche (chap.
- Page 161 Unité de poids 1☆01 (sélectionnable uniquement (ct) 2☆14 lorsque l’interrupteur de véri- (oz) fication n’est pas en position (lb) de vérification, voir (ozt) chap. 5.10) (dwt) (grain),. (sauf modélos EWB) ↓ S.u. (tl Hong Kong) (tl Singapore,Malaysia) (tl Taiwan) (mom) (to) (Pcs) sauf EW 120-4NM...
- Page 162 7.2.1 Paramètres en pesée avec plage de tolérance (sauf modèle KERN EW 120-4NM) Les réglages 21. Co. à 23. P .. ne sont possibles que lorsque la fonction de pesée avec tolérance est activée. Fonction Affichage Sélection Description des possibilités de sélection...
- Page 163 7.2.2 Paramètres pour l’interface sérielle (sauf modèles EWB) Fonction Affichage Sélection Description des possibilités de sélection Format de sortie de I.F. L’interface n’est pas active l’interface ☆ Format de données à 6 positions Format de données à 7 positions Condition de sortie de o.c.
- Page 164 8 Sortie de données (sauf modèles EWB) La balance est fournie en série avec une sortie de données RS 232C. 8.1 Description de la sortie de données standard (RS 232C) La sortie de données se trouve sur la face arrière de l’appareil, Il s’agit d’une prise standard à...
- Page 165 20 H Les données sont 0 ou positives 8.4.3 Données D 1 à D 7 7 mots avec format à 6 positions (sauf modèle KERN EW 120-4NM) D 1 à D 8 8 mots avec format à 7 positions Code...
- Page 166 8.4.4 Unités U 1, U 2 = 2 mots utilisés comme codes ASCII Code Signification Symbole (SP) Gramme Carat Onze Livre Onze fine Pennyweight Grain (en haut à droite) Tael (Hong Kong) (en haut à Tael (Singapore, Malaysia) droite) Tael (Taiwan) (en bas à...
- Page 167 8.5 Commandes liées à la saisie de données 8.5.1 Format de saisie des commandes Se compose de 4 caractères, CR=0DH, LF=0AH 8.5.2 Télécommandes pour le tarage Code Contenu Commande de tarage 8.5.3 Télécommandes Signification Code Pas de sortie de données Sortie continuelle des données Sortie continuelle de données concernant les valeurs pesées stables.
- Page 168 Retirer immédiatement les matières à peser renversées sur la balance. 9.2 Maintenance, entretien L´appareil ne doit être ouvert que par des dépanneurs formés à cette fin et ayant re- çu l´autorisation de KERN. Avant d´ouvrir l´appareil, couper ce dernier du secteur. 9.3 Elimination L´élimination de l´emballage et de l´appareil doit être effectuée par l´utilisateur selon...
- Page 169 10 Aide succincte en cas de panne En cas d´anomalie dans le déroulement du programme, la balance doit être arrêtée pendant un court laps de temps et coupée du secteur. Le processus de pesée doit alors être recommencé depuis le début. Aide: Anomalie Cause possible...
- Page 170 11 Déclaration de conformité Vous trouvez la déclaration de conformité CE- UE actuelle online sous: www.kern-sohn.com/ce Dans le cas de balances étalonnées (= de balances à la conformité évaluée) la déclaration de conformité est comprise dans les fourni- tures. EW/EG-N-BA-f-1728...