Publicité
Les langues disponibles
Les langues disponibles
Liens rapides
Installation, Service and User Instructions
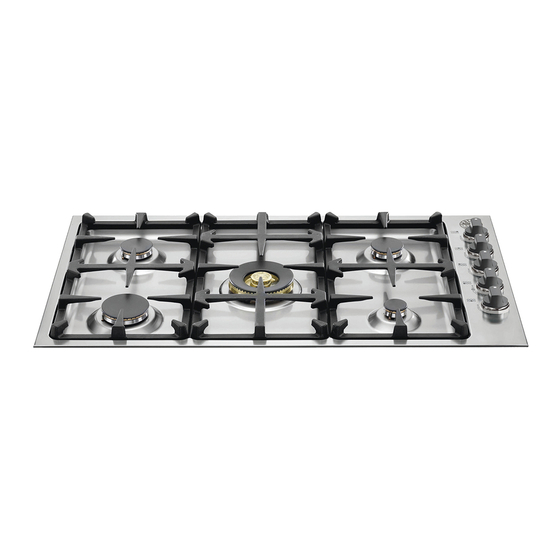
Built-in gas hotplates
DIMENSIONS: 36
IMPORTANT: SAVE FOR LOCAL ELECTRICAL INSPECTOR'S USE.
READ AND SAVE THESE INSTRUCTIONS FOR FUTURE REFERENCE.
OBSERVE ALL GOVERNING CODES AND ORDINANCES.
WARNING: If the information in this manual is not followed exactly, a fire or
explosion may result causing property damage, personal injury or death.
Do not store or use gasoline or other flammable vapors and liquid in the vicinity of
this or any other appliance.
WHAT TO DO IF YOU SMELL GAS
- Do not try to light any appliance.
- Do not touch any electrical switch.
- Do not use any phone in your building.
- Immediately call your gas supplier from a neighbor's phone. Follow
the gas supplier's instructions.
- If you cannot reach your gas suppliers, call the fire department.
Installation and service must be performed by a qualified installer, service agency
or the gas supplier.
Read this instruction booklet before installing and using the appliance.
The manufacturer will not be responsible for any damage to property or to persons caused by
incorrect installation or improper use of the appliance.
The manufacturer reserves the right to make changes to its products when considered necessary and useful,
without affecting the essential safety and operating characteristics.
This appliance has been designed for non-professional, domestic use only.
(French version page 11)
BERTAZZONI
''
1/2
Models B3H0..A7X(2 or 5)D
Models B3H0..Q7X(2 or 5)D
Models B3K0..Q7X(2 or 5)D
Models B3K0..U7X(2 or 5)D
(W) x 21
(925 mm)
''
(D)
1/4
(540 mm)
Type 'A'
Type 'A'
Type 'B'
Type 'C'
Cod. 310498
Publicité

Manuels Connexes pour Bertazzoni B3H0 A7X Serie


Sommaire des Matières pour Bertazzoni B3H0 A7X Serie
- Page 1 Installation, Service and User Instructions (French version page 11) BERTAZZONI Built-in gas hotplates DIMENSIONS: 36 ’’ (W) x 21 ’’ (925 mm) (540 mm) Models B3H0..A7X(2 or 5)D Type ‘A’ Models B3H0..Q7X(2 or 5)D Type ‘A’ Models B3K0..Q7X(2 or 5)D Type ‘B’...
- Page 2 INDEX: Installation Instructions……………………………………..………………………..pag.2 Inserting the hotplate……………………………………………..…………………..pag.3 Requirements……………………………………..……………………………….…..pag.3 Attaching the hotplate……………………………………..………………………….pag.4 Gas connection……………………………………..…………………………………pag.4 Electrical connection……………………………………..……………………….…..pag.5 Wiring diagrams……………………………………..…………………………….…..pag.5 Room ventilation…………………………………….…………………………………pag.5 Location and venting…………………………………….…………………………….pag.5 Replacement of nozzles……………………………………..………………………..pag.5 Regulation of burners……………………………………………...………………….pag.6 Descriptions…………………………………………………………………………….pag.6 Service & maintenance instructions……………………………..…………………..pag.6 Greasing the valves……………………………………………..…………………….pag.7 User instructions……………………………………………..………………………..pag.7 Using burners……………………………………………………..……………………pag.7 Cleaning the appliance……………………………………………..…………………pag.8 Figures………………………………………………...…………..……………………pag.21 Installation instructions This appliance shall only be installed by an authorized person.
- Page 3 ATTENTION: A manual valve shall be installed in an accessible location in the gas line external to the appliance for the purpose of turning on or shutting off gas to the appliance WARNING: Do not use aerosol sprays in the vicinity of this appliance while it is in operation Inserting the hotplate After having removed the various loose parts from the internal and external packing, make sure that the hotplate in not damaged and is suitable for the specific gas usage.
- Page 4 Gas connection Before connecting the appliance to the gas supply, first remove the plastic plug on which is press- fitted into the gas inlet union; to remove, just pull it off. 1. Check the ‘gas type’ sticker attached to the hotplate. Details of the injector sizes used are recorded on the data plate located on the base of the appliance.
- Page 5 Room ventilation – Location and venting. ATTENTION: An exhaust fan may be used with the appliance; in each case it shall be installed in conformity with the national standards in force. ATTENTION: Exhaust hood operation may affect other vented appliances; in each case it shall be installed in conformity with the national standards in force.
- Page 6 To convert the regulator for use with the other gas different from which one it is pre-arranged it is enough perform the following operations: 1) Unscrew by hand the upper metal stopper of the regulator (Fig. 5). 2) Unscrew by hand the white plastic piece screwed under the above mentioned metal stopper, afterward screw it again in opposite way under the metal stopper (for gas reference see the written “LP”...
- Page 7 Do not store dangerous or flammable material in the cabinet areas above appliance; store them in a safe place in order to avoid potential hazards. For safe use of appliance, do not use it for space heating. Do not use aerosol sprays in the vicinity of this appliance while it is in operation For description of hotplates refer to installation instructions.
- Page 8 WARNING: If the power is cut off, the burners can be lit with matches. The burners equipped with a safety thermocouple can only be lit when the knob is in the MAXIMUM position (large flame etching). Note: The use of a gas cooking appliance produces heat and humidity in the room where it is installed. Therefore, proper ventilation in the room is needed and natural ventilation openings must remain unobstructed and activating the mechanical exhaust fan/range hood.
- Page 9 COSMETIC WARRANTY Bertazzoni will cover parts showing cosmetic defects in material and workmanship for a period of thirty (30) days from date of installation of the unit. This coverage will include scratches, stains, surface imperfections on stainless steel, paint and porcelain, with the exclusion of slight differences in color due to materials and painting/enamelling technologies.
- Page 10 After sale service: Dealer /Importer: Name, address, phone SERVICE CENTERS Name Phone MANUFACTURER: BERTAZZONI SPA VIA PALAZZINA, 8 – 42016 – GUASTALLA (REGGIO E.) ITALY Tel. 0522/226411 – telefax 0522/226440 – http://www.bertazzoni.com...
- Page 11 Installation, Service et Instructions pour l’Utilisateur BERTAZZONI Tables de cuisson gaz à encastrer DIMENSIONS: 36 ’’ (W) x 21 ’’ (925 mm) (540 mm) Modèles B3H0..A7X(2 or 5)D Type ‘A’ Modèles B3H0..Q7X(2 or 5)D Type ‘A’ Modèles B3K0..Q7X(2 or 5)D Type ‘B’...
- Page 12 INDEX: Instructions d’installation..…………………………………..………………………...page 12 Insertion de la table de cuisson..………………………………..………………….. .page 13 Exigences…..……………………………………..……………………………….….. page 13 Fixation de la table de cuisson….………………………..………………………….. page 14 Branchement du gaz………………………………..………………………………….page 14 Branchement électrique…………………………………..……………………….…..page 14-15 Schéma de câblage..………………………………..…………………………….…...page 15 Ventilation du local……………………………………………………………… ……page 15 Positionnement et dégazage…………………………….……………………………page 15 Remplacement des becs….…………………………………..………………………page 15 Réglage des brûleurs….
- Page 13 La pression d’alimentation minimum du gaz pour le contrôle du réglage du régulateur doit être au moins de 1“ colonne d’eau (w.c.) (249 Pa) au-dessus de la pression du collecteur d’admission à l’appareil spécifiée (cette pression de fonctionnement est de 4” colonne d’eau (1.00 kPa) pour le Gaz Naturel et 11”...
- Page 14 Fixation de la table de cuisson Pour empêcher aux liquides de fuir accidentellement dans l’espace de stockage sous-jacent, l’appareil est équipé d’une garniture spéciale. Pour appliquer cette garniture, suivez attentivement les instructions dans la Fig. 3. Disposez les bandes d’étanchéité protectrices le long des bords de l’ouverture du banc de travail et couvrez soigneusement l’extrémité...
- Page 15 Branchement électrique Le branchement de la table de cuisson au réseau est effectué par le fil électrique et la fiche tripolaire positionnée sous la table de cuisson. L’appareil fonctionne à une tension du réseau de 120V c.a., fréquence 60Hz. L’absorption d’énergie électrique est d’environ 1W pour la version au 5 brûleur à gaz ou 2W pour la version de 6 brûleurs à...
- Page 16 Modèle B3K0..(Q or U)7X(2 or 5)D Brûleur Position Diam inj. Dèbit nom. Dèbit reduit By-pass Pressure size 1/100mm Type [i.w.c.] [BTU/h] [BTU/h] [1/100mm] Auxiliaire Frontale D. 0,92 4” 3750 1098 réglé 0,56 LP(Propane) 11” 3750 1098 0,29 Semi-Rapide Arriere G et C 1,17 4”...
- Page 17 Instructions de service et d’entretien Le service et l’entretien doivent seulement être exécutés par une personne autorisée Pour remplacer les parties telles que les brûleurs, les valves et les composants électriques, la table de cuisson doit être enlevée du banc de travail en libérant les crochets de fixage, desserrant les vis de fixage de chaque brûleur, dévissant les écrous de fixage crochets de fixation de la table de cuisson qui sont visibles au fond de la surface, enlevant la partie supérieure de la table de cuisson et remplaçant ensuite les pièces défectueuses.
- Page 18 Brûleurs équipés d’un dispositif de sécurité (thermocouple): Tournez le bouton qui correspond au brûleur choisi dans le sens contraire des aiguilles d’une montre à la position de MAXIMUM à l’étoile gravée (flamme large) et puis appuyez sur le bouton pour activer l’allumage par étincelle.
- Page 19 Avant le replacement sur la tête du brûleur, assurez-vous que les trous ne soient pas obstrués. Nous Vous prions de bien vouloir vous enregistrer sur notre site web pour valider votre www.bertazzoni.com garantie du nouveau produit et nous aider à Vous aider dans le cas de dommages.
- Page 20 14. Défauts et dommages résultant du transport du produit à la maison du propriétaire. Les défauts et les dommages résultant de forces externes qui échappent au contrôle de Bertazzoni SpA tels que les incendies, les inondations, les tremblements de terre et autres catastrophes naturelles.
- Page 21 Service après vente: Revendeur /Importateur: Nom, adresse, téléphone CENTRES DE SERVICE Téléphone FABRICANT: BERTAZZONI SPA VIA PALAZZINA, 8 – 42016 – GUASTALLA (REGGIO E.) ITALY Tél. 0522/226411 – fax 0522/226440 – http://www.bertazzoni.com Fig 1...
- Page 22 Fig 2 Fig.3 Fig.4 Fig.5 Fig.6 Fig.7 Fig.8...
- Page 23 Inches 1” 11/16 1” 3/16 1” 1/16 4”7/16 Fig.9 Fig.10 Fig.11 Fig.12...
- Page 24 Fig.13 Fig.14 Fig.16 Fig.17...