Table des Matières
Publicité
Les langues disponibles
Les langues disponibles
Liens rapides
Publicité
Table des Matières

Manuels Connexes pour Techness RUN1000


Sommaire des Matières pour Techness RUN1000
- Page 1 All manuals and user guides at all-guides.com MODE D’EMPLOI – TAPIS DE COURSE RUN1000 Merci d’avoir acquis un produit TECHNESS. Ce produit a été conçu pour vous garantir une entière satisfaction lors de vos entraînements et dans un but d’améliorer votre forme physique.
-
Page 2: Garantie
All manuals and user guides at all-guides.com GARANTIE Cet appareil a été fabriqué avec des matériaux de qualité. La validité de la garantie pour cet appareil implique une utilisation correcte en accord avec les instructions décrites dans ce guide. Une utilisation ou une manipulation incorrecte entraînera l’annulation de la garantie. -
Page 3: Instructions De Securite
All manuals and user guides at all-guides.com INSTRUCTIONS DE SECURITE Cet appareil a été conçu pour être le plus sûr à l’usage. Toutefois, il est important de suivre les instructions suivantes pour assurer votre sécurité. Lisez et comprenez les instructions avant toute utilisation. 1/ Il est très important de consulter votre médecin avant de vous entraîner, surtout si vous désirez faire un entraînement intensif, ou si vous avez des problèmes de santé. -
Page 4: Contenu De La Boite
All manuals and user guides at all-guides.com CONTENU DE LA BOITE: ●Ouvrez la boîte et vérifiez qu’elle contienne bien les pièces suivantes. Si certaines pièces sont manquantes, contactez le Service Après Ventes. Cadre principal et base Console Pieds de support Cache Poignées Clé... -
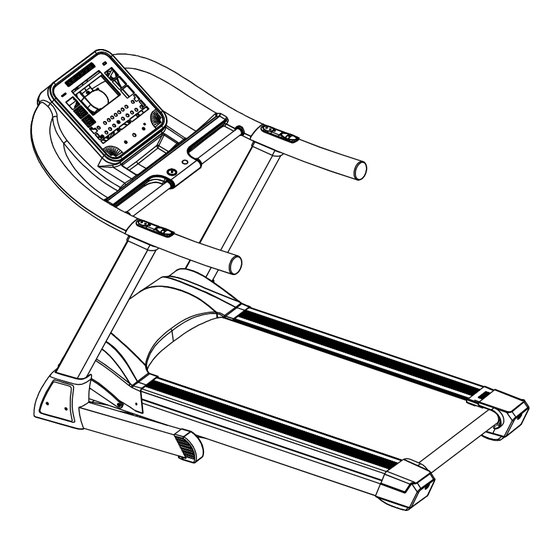
Page 5: Parties Principales Du Tapis
All manuals and user guides at all-guides.com PARTIES PRINCIPALES DU TAPIS: Rouleau avant Rouleau arrière Rail de décoration Rail latéral Cache moteur Console Poignées Cache pour la base Moteur... - Page 6 All manuals and user guides at all-guides.com Moteur d’inclinaison Plaque de course Bande de course Cache arrière (gauche) Cache arrière (droit) Pied Système d’ouverture...
- Page 7 All manuals and user guides at all-guides.com SCHEMA: TAPIS ASSEMBLE Poignée Console Clé de sécurité Pied de support Cache moteur Rail latéral Cache Roue Caches Cadre arrière principal Bande de course...
-
Page 8: Instructions D'assemblage
All manuals and user guides at all-guides.com INSTRUCTIONS D’ASSEMBLAGE Étape 1 : Retirez l’appareil de la boîte et posez-le sur une surface stable et plane. Utilisez 4 vis M8*15 et 6 vis M8*55*20 (voir la liste des accessoires à la fin du guide) pour assembler les pieds de support (droit et gauche). - Page 9 All manuals and user guides at all-guides.com Étape 3 : Utilisez 4 vis M8*50*20 pour assembler la console et les pieds de support. Étape 4: Utilisez 4 vis M3*28 pour assembler les poignées avec la poignée avec mousse. Serrez les vis.
-
Page 10: Deplacer Votre Tapis
All manuals and user guides at all-guides.com REGLER VOTRE TAPIS DE COURSE 1. PLIER / DEPLIER / DEPLACER VOTRE TAPIS PLIER / DEPLIER VOTRE TAPIS: 1. Débranchez l’appareil avant toute manipulation. 2. Soulevez le tapis jusqu’à sa position vertical. 3. Vérifiez que la sécurité soit en place. 4. -
Page 11: Informations De Securite
All manuals and user guides at all-guides.com INFORMATIONS DE SECURITE ●Alimentation: ●Choisissez un endroit proche d’une prise pour votre tapis. ●Branchez l’appareil sur une seule prise équipée de prise terre. N’utilisez pas de rallonge. ●Un branchement défectueux peut entraîner des risques d’électrochocs et de dysfonctionnements. -
Page 12: Fonctions Générales
All manuals and user guides at all-guides.com Fonctions générales ◆ Une fois les réglages effectuées, vous pouvez démarrer le tapis en appuyant sur START. ◆ Si vous appuyez sur STOP pendant l’entraînement, le tapis s’arrêtera. ◆ Si l’utilisateur appuie une 2ème fois sur STOP, le tapis va s’arrêter et la machine reviendra à... -
Page 13: Utilisation De La Console
All manuals and user guides at all-guides.com Utilisation de la console Incline + Incline - Speed﹢ Speed - Start/Stop Program Mode ●Démarrez le tapis : Lorsque le tapis est branché, l’affichage est le suivant (photo 1):... -
Page 14: Écran Lcd
All manuals and user guides at all-guides.com Si vous n’avez pas mis la clé de sécurité, l’affichage sera (photo 2 ): Si vous avez inséré la clé, vous verrez (photo 3 ) : ●Écran LCD L’écran LCD 10” affiche le programme et les chiffres. Le programme et le pouls seront dans la même fenêtre. -
Page 15: Informations Sur Les Touches
All manuals and user guides at all-guides.com ●Informations sur les touches 1. Clé de sécurité Retirez la clé de sécurité et l’affichage sera “----”, une petite alarme sonnera toutes les 2 secondes et le tapis s’arrêtera complètement. L’alarme ne s’arrêtera que lorsque vous aurez réinséré... - Page 16 All manuals and user guides at all-guides.com “01” indique le genre masculine, “02” indique le genre féminin. Données originales Ecart âge 10-99 hauteur 170CM 100-220 poids 70KG 20-150 D’après la moyenne, le paramètre FAT indique : 19 > vous êtes plutôt maigre Entre 20-25 >...
- Page 17 All manuals and user guides at all-guides.com 6. Inclinaison +/- : Appuyez sur Incline+/- pour augmenter ou baisser l’inclinaison. Dans la fonction FAT, appuyez sur Incline+/- key, réglez le paramètre désiré. 7、 、 、 、 Speed+/- key: Augmenter et baisser la vitesse de 0.1km/h. Dans les programmes P0-P24, utilisez les touches Speed+/- key pour régler les paramètres.
-
Page 18: Time Program
All manuals and user guides at all-guides.com ●Liste des programmes TIME PROGRAM SPEED INCLINE SPEED INCLINE SPEED INCLINE SPEED INCLINE SPEED INCLINE SPEED INCLINE SPEED INCLINE SPEED INCLINE SPEED INCLINE SPEED INCLINE SPEED INCLINE SPEED INCLINE SPEED INCLINE SPEED INCLINE SPEED INCLINE SPEED... - Page 19 All manuals and user guides at all-guides.com SPEED INCLINE SPEED INCLINE SPEED INCLINE SPEED INCLINE SPEED INCLINE SPEED INCLINE SPEED INCLINE SPEED INCLINE ERROR MESSAGE AND SOLUTIONS: MESSAGE DESCRIPTION SOLUTION Problème de console La console ne peut pas démarrer le tapis. Affichage clignotant de “E01”...
-
Page 20: Entretien Du Tapis
All manuals and user guides at all-guides.com Vérifiez le câble du moteur d’inclinaison et tous Le moteur d’inclinaison ne les branchements (alimentation et connexions répond pas correctement. au panneau de contrôle). Changez les câbles ou le moteur d’inclinaison si le problème persiste. -
Page 21: Nettoyage
All manuals and user guides at all-guides.com (n’utilisez que spray silicone sans huile) 2. Application du lubrifiant sur la bande: ● Positionnez la bande pour que la couture soit au milieu de la plateforme. ●Insérez la valve dans le vaporisateur. ●... - Page 22 All manuals and user guides at all-guides.com Vis d’ajustement Moteur Bande Rouleau avant POUR BAISSER LA TENSION DE LA BANDE, TOURNEZ LES ECROUS DANS LE SENS INVERSE DES AIGUILLES D’UNE MONTRE. RESPECTEZ LE MÊME NOMBRE DE TOUR DES 2 CÔTES. PROCEDEZ PAR ¼ DE TOUR A CHAQUE AJUSTEMENT POUR NE PAS TENDRE LA BANDE DE FACON EXCESSIVE.
-
Page 23: Important
All manuals and user guides at all-guides.com 2. Lorsque la bande est centrée, augmentez la vitesse jusqu’à 16Km/h et vérifiez que le déroulement de la bande est optimal. Répétez les étapes décrites ci-dessus si nécessaires. Si la procédure de centrage échoue, cela signifie que votre bande n’est pas assez tendue. - Page 24 All manuals and user guides at all-guides.com SCHEMA EXPLOSE...
-
Page 25: Liste Des Pièces
All manuals and user guides at all-guides.com Liste des pièces N° DESCRIPTION N° DESCRIPTION Cadre de base Vis Philip filetée M8*25 Cadre de la plateforme Vis Philip filetée M6*25 Cadre d’inclinaison Vis Cross Allen filetée M5*20 Cadre base moteur Vis Cross Allen filetée M5*10 Cadre support (gauche) Vis Cross Allen filetée M4*10 Cadre support (droit) - Page 26 All manuals and user guides at all-guides.com Vis Allen filetée M8*20 Cache moteur gauche prise Vis hexagonale filetée Cache moteur droit M8*40 DESCRIPTION DESCRIPTION Cache moteur droit Contrôleur Câble d’alimentation Cache haut-parleur gauche Filtre Cache haut-parleur droit Capteur vitesse Ventilateur Transformateur Cache fils Moteur...
-
Page 27: Conseils Et Astuces D'exercices
All manuals and user guides at all-guides.com Conseils et astuces d’exercices Démarrer votre entraînement doucement. Ne vous fixez pas des limites trop hautes. Commencez par vous entraîner tous les 2 jours. Et progressez semaine par semaine. Commencez par des temps courts pour chaque exercice et augmentez progressivement. Vous pouvez compléter votre entraînement avec d’autres exercices comme du vélo, de la natation…... -
Page 28: Exercice Pour Les Genoux
All manuals and user guides at all-guides.com 2. EXERCICE POUR LES GENOUX Asseyez-vous et dépliez votre jambe droite. Pliez votre jambe gauche (voir schéma). Penchez-vous en avant et essayez de toucher votre pied droit avec votre main droite. Restez dans cette position pendant 30-40 secondes. 3.EXERCICE POUR LES TENDONS / MOLLETS Placez vos 2 mains sur le mur. - Page 29 All manuals and user guides at all-guides.com USER GUIDE – TREADMILL RUN1000 Thanks for purchasing this product. The product will help you exercise your muscles in the correct way and to improve your fitness – and all this in a familiar environment.
- Page 30 All manuals and user guides at all-guides.com Implied Warranty The importer of this machine assures that this device was manufactured from high quality materials. Prerequisite for the implied warranty is the proper setup in accordance with the operating instructions. Improper use and /or incorrect transportation can render the warranty void. The implied warranty is for 1 years, beginning with the date of purchase.
-
Page 31: General Safety Instructions
All manuals and user guides at all-guides.com GENERAL SAFETY INSTRUCTIONS A great deal of emphasis was placed on safety in the design and manufacture of this fitness device. Still, it is very important that you strictly adhere to the following safety instructions. - Page 32 All manuals and user guides at all-guides.com ASSEMBLY ●Before starting with the assembly of this fitness device, carefully read through the set up steps as of page 7 We also recommend that you view the assembly drawing prior to assembly . ●...
- Page 33 All manuals and user guides at all-guides.com UNPACK AND VERIFY THE CONTENTS OF THE BOX: ●Lift up and remove the box that surrounds the Treadmill. ● Check the following items are present. If any of the parts are missing, contact with the dealer.
- Page 34 All manuals and user guides at all-guides.com MAIN PARTS OF THE TREADMILL: Front roller Rear roller decorate rail Side rail motor cover console Handle bar Base cover Motor Incline motor Running board Running belt...
- Page 35 All manuals and user guides at all-guides.com End cover (left) End cover (right) Feet Soft drop...
-
Page 36: Assembly Diagram
All manuals and user guides at all-guides.com ASSEMBLY DIAGRAM Console Safety Key Handle Bar Stand Post Motor Cover Side Rail Wheel cover End Cover Main Frame Running Belt... - Page 37 All manuals and user guides at all-guides.com ASSEMBLY INSTRUCTIONS Step 1: Take the machine out of package, put on a flat surface; Use 4pcs M8*15 and 6pcs M8*55*20 screws separately to fit the stand post (Left and right) onto the base frame. Please do not tight any bolts now.
- Page 38 All manuals and user guides at all-guides.com Step 3: Use 4pcs M8*50*20 screws fit the console to the stand post and tight the screw. Step 4: Use 4pcs M3*28 screws fit the handle bar cover to the PU handle bar and tight the screw.
- Page 39 All manuals and user guides at all-guides.com SETTING UP YOUR TREADMILL 1. FOLDING/UNFOLDING & MOVING THE TREADMILL FOLDING &UNFOLDING THE TREADMILL: 1. Unplug from power point before folding 2. Lift deck until it's parallel to the upright post 3. Check the cylinder locks into right position 4.
-
Page 40: Special Safety Precautions
All manuals and user guides at all-guides.com Special Safety Precautions ●Power source: ●Choose a place in reach of a socket when placing the treadmill. ●Always connect the appliance to a socket with a grounded circuit and no other appliances connected to it. It is recommended not to use any extension cords. ●A faulty grounding of the appliance can cause the risk of electrical shocks. - Page 41 All manuals and user guides at all-guides.com General Functionalities ◆ To start any workout phase after the setup, the user has to press the Start key. ◆ If the user presses the Stop key during the workout phase, the workout pulses. ◆...
- Page 42 All manuals and user guides at all-guides.com Use Instruction Console Incline + Incline - Speed﹢ Speed - Start/Stop Mode Program ●Start the treadmill: When the treadmill connects to power, the LCD show like the below picture 1:...
- Page 43 All manuals and user guides at all-guides.com If the treadmill without the safety key, the LCD will show like the below picture2: With the safety key, will show like below picture 3: ●LCD window display 10” LCD window displays the item and number. Program and Pulse use the same window;...
- Page 44 All manuals and user guides at all-guides.com Pull off the safety key, the LCD windows show“----”, the buzzer sound “BIBI-BI”, the sound last 0.5second every 2second once and the treadmill will stop right now. The sound will stop until put on the safety key. After putting on the safety key, the computer will show 2second, and all the data will be cleared.
- Page 45 All manuals and user guides at all-guides.com Designed original item Designed range number 10-99 height 170CM 100-220 weight 70KG 20-150 According to the standard of human being, the fat low 19 shows you are tend to be thin, it is perfect when the fat is between 20 to 25. If between 26 to 29 it suggests you are a little fat.
- Page 46 All manuals and user guides at all-guides.com In P0-P24, choose time, press Speed+/- key, can adjust the number. In FAT, after choosing the item, press Speed+/- key can adjust the number. 8. Quick incline keys 9. Quick speed keys ●Program speed diagram TIME PROGRAM SPEED...
- Page 47 All manuals and user guides at all-guides.com SPEED INCLINE SPEED INCLINE SPEED INCLINE SPEED INCLINE SPEED INCLINE SPEED INCLINE SPEED INCLINE SPEED INCLINE SPEED INCLINE SPEED INCLINE ERROR MESSAGE AND SOLUTIONS: SYMPTOM DESCPRIPTION SOLUTION Console is bad Control board is bad, can not start the treadmill.
- Page 48 All manuals and user guides at all-guides.com Treadmill can not start, warning sound No speed sensor signal : 9times. Console show the E03. If treadmill control board has send the can restart in 10 seconds, it will be ok. signal to motor, but can not Solution: No speed sensor signal for receive the signal from motor 3seconds, then check the sensor plug or...
- Page 49 All manuals and user guides at all-guides.com TREADMILL MAINTENANCE Proper maintenance is very important to ensure a faultless and operational condition of the treadmill. Improper maintenance can cause damage to the treadmill or shorten the life of the product. All parts of the treadmill must be checked and tightened regularly. Worn out parts must be replaced immediately.
- Page 50 All manuals and user guides at all-guides.com TO INCREASE THE RUNNING BELT TENSION: A. Place 8mm wrench on the left belt tension bolt. Turn the wrench clockwise 1/4 turn to draw the rear roller and increase the belt tension. B. Repeat STEP 1 for the right belt tension bolt. You must be sure to turn both bolts the same number of turns, so the rear roller will stay square relative to the frame.
- Page 51 All manuals and user guides at all-guides.com ● If toward the right side of the deck, turn the right adjustment bolt clockwise 1/4 turn and the left adjustment bolt counter clockwise 1/4. ● If the belt is still not centre, repeat the above step until the running belt is on centre. 2.
- Page 52 All manuals and user guides at all-guides.com EXPLODING DRAWING...
- Page 53 All manuals and user guides at all-guides.com Detail of assembly QUAN QUAN NO DESCRIPTION DESCRIPTION TITY TITY Base fame Philip full thread screw M8*25 Platform frame Philip full thread screw M6*25 Incline frame Cross Allen full thread screw M5*20 Motor base frame Cross Allen full thread screw M5*10 Left Upright frame...
- Page 54 All manuals and user guides at all-guides.com Hex full thread screw Motor cover right M8*40 DESCRIPTION QUANTITY DESCRIPTION QUANTITY Motor cover right Controller PCB board Power wire Speaker cover left Filter Speaker cover right Speed sensor Transformer Wire cover Motor Washer Incline motor Feet cover...
-
Page 55: General Fitness Tips
All manuals and user guides at all-guides.com General fitness tips Start your exercise program slowly, i.e. one exercise unit every 2 days. Increase your exercise session week by week. Begin with short periods per exercise and then increase these continually. Start slowly with the exercise sessions and don’t set yourself impossible targets. - Page 56 All manuals and user guides at all-guides.com Warm-up / stretching exercises A successful exercise session begins with warming up exercises and ends with exercises for cooling down and relaxing. These warming up exercises prepare your body for the subsequent demands made upon it. The cooling down / relaxation period after the exercise session ensures that you do not experience any muscular problems.
- Page 57 All manuals and user guides at all-guides.com this position for 30-40 seconds if possible. 4.EXERCISES FOR THE UPPER THIGH Support yourself by placing your hand on the wall, then reach down behind you and lift up your right or left foot as close to your buttocks as possible. Feel a comfortable tension in your front upper thigh.