
Manuels Connexes pour Luvion easy


Sommaire des Matières pour Luvion easy
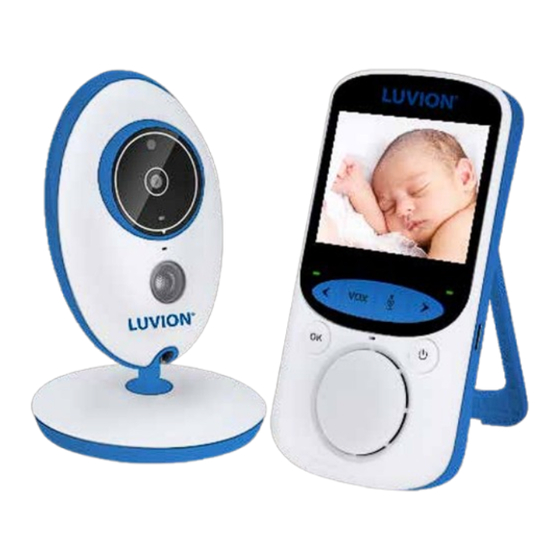
- Page 1 LUVION Premium Baby products InstructIon manual HandleIdIng manual d’InstructIons BenutzerHandBucH...
-
Page 2: Table Des Matières
SPEcIFIcAtIonS IntroductIon Thank you for purchasing the Luvion Easy+. Now, you will be able to see and hear your baby everywhere in and around the house. Please keep the original dated sales receipt for your administration and proof of warranty. For service and warranty issues, you will always be asked for a copy. -
Page 3: Contents Of Package
LUVION Premium Baby products contents oF PacKage the box includes the following components: Easy+ Easy+ duo 1 x parent unit (monitor) 1 x parent unit (monitor) 1 x baby unit (camera) 2 x baby unit (camera) 1 x power adapter for the parent unit... -
Page 4: Overview Of Parent Unit (Monitor)
oVerVIeW oF Parent unIt (monItor) 1. Power connector - connect the included uSB power adapter to power and/or charge the parent unit. 2. lcd display - 2.4” lcd Screen. 3. Power indicator led - indicates whether the parent unit is switched on. 4. -
Page 5: Overview Of Baby Unit (Camera)
5. Infrared led - Allows for 5m distance of night vision, automatically activates within low light conditions. 6. Power connector - Input for the luvion power adapter. 7. temperature sensor - the measured ambient temperature is displayed on the screen of the parent unit. -
Page 6: Getting Started
Completely before first use hold the on/oFF button to switch the monitor on. the screen will now show the luvion introduction screen. InstallIng tHe BaBY unIt (camera) Before you install the baby unit (camera), carefully plan where and how you want to position it. Make sure that you take in account the length of the power cable and the position of the power socket, because the baby unit (camera) needs to be connected to the power grid. - Page 7 LUVION Premium Baby products : Before permanently installing the baby unit (camera), make sure that the wireless connection note between the baby unit and parent unit is sufficient. Verify this when both the parent unit and baby unit are placed in the positions from which you would like to use them.
- Page 8 usIng tHe sYstem the video of the baby unit will be displayed on the screen of the parent unit when both are switched on. the icons on the screen are explained below. 1. Signal indicator - the signal indicator shows the strength of the connection between units.
-
Page 9: Menu
LUVION Premium Baby products menu open the menu of the luvion Easy to change the device settings. > Press the oK / Menu button on the parent unit to open the menu. > use the left and right buttons to select a submenu. - Page 10 > settIngs menu You can use the Settings menu to set the time and date, to change the temperature unit, select camera switch mode or to set the backlight brightness and backlight time interval. > Select the settings icon in the main menu >...
- Page 11 LUVION Premium Baby products > > lcd BacKlIgHt menu settings You can change the lcd backlight brightness and the time interval of the baby unit video in this menu. When the image of the video is too dark, try to increase the brightness.
-
Page 12: Pairing
PaIrIng use the Pairing function to connect a baby unit (camera) to the parent unit (monitor). Plug the charger into the wall socket and connect to the camera, to power on the camera. hold the power button on the monitor to switch on the monitor. - Page 13 LUVION Premium Baby products camera register Select the desired camera (1 or 2) and press oK button to pair the camera the screen will display “re-register the camera?” Press oK to confirm. the screen will display “Please press the Pair key on your baby unit.
-
Page 14: Troubleshooting
If you have any problems with the luvion Easy+, there is often a quick and simple solution. Please try the following: Problem solution no video from the baby check the power supply of the baby unit. Make sure the power unit adapter is plugged in. -
Page 15: Technical Specifications
LUVION Premium Baby products tecHnIcal sPecIFIcatIons general specifications operating Frequency range 2.400 Mhz ~ 2.483,5 Mhz transmitting Power 17 dBm Max receiving Sensitivity -90 dBm type of Spread Spectrum FhSS 16 channels type of Modulation GSFK data rate 2 Mbps... - Page 16 Parent unit (monitor) lcd Panel Size 2.4“ / 6,1 cm lcd resolution h: 320 px, V: 240 px Viewing Angle h: 110°, V: 140° Power requirement 5 Vdc 500mA +/- 5 % Power consumption 250mA MAX. operating temperature - 10° ~ 45° operating humidity 0% ~ 85% Battery...
- Page 17 LUVION Premium Baby products...
- Page 18 SPEcIFIcAtIES IntroductIe Hartelijk dank voor uw aanschaf van de Luvion Easy+. Vanaf nu kunt u uw baby altijd horen én zien. Zorg ervoor dat u altijd uw originele aankoopbewijs bewaart. Voor garantiegevallen zal u altijd gevraagd worden om een kopie van uw aankoopbewijs te tonen.
-
Page 19: Inhoud Van Dit Pakket
LUVION Premium Baby products InHoud Van dIt PaKKet de doos bevat de volgende onderdelen: Easy+ Easy+ duo 1 x ouder unit (monitor) 1 x ouder unit (monitor) 1 x baby unit (camera) 2 x baby unit (camera) 1 x adapter voor de ouder unit... -
Page 20: Overzicht Ouder Unit (Monitor)
oVerzIcHt ouder unIt (monItor) 1. adapter aansluiting- hiermee kunt u de monitor via de uSB voedingsadapter opladen. 2. lcd scherm - 2.4” lcd Scherm, geeft het camerabeeld weer. 3. oplaad led / Power indicator led - Geeft aan of de monitor op dit moment wordt opgeladen. - Geeft aan dat de monitor aan staat. -
Page 21: Overzicht Baby Unit (Camera)
5. Infrared led’s - Geeft 5m nachtzicht . de lEd’s worden automatisch geactiveerd in een donkere omgeving. 6. adapter aansluiting - aansluiting voor de luvion usb adapter. 7. temperatuursensor - de gemeten temperatuur wordt weergeven op het scherm van de ouderunit. -
Page 22: Klaarmaken Voor Gebruik
: Laad de ouder unit volledig op bij eerste gebruik. et op houdt de on/oFF knop ingedrukt om de monitor in te schakelen. het scherm zal nu het luvion logo weergeven. BaBY unIt (camera) Bepaal eerst goed waar u de baby unit plaatst voordat u de unit gaat gebruiken. - Page 23 LUVION Premium Baby products : Wees er zeker van, voordat u de baby unit permanent bevestigt, dat de draadloze verbinding tussen et op de baby unit en de ouder unit voldoende is. Controleer dit door beide units te plaatsen op plek waar u ze wilt gebruiken en even te testen.
- Page 24 geBruIK het beeld van de baby unit wordt weergeven als de ouder unit en de baby unit aan staan. de iconen op het scherm worden hier beneden uitgelegd. 1. Signaal indicatie de signaal indicatie geeft aan hoe sterk het signaal is dat wordt ontvangen van de baby unit.
-
Page 25: Menu
LUVION Premium Baby products menu open het menu van de luvion Easy om apparaatinstellingen te veranderen. > druk op de oK knop op de monitor om het menu te openen. > druk op de < of > knop om een submenu te selec- teren. - Page 26 > InstellIngen menu In dit submenu kunt u de datum en tijd, de temperatuureenheid, en de helerderheid van het scherm instellen. > Selecteer het instellingen icoon in het hoofdmenu > druk op oK om uw selectie te bevestigen. > Gebruik de < of > knop om de instelling te selecteren die u wil wijzigen.
- Page 27 LUVION Premium Baby products > lcd VerlIcHtIng > menu instellingen In dit submenu kunt u de helerderheid en de tijdsinterval van de lcd verlichting instellen. Als het beeld van uw babyfoon te donker is probeer dan de helderheid te verhogen. de minimale helderheid is 1, de maximale helderheid is 5.
-
Page 28: Pairing
PaIrIng Gebruik Pairing om een baby unit (camera) te verbinden met de ouder unit (monitor). Steek de stekker in het stopcontact en verbindt de connector met de camera. houdt de aan/uit knop van de monitor ingedrukt om de monitor aan te zetten. druk op de oK knop om het hoofdmenu te openen. - Page 29 LUVION Premium Baby products camera register Selecteer de gewenste camera (1 of 2) en druk op de oK button om de camera bij de monitor te registreren (pairen) de boodschap “camera opnieuw registreren?” zal verschijnen. druk op oK om te bevestigen.
-
Page 30: Probleem & Oplossing
ProBleem & oPlossIng Mocht u tegen problemen aanlopen met de luvion Easy+ dan is er vaak een snelle, simpele oplossing beschikbaar: Probleem oplossing Er is geen beeld op de controleer de adapter van de baby unit. controleer of de stekker ouder unit. -
Page 31: Technische Specificaties
LUVION Premium Baby products tecHnIscHe sPecIFIcatIes technische specificaties Frequentiebereik 2.400 Mhz ~ 2.483,5 Mhz zendvermogen 17 dBm Max ontvangst gevoeligheid -90 dBm type Spread Spectrum FhSS 16 Kanalen type Modulatie GSFK data Snelheid 2 Mbps Bereik 300 m (open veld) - Page 32 Batterij 750mAh service en support +31 (0) 15 2190305 klantenservice@luvion.nl · let oP Buitenshuis gebruik in Frankrijk, Italië, rusland en de oekraïne niet toegestaan dit product is in overeenstemming met de essentiële eisen en andere relevante bepalingen van richtlijn 2014/53/Eu.
- Page 33 LUVION Premium Baby products...
- Page 34 SPEcIFIcAtIonS tEchnIQuES IntroductIon Nous vous remercions d’avoir choisi le Luvion Easy+ Il est important et recommandé de toujours conserver votre bon d’achat original. En cas de garantie vous serez amené à envoyer une copie de votre bon d’achat original. En cas de garantie vous pouvez prendre contact avec votre agent Luvion ou bien avec votre représentant local Luvion.
-
Page 35: Contenue Du Kit
LUVION Premium Baby products contenu du KIt le luvion Easy Plus contient les pièces suivantes : Easy+ Easy+ duo 1 x appareil parents (moniteur) 1 x appareil parents (moniteur) 1 x appareil bébé (caméra) 2 x appareil bébé (caméra) 1 x adaptateur secteur pour l’appareil parents 1 x adaptateur secteur pour l’appareil parents... -
Page 36: Instruction Appareil Parents (Moniteur)
InstructIon aPPareIl Parents (monIteur) 1. Connecteur d’alimentation - branchez l’adaptateur secteur uSB sur une prise et/ou chargez l’appareil parents 2. Ecran LCD - Ecran lcd 2.4’’ . 3. Voyant LED de charge / Voyant LED d’alimentation - indique que l’appareil est en cours de chargement - indique si l’appareil parents est allumé... -
Page 37: Instruct Ions Appareil Bebe (Camera )
5. led Ir - Permet une visibilité nocturne jusqu’à 5 mètres. les lumières lEd sont activées automatiquement dans un environnement sombre. 6. connecteur d’alimentation - entrée de l’adaptateur secteur luvion 7. capteur de température - la température mesurée est retransmise sur l’écran de l’appareil parents. -
Page 38: Mise En Route
Chargez l appareil parents Complètement avant la première utilisation tenir le bouton on / off pour allumer l’appareil parentś. le logo luvion s’affiche alors sur l’écran. aPPareIl BéBé (caméra) déterminez d’abord où et comment vous voulez positionner l’appareil bébé avant de l’installer. tenez en compte de la longueur du fil de l’adaptateur et l’emplacement de la prise électrique disponible afin de... - Page 39 LUVION Premium Baby products : Veillez à être certain, avant de placer l’appareil bébé de façon permanente, que la connexion attention sans fil est suffisante entre l’appareil bébé et l’appareil parents. Contrôlez ceci pour chaque appareil avant de les placer aux endroits désirés.
- Page 40 utIlIsatIon du sYstème l’image de la caméra s’affiche sur l’écran du moniteur que lorsque les deux appareils sont allumés. les icônes sur l’écran vous sont expliquées ci-dessous. 1. Le signal indicateur le signal indicateur indique l’intensité du signal reçu que l’appareil bébé émet. un ou plusieurs tirets signifient que le signal est faible, alors que 4 tirets signifient que le signal est puissant (voir le tableau).
-
Page 41: Menu
LUVION Premium Baby products menu ouvrir le menu du luvion Easy afin de changer les paramètres. > touchez le bouton oK / Menu sur l’appareil parents (moniteur) pour accéder au menu. > utilisez les boutons < et > pour sélectionner un sous-menu >... - Page 42 > Paramètres menu Vous pouvez utiliser le menu Paramètres pour régler l’heure et la date, changer l’unité de température ou bien régler la luminosité du rétroéclairage et l’intervalle de temps du rétroéclairage. > Sélectionnez l’icône Paramètres dans le menu principal >...
- Page 43 LUVION Premium Baby products > > retroeclaIrage lcd menu paramètres dans ce menu vous pouvez modifier la luminosité du rétroéclairage lcd, ainsi que l’intervalle de temps de l’appareil bébé. lorsque l’image de la vidéo est trop sombre, essayez d’augmenter la luminosité.
-
Page 44: Couplage
couPlage utilisez le couplage pour connecter l’appareil bébé (caméra) avec l’appareil parents (moniteur). Branchez le chargeur dans la prise murale pour allumer l’appareil bébé (caméra) tenez le bouton d’alimentation sur le moniteur pour allumer le moniteur. Appuyez sur le bouton oK pour ouvrir le menu principal. - Page 45 LUVION Premium Baby products camera register Sélectionnez la caméra souhaitée (1 ou 2) et appuyez sur le bouton oK pour coupler la caméra l’écran affichera “ réenregistrer la caméra ? “ Appuyez sur oK pour confirmer. l’écran affichera « Veuillez appuyer sur la touche couplage de l’appareil bébé.
-
Page 46: Problèmes Et Solutions
ProBlemes et solutIons Si vous rencontrez des problèmes techniques liés à l’utilisation du luvion Easy Plus, il existe souvent une solution simple et rapide : Problème solution l’image ne s’affiche pas contrôlez l’adaptateur secteur de l’appareil bébé (caméra). Vérifiez sur l’écran de l’appareil si la prise est dans l’interrupteur et/ou la lumière verte est allumée. -
Page 47: Specifications Techniques
LUVION Premium Baby products sPecIFIcatIons tecHnIQues spécifications techniques Gamme de fréquence de réception 2.400 Mhz ~ 2.483,5 Mhz Puissance de l’antenne 17 dBm Max Sensibilité réception -90 dBm type de gamme de répartition FhSS 16 chaînes type de démodulation GSFK Vitesse des données... - Page 48 appareil parents (moniteur) taille écran lcd 2.4“ / 6,1 cm résolution écran lcd h: 320 px, V: 240 px Angle de vue h: 110°, V: 140° Alimentation 5 Vdc 500mA +/- 5 % consommation 250mA MAX. Gamme de fonctionnement de température - 10°...
- Page 49 LUVION Premium Baby products...
- Page 50 SPEzIFIKAtIonEn eInFüHrung Vielen Dank, dass Sie sich für den Luvion Easy+ entschieden haben. Von nun an können Sie Ihr Baby innerhalb und außerhalb des Hauses sehen und hören. Bitte heben Sie die Quittung gut auf. Im Falle von Garantieansprüchen und Serviceleistungen werden Sie auf- gefordert eine Kopie des Kaufbelegs einzureichen.
- Page 51 LUVION Premium Baby products der luvion Easy enthält die folgenden Bestandteile: Easy+ Easy+ duo 1 x Elterneinheit (Monitor) 1 x Elterneinheit (Monitor) 1 x Babyeinheit (Kamera) 2 x Babyeinheit (Kamera) 1 x netzstecker für die Elterneinheit 1 x netzstecker für die Elterneinheit 1 x netzstecker für die Babyeinheit...
-
Page 52: Übersicht Über Die Elterneinheit (Monitor)
üBersIcHt üBer dIe elterneInHeIt (monItor) 1. Stromanschluss – Verbindet den enthaltenen uSB-Adapter mit dem Stromnetzwerk und/oder der Elterneinheit. 2. LCD Display - 2.4” Video-display. 3. Betriebsanzeige / Ladeanzeige – zeigt an, ob sich die Elterneinheit im ladezustand befindet. – zeigt an, ob die Elterneinheit eingeschaltet ist. -
Page 53: Übersicht Über Die Babyeinheit (Kamera)
5. Infrarot-leds – Werden bei schlechten lichtverhältnissen automatisch aktiviert und ermöglichen eine nachtsicht der Babyeinheit über eine Entfernung von 5 m. 6. stromanschluss - Steckplatz für den luvion netzstecker. 7. temperatursensor - die gemessene umgebungstemperatur wird auf dem display der Elterneinheit angezeigt. -
Page 54: Erste Schritte
Sie die on / oFF-taste gedrückt, um den Monitor einzuschalten. Auf dem display erscheint nun der luvion Startbildschirm. InstallatIon der BaBYeInHeIt (Kamera) Bevor Sie die Babyeinheit installieren, überlegen Sie sich gut, wo diese im raum platziert werden soll. - Page 55 LUVION Premium Baby products : Bevor sie die Babyeinheit dauerhaft befestigen, stellen Sie sicher, dass die drahtlose eaChten sie Verbindung zwischen Baby- und Elterneinheit ausreichend ist. Überprüfen sie dies, wenn sich Elterneinheit und Babyeinheit an den Positionen befinden, von denen aus Sie diese nutzen wollen.
- Page 56 VerWendung Sind sowohl Eltern- als auch Babyeinheit eingeschaltet, wird auf der Elterneinheit das Video der Babyeinheit wiedergegeben. die Symbole auf dem display werden im Folgenden beschrieben. 1. Signalanzeige die Signalanzeige zeigt die Signalstärke zwischen der Eltern- und Babyeinheit an. Keine Balken weisen auf ein schwaches Signal hin, vier Balken auf ein starkes Signal (siehe tabelle).
-
Page 57: Menü
LUVION Premium Baby products menü Öffnen Sie das Menü des luvion Easy, um die Geräteeinstellungen zu ändern.. > drücken Sie die Menü/oK- taste der Elterneinheit, um das Menü zu öffnen. > Wählen Sie die < und > tasten, um ein untermenü... - Page 58 erscheint die Mitteilung „register Successful“ (erfolgreiche registrierung) auf dem display. Successful!” will be displayed. > eInstellungen menü Sie können das Einstellungsmenü nutzen, um datum und uhrzeit einzustellen, die temperatureinheit zu verändern, oder zum Einstellen der helligkeit der hintergrundbeleuchtung und der zeitabschaltung der hintergrundbeleuchtung.
- Page 59 LUVION Premium Baby products > > lcd BacKlIgHt menü einstellungen In diesem Menü können Sie die lcd- hintergrundbeleuchtung, sowie das zeitintervall indem das Video der Babyeinheit abgespielt wird verändern. Versuchen Sie die Bildschirmhelligkeit zu erhöhen, wenn das widergegebene Bild der Babyeinheit zu dunkel erscheint.
-
Page 60: Pairing (Kopplung)
PaIrIng (KoPPlung) nutzen Sie die Pairing Funktion, um die Babyeinheit (Kamera) mit der Elterneinheit (Monitor) zu verbinden. Stecken Sie das ladegerät in die Steckdose und schließen Sie es an die Kamera an, um die Kamera einzuschalten. halten Sie die Ein- / Aus-taste am Monitor gedrückt, um den Monitor einzuschalten. - Page 61 LUVION Premium Baby products camera register Wählen Sie die gewünschte Kamera (1 oder 2) und drücken Sie die taste oK, um die Kamera zu koppeln Auf dem Bildschirm erscheint die Mitteilung „re-register - Kamera?“ drücken Sie oK, um die Kopplung zu bestätigen.
-
Page 62: Fehlerbehebung
FeHlersucHe/FeHlerBeHeBung treten bei der handhabung Ihres Easy+ probleme auf, findet sich häufig eine einfache lösung: Problem lösung Kein Video der Babyeinheit Stellen Sie sicher, dass die Babyeinheit an das Stromnetzwerk angeschlossen ist und der netzstecker eingesteckt ist. das grüne lEd-licht muss leuchten. -
Page 63: Technische Spezifikationen
LUVION Premium Baby products tecHnIscHe sPezIFIKatIonen technische spezifikationen Frequenzbereich 2.400 Mhz ~ 2.483,5 Mhz Sendeleistung 17 dBm Max Empfangsempfindlichkeit -90 dBm typ des Wechselspektrums FhSS 16 Kanäle Modulationsart GSFK datenübertragungsrate 2 Mbps Sendereichweite 300 m (Sichtline) Babyeinheit (Kamera) Bildsensor typ 0.3Mpix color cMoS Image Sensor... - Page 64 elterneinheit (monitor) Größe lcd-Anzeige 2.4“ / 6,1 cm lcd Auflösung h: 320 px, V: 240 px Bildwinkel h: 140° V: 110° Stromversorgung 5 Vdc 500mA +/- 5 % leistungsaufnahme 250mA MAX. Betriebstemperaturbereich - 10° ~ 45° zulässige luftfeuchtigkeit 0% ~ 85% Batterie 750mAh ·...
- Page 65 LUVION Premium Baby products...
- Page 66 Premium Babyproducts Visit us at: www. luvion.com...