Table des Matières
Publicité
Les langues disponibles
Les langues disponibles
Liens rapides
MANUALE D'USO
---------------------------------------------------------------------------------------------------------------------------------------------------------
OPERATING INSTRUCTIONS
---------------------------------------------------------------------------------------------------------------------------------------------------------
MANUEL D'INSTRUCTIONS
---------------------------------------------------------------------------------------------------------------------------------------------------------
BEDIENUNGSANWEISUNG
Publicité
Chapitres
Table des Matières

Sommaire des Matières pour Videotec DCIR
- Page 1 MANUALE D’USO --------------------------------------------------------------------------------------------------------------------------------------------------------- OPERATING INSTRUCTIONS --------------------------------------------------------------------------------------------------------------------------------------------------------- MANUEL D’INSTRUCTIONS --------------------------------------------------------------------------------------------------------------------------------------------------------- BEDIENUNGSANWEISUNG...
- Page 3 MANUALE D’USO...
-
Page 5: Table Des Matières
Terminazione della linea di comunicazione RS485 verso il ricevitore ..................6 Connessione Punto – Punto..............................6 Connessione Multipunto ................................. 6 Come inserire la resistenza di terminazione sulla base del telecomando DCIR................ 7 Collegamento del telecomando DCIR alle periferiche ....................... 7 Esempio d'installazione ................................8 Cavi...................................... -
Page 6: Introduzione
Controllare che il contenuto sia rispondente alla lista del materiale sopra indicata. Cosa contiene questo Manuale d’Uso In questo manuale è descritto il telecomando DCIR con le particolari procedure di installazione, configurazione e utilizzo. E’ necessario leggere attentamente questo manuale, in particolar modo il capitolo riguardante le norme di sicurezza, prima di installare ed utilizzare il telecomando. -
Page 7: Norme Di Sicurezza
Conservare con cura il presente manuale per ogni futura consultazione Dati di marcatura Sul retro della base del telecomando DCIR sono riportate due etichette conformi alla marcatura CE. La prima etichetta contiene il codice di identificazione del modello (Codice a barre EXT3/9 ). -
Page 8: Apparecchi Controllabili Con Il Telecomando Dcir
• MICRODEC485 • DTMRX1 • DTRX3 (controllabile tramite DCIR e matrici della serie SM tramite telemetria su cavo coassiale). Ricevitori di telemetria controllabili in parte: • DTRXDC (è controllabile con tutte le sue funzionalità però non è possibile variare la velocità di movimento... -
Page 9: Variazione Di Protocollo, Velocità Di Comunicazione E Indirizzo Dcir
Possono essere utilizzati fino a 2 DCIR per controllare la stessa matrice video della serie SM. Nel caso si utilizzino 2 DCIR configurare opportunamente le basi con indirizzi diversi (la prima con dip 8 off: indirizzo 1, la seconda con dip 8 on: indirizzo 2). -
Page 10: Telemetria Su Coassiale
Il telecomando DCIR consente di trasmettere la telemetria su cavo coassiale tramite matrici di tipo SM42A, SM82A, SM84A, SM164A. Impostare la linea video di tipo MACRO sia nel DCIR sia nella matrice. Cercare di utilizzare un baud rate sufficientemente veloce (si consiglia di impostare un baudrate di 38400). E' necessario utilizzare ricevitori di telemetria adatti allo scopo (come ad esempio DTRX3 dotato di scheda DTCOAX). -
Page 11: Come Inserire La Resistenza Di Terminazione Sulla Base Del Telecomando Dcir
Riferirsi al disegno di pagina 5 per l’individuazione del dip-switch. Collegamento del telecomando DCIR alle periferiche La base del telecomando DCIR e la matrice SM42A, SM82A, SM84A, SM164A / LXRPS42A / LXRPS82A / LXRPS42TA / LXRPS82TA / LXRPS84A / LXRPS164A possono essere collegati direttamente tramite il cavo telefonico 6 poli con plug RJ11 collegato alla base per la verifica in laboratorio del funzionamento delle apparecchiature. -
Page 12: Esempio D'installazione
Collegamento DCIR – Ricevitori (MICRODEC485, DTRXDC, DTRX3, DTMRX1) Fare riferimento alla tabella di seguito riportata (Tabella 2) per il collegamento del DCIR con il ricevitore. Riferirsi alla Tabella 1 sopra riportata per i restanti collegamenti con la matrice (che fornisce alimentazione al DCIR). -
Page 13: Cavi
DCIR). La distanza massima raggiungibile di collegamento tra DCIR e periferiche è di 1200 m in RS485. Il cavo telefonico fornito è di 1,5 m: per arrivare a distanze maggiori fare uso delle scatole di derivazione RJ jack. -
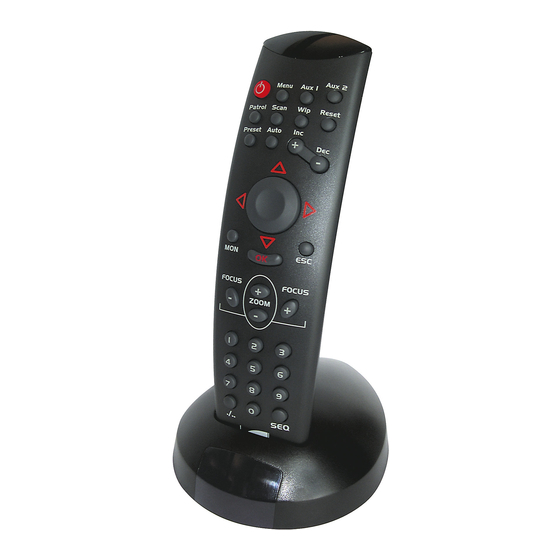
Page 14: Telecomando E Funzioni Di Commutazione
Telecomando e funzioni di commutazione Tasti di commutazione video Il telecomando DCIR consente di controllare, fino a 999 ingressi video (o ricevitori di telemetria) e 99 uscite (monitor) nel caso sia impostato il protocollo di comunicazione Macro (matrici della serie SM) nella linea Video. -
Page 15: Tasti Di Controllo Telemetria
Tasti di controllo telemetria Il telecomando DCIR può controllare fino a 16 ricevitori di telemetria (999 ricevitori nel caso si utilizzi una matrice della serie SM con protocollo Macro su linea video). Nel caso la matrice video sia assente o si utilizzi una matrice modello Linxs assicurarsi di impostare il dip switch dip 2 di sw1 ON. -
Page 16: Programmazione Delle Matrici Video
Fare riferimento ai rispettivi manuali d’uso delle matrici per i dettagli delle funzioni Utilizzo delle funzioni avanzate (solo per i ricevitori abilitati) Il telecomando DCIR permette di definire delle posizioni di preset nei ricevitori che ne sono provvisti e di richiamarle in modo manuale o automatico. - Page 17 Patrol standard oppure esteso. Se l’ultima sequenza di patrol impostata da telecomando è stata una sequenza di patrol standard, da ora in avanti il telecomando DCIR eseguirà sequenze di partol standard su pressione del tasto patrol. Viceversa se si è impostato una sequenza di patrol esteso.
-
Page 18: Manutenzione
Risoluzione dei problemi di installazione Il telecomando DCIR è caratterizzato da una notevole facilità d’uso, ciononostante possono insorgere dei problemi sia in fase di installazione, di configurazione o durante l’uso. - Page 19 OPERATING INSTRUCTIONS...
- Page 21 RS485 communication line termination to receiver ........................6 Point - point connection ................................6 Multipoint connection................................6 How to insert the termination resistance in the DCIR remote control base.................. 7 DCIR connection to peripheral units............................7 Installation example.................................. 8 Cables ......................................9 REMOTE CONTROL AND SWITCHING FUNCTIONS....................10...
-
Page 22: Introduction
Contents of this Instruction Manual This manual describes the DCIR control remote control, together with its specific procedures of installation, configuration and use. Read carefully this manual, in particular the chapter concerning the safety rules, before the remote control installation and use. -
Page 23: Safety Rules
Safety rules The remote control DCIR complies with the normative laws in force at the time of editing of this manual, concerning electric safety, electromagnetic compatibility and general requirements. Anyway, in order to ensure the users (installer technician and operator), the following warnings are specified for safety’s sake:... -
Page 24: Devices Controlled By The Dcir Remote Control
Completely controllable telemetry receivers: • MICRODEC485 • DTMRX1 • DTRX3 (controllable by DCIR and SM series matrixes using telemetry over the coax). Partly controllable telemetry receivers: • DTRXDC (all functions can be controlled but speed of pan & tilt movements cannot be varied) Installation The following procedures must be carried out with power supply off, if not otherwise specified. -
Page 25: Changing The Dcir Protocol, Communication Rate And Address
Address of DCIR 2 (**) The DCIR remote control can be used, setting the protocol on MACRO telemetry line, to store up to 40 preset positions in the new DTRX3 receiver (which should be set up with the MACRO protocol i.e. dip 8 of SW4 in the receiver will switched to OFF). -
Page 26: Telemetry Via Coaxial Cable
The DCIR can be used for telemetry transmission via coaxial cable using matrixes of the type SM42A, SM82A, SM84A, SM164A. Set up the MACRO type video line in both the DCIR and the matrix. It is important to use a sufficiently fast baud rate (we recommend a baud rate setting of 38400). -
Page 27: How To Insert The Termination Resistance In The Dcir Remote Control Base
Refer to the scheme at page 5 for the dip-switch identification. DCIR connection to peripheral units The DCIR remote control base and the SM42A / SM82A / SM84A / SM164A / LXRPS42A / LXRPS82A / LXRPS42TA / LXRPS82TA / LXRPS84A / LXRPS164A matrix can be connected together by 6-pole telephone cable with RJ11 plug, for a laboratory check of the devices functioning. -
Page 28: Installation Example
Connecting: DCIR – Receivers (MICRODEC485, DTRXDC, DTRX3, DTMRX1) See the table below (Table 2) for connecting the DCIR with the receiver. See Table 1 above for the other connections with the matrix (which powers the DCIR). DCIR MICRODEC485, DTRXDC, DTMRX1... -
Page 29: Cables
12 V external power supply to power the DCIR. The maximum connection distance between the DCIR and the peripheral units is about 1200m in RS485. The telephone cable supplied is 1,5 m long: for longer distances use RJ jack boxes. -
Page 30: Remote Control And Switching Functions
Video switching keys The DCIR remote control can be used to control up to 999 input videos (or telemetry receivers) and 99 output devices (monitors) if the Macro communication protocol setting (SM series matrixes) is used for the video line. -
Page 31: Telemetry Control Keys
Telemetry control keys The DCIR remote control is able to control up to 16 telemetry receivers (999 receivers if using an SM series matrix with the Macro protocol on the video line). If there is no video matrix or a Linxs model matrix is used, make sure dip-switch dip 2 on SW1 is switched to ON. -
Page 32: Programming The Video Matrixes
See the respective matrix instruction manuals for details about the functions Using the advanced functions (only for enabled receivers) The DCIR remote control can be used to define preset positions in those receivers that allow them, and to recall them manually or automatically. - Page 33 Patrol function will be activated. If the last Patrol sequence setting made by the remote control was a standard patrol sequence, from then on the DCIR remote control will carry out the standard patrol sequence when the patrol key is pressed. And vice versa if an extended patrol sequence setting has been made.
-
Page 34: Maintenance
Switch off the appliance to clean it. Clean the remote control at regular intervals with a cotton dry cloth, avoiding the use of detergents or wet cloths. Solution of installation problems Even if the remote control DCIR is easy to use, some problems may arise during installation, configuration or use. Problem... - Page 35 MANUEL D’INSTRUCTIONS...
- Page 37 Terminaison de la ligne de communication RS485 vers le récepteur..................6 Connexion Point – Point ................................6 Connexion Multipoint ................................6 Comment insérer la résistance de terminaison sur la base de la télécommande DCIR .............. 7 Branchement de la télécommande DCIR aux périphériques....................... 7 Exemple d’installation................................8 Câblage.......................................
-
Page 38: Introduction
Vérifier que le contenu correspond à la liste du matériel indiqué ci-dessus. Contenu du Manuel d’Emploi Dans ce manuel on décrit la télécommande DCIR et les procédures particulières d’installation, configuration et emploi. Il est nécessaire de lire attentivement ce manuel, surtout le chapitre concernant les normes de sécurité, avant d’installer et d'employer la télécommande. -
Page 39: Normes De Sécurité
Normes de sécurité La télécommande DCIR est conforme aux normes en vigueur au moment de la publication de ce manuel pour ce qui concerne la sécurité électrique et la compatibilité électromagnétique. Nous tenons cependant préciser certaines instructions afin que les techniciens et opérateurs puissent opérer en toute sécurité. -
Page 40: Appareils Pouvant Être Contrôlés Au Moyen De La Télécommande Dcir
• MICRODEC485 • DTMRX1 • DTRX3 (contrôlable par DCIR et par matrices de la série SM au moyen de télémétrie sur câble coaxial). Récepteurs de télémétrie partiellement contrôlables: • DTRXDC (totalité des fonctions contrôlables, mais vitesse fixe du mouvement de tourelle). -
Page 41: Variation De Protocole, Vitesse De Communication Et Adresse Dcir
à 19200 bauds. Un maximum de 2 DCIR peut être utilisé pour contrôler la même matrice vidéo de la série SM. En cas d'utilisation de 2 DCIR, configurer de façon adéquate les bases avec des adresses différentes (la première avec dip 8 off: adresse 1, la seconde avec dip 8 on: adresse 2). -
Page 42: Télémétrie Sur Coaxial
La télécommande DCIR permet de transmettre la télémétrie sur câble coaxial au moyen de matrices du type SM42A, SM82A, SM84A et SM164A. Définir la ligne vidéo de type MACRO sur le DCIR et sur la matrice. Utiliser de préférence une vitesse de transmission en bauds suffisamment rapide (vitesse de transmission conseillée: 38400). -
Page 43: Comment Insérer La Résistance De Terminaison Sur La Base De La Télécommande Dcir
Branchement de la télécommande DCIR aux périphériques La base de la télécommande DCIR et la matrice SM42A / SM82A / SM84A / SM164A / LXRPS42A/LXRPS82A / LXRPS42TA / LXRPS82TA / LXRPS84A / LXRPS164A peuvent être branchées directement à l’aide du câble téléphonique 6 pôles avec fiche RJ11 branché... -
Page 44: Exemple D'installation
Connexion DCIR – Récepteurs (MICRODEC485, DTRXDC, DTRX3, DTMRX1) Se reporter au tableau ci-dessous (Tableau 2) pour la connexion du DCIR avec le récepteur. Se reporter au Tableau 1 ci-dessus pour le reste des connexions avec la matrice (fournissant l'alimentation au DCIR). -
Page 45: Câblage
DCIR). La distance maximale pouvant être atteinte pour la connexion entre télécommande DCIR et périphériques est de 1200m en RS485. Le câble téléphonique fourni est de 1,5 m: pour arriver à des distances supérieures, utiliser les boîtes de dérivation RJ jack. -
Page 46: Télécommande Et Fonctions De Commutation
Touches de commutation vidéo La télécommande DCIR permet de contrôler un maximum de 999 entrées vidéo (ou récepteurs de télémétrie) et 99 sorties (moniteur) en cas de protocole de communication Macro (matrices de la série SM) sur la ligne Vidéo. -
Page 47: Touches De Contrôle Télémétrie
Touches de contrôle télémétrie La télécommande DCIR peut contrôler un maximum de 16 récepteurs de télémétrie (999 récepteurs en cas d'utilisation d'une matrice de la série SM avec protocole Macro sur la ligne vidéo). En cas d'absence de matrice vidéo ou d'utilisation d'une matrice modèle Linxs, s'assurer de définir le Dip switch dip 2 de sw1 sur ON. -
Page 48: Programmation Des Matrices Vidéo
Se reporter aux manuels d'utilisation des matrices pour davantage de détails concernant les fonctions. Utilisation des fonctions avancées (récepteurs validés uniquement) La télécommande DCIR permet de définir des positions de préréglage sur les récepteurs en étant dépourvus et de les rappeler en mode manuel ou automatique. - Page 49 Patrouille standard ou étendue sera activée. Si la dernière séquence de patrouille définie au moyen de la télécommande était de type standard, la télécommande DCIR effectuera désormais des séquences de patrouille standard sur pression de la touche Patrol, et vice-versa si une séquence de patrouille étendue a été...
-
Page 50: Entretien
évitant l’emploi de détergents ou de chiffons mouillés. Résolution des problèmes d’installation Bien que la télécommande DCIR se caractérise par une excellente fiabilité d’emploi, des problèmes peuvent se produire en phase d’installation, de configuration ou pendant l’emploi. - Page 51 BEDIENUNGSANWEISUNG...
- Page 53 ANSCHLÜSSE ................................6 Abschluß der Kommunikationsleitung RS485 zum Empfänger ....................6 Punkt-zu-Punkt-Verbindung..............................6 Mehrpunktverbindung................................6 Einschalten des Abschlußwiderstandes an der Basis der Fernbedienung DCIR ..............7 Anschluß der Fernbedienung DCIR an die Peripheriegeräte ....................7 Installationsbeispiel ................................8 Kabel ......................................9 FERNSTEUERUNG UND UMSCHALTFUNKTIONEN .....................10...
-
Page 54: Einleitung
Kontrollieren Sie, daß der Inhalt mit der oben angeführten Materialliste übereinstimmt. Inhalt dieses Bedienungshandbuches In diesem Handbuch ist die Fernbedienung DCIR beschrieben sowie die jeweiligen Vorgangsweisen zur Installation, Konfiguration und Verwendung. Es ist notwendig das Handbuch und insbesondere das Kapitel in Bezug auf die Sicherheitsbestimmungen vor der Installation und Verwendung der Fernbedienung aufmerksam zu lesen. -
Page 55: Sicherheitsbestimmungen
Anlage gefährden. Beschreibung der Fernbedienung DCIR Die DCIR ist ein professionelles Produkt zur Anwendung im Sicherheits- und Überwachungsbereich. In einem Sicherheitssystem ermöglich die Fernbedienung die Bedienung der Videoumschaltung (mittels Matrix SM42A / SM82A / SM84A / SM164A / LXRPS42A / LXRPS82A / LXRPS42TA/ LXRPS82TA / LXRPS84A / LXRPS164A) und die Bedienung der Peripheriestationen (mittels Empfänger DTMRX1, DTRX3). -
Page 56: Mit Der Fernsteuerung Dcir Bedienbare Geräte
Vollständig steuerbare Telemetrieempfänger: • MICRODEC485 • DTMRX1 • DTRX3 (steuerbar mit DCIR und Matrix der Serie SM mit Telemetriedatenübertragung über Koax-Kabel). Teilweise steuerbare Telemetrieempfänger: DTRXDC (sämtliche Funktionen lassen sich steuern; es ist allerdings nicht möglich, die Bewegungsgeschwindigkeit der Schwenkkopf zu ändern) Installation Die folgenden Arbeitsschritte sind, sofern nicht anders vermerkt, ohne Stromversorgung durchzuführen. -
Page 57: Änderung Des Protokolls, Der Übertragungsgeschwindigkeit Und Der Adresse Dcir
Adresse DCIR 2 (**) Wird MACRO als Protokoll für die Telemetrieleitung benutzt, so lassen sich mit der Fernsteuerung DCIR bis zu 40 Preset- Positionen im neuen Empfänger DTRX3 speichern (in letzterem muß ebenfalls das Protokoll MACRO eingestellt sein, also dip8 von SW4 des Empfängers muß... -
Page 58: Übertragung Von Telemetriedaten Über Koaxialkabel
Die Fernsteuerung DCIR gestattet die Übertragung von Telemetriedaten durch Koax-Kabel über Matrix des Typs SM42A, SM82A, SM84A, SM164A. Für die Videoleitung wird sowohl in der Einrichtung DCIR, als auch in der Matrix das Protokoll MACRO eingestellt. Es sollte versucht werden, mit einer ausreichend schnellen Übertragungsrate zu arbeiten (empfohlen wird eine Baudrate von 38400). -
Page 59: Einschalten Des Abschlußwiderstandes An Der Basis Der Fernbedienung Dcir
Basis integriert wurde. DCIR VIDEO Verbindung DCIR - Einheit SM42A / SM82A / SM84A / SM164A / LXRPS42A / LXRPS82A / LXRPS42TA / LXRPS82TA / LXRPS84A / LXRPS164A Für größere Entfernungen können Mauerkästen RJ jack benutzt werden, anschließbar nach die folgende Tabelle über ein 4-poliges Kabel:... -
Page 60: Installationsbeispiel
Verbindung DCIR – Empfänger (MICRODEC485, DTRXDC, DTRX3, DTMRX1) Auskunft über die Verbindung der Fernsteuerung DCIR mit dem Empfänger gibt die folgende Tabelle (Tabelle 2). In der obigen Tabelle 1 sind die verbleibenden Anschlußmöglichkeiten mit der Matrix genannt (welche die Fernsteuerung DCIR mit Strom versorgt). -
Page 61: Kabel
700 m; für größeren Entfernungen muß man einen äußeren 12V Speiser benutzen, um die DCIR zu speisen.) Die maximal erreichbare Entfernung der Verbindung zwischen DCIR und Peripheriegeräten beträgt im RS485 1.200 m. Das mitgelieferte Telefonkabel ist 1,5 m lang: Für längere Distanzen benutzen Sie die Abzweigdose RJ jack. -
Page 62: Fernsteuerung Und Umschaltfunktionen
Fernsteuerung und Umschaltfunktionen Videoumschalttasten Die Fernsteuerung DCIR gestattet es, bis zu 999 Videoeingänge (oder Telemetrieempfänger) und 99 Ausgänge (Monitor) zu steuern, falls das Übertragungsprotokoll Macro für die Videoleitung benutzt wird (Matrix der Serie SM). Umgekehrt lassen sich maximal 16 Video-/Empfängereingänge und 4 Videoausgänge steuern, falls das Videoprotokoll des Typs Linxs benutzt wird (Matrix der Serie LXRPS). -
Page 63: Tasten Für Die Telemetriesteuerung
Tasten für die Telemetriesteuerung Die Fernsteuerung DCIR ist in der Lage, bis zu 16 Telemetrieempfänger zu steuern (999 Empfänger, wenn eine Matrix der Serie SM mit Protokoll Macro auf der Videoleitung benutzt wird). Falls keine Videomatrix vorhanden ist oder falls eine Matrix des Modells Linxs benutzt wird, muß der Dip switch dip 2 des Auswahlschalters sw1 auf ON gesetzt werden. -
Page 64: Programmierung Der Videomatrix
Zur Beachtung: Bei den aktuellen Empfängern können bis zu 14 Preset-Positionen gespeichert werden (Empfänger DTRX3 und DTRXDC). Falls ein Empfänger des Modells DTRX3 mit Übertragungsprotokoll Macro benutzt wird und man die Telemetrieleitung der Einrichtung DCIR mit dem Protokolltyp Macro einrichtet, können bis zu 40 Positionen gespeichert (preset) und aufgerufen (scan) werden. - Page 65 Zur Beachtung: Je nachdem, welche Patrolsequenz zuletzt von der Fernsteuerung eingestellt worden ist, wird die standardmäßige oder die erweiterte Patrolfunktion aufgerufen: War zuletzt von der Fernsteuerung eine Standard-Patrolsequenz eingestellt worden, so führt die Fernsteuerung DCIR ab diesem Zeitpunkt auf Druck der Taste Patrol Standard-Patrolsequenzen aus. Für die erweiterte Patrolsequenz gilt Entsprechendes.
-
Page 66: Wartung
Die Reinigung muß immer bei ausgeschaltetem Gerät durchgeführt werden. Die Tastatur regelmäßig mit einem trockenen Baumwolltuch reinigen und auf Reinigungsmittel und nasse Tücher verzichten. Lösung von Installationsproblemen Der Fernbedienung DCIR zeichnet sich durch eine extrem einfache Anwendung aus. Trotzdem können während der Installation, Konfiguration und während der Anwendung Probleme auftreten. Problem Mögliche Ursache...