Table des Matières
Publicité
Les langues disponibles
Les langues disponibles
Liens rapides
Publicité
Table des Matières

Manuels Connexes pour Doro 914c


Sommaire des Matières pour Doro 914c
- Page 1 914c/915c...
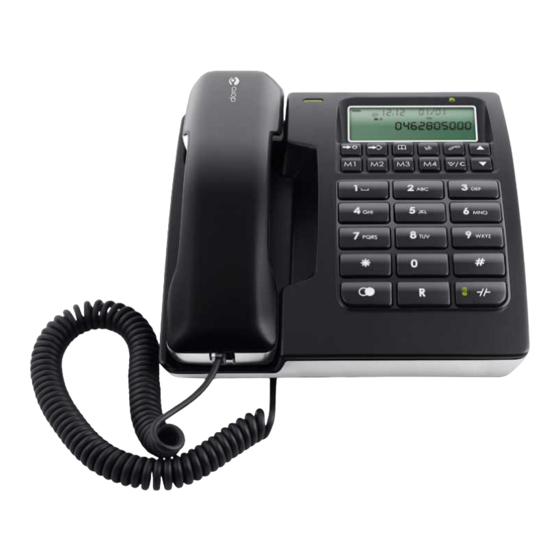
- Page 2 4 5 6 English 1 Hanging peg for handset 7 Phonebook 13 One-touch buttons M1-M4 2 Handset volume control 8 Caller ID/back 14 Button with LED: 3 Mute button 9 New number indicator 914c: Hold 4 Speed dial button 10 Call number 915c:Hands free 5 Ringer indicator 11 Scroll UP/DOWN buttons 15 Redial button 6 Store button 12 Clear/OK button Français 1 Languette de support du 7 Répertoire 12 Touche pour confirmer/ combiné 8 Touche d’accès au Journal effacer 2 Touches de réglage du...
- Page 3 English Connection/Basic setting 1. Connect the spiral cord to the socket on the handset and to the socket marked q on the telephone. 2. 914c: Connect the batteries. See Batteries. 915c: Connect the mains adapter to the socket marked DC 9V on the bottom of the telephone and then to an electrical wall socket. 3. Fit the table stand by following the diagram below. 4. Replace the handset. 5. The display will flash ENGLISH. If not, hold v pressed down for about 4 seconds. 6. Scroll to the desired language with v / V . Press 0 . 7. Scroll to the desired contrast setting (3=normal) with v / V . Press 0 . 8. Scroll to the desired hour (00-23) with v / V . Press 0 .
-
Page 4: Making A Call
English The display In standby mode the date and time is indicated on the display, as well as the number of new phone numbers and the total number of phone numbers that have been stored in the Caller ID memory. Making a call Regular dialling 1. Pick up the handset. 2. Enter the desired number. Dialling with correction function If necessary, the telephone number you have dialled can be changed before it is connected. 1. Enter the required number. Mistakes can be deleted using 0 . 2. Pick up the handset, the number is dialled. Pick up the handset, the number is dialled. Call Back Pick up the handset. Press r to redial the most recently dialled number. Mute button Press and hold to disable the handset microphone, release to reconnect the microphone. Volume control The handset volume may be adjusted during a call with Ring signal... -
Page 5: Phonebook
English Phonebook Use the Phonebook to store names and telephone numbers. A stored phone number can be dialled using fewer keystrokes than if it is dialled manually. If you subscribe to a Caller ID service, the name/number of the caller will be shown when you receive an incoming call (for those numbers stored in the Phonebook or the memories). The Phonebook will store 32 sets of names and phone numbers. Entries in the Phonebook are arranged alphabetically. Each name can be up to 16 characters in length, and telephone numbers can be up to 22 digits in length. Each number key has been allocated certain letters. Storing names/numbers 1. Press b . 2. Press 3. Press again. 4. Enter the phone number (up to 22 digits) using the keypad. Press 5. Enter name. Press the equivalent digit key sufficient times for the first letter. Press Press r if you want a pause in the telephone number. Dialling from the phonebook 1. Press b . 2. Scroll among the entries with v / V . Or you can do a quick search by pressing the corresponding number key for the first letter one or more times. - Page 6 English Caller ID Caller ID allows you to see who is calling before you answer a call or to see who has called in your absence. If the number is stored in the phonebook, the name is shown instead. Received calls are stored chronologically. The sequence number is shown in the top right- hand side of the display. When the memory is full, the oldest number will be deleted automatically as each new call is logged. New calls are indicated in plain text and by the red indicator flashing in standby mode. You must subscribe to this service from your network operator in order for this feature to function. Retrieving and dialling incoming numbers 1. Press v and V to scroll through phone numbers of calls received. 2. Press and lift the handset; the number is dialled or wait to return to standby mode. Messages Apart from phone numbers, the display can show: OUT OF AREA No information received, e.g. an international call.
- Page 7 English On Hold (914c) Press to place a call on hold. The call can be resumed by lifting the handset on the same telephone. Hands free function (only 915c) 1. Press . The hands free function will be activated and the LED indicator next to the button will illuminate. 2. Dial the required telephone number. Adjust the volume using the volume control located on the side of the telephone. 3. Press to terminate the call. Please note! If you wish, you can switch between handset and hands free mode by simply pressing or lifting the handset.
-
Page 8: Declaration Of Conformity
English Declaration of conformity Doro hereby declares that the product Doro 914c/915c conforms to the essential requirements and other regulations contained in the directives 1999/5/EC (R&TTE), 2002/95/EC (ROHS). A copy of the manufacturer’s declaration is available at www.doro.com/dofc If you cannot resolve the fault using the faultfinder section, technical support is available by email: tech@doro-uk.com -premium rate telephone number: 0905 895 0854, calls cost 50 pence per minute (prices correct at the time of publication). You can also contact us in writing (regarding any Spares or Technical query): Customer Services Doro UK Ltd First Floor Bridge House Chiltern Hill Chalfont St. Peter Buckinghamshire, SL9 9UE Further contact details are available on our website: www.doro-uk.com. Guarantee This product is guaranteed for a period of 12 months from the date of purchase. In the unlikely event of a fault occurring during this period, please contact the place of purchase. Proof of purchase is required for any service or support needed during the guarantee period. This guarantee shall not apply to a fault caused by an accident or a similar incident or damage, liquid ingress, negligence, abnormal usage or any other circumstances attributable to the user.Furthermore, this guarantee shall not apply to a fault caused by a thunderstorm or any other voltage fluctuations. Australia and New Zealand... - Page 9 English Guarantee This product is guaranteed for a period of 12 months from the date of purchase. Should you experience difficulties with the product, please contact us for assistance. If the product is then found to be faulty you will be asked to return it directly to us with a copy of the purchase receipt. This guarantee shall not apply to a fault caused by an accident or a similar incident or damage, liquid ingress negligence, abnormal usage, not reasonably maintained or any other circumstances on the purchaser’s part. Furthermore, this guarantee shall not apply to a fault caused by a thunderstorm or lightning, excessive or any other voltage fluctuations or faults on the telephone line. (As a matter of precaution, we recommend disconnecting the telephone during a thunderstorm). This guarantee does not affect your statutory rights. AUSTRALIA NEW ZEALAND DORO Australia Pty Ltd Atlas Gentech (NZ) Limited Private Bag 14927 PO Box 6646 Panmure Silverwater BC NSW 1811 Australia Auckland New Zealand Consumer Support Consumer Support Ph: Ph: 1300 885 023 Ph: 0900-500-25 (Toll Call) Fax: (02) Fax: (09) 574-2722 9748 6892 Email: support@doro.com.au Email: Web site: www.doro.com.au support@atlasgentech.co.nz REN (RN for New Zealand) The REN (Ringer Equivalence Number) or (RN) is of significance only if you wish to connect more than 1 telephone to your telephone line. A standard telephone line has a...
- Page 10 English ALL PRODUCTS The grant of a Telepermit for any item of terminal equipment indicates only that Telecom has accepted that the item complies with the minimum conditions for connection to its network. It indicates no endorsement of the product by Telecom, nor does it provide any sort of warranty. Above all, it provides no assurance that any item will work correctly in all respects with another item of Telepermitted equipment of a different make or model, nor does it imply that any product is compatible with all of Telecom’s network services. This equipment shall not be set to make automatic calls to the Telecom “111“ Emergency Service. This equipment may not provide for the effective hand-over of a call to another device connected to the same line. This equipment should not be used under any circumstances that may constitute a nuisance to other Telecom Customers. CND PRODUCTS If a charge for local calls is unacceptable, the “DIAL“ button should NOT be used for local calls. Only the 7 digits of the local number should be dialled from your telephone. DO NOT dial the area code digit or the “0“ prefix. Numbers longer than 14 digits will not be displayed correctly and Dial back function should not be used.
-
Page 11: Raccordement/Réglages De Base
Français Raccordement/Réglages de base 1. Reliez le cordon spiralé au combiné et à la fiche marquée q située au dos du téléphone. 2. 914c: Mettez les piles en place. Voir Mise en place des piles. 915c: Reliez le bloc d’alimentation à la prise du téléphone marquée DC 9V et à la prise de courant. 3. Installez le pied de support (voir schéma ci-dessous). 4. Placez le combiné en position raccrochée. 5. FRANCAIS clignote sur l’afficheur. Sinon, appuyez pendant 4 secondes sur la touche v . 6. Atteignez la langue désirée avec les touches v / V . Appuyez sur 0/ 7. Atteignez le contraste désiré (3=normal) avec les touches v / V . Appuyez sur 0/ 8. Atteignez l’heure désirée (00-23) avec les touches v / V . Appuyez sur 0/... -
Page 12: Afficheur
Français Afficheur En veille, la date et l’heure sont affichées ainsi que le nombre total d’appels enregistrés dans le journal des appelants (nouveaux appels et nombre total d’appels). Sonnerie Volume de la sonnerie Mélodie Tonalité d’appel (915c) Appeler Appel normal 1. Prenez le combiné. 2. Composez le numéro désiré. Composer le numéro avant de décrocher Cette méthode vous permet de composer un numéro de téléphone et, au besoin, de le changer avant d’appeler. 1. Composez le numéro. En cas d’erreur, effacez avec la touche 0/ 2. Décrochez le combiné pour appeler votre correspondant. Touche Bis Prenez le combiné. Appuyez sur r pour rappeler le dernier numéro composé. Régler le volume Utilisez la touche pour ajuster le volume du combiné en cours de conversation. Touche Secret Appuyez pour couper le micro du combiné. Mémoires Ce téléphone a 4 touches de mémoire directe et 10 mémoires abrégées. Une fois qu’un numéro est enregistré sur une de ces plages, vous le composez en pressant simplement une ou deux touches. Les touches de mémoires directes sont M1, M2, M3 et M4 et les numéros en mémoire abrégée sont 0 à 9. -
Page 13: Répertoire
Français Répertoire Le répertoire permet d’enregistrer les noms et numéros de téléphone. Une fois enregistrés, vous composez ces numéros en appuyant simplement sur une ou deux touches. Si vous êtes abonné à la présentation du numéro, le nom/numéro du correspondant s’affiche à la réception d’un appel (uniquement pour les numéros sauvegardés dans le répertoire ou en mémoire). Le répertoire peut contenir 32 noms (de 16 caractères max.) et numéros (de 22 chiffres max.) de téléphone classés par ordre alphabétique. Vous pouvez saisir les noms dans votre répertoire grâce aux touches numériques du téléphone y compris certains caractères spéciaux. Enregistrer un nom/numéro 1. Appuyez sur b . 2. Appuyez sur 3. Appuyez à nouveau sur 4. Composez le numéro de téléphone (22 chiffres max.). Appuyez sur 5. Entrez le nom. Appuyez une ou plusieurs fois sur la touche numérotée correspondant à la première lettre. Appuyez sur Insérez une pause en appuyant sur r . Appeler un numéro du répertoire 1. Appuyez sur b . 2. Faites défiler les entrées avec les touches v / V . Vous pouvez aussi effectuer une recherche rapide en appuyant une ou plusieurs fois sur la touche numérotée correspondant à la première lettre du nom de l’entrée. -
Page 14: Présentation Du Numéro
(double enveloppe) Vous avez reçu plusieurs provenant appels de ce même numéro. Effacer un numéro de téléphone 1. Atteignez l’entrée désirée à l’aide la touche v ou V . 2. Appuyez sur 0/ , EFFACER ? s’affiche ou appuyez sur 0/ jusqu’à ce que TOUT EFFACER ? s’affiche. 3. Appuyez sur 0/ jusqu’à ce que le numéro s’efface. Transférer les numéros dans le répertoire 1. Atteignez le numéro désiré comme décrit précédemment. 2. Appuyez sur 3. Appuyez à nouveau sur . La méthode d’enregistrement des noms est identique à celle utilisée pour le répertoire. Mise en garde (914c) pour mettre un appel en garde. En conversation, utilisez la touche... -
Page 15: En Cas De Problèmes
En cas de problèmes Vérifiez que le câble téléphonique soit en bon état et qu’il soit branché correctement. Débranchez tout autre matériel, rallonges et téléphones. Si l’appareil fonctionne alors normalement, la panne est causée par le matériel additionnel. Testez le matériel sur une ligne en état de marche (chez un voisin par ex.). Si le matériel fonctionne sur ce raccordement, votre propre ligne téléphonique est défectueuse. Signalez la panne à votre opérateur. Si le téléphone ne fonctionne toujours pas, contactez votre revendeur. N’oubliez pas de vous munir du ticket de caisse ou d’une copie de la facture. Garantie et S.A.V. Pour la France Cet appareil est garanti deux ans à partir de sa date d’achat, la facture faisant foi. En cas de problèmes, contactez votre revendeur. La réparation dans le cadre de cette garantie sera effectuée gratuitement. La garantie est valable pour un usage normal de l’appareil tel qu’il est défini dans la notice d’utilisation. Les fournitures utilisées avec l’appareil ne sont pas couvertes par la garantie. Sont exclues de cette garantie les détériorations dues à une cause étrangère à l’appareil. Les dommages dus à des manipulations ou à un emploi non conformes, à un montage ou entreposage dans de mauvaises conditions, à un branchement ou une installation non-conformes ne sont pas pris en charge par la garantie. Par ailleurs, la garantie ne s'appliquera pas si l'appareil a été endommagé à la suite d'un choc ou d'une chute, d'une fausse manœuvre, d'un branchement non-conforme aux instructions mentionnées dans la notice, de l'effet de la foudre, de surtensions électriques ou électrostatiques, d'une protection insuffisante contre l'humidité, la chaleur ou le gel. En tout état de cause, la garantie légale pour vices cachés s'appliquera conformément aux articles 1641 et suivants du Code Civil. Si vous souhaitez obtenir de l'aide lors de l'installation ou poser une question technique sur le produit, contactez notre Service d'Assistance Téléphonique au 08 92 68 90 18 (N° Audiotel - 0,34€ /min.). Il est recommandé de débrancher l’appareil en cas d’orage. En tant que consommables, les batteries sont exclues de la garantie. Déclaration de conformité Doro certifie que cet appareil Doro 914c/915c est compatible avec l’essentiel des spécifications requises et autres points des directives 1999/5/EC (R&TTE) et 2002/95/ EC (ROHS). La déclaration de conformité peut être consultée à l'adresse suivante : www.doro.com/dofc... - Page 16 English French Version 1.2 (Type II)