Table des Matières
Publicité
Liens rapides
Publicité
Table des Matières

Manuels Connexes pour Phonocar 04041


Sommaire des Matières pour Phonocar 04041
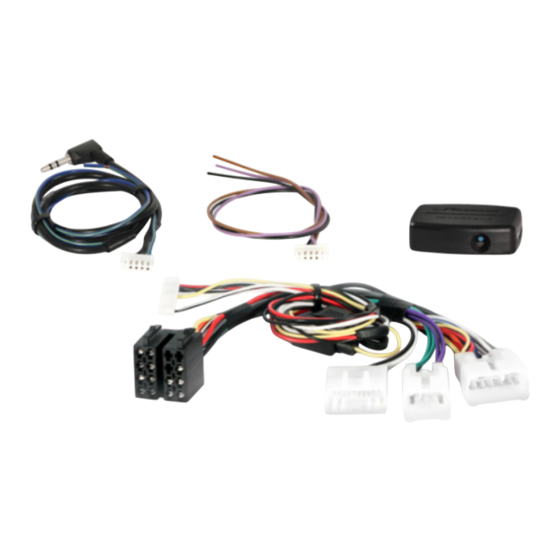
- Page 1 INTERFACCIA COMANDI AL VOLANTE STEERING WHEEL CONTROLS PLUG&PLAY CONNETTORE ISO / ISO CONNECTOR 04041 Istruzioni di montaggio Installation instructions Instructions de montage Montageanleitung Instrucciones para el montaje TOYOTA 03>14 01/2019 20 POLI / POLES...
- Page 2 Precauzioni • Warnings • Précautions • Vorsicht • Precauciones IT-EN IT • Per l’installazione rivolgersi al personale tecnico qualificato. • Usare solo con impianto elettrico a 12V DC con negativo a massa. • Quando si sostituisce il fusibile, utilizzarne uno con lo stesso valore di amperaggio. • Non aprire l’unità...
- Page 3 Precauzioni • Warnings • Précautions • Vorsicht • Precauciones DE • Die Installation muss durch technische Fachkräfte vorgenommen werden • Nur bei 12V DC verwenden, mit Negativ-Pol zur Masse • Beim Auswechseln, immer Sicherungen derselben Ampere-Stärke verwenden • Nie versuchen, das Gerät zu öffnen oder eigenhändig zu reparieren. Immer den Händler bzw. technische Fachkräfte zu Rate ziehen •...
- Page 4 Compatible brands: ALPINE - BLAUPUNKT - CLARION - ALPINE - BLAUPUNKT - CLARION - JVC - KENWOOD JVC - KENWOOD - PHONOCAR - PIONEER - SONY. - PHONOCAR - PIONEER - SONY They must be equipped with REMOTE INPUT CABLE e devono essere provviste di CAVO INGRESSO FOR SWC.
- Page 5 Collegamenti • Connections IT-EN Collegare il connettore ISO sulla autoradio e il connettore ORIGINAL specifico sulla vettura (verificare la compatibilità del mo- CAR CONNECTOR dello di interfaccia prima del collegamento). Effettuare il collegamento di entrambi i cablaggi (ISO/specifico e CAR RADIO connessione filo comandi autoradio) sulla interfaccia e successivamente girare il quadro della vettura.
-
Page 6: Dipswitch Settings
Programmazione • Programming IT-EN Inserire un piccolo cacciavite nella Introduce a small screwdriver into the feritoia presente sullo sportello laterale slot on the side cover (1), carefully lift it (1), sollevarlo delicatamente facendo by levering downwards (2) until it relea- leva verso il basso (2) fino allo sgancio ses from the box. -
Page 7: Connection Cable
Programmazione • Programming MICRO SWITCH IT-EN Individuare la casa automobilistica e il modello della Select the car manufacturer and model of your car, propria vettura, successivamente impostare gli inter- then set the switches on the left side as shown below: ruttori lato sinistro come indicato: TOYOTA DIPSWITCH SETTING... -
Page 8: Dipswitch
Impostostazioni autoradio • Car radio settings IT-EN Impostare gli interruttori lato destro dell’interfaccia Set the switches on the right side of the interface in base alla propria autoradio e collegare il cablaggio according to your car radio and connect the wiring seguendo le indicazioni seguenti: according to the following instructions: ATTENZIONE:... - Page 9 Impostostazioni autoradio • Car radio settings IT-EN DIPSWITCH ADAPTATOR CABLE DIPSWITCH ADAPTATOR CABLE BLAUPUNKT RESISTIVE PHONOCAR RESISTIVE VIOLA/PURPLE VIOLA/PURPLE KEY 1/A SWC1 KEY 1/A SWC1 MARRONE/BROWN MARRONE/BROWN KEY 2/B SWC2 KEY 2/B SWC2 NERO/BLACK NERO/BLACK KEY GROUND KEY GROUND CLARION...
- Page 10 INTERFACE COMMANDES AU VOLANT LENKRAD -STEUERUNGEN PLUG&PLAY CONNECTEUR ISO / ISO KONNEKTOR 04041 Instructions de montage Montageanleitung TOYOTA 03>14 20 POLI / POLES...
- Page 11 Kompatible Marken: ALPINE - BLAUPUNKT - CLARION - JVC - KENWOOD ALPINE - BLAUPUNKT - CLARION - JVC - KENWOOD - - PHONOCAR - PIONEER - SONY PHONOCAR - PIONEER - SONY. qui doivent être équipés du CÂBLE D’ENTRÉE REMOTE Die Autoradios müssen mit Remote Eingangs-Kabel für...
- Page 12 Branchements • Verbindungen FR-DE Brancher le connecteur ISO sur l’autoradio et le con- ORIGINAL necteur spécifique sur la voiture (vérifier la compatibilité CAR CONNECTOR du modèle d’interface avant d’effectuer tout branche- ment). Brancher les deux câbles (câble spécifique ISO et CAR RADIO branchement du fil pour les commandes de l’autoradio) sur l’interface, puis tourner le contact du véhicule.
- Page 13 Programmation • Einstellung FR-DE Tourner un petit tournevis dans la fente Einen kleinen Schraubenzieher in den de la trappe latérale (1), le soulever dou- Eingang der Seitenabdeckung (1) ein- cement en tirant vers le bas (2) jusqu’au führen, vorsichtig anheben, indem man déclenchement du boîtier.
- Page 14 Programmation • Einstellung MICRO SWITCH FR-DE Sélectionner le constructeur automobile et le modèle Wählen Sie den Fahrzeughersteller und das Modell de votre voiture, puis régler les interrupteurs à gauche Ihres Autos aus und stellen Sie dann die Schalter auf comme indiqué ci-dessous : der linken Seite wie unten gezeigt ein: TOYOTA DIPSWITCH SETTING...
- Page 15 Réglages de l’autoradio • Einstellung nach Radio-Marke FR-DE Régler les commutateurs sur le côté droit de l’interface Stellen Sie die Schalter auf der rechten Seite des Inter- en fonction de votre autoradio et brancher le câblage faces gemäß Ihrem Autoradio ein und schließen Sie selon les instructions suivantes: die Kabel gemäß...
- Page 16 Réglages de l’autoradio • Einstellung nach Radio-Marke FR-DE DIPSWITCH ADAPTATOR CABLE DIPSWITCH ADAPTATOR CABLE BLAUPUNKT RESISTIVE PHONOCAR RESISTIVE POURPRE/PURPLE POURPRE/PURPLE KEY 1/A SWC1 KEY 1/A SWC1 MARRON/BRAUN MARRON/BRAUN KEY 2/B SWC2 KEY 2/B SWC2 NOIR/SCHWARZ NOIR/SCHWARZ KEY GROUND KEY GROUND...
-
Page 17: Mandos De Volante
MANDOS DE VOLANTE PLUG&PLAY CONECTOR ISO 04041 Instrucciones para el montaje TOYOTA 03>14 20 POLI / POLES... -
Page 18: Programación
Las señales de salida del art. 04040 son las siguientes: Mandos de volante - Bajo-llave +12V. Las marcas de autorradios compatibles son las siguientes: Alpine - Blaupunkt - Clarion - JVC - Kenwood - Phonocar - Pioneer - Sony y deben absolutamente disponer de la SALIDA PARA EL CONTROL REMOTO DE LOS MANDOS DE VOLANTE. - Page 19 Instalación Conectar el conector ISO en la autorradio y el ORIGINAL conector especifico al coche (verificar una vez más CAR CONNECTOR la compatibilidad del modelo de interfaz antes de CAR RADIO conectarlo). Efectuar la conexión de ambos cableados (ISO/especifico y conexión cable/Jack con el control remoto de los mandos de volante del autorradio) con el interfaz y a continuación girar la llave de contacto para que se encienda el cuadro de instrumentos del coche.
- Page 20 Configuración MICRO SWITCH CONFIGURACIÓN VEHÍCULO Localizar la marca automovilística y el modelo de coche, a continuación configurar los micros switch en el lado izquierdo como indicado. TOYOTA DIPSWITCH SETTING CONNECTION CABLE NEGRO 4 Runner 03>14 BLANCO Auris 07>14 BLANCO-NEGRO Avensis T25 03>08 Corolla E12 01>14 Land Cruiser 03>10 Matrix 09>14...
- Page 21 DIPSWITCH ADAPTATOR CABLE DIPSWITCH ADAPTATOR CABLE ALPINE KENWOOD NO CONECTAR NO CONECTAR KENWOOD KENWOOD BLAUPUNKT RESISTIVE PHONOCAR RESISTIVE VIOLETA VIOLETA KEY 1/A SWC1 KEY 1/A SWC1 MARRÓN MARRÓN KEY 2/B SWC2 KEY 2/B SWC2 NEGRO NEGRO KEY GROUND...
- Page 22 Configuraciones de autoradio DIPSWITCH ADAPTATOR CABLE DIPSWITCH ADAPTATOR CABLE PIONEER CLARION NO CONECTAR KENWOOD NO CONECTAR KENWOOD SONY JVC >2011 NO CONECTAR NO CONECTAR UNIVERSAL RESISTIVE JVC 2011> VIOLETA KEY 1/A SWC1 NO CONECTAR MARRÓN KEY 2/B SWC2 NEGRO KEY GROUND...
- Page 24 11 10R-0505/01-1054 PHONOCAR S.p.a. Via F.lli Cervi, 167/C - 42124 Reggio Emilia (Italy) - Tel. +39 0522 941621 • www.phonocar.com - e-mail:info@phonocar.it...