Table des Matières
Publicité
Les langues disponibles
Les langues disponibles
Liens rapides
DE Luftbefeuchter
Gebrauchsanweisung ................ 2
EN Air humidifier
Instructions for use .................. 12
FR Humidificateur d'air
Mode d'emploi ......................... 22
ES Humidificador de aire
Instrucciones de uso ................ 32
IT
Umidificatore
Istruzioni per l'uso .................... 42
TR Hava Nemlendirici
Kullanım Kılavuzu ..................... 52
RU Увлажнитель воздуха
Инструкция по применению .. 62
PL Nawilżacz powietrza
Instrukcja obsługi ..................... 72
LB 55
Publicité
Chapitres
Table des Matières

Manuels Connexes pour Beurer LB 55


Sommaire des Matières pour Beurer LB 55
- Page 1 LB 55 DE Luftbefeuchter Umidificatore Gebrauchsanweisung ....2 Istruzioni per l'uso ....42 EN Air humidifier TR Hava Nemlendirici Instructions for use ....12 Kullanım Kılavuzu ..... 52 FR Humidificateur d’air RU Увлажнитель воздуха Mode d’emploi ......22 Инструкция по применению .. 62 ES Humidificador de aire PL Nawilżacz powietrza...
-
Page 2: Table Des Matières
DEUTSCH Inhalt 1. Zum Kennenlernen ............2 7. Bedienung ..............7 2. Bestimmungsgemäßer Gebrauch ........ 3 8. Reinigung und Aufbewahrung ........8 3. Funktionen des Gerätes..........3 9. Was tun bei Problemen? ........... 10 4. Sicherheitshinweise ............. 3 10. Technische Angaben ..........11 5. -
Page 3: Bestimmungsgemäßer Gebrauch
Hersteller kann nicht für Schäden haftbar gemacht werden, die durch unsachgemäßen oder leicht- sinnigen Gebrauch entstehen. 3. Funktionen des Gerätes Der Luftbefeuchter LB 55 • befeuchtet die Luft mit Warmwasserdampf, besonders Hygienisch • weist eine Befeuchtungsleistung auf: 200 ml/h und 400 ml/h •... - Page 4 WARNUNG Halten Sie Kinder von Verpackungsmaterial fern. Es besteht Erstickungsgefahr. Stromschlag WARNUNG Wie jedes elektrische Gerät ist dieser Luftbefeuchter vorsichtig und umsichtig zu gebrauchen, um Gefahren durch elektrische Schläge zu vermeiden. • Benutzen Sie das Gerät nur mit der auf dem Gerät notierten Netzspannung (das Typenschild befindet sich auf der Unterseite der Basis).
- Page 5 Handhabung ACHTUNG • Nach jedem Gebrauch und vor jeder Reinigung ist das Gerät auszuschalten und auszustecken. • Das Gerät ist nur für den in dieser Gebrauchsanleitung beschriebenen Zweck vorgesehen. Der Hersteller kann nicht für Schäden haftbar gemacht werden, die durch unsachgemäßen oder leicht- sinnigen Gebrauch entstehen.
-
Page 6: Gerätebeschreibung
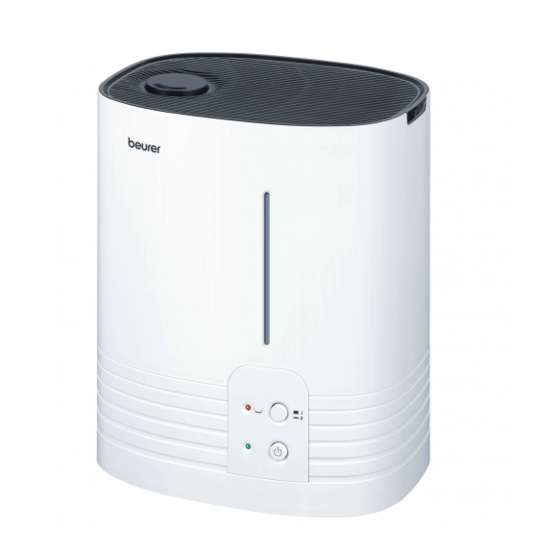
5. Gerätebeschreibung Luftbefeuchter 1 Dampfdüse 2 Abdeckung 3 Dampfturm 4 Kalkpad (unterhalb des Dampfturms in der Heißwasserkammer) 5 Heißwasserkammer (unterhalb des Dampfturms, nicht abgebildet) 6 Gehäuse des Luftbefeuchters 7 Griffmulden am Wassertank 8 Wassertank, Inhalt 6 Liter 9 Tankverschluss mit Ventil 10 Wasserstandsanzeige 11 Kabel mit Netzstecker 12 Bedienfeld (siehe auch Abbildung unten) -
Page 7: Bedienung
Vor dem ersten Gebrauch reinigen Aus hygienischen Gründen empfehlen wir, das Gehäuse des Luftbefeuchters [6], den Wassertank [8] und das Kalkpad [4] vor dem ersten Gebrauch gründlich mit kaltem Wasser auszuspülen. Gehen Sie dabei vor, wie beschrieben im Kapitel 8 „Reinigung und Aufbewahrung“, Abschnitt „Gerät reinigen“. Wassertank befüllen Befüllen Sie den Wassertank [8], wenn Sie das Gerät in Betrieb nehmen oder wenn die rote Kontrollanzeige [A] leuchtet und so einen zu niedrigen Wasserstand anzeigt. -
Page 8: Reinigung Und Aufbewahrung
Dampfmenge wählen • Wählen Sie die Dampfmenge über die Dampf-Taste [C] . Stufe I: wenig Dampf (ca. 200 ml/h) Stufe II: viel Dampf (ca. 400 ml/h) Nach wenigen Minuten beginnt das Gerät mit der geänderten Dampfabgabe. Gerät ausschalten Hinweis • Das Gerät ist für den Dauerbetrieb geeignet. Wir empfehlen dennoch, es für längere Zeit nicht ohne Aufsicht zu betreiben (Nachtbetrieb). - Page 9 Vor dem Reinigen und Entkalken Gerät vom Netz nehmen • Schalten Sie das Gerät mit der ON/OFF-Taste [D] aus. Die grüne Kontrollanzeige [B] erlischt. • Ziehen Sie den Netzstecker [11] aus der Steckdose und warten Sie mindestens 15 Minuten, bis der Luft- befeuchter vollständig ausgekühlt ist.
-
Page 10: Was Tun Bei Problemen
Gerät entkalken Luftbefeuchter entkalken Hinweis • Versuchen Sie keinesfalls, Kalkablagerungen mit spitzen oder scharfen Gegenständen zu entfernen. Der Luftbefeuchter könnte dadurch beschädigt oder undicht werden. • Beachten Sie auch die Hersteller-Hinweise zu Ihrem Entkalkungsmittel. • Verwenden Sie ein handelsübliches Entkalkungsmittel. •... -
Page 11: Technische Angaben
Die gesetzlichen Gewährleistungen des Kunden bleiben durch die Garantie unberührt. Für Geltendmachung eines Garantiefalles innerhalb der Garantiezeit ist durch den Kunden der Nachweis des Kaufes zu führen. Die Garantie ist innerhalb eines Zeitraumes von 3 Jahren ab Kaufdatum gegenüber der Beurer GmbH, Ulm (Germany) geltend zu machen. -
Page 12: Getting To Know Your Appliance
ENGLISH Contents 1. Getting to know your appliance ........ 12 7. Operation ..............17 2. Intended use .............. 13 8. Cleaning and storage ..........18 3. Instrument functions ..........13 9. In the event of problems ..........20 4. Safety information ............. 13 10. -
Page 13: Intended Use
– The device is only intended for the purpose described in these instructions for use. The manufacturer is not liable for damage resulting from improper or careless use. 3. Instrument functions The LB 55 air humidifier • moistens the air with warm steam, particularly hygienic • with a humidification output of: 200 ml/h and 400 ml/h •... - Page 14 Electric shock WARNING As with every electrical device, use this air humidifier carefully and cautiously, in order to avoid hazards due to electric shock. • Only operate the device at the voltage indicated on the device (the type plate is located on the underside of the base unit).
- Page 15 • Avoid water damage by handling the device carefully (e.g. water damage from splashing in the vicinity of wooden floors). • If the device should accidentally tip over, water may escape, even if the device is switched off and unplugged. •...
-
Page 16: Appliance Description
5. Appliance description Air humidifier 1 Steam nozzle 2 Cover 3 Steam tower 4 Pad (beneath the steam tower in the hot water chamber) 5 Hot water chamber (beneath the steam tower, not illustrated) 6 Air humidifier casing 7 Water tank handles 8 Water tank, volume 6 litres 9 Tank catch, with valve 10 Water level window... -
Page 17: Operation
Clean before using for the first time For reasons of hygiene, we recommend rinsing the air humidifier, water tank and pad [4] thoroughly with cold water before using for the first time. Then proceed as described in the “Cleaning the device” section of chapter 8 “Cleaning and storage”. -
Page 18: Cleaning And Storage
Switching off the appliance Note • The appliance is suitable for continuous operation. We recommend, however, that it is not operated for any length of time without supervision (night operation). • When the water tank is empty, the devices switches into idle mode. Press the ON/OFF button [D] in order to switch off the appliance. - Page 19 Disassemble the appliance • Remove the cover [2] from the air humidifier. • Pull the water tank [8] out of the air humidifier using the handles [7]. Unscrew the tank catch [9] from the tank [8]. • Pull up the steam tower [3] out of the air humidifier. Remove the steam nozzle [1] from the steam tower [3]. •...
-
Page 20: In The Event Of Problems
After cleaning and descaling Insert the pad • Put the cleaned pad or replacement pad [4] into the hotwater chamber. Assemble the appliance • Put the steam tower [3] back into the air humidifier. Press the steam nozzle [1] into the opening at the top of the steam tower [3]. -
Page 21: Replacement Items
In case of returning the unit please add a copy of your receipt and a short report of the defect. The following warranty terms shall apply: 1. The warranty period for BEURER products is either 3 years or- if longer- the country specific warranty period from date of Purchase. - Page 22 FRANÇAIS Contenu 1. Premieres experiences ..........22 7. Utilisation ..............27 2. Utilisation conforme aux recommandations ....23 8. Nettoyage et stockage ..........28 3. Fonctions de l’appareil ..........23 9. Que faire en cas de probleme ? ........ 30 4.
-
Page 23: Utilisation Conforme Aux Recommandations
– L’appareil est conçu pour l’utilisation décrite dans ce mode d’emploi. Le fabricant ne peut être tenu responsable des dommages causés par une utilisation inappropriée ou non conforme. 3. Fonctions de l’appareil L’humidificateur d’air LB 55 • humidifie l’air de manière particulièrement hygiénique • offre de véritables performances en termes d’humidification : 200 ml/h et 400 ml/h •... - Page 24 AVERTISSEMENT Maintenez les emballages hors de la portée des enfants. Ils pourraient s’étouffer. Choc électrique AVERTISSEMENT Comme tout appareil électrique, cet humidificateur d’air nécessite prudence et circonspection lors de son utilisation pour éviter tout risque de choc électrique. • N’utilisez l’appareil qu’à la tension indiquée sur l’appareil (la plaque signalétique se trouve en-dessous de la base).
- Page 25 • Les températures à l’intérieur de l’humidificateur d’air sont élevées. Par conséquent, prenez les pré- cautions correspondantes, notamment en présence d’enfants, et placez l’appareil à un endroit auquel les enfants ne pourront pas accéder. Utilisation ATTENTION • L’appareil doit être éteint et débranché après chaque utilisation et avant chaque nettoyage. •...
-
Page 26: Description De L'appareil
5. Description de l‘appareil Humidificateur d’air 1 Buse de vapeur 2 Couvercle 3 Tour d’évaporation 4 Tampon anti-tartre (sous la tour d’évaporation dans la chambre d’eau chaude) 5 Chambre d’eau chaude (sous la tour d’évaporation, non illustrée) 6 Carter de l’humidificateur d’air 7 Creux de préhension sur le réservoir d’eau 8 Réservoir d’eau, capacité... -
Page 27: Utilisation
Nettoyage avant la première utilisation Pour des raisons d’hygiène, nous vous conseillons de laver soigneusement l’humidificateur d’air, le réservoir d’eau [8] et le tampon anti-tartre [4] à l’eau froide avant d’utiliser l’appareil pour la première fois. Pour ce faire, reportez-vous à la section « Nettoyer l’appareil » du chapitre 8 « Entretien et rangement ». Remplissage du réservoir d’eau Si vous voulez mettre l’appareil en marche ou si le témoin de contrôle rouge [A] s’allume indiquant que le niveau d’eau est bas, remplissez le réservoir d’eau [8]. -
Page 28: Nettoyage Et Stockage
Choix de la quantité de vapeur • Choisissez la quantité de vapeur au moyen de la touche vapeur [C] . Position I : peu de vapeur (env. 200 ml/h) Position II : beaucoup de vapeur (env. 400 ml/h) Au bout de quelques minutes, le débit de vapeur de l’appareil commence à changer. Arrêt de l’appareil Remarque •... - Page 29 Avant le nettoyage et le détartrage Mise hors secteur de l’appareil • Eteignez l’appareil au moyen de la touche ON/OFF [D]. Le témoin de contrôle vert [B] s’éteint. • Débranchez l’appareil [11] et attendez au moins 15 minutes que l’humidificateur d’air ait complètement refroidi.
-
Page 30: Que Faire En Cas De Probleme
Détartrage de l’appareil Détartrage de l’humidificateur d’air Remarque • N’essayez en aucun cas d’enlever les dépôts de tartre au moyen d’objets pointus ou tranchants. Vous pourriez endommager l’humidificateur d’air ou lui faire perdre son étanchéité. • Respectez également les consignes du fabricant de votre détartrant. •... -
Page 31: Dinnees Techniques
Les conditions de garantie suivantes s‘appliquent : 1. La période de garantie des produits BEURER est de 3 ans ou, si elle est plus longue, elle est applicable dans le pays concerné à compter de la date d‘achat. - Page 32 ESPAÑOL Contenido 1. Para conocer el producto .......... 32 7. Manejo ............... 37 2. Uso correcto .............. 33 8. Limpieza y conservación ........... 38 3. Funciones del aparato ..........33 9. ¿Qué hacer si hay problemas? ........40 4. Instrucciones de seguridad ........33 10.
-
Page 33: Uso Correcto
3. Funciones del aparato El humidificador de aire LB 55 • humedece el aire con vapor de agua caliente, especialmente higiénico • presenta el rendimiento de humidificación: 200 ml/h y 400 ml/h •... - Page 34 ADVERTENCIA No deje que los niños se acerquen al material de embalaje; existe peligro de asfixia. Descarga eléctrica ADVERTENCIA Como todos los aparatos eléctricos, este humidificador de aire debe utilizarse con extremo cuidado para evitar una descarga eléctrica. • Úselo sólo con la tensión de red indicada en el aparato (la placa de características se encuentra en la parte de abajo de la base).
- Page 35 • Coloque el cable de red de forma que no se pueda tropezar con él. • No introduzca ningún objeto en las aberturas del aparato. • No coloque objetos sobre el aparato. • Proteja el aparato de las temperaturas elevadas. •...
-
Page 36: Descripción Del Aparato
5. Descripción del aparato Humidificador de aire 1 Tobera de vapor 2 Cubierta 3 Torre de vapor 4 Almohadilla antical (debajo de la torre de vapor, en la cámara de agua caliente) 5 Cámara de agua caliente (debajo de la torre de vapor, no representada) 6 Caja del humidificador de aire 7 Asideros del depósito de agua... -
Page 37: Manejo
Limpiar antes del primer uso Por motivos de higiene, recomendamos lavar bien con agua fría el humidificador de aire, el depósito de agua [8] y la almohadilla antical [4] antes del primer uso. Proceda como se describe en el capítulo 8 “Limpieza y conservación”, apartado “Limpieza del aparato”. -
Page 38: Limpieza Y Conservación
Seleccionar la cantidad de vapor • Seleccione la cantidad de vapor con la tecla de vapor [C] . Escalón I: poco vapor (aprox. 200 ml/h) Escalón II: mucho vapor (aprox. 400 ml/h) A los pocos minutos, el aparato comienza a sacar vapor con la intensidad seleccionada. Apagar el aparato Nota •... - Page 39 Antes de limpiar y descalcificar Desenchufar el aparato de la red • Apague el aparato con la tecla “ON/OFF” [D]. Se apaga el indicador de control [B] verde. • Desenchufe la clavija [11] de la toma de corriente y espere por lo menos 15 minutos, hasta que el humi- dificador de aire se haya enfriado completamente.
-
Page 40: Qué Hacer Si Hay Problemas
Descalcificar el aparato Descalcificar el humidificador de aire Nota • Nunca intente quitar depósitos de cal con objetos puntiagudos o afilados. El humidificador de aire podría resultar dañado o con fugas. • Observe también las indicaciones del fabricante de su producto descalcificador. •... -
Page 41: Datos Téchnicos
Se aplican las siguientes condiciones de garantía: 1. El periodo de garantía para productos de BEURER es de 3 años o, si es superior, se aplica el periodo de garantía vigente en el país correspondiente a partir de la fecha de compra. - Page 42 ITALIANO Contenuto 1. Presentazione ............42 7. Funzionamento ............47 2. Uso conforme ............43 8. Pulizia e conservazione ..........48 3. Funzioni dell’apparecchio .......... 43 9. Che fare quando sorgono problemi?......50 4. Avvertenze di sicurezza ..........44 10. Specifiche techniche ..........51 5.
-
Page 43: Uso Conforme
è da ritenersi responsabile in caso di danni riconducibili a uso non conforme o sconsiderato. 3. Funzioni dell’apparecchio L‘umidificatore LB 55 • umidifica l’aria, con il vapore dell’acqua calda, particolarmente igienico • offre l’umidificazione seguente: 200 ml/h e 400 ml/h •... -
Page 44: Avvertenze Di Sicurezza
4. Avvertenze di sicurezza Leggere accuratamente le presenti istruzioni per l’uso. La non osservanza delle avvertenze riportate qui si seguito può causare infortuni alle persone o danni materiali. Conservare le istruzioni per l’uso e metterle a disposizione anche degli altri utenti. Consegnare queste istruzioni per l’uso a chiunque intenda servirsi dell’articolo. - Page 45 Impiego ATTENZIONE • Dopo ogni uso e prima delle operazioni di pulizia, spegnere l’apparecchio ed estrarre la spina. • L’apparecchio è concepito solo per l’impiego descritto nelle presenti istruzioni per l’uso. Il produttore non è da ritenersi responsabile in caso di danni riconducibili a uso non conforme o sconsiderato. •...
-
Page 46: Descrizione Dell'apparecchio
5. Descrizione dell‘apparecchio Umidificatore 1 Ugello di erogazione del vapore 2 Copertura 3 Torre di vaporizzazione 4 Pastiglia anticalcare (sotto la torre di vaporizzazione, nella camera d’acqua calda) 5 Camera d’acqua calda (sotto la torre di vaporizzazione, non raffigurata) 6 Involucro dell’umidificatore 7 Impugnature sul serbatoio dell’acqua 8 Serbatoio dell’acqua, capienza 6 litri 9 Tappo del serbatoio con valvola... -
Page 47: Funzionamento
Riempimento del serbatoio dell’acqua Prima della messa in servizio è necessario riempire il serbatoio dell’acqua. Procedere come descritto nel capitolo 8 “Pulizia e conservazione”, paragrafo “Pulizia dell’apparecchio”. Riempimento del serbatoio dell’acqua Riempire il serbatoio dell’acqua [8] quando si mette in funzione l’apparecchio oppure quando la spia di con- trollo rossa [A] si accende indicando un livello d’acqua troppo basso. -
Page 48: Pulizia E Conservazione
Spegnimento dell’apparecchio Nota • L’apparecchio è idoneo al funzionamento continuo. Consigliamo comunque di non usarlo per lunghi periodi senza sorveglianza (funzionamento notturno). • Quando il serbatoio dell‘acqua è vuoto, l‘apparecchio va in modalità di riposo. Premere il pulsante ON/OFF [D] per spegnere l’apparecchio. La spia di controllo verde [B] si spegne. 8. - Page 49 Prima della pulizia e della decalcificazione Disinserire l’apparecchio dalla rete • Spegnere l’apparecchio con il pulsante ON/OFF [D]. La spia di controllo verde [B] si spegne. • Sconnettere la spina elettrica [11] dalla presa e attendere almeno 15 minuti finché l’umidificatore non si sarà...
-
Page 50: Che Fare Quando Sorgono Problemi
Decalcificazione dell’apparecchio Decalcificare l’umidificatore Nota • Non tentare in nessun caso di rimuovere i depositi calcarei con l’ausilio di oggetti appuntiti o sostanze aggressive. L’umidificatore potrebbe danneggiarsi o non essere più stagno. • Rispettare sempre le indicazioni del produttore concernenti il decalcificante. •... -
Page 51: Specifiche Techniche
Allegare al reso dell‘apparecchio una copia della prova d‘acquisto e una breve descrizione del difetto. Si applicano le seguenti condizioni di garanzia: 1. La garanzia dei prodotti BEURER dura 3 anni oppure, se più lunga, fa fede la durata di garanzia valida dalla data di acquisto di ciascun paese. - Page 52 TÜRKÇE Içindekiler 1. Tanimak için ............... 52 7. Kullanım ..............57 2. Amacına uygun kullanım ........... 53 8. Temizlik ve saklama ........... 58 3. Cihazın işlevleri ............53 9. Problemlerde ne yapmali? ......... 60 4. Güvenlik bilgileri ............53 10. Teknik bilgiler ............61 5.
-
Page 53: Amacına Uygun Kullanım
– Cihaz sadece kullanım kılavuzunda açıklanan şekilde kullanım için tasarlanmıştır. Nizami olmayan ve dikkatsiz kullanımdan ötürü oluşacak hasarlardan üretici firma sorumlu değildir. 3. Cihazın işlevleri LB 55 hava nemlendirici • sıcak su buharı ile havayı nemlendirir, son derece hijyenik • nemlendirme performansı: 200 ml/saat ve 400 ml/saat •... - Page 54 UYARI Çocukları ambalaj malzemesinden uzak tutun. Boğulma tehlikesi vardır. Elektrik Çarpması UYARI Elektrik çarpması tehlikesinden kaçınmak için elektrikli her cihaz gibi bu hava nemlendirici de dikkatli biçimde kullanılmalıdır. • Cihazı üzerinde belirtilen şebeke voltajında çalıştırın (Model etiketi tabanın altında yer alır). •...
- Page 55 • Cihazı özenle kullanarak su nedeniyle oluşabilecek hasarları önleyin (örn. ahşap zeminlerde su sıçraması nedeniyle oluşabilecek hasarlar). • Cihaz yanlışlıkla devrilirse, cihaz kapalı ve prize takılı olmasa dahi su sızdırabilir. • Hava nemlendiricinin bulunduğu ortam nemli olabilir. • Kireçli su beyaz bir tortu oluşturabilir. •...
-
Page 56: Cihazin Tarifi
5. Cihazin tarifi Hava nemlendirici 1 Buhar çıkış ağzı 2 Kapak 3 Buhar kulesi 4 Kireç pedi (buhar kulesinin alt tarafında sıcak su hücresinde) 5 Sıcak su hücresi (buhar kulesinin alt tarafında, resim yok veya görünmüyor) 6 Hava nemlendiricinin gövdesi 7 Su tankında tutamak çukurları... -
Page 57: Kullanım
İlk kez kullanmadan önce temizleyiniz Hijyenik sebeplerden dolayı, hava nemlendiricinin gövdesini [6], su tankını [8] ve kireç pedini [4], cihazı ilk kez kullanmadan önce soğuk su ile iyice durulamanızı öneriyoruz. Bunun için bkz. Bölüm 8 “Temizleme ve saklama” / “Cihazın temizlenmesi”. Su tankının doldurulması... -
Page 58: Temizlik Ve Saklama
Cihazın kapatılması • Cihaz sürekli kullanılmaya uygundur. Yine de, cihazı uzun süre denetimsiz çalıştırmamanızı tavsiye ediyoruz (gece çalıştırma durumunda). • Su haznesi boşaldığında cihaz uyku moduna geçer. Cihazı kapatmak için, ON/OFF tuşuna [D] basınız. Yeşil kontrol göstergesi [B] söner. 8. Temizlik ve saklama Genel bakış... - Page 59 İlk kez temizlemeden ve kireçten arındırmadan önce Cihazın elektrik bağlantısının çözülmesi • Cihazı kapatmak için, ON/OFF tuşuna [D] basınız. Yeşil kontrol göstergesi [B] söner. • Elektrik fişini [11] çekip prizden çıkarınız ve hava nemlendirici tamamen soğuyuncaya kadar, en az 15 dakika bekleyiniz.
-
Page 60: Problemlerde Ne Yapmali
Cihazın kireçten arındırılması Hava nemlendiricinin kireçten arındırılması • Kireç tortularını kesinlikle sivri veya keskin cisimler ile temizlemeye çalışmayınız. Aksi halde hava nem- lendirici zarar görebilir veya sızdırmazlığı kaybolabilir. • Kireçten arındırma maddenizin üreticisi tarafından verilen bilgilere de dikkat ediniz • Normal satılan herhangi bir kireçten arındırma maddesi kullanınız. •... -
Page 61: Teknik Bilgiler
Cihazı geri gönderirken faturanızın bir kopyasını ve arızanın kısa açıklamasını ekleyin. Aşağıdaki garanti koşulları geçerlidir: 1. BEURER ürünlerinin garanti süresi 3 yıldır veya – daha uzun ise – ilgili ülkede geçerli olan satın alma tarihinden itibaren garanti süresi kabul edilir. - Page 62 РУССКИЙ Cодержание 1. Для знакомства............62 7. Обслуживание ............67 2. Использование по назначению ......63 8. Уход и хранение ............68 3. Функции прибора ............. 63 9. Что делать в случае проблем? ....... 70 4. Указания по технике безопасности ......63 10.
-
Page 63: Использование По Назначению
Данный электрический увлажнитель воздуха служит для гигиенического, стерильного увлажнения воздуха в жилых и рабочих помещениях. 3. Функции прибора Увлажнитель воздуха LB 55 • Увлажняет воздух водяным паром, очень гигиенично. • Производительность при увлажнении: 200 мл/ч и 400 мл/ч. • Подходит для помещений площадью до 50 м... - Page 64 ПРЕДОСТЕРЕЖЕНИЕ Не разрешайте детям играть с упаковочным материалом. Они могут задохнуться. Удар электрическим током ПРЕДОСТЕРЕЖЕНИЕ Как и любой другой электрический прибор, осторожно и бережно используйте этот увлажнитель воздуха, чтобы избежать опасности поражения электрическим током. • Эксплуатируйте прибор только при указанном на нем напряжении (заводская табличка расположена...
- Page 65 Использование прибора ВНИМАНИЕ • После каждого применения и перед очисткой прибор необходимо отключать. • Прибор должен использоваться только в целях, описываемых в данной инструкции по при- менению. Производитель не несет ответственности за ущерб, причиненный вследствие ис- пользования прибора не по назначению или халатного обращения с ним. •...
- Page 66 5. Описание прибора Увлажнитель воздуха 1. Паровое сопло 2. Крышка 3. Паровая камера 4. Таблетка от накипи (под паровой камерой в камере горячей воды) 5. Камера горячей воды (под паровой камерой, не показана) 6. Корпус увлажнителя 7. Ручки на резервуаре для воды 8.
- Page 67 Очистка перед первым использованием В целях гигиены мы рекомендуем тщательно промыть холодной водой перед первым использованием корпус увлажнителя воздуха [6], резервуар для воды [8] и таблетку от накипи [4]. Действуйте в соответствии с указаниями главы 8 «Очистка и хранение», раздел «Очистка прибора». Заполнение...
- Page 68 Выбор расхода пара • Выберите расход пара кнопкой «Пар» [C] . Положение I: мало пара ( ок. 200 мл/ч) Положение II: много пара (ок. 400 мл/ч) Через несколько минут прибор начинает подавать измененное количество пара. Выключение прибора Указание • Прибор предназначен для непрерывного режима работы. Тем не менее, мы не рекомендуем использовать...
- Page 69 Перед очисткой и удалением накипи Отсоединение прибора от сети • Включите прибор кнопкой ON/OFF [D]. Зеленый контрольный индикатор [В] гаснет. • Вытащите вилку [11] из розетки и подождите не менее 15 минут, пока прибор полностью не охладится. Разборка прибора • Снимите с увлажнителя воздуха крышку [2]. •...
-
Page 70: Что Делать В Случае Проблем
• Заполните камеру горячей воды [5] до краев раствором средства для удаления накипи. • Оставьте раствор действовать до тех пор, пока накипь не растворится. • Вылейте раствор. Для этого наклоните прибор в бок. • Тщательно промойте прибор свежей водой. После очистки и удаления накипи Укладывание... -
Page 71: Предметы, Приобретаемые Дополнительно
Производительность пара Положение I: ок. 200 мл/ч Положение II: ок. 400 мл/ч Система защиты от С помощью термостата перегрева Система защиты от сухого Если в нагревательной головке находится недос- таточно воды, хода прибор автоматически отключается. Прибор определяет уровень воды с помощью датчика. Включение... - Page 72 POLSKI Spis treści 1. Najważniejsze informacje .......... 73 7. Obsługa ..............78 2. Użytkowanie zgodne z przeznaczeniem ....74 8. Czyszczenie i przechowywanie ......... 79 3. Działanie urządzenia ..........74 9. Postępowanie w razie problemów ......81 4. Wskazówki dot. bezpieczeństwa ......75 10.
-
Page 73: Użytkowanie Zgodne Z Przeznaczeniem
– Urządzenie przewidziane jest do celu opisanego w niniejszej instrukcji obsługi. Producent nie ponosi odpowiedzialności za szkody wynikłe z nieprawidłowego lub lekkomyślnego użytkowania. 3. Działanie urządzenia Nawilżacz powietrza LB 55 • nawilża powietrze parą wodną, wyjątkowo higieniczny produkt • wydajność nawilżania: 200 ml/h i 400 ml/h •... -
Page 74: Wskazówki Dot. Bezpieczeństwa
Opakowanie zutylizować w sposób przyjazny dla środowiska. 4. Wskazówki dot. bezpieczeństwa Należy starannie przeczytać instrukcję obsługi! Niestosowanie się do poniższych wskazówek może spowo- dować szkody rzeczowe i osobowe. Należy zachować niniejszą instrukcję obsługi i udostępniać ją także innym użytkownikom. Przy odstąpieniu urządzenia przekazać niniejszą instrukcję obsługi wraz z urządzeniem. OSTRZEŻENIE Opakowanie należy przechowywać... - Page 75 • Nigdy nie próbować wyciągać wieży parowej [3], dyszy parowej [1] lub wkładu zmiękczającego wodę [4] podczas pracy urządzenia lub w ciągu 15 minut po jego wyłączeniu. Części te można wycią- gać tylko w celu ich oczyszczenia. • W nawilżaczu powietrza panuje wysoka temperatura, dlatego należy zastosować odpowiednie środki ostrożności w szczególności w obecności dzieci.
- Page 76 Utylizacja UWAGA Ze względu na ochronę środowiska naturalnego po zakończeniu okresu eksploatacji urządzenia nie należy go wyrzucać wraz ze zwykłymi odpadami domowymi. Utylizację należy zlecić w odpo- wiednim punkcie zbiórki w danym kraju. Urządzenie należy zutylizować zgodnie z dyrektywą o zużytych urządzeniach elektrycznych i elektronicznych –...
-
Page 77: Uruchomienie
6. Uruchomienie • Otworzyć opakowanie z kartonu. • Usunąć wszystkie folie. • Sprawdzić, czy urządzenie, wtyczka sieciowa i kabel nie są uszkodzone. Przed pierwszym użyciem oczyścić Przed pierwszym uruchomieniem zaleca się ze względów higienicznych dokładnie umyć zimną wodą obudowę nawilżacza [6], zbiornik wody [8] i wkład zmiękczający wodę [4]. Należy stosować się do instrukcji zawartych w rozdziale 8 „Czyszczenie i przechowywanie”, sekcja „Czyszczenie urządzenia”. -
Page 78: Czyszczenie I Przechowywanie
Wybrać ilość pary • Wybrać ilość pary za pomocą przycisku pary [C] . Stopień I: mało pary (ok. 200 ml/h) Stopień II: dużo pary (ok. 400 ml/h) Po kilku minutach urządzenie zaczyna pracować ze zmienioną ilością wypływającej pary. Wyłączyć urządzenie Wskazówka •... - Page 79 Przed oczyszczeniem i usuwaniem kamienia Odłączyć urządzenie od sieci • Wyłączyć urządzenie przyciskiem ON/OFF [D]. Zielone światło sygnalizacyjne [B] gaśnie. • Wyciągnąć wtyczkę sieciową [11] z gniazdka i poczekać co najmniej 15 minut do całkowitego schłodze- nia urządzenia. Rozłożyć urządzenie •...
-
Page 80: Postępowanie W Razie Problemów
• Pozwolić na działanie roztworu aż do całkowitego rozpuszczenia kamienia. • Wylać roztwór do usuwania kamienia. Urządzenie przechylić na bok i usunąć roztwór do usuwania kamienia. • Przepłukać dokładnie urządzenie świeżą wodą. Po oczyszczeniu i usunięciu kamienia Włożyć wkładkę zmiękczającą wodę •... -
Page 81: Dane Techniczne
Przy odsyłce urządzenia należy załączyć kopię dowodu zakupu i krótki opis usterki. Obowiązują następujące warunki gwarancji: 1. Okres gwarancji na produkty firmy BEURER wynosi 3 lata lub, jeśli jest dłuższy, obowiązuje w danym kraju od daty zakupu. W przypadku roszczeń z tytułu gwarancji konieczne jest potwierdzenie daty zakupu przez okazanie dowodu zakupu lub faktury. - Page 84 Beurer GmbH • Söflinger Str. 218 • 89077 Ulm, Germany www.beurer.com • www.beurer-gesundheitsratgeber.com • www.beurer-healthguide.com...