Table des Matières
Publicité
Les langues disponibles
Les langues disponibles
Liens rapides
EN Mobile welding fume extractor with flexible arm
EN Stationary welding fume extractor with flexible arm
EN Stationary welding fume extractor with two flexible arms
NL Mobiele lasrookafzuiger met flexibele afzuigarm
NL Stationaire lasrookafzuiger met flexibele afzuigarm
NL Stationaire lasrookafzuiger met twee flexibele afzuigarmen
DE Mobiler Schweißrauchabsauger mit flexiblem Arm
DE Stationärer Schweißrauchabsauger mit flexiblem Arm
DE Stationärer Schweißrauchabsauger mit zwei flexiblen Armen
FR Epurateur mobile des fumées de soudure avec bras flexible
FR Epurateur fixe des fumées de soudure avec bras flexible
FR Epurateur fixe des fumées de soudure avec deux bras flexibles
ES
ES
ES
Aspirador fijo para humos de soldadura con brazo flexible
Aspirador fijo para humos de soldadura con dos brazos flexibles
Aspirador móvil de humos de soldadura con brazo flexible
PL
PL
PL
Stacjonarny odciąg dymów spawalniczych z dwoma ramionami elastycznymi
Stacjonarny odciąg dymów spawalniczych z ramieniem elastycznym
Mobilny odciąg dymów spawalniczych z ramieniem elastycznym
MONOGO | MONOGO
EN
Installation and user manual
NL
Installatie- en gebruikershandleiding
DE
Installations- und Betriebsanleitung
FR
Manuel d'installation et d'utilisation
ES
Manual de instalación y de uso
PL
Instrukcja użytkowania i montażu
www.plymovent.com
PLuS
Publicité
Table des Matières

Manuels Connexes pour PLYMOVENT MONOGO


Sommaire des Matières pour PLYMOVENT MONOGO
- Page 1 DE Mobiler Schweißrauchabsauger mit flexiblem Arm FR Epurateur fixe des fumées de soudure avec deux bras flexibles FR Epurateur fixe des fumées de soudure avec bras flexible FR Epurateur mobile des fumées de soudure avec bras flexible Aspirador fijo para humos de soldadura con dos brazos flexibles Aspirador fijo para humos de soldadura con brazo flexible Aspirador móvil de humos de soldadura con brazo flexible Stacjonarny odciąg dymów spawalniczych z dwoma ramionami elastycznymi Stacjonarny odciąg dymów spawalniczych z ramieniem elastycznym Mobilny odciąg dymów spawalniczych z ramieniem elastycznym MONOGO | MONOGO PLuS Installation and user manual Installatie- en gebruikershandleiding Installations- und Betriebsanleitung Manuel d’installation et d’utilisation Manual de instalación y de uso Instrukcja użytkowania i montażu www.plymovent.com...
- Page 2 Instrukcja ta ma być stosowana do standardowego modelu produktu, typu podanego na pierwszej stronie. W ten sposób producent nie może ponosić odpowiedzialności za szkody wynikłe ze stosowania niniejszej instrukcji do wersji faktycznie dostarczonej do użytkownika. Niniejsza instrukcja została napisana z wielką starannością. Jednak producent nie może być pociągnięty do odpowiedzialności za jakiekolwiek błędy zawarte w niniejszej instrukcji lub ich konsekwencje. 0000111691/150418/A MonoGo...
-
Page 3: Table Des Matières
8. Piezas de recambio 9. Schéma électrique 9. Esquema eléctrico 10. Mettre au rebut 10. Desechar Déclaration de Conformité Declaración CE POLSki Strona Wstęp 1. Wprowadzenie Opis produktu 3. Bezpieczeństwo Instalacja 5. Użytkowanie 6. Obsługa 7. Rozwiązywanie problemów 8. Części zamienne 9. Schemat elektryczny 10. Utylizacja Deklaracja CE 0000111691/150418/A MonoGo... -
Page 4: Preface
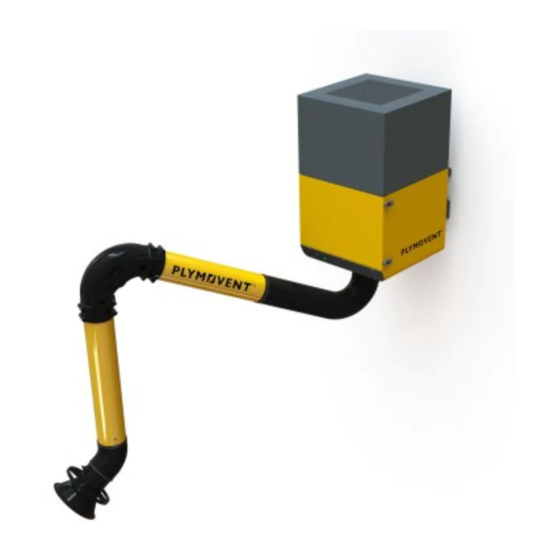
The MonoGo is a stationary filter unit with an integrated fan Suggestions and recommendations to simplify and an extraction arm. It features a pre filter cassette and a carrying out tasks and actions. HEPA filter cassette (both disposable). aTTENTiON A remark with additional information for the user. A 1.2.1 Intensity of use remark brings possible problems to the user’s We recommend to use the MonoGo for occasional welding attention. TIG welding. The MonoGo is suitable for occasional to plus CauTiON! regular welding activities Procedures, if not carried out with the necessary caution, could damage the product, the workshop or the environment. Options and accessories... -
Page 5: Dimensions
Process temperature: - min. 5°C (41°F) - nom. 20°C (68°F) Fig. 2.1 Main components and elements - max. 70°C (158°F) Max. relative humidity Operation Suitable for outdoor use The MonoGo works in accordance with the recirculation principle. Welding fume is extracted through the hood of the Transport of the unit connected extraction arm by the built-in fan. The polluted air You cannot hold the manufacturer liable for any transportation passes the pre filter cassette and is cleaned by the HEPA filter damage after delivery of the product. cassette. The cleaned air is returned in the workshop through the outlet - Handle the filter unit and the accompanying extraction arm grid on top of the unit. with care. -
Page 6: Intended Use
- Make sure that the workspace is well illuminated. - Do not leave any tools or other objects in or on the unit. - Stay alert and keep your attention to your work. Do not - The welding current return circuit between the workpiece install the product when you are under the influence of and the welding machine has a low resistance. Thus avoid drugs, alcohol or medicine. connection between the workpiece and the MonoGo, so that - Air containing particles such as chromium, nickel, beryllium, there is no possibility of the welding current flowing back to cadmium, lead etc., should never be recycled. This air must the welding machine via the protective earth conductor of always be brought outside the working area. the MonoGo. Service, maintenance and repairs - Obey the maintenance intervals given in this manual. Overdue maintenance can lead to high costs for repair and revisions and can render the guarantee null and void. - Always use Personal Protective Equipment (PPE) to avoid injury. This also applies for persons who enter the work area. - Make sure the room is sufficiently ventilated. - Use tools, materials, lubricants and service techniques which have been approved by the manufacturer. Never use worn tools and do not leave any tools in or on the product. - Use sufficient climbing gear and safety guards when working on a higher level than 2 metres (local restrictions may apply). -
Page 7: Installation
- stationary filter unit, incl. wall bracket arm to stationary unit - bolt M10x30 (2) + locknut M10 (2) + washer (4) - washer M6 (8) To install the extraction arm, do the following. - bolt M6x25 (8) Extraction arm Do a balance check of the arm before you fasten the hoses. Refer to section 6.3. In case of MonoGo: hose tube arm - extraction arm (pre-assembled; excl. hose tube) Fig. 4.2 - hose tube • Remove the locknut M20 (A) from the hinge rod (E). - hose clamp (2) • In case of a hose tube arm: put the hose tube over the - rotating flange internal rods of the arm. -
Page 8: Switch Box
• Install the hood collar (H) to the hood (G). Fasten it with applications in combination with grinding, welding or the clip. any other application that generate sparks. • Install the hose tube (A) to the hood. Refer to chapter 3 / Safety instructions / Use. • Fasten the hose tube with a hose clamp (B). Control panel The MonoGo has a separate switch box to put the unit on and off. Controls and indicators: Fig. 5.1 A Buzzer (service indicator) Indicator light Switch box with rotary switch 0-1 D (2x) E (2x) Fig. -
Page 9: Maintenance
• Close and lock the door. Clean the inside with an industrial vacuum cleaner and remove dust from the filter compartment Check sealing material of the door. Replace if necessary Extraction Check for encrusted particles. Clean if necessary Mains cord Check for damage. Repair or X *) replace if necessary Extraction arm Tubes Clean the outside with a non-aggressive detergent Clean the inside thoroughly Flexible Check for cracks or damages. hoses Replace if necessary Fig. 6.1 Replacement of the pre filter cassette Hood Check the movement of the hood. If necessary, adjust the friction; refer to section 6.3 6. The arrow indicates the airflow direction 0000111691/150418/A MonoGo EN - 8... -
Page 10: Troubleshooting
Replace the pre • Determine which joint needs more or less friction. emits an extraction clogged filter cassette • Loosen the hose tube to get access to the hinges. acoustic capacity • Pull the arm in a horizontal position. The HEPA filter Replace the HEPA signal is clogged filter cassette • Adjust the friction; refer to Fig. VI on page 54 for the adjustment points. 7. The arrow indicates the airflow direction. An incorrectly placed pre filter cassette affects the filter lifetime. 0000111691/150418/A MonoGo EN - 9... -
Page 11: Spare Parts
- clean the outside During dismantling of the unit: - make sure that the area is sufficiently ventilated, e.g. by a mobile ventilation unit After dismantling of the unit: - clean the dismantling area 10.2 Disposal Dispose of the pollutants and dust, together with the used filters, in a professional manner in accordance with federal, state or local regulations. CE DECLaRaTiON CE declaration of conformity for machinery We, Plymovent Manufacturing B.V., Koraalstraat 9, 1812 RK Alkmaar, Netherlands, herewith declare, on our own responsibility, that the products: - MonoGo - MonoGo plus 0000111691/150418/A MonoGo EN - 10... -
Page 12: Identificatie Van Het Product
Productaanduidingen VOORWOORD Tenzij specifiek vermeld, is de inhoud van deze handleiding van toepassing op zowel de MonoGo als de MonoGo plus Gebruik van deze handleiding Deze handleiding is bedoeld als naslagwerk waarmee iNLEiDiNG professionele, geschoolde en daartoe bevoegde gebruikers het aan de voorzijde van dit document vermelde product op veilige wijze kunnen installeren, gebruiken, onderhouden en Identificatie van het product repareren. Het identificatieplaatje bevat o.a. de volgende gegevens: Pictogrammen en symbolen - productnaam - serienummer In deze handleiding worden de volgende pictogrammen en - aansluitspanning en frequentie symbolen gebruikt: - vermogen algemene beschrijving Suggesties en adviezen om de betreffende taken of handelingen gemakkelijker te kunnen uitvoeren. -
Page 13: Productbeschrijving
Zie Fig. II op pag. 52. Omgevings- en procescondities Procestemperatuur: - min. 5°C - nom. 20°C Fig. 2.1 Hoofdcomponenten en -elementen - max. 70°C Max. relatieve vochtigheid Werking Geschikt voor buitengebruik De MonoGo werkt op basis van het recirculatieprincipe. De ingebouwde ventilator zuigt de lasrook via de kap van de Transport van de unit aangesloten afzuigarm aan. De vervuilde lucht passeert de De fabrikant kan op geen enkele wijze verantwoordelijk voorfiltercassette en wordt verder gereinigd door de HEPA worden gesteld voor transportschade na aflevering. filtercassette. De schone lucht wordt via het uitblaasrooster aan de - Ga altijd voorzichtig met de filterunit en de bijbehorende bovenkant van de unit weer in de ruimte teruggevoerd. afzuigarm om. 2.2.1... - Page 14 - Draag tijdens installatie altijd persoonlijke product, voldoende goedgekeurde brandblussers (geschikt beschermingsmiddelen (PBM) ter voorkoming van letsel. Dit voor brandklassen ABC) aanwezig zijn. geldt ook voor personen die tijdens installatie in het - Laat geen gereedschap op of in de unit achter. werkgebied aanwezig zijn. - De retourstroom tussen het werkstuk en de lasmachine heeft - Gebruik bij werkzaamheden hoger dan 2 meter goedgekeurd een lage weerstand. Zorg daarom dat er géén contact is klimmateriaal voor werken op de desbetreffende hoogte tussen het werkstuk en de MonoGo, om te voorkomen dat er (houd rekening met eventuele lokale voorschriften). lasstroom via de aardleiding van de MonoGo naar de - Installeer het product nooit voor in-, uit- en doorgangen die lasmachine terugstroomt. zijn bedoeld voor hulpdiensten. - Houd rekening met eventuele gas-, water- en Service, onderhoud en reparatie elektraleidingen.. - Respecteer de in deze handleiding gegeven - Zorg voor voldoende verlichting. onderhoudsintervallen. Achterstallig onderhoud kan leiden - Blijf voortdurend opletten en houd uw aandacht bij het werk. tot hoge kosten voor reparaties en revisies en kan Installeer het product niet als u onder invloed bent van aanspraken op garantie doen vervallen.
-
Page 15: Installatie
- stationaire filterunit, incl. wandbeugel arm aan stationaire unit - bout M10x30 (2) + borgmoer M10 (2) + sluitring (4) - sluitring M6 (8) Monteer de afzuigarm als volgt. - bout M6x25 (8) Afzuigarm Controleer de balansinstelling van de arm voordat u de slangen bevestigt. Zie par. 6.3. In geval van een MonoGo: slangarm - afzuigarm (voorgemonteerd; excl. slang) Fig. 4.2 - slang • Verwijder de borgmoer M20 (A) van de scharnierstang (E). - slangklem (2) • In geval van een slangarm: schuif de slang over de interne - draaiflens stangen van de arm. - draaischarnier, incl. manchet • Schuif de slangklem (F) en het draaischarnier (incl. -
Page 16: Montage Van De Kap
• Monteer de kraag (H) aan de kap (G) en bevestig deze met Brandgevaar! Gebruik het product niet voor de clip. polijsten in combinatie met slijpen, lassen of andere • Schuif de slang (A) over de kap. toepassingen die vonken veroorzaken. • Bevestig de slang met een slangklem (B). Zie hoofdstuk 3 / Veiligheidsvoorschriften / Gebruik. Bedieningspaneel De MonoGo heeft een apart bedieningselement om de unit aan en uit te schakelen. Bedieningsorganen en controlelampen: Fig. 5.1 A Zoemer (service-indicator) Controlelamp Bedieningselement met draaischakelaar 0-1 D (2x) E (2x) Fig. 5.1 Bedieningsorganen en controlelampen Gebruik Fig. -
Page 17: Periodiek Onderhoud
Voedings- Controleer op beschadigingen. Indien X *) kabel nodig repareren of vervangen. Afzuigarm Buizen Reinig de buitenkant met een niet-agressief schoonmaakmiddel Reinig de binnenkant grondig Flexibele Controleer op beschadigingen. Indien slangen nodig vervangen Fig. 6.1 Vervanging van de voorfiltercassette Controleer de beweging van de kap. Pas indien nodig de frictie aan; zie par. 6.3 6. De pijl geeft de luchtstroomrichting door het filter aan 0000111691/150418/A MonoGo NL - 16... -
Page 18: Verhelpen Van Storingen
Vervang ook de HEPA filtercassette • Bepaal welk scharnier meer of minder frictie nodig heeft. De zoemer Onvoldoende Voorfilter is Vervang de • Maak de slang los om toegang te krijgen tot het scharnier. geeft een afzuig- verstopt voorfiltercassette • Trek de arm in een horizontale positie. akoestisch capaciteit HEPA filter is Vervang de HEPA signaal verstopt filtercassette 7. De pijl geeft de luchtstroomrichting door het filter aan. Een verkeerd geplaatste voorfiltercassette verkort de standtijd van het filter. 0000111691/150418/A MonoGo NL - 17... -
Page 19: Reserveonderdelen
Wij, Plymovent Manufacturing B.V., Koraalstraat 9, 1812 RK de gewenste goede niet correct 54 voor de Alkmaar, Nederland, verklaren geheel onder eigen positie staan afzuiging afstelpunten verantwoordelijkheid dat de producten: Het lukt niet - MonoGo de arm in de gewenste - MonoGo plus positie te krijgen waarop deze verklaring betrekking heeft, in overeenstemming zijn met de bepalingen van de volgende richtlijnen: - Machinerichtlijn 2006/42 EC RESERVEONDERDELEN - EMC 2014/30 EU - Laagspanningsrichtlijn 2014/35 E... -
Page 20: Identifizierung Des Produktes
KUA-4 18 kg werden, wenden Sie sich bitte an Ihren Händler. Er ist gern Ventilator bereit, Ihnen zu helfen. Halten Sie in diesem Fall folgende Ventilatortyp radial Angaben bereit: - Produktname Absaugkapazität max. 850 m�/h - Seriennummer Ventilatorgeschwindigkeit 2800 UpM Schalldruckpegel 67 dB(A) laut ISO 3746 Diese Angaben finden Sie auf dem Typenschild. Produktbezeichnungen 1. ca. 1 Spule Schweißdraht (Massivdraht) bzw. 7,5 kg an Schweißelektroden Falls nicht anders spezifiziert, gilt der Inhalt dieser Anleitung monatlich sowohl für das Modell MonoGo als auch das Modell MonoGo plus 2. ca. 2 Spulen Schweißdraht (Massivdraht) bzw. 15 kg an Schweißelektroden monatlich 0000111691/150418/A MonoGo DE - 19... -
Page 21: Sicherheitsvorschriften
Prozessbedingungen Prozesstemperatur: - min. 5°C - nom. 20°C - max. 70°C Fig. 2.1 Hauptbestandteile und -Elemente Max. relative Feuchtigkeit Außeneinsatz zugelassen nein Arbeitsweise Transport der Einheit Die MonoGo arbeitet nach dem Rückführungsprinzip. Der integrierte Ventilator saugt den Schweißrauch über die Haube Der Hersteller kann in keiner Weise für Transportschäden nach des angeschlossenen Absaugarms ab. Die verschmutzte Luft Ablieferung haftbar gemacht werden. passiert die Vorfilter-Kassette und wird von dem HEPA- Kassettenfilter gereinigt. - Gehen Sie immer vorsichtig mit der Filtereinheit und dem Die gereinigte Luft wird durch das an der Obenseite der Einheit dazugehörigen Absaugarm um. befindlichen Ausblasgitter wieder in die Werkstatt - Vor dem Transport muß der Absaugarm völlig entkoppelt zurückgeführt. werden. Koppeln Sie den Absaugarm los durch das Ankopplungsverfahren in entgegengesetzter Richtung 2.2.1... -
Page 22: Bestimmungsgemäße Verwendung
Produkts zugelassene Feuerlöschgeräte (geeignet für die während der Montage oder Wartung den Arbeitsbereich Brandklassen ABC) in ausreichender Zahl vorhanden sind. betreten. - Keine Werkzeuge oder andere Gegenstände auf bzw. in der - Bei Arbeiten auf Höhen größer als 2 Meter geeignete Einheit zurücklassen. Kletterausrüstung und Schutzvorrichtungen verwenden! - Die Schweißstromrückleitung zwischen Werkstück und (möglicherweise gelten örtliche Einschränkungen) Schweißmaschine besitzt einen niedrigen Widerstand. - Das Produkt nie vor Ein-, Aus- oder Durchgängen Deswegen unbedingt eine Verbindung zwischen Werkstück installieren, die für Rettungsdienste u.a. zugänglich sein und MonoGo vermeiden, damit der Schweißstrom nicht über müssen. die Schutzerdungsleitung des MonoGo zurück in die - Auf kreuzende Gas- und Wasserleitungen sowie elektrische Schweißmaschine fließt. Kabel achten! - Auf ausreichende Ausleuchtung des Arbeitsbereiches achten! Service, Wartung und Reparaturen - Seien Sie immer aufmerksam und bleiben Sie es bei der - Beachten Sie die angegeben Wartungsintervalle. Überfällige Arbeit. Installieren Sie das Produkt nie, wenn Sie unter dem Wartung kann zu hohen Kosten für Reparaturen und Einfluß von Drogen, Alkohol oder Medikamenten stehen. Revisionen führen und kann den Garantieanspruch nichtig - Luft, die Chrom-, Nickel-, Beryllium-, Cadmium- oder machen. - Page 23 Fig. 4.1 Montage der Wandhalterung - Befestigungsschraube M10x30 (2) + Sicherungsmutter M10 (2) + Unterlegscheibe (4) absaugarm an stationärer Filtereinheit - Unterlegscheibe M6 (8) - Befestigungsschraube M6x25 (8) Zur Montage des Absaugarms wie folgt vorgehen. absaugarm hiNWEiS Vor Befestigung der Schläuche überprüfen, ob sich Bei einem MonoGo: Schlaucharm der Absaugarm im Gleichgewicht befindet. Siehe - Absaugarm (vormontiert; exkl. Schlauchrohr) Abschnitt #. Siehe Abschnitt 6.3. - Schlauchrohr - Schlauchklemme (2) Fig. 4.2 - Drehflansch • Sicherungsmutter M20 (A) von der Scharnierstange (E) - Schwenkring, inkl. Gummimanschette entfernen.
-
Page 24: Montage Der Haube
Metallrohr-Arm (KUA): siehe Fig. 4.4 Siehe Kapitel 3 / Sicherheitsvorschriften / • Das am Haubengelenk befestigte Befestigungsmaterial Gebrauch. lösen. • Die Absaughaube (G) mit Schraube (F), zwei Unterlegscheiben (E), zwei Federscheiben (D) und Bedienfeld Sicherungsmutter (C) montieren. MonoGo umfaßt eine separate Fernbedienung um die Einheit • Haubenkragen (H) an der Absaughaube (G) befestigen. ein- und auszuschalten. Bedienelemente und Kontrolllampen: Dabei mit der Lasche befestigen. • Schlauchrohr (A) an der Absaughaube anschließen. Fig. 5.1 • Schlauchrohr mit einer Schlauchklemme (B) befestigen. A Summer (Wartungsanzeige) Kontrollleuchte Bedienelement mit Drehschalter 0-1 D (2x) E (2x) Fig. -
Page 25: Regelmäßige Wartung
Industriestaubsauger reinigen und gültigen Bestimmungen entsorgen. den Staub aus dem • Neue Vorfilter-Kassette einsetzen. Der auf dem Rahmen Filterkompartiment entfernen. befindliche Pfeil muss nach oben zeigen. Das Dichtungsmaterial kontrollieren. • Tür schließen und verriegeln. Falls erforderlich austauschen. Ventilator Auf Schmutzverkrustungen kontrollieren. Falls erforderlich reinigen. Netzkabel Auf Beschädigung kontrollieren. Falls X *) erforderlich reparieren bzw. austauschen. absaugarm Röhren Das Äußere mit einem milden Reinigungsmittel reinigen Das Innere gründlich reinigen 6. Der Pfeil zeigt die Luftstromrichtung an 0000111691/150418/A MonoGo DE - 24... - Page 26 Seite 54. FEhLERBEhEBuNG Wenn die Einheit nicht oder nicht ordnungsgemäß funktioniert, dann können Sie möglicherweise anhand der folgenden Checkliste die Störung selbst beheben. Wenn dies nicht der Fall ist, wenden Sie sich bitte an Ihren Händler. WaRNuNG Beim Ausführen der untenstehenden Arbeiten die in Kapitel 3 beschriebenen Sicherheitsvorschriften befolgen. Fig. 6.2 Entnehmen des HEPA-Kassettenfilters Fig. 6.3 • Neuen HEPA-Kassettenfilter einsetzen. Die seitlichen Stifte passen genau in die Schlitze (A) in dem Gehäuse. • HEPA-Kassettenfilter mit den Laschen verriegeln (B). Die Laschen unbedingt in die Schlitze (in einem Winkel von 45 Grad) drücken. • Flügelmutter wieder festdrehen. • Die Vorfilter-Kassette wieder einsetzen. Der auf dem Rahmen befindliche Pfeil muss nach oben zeigen. upwards • Close and lock the door. 7. Der Pfeil zeigt die Luftstromrichtung an. Eine nicht korrekt eingebaute Vorfilterkassette beeinträchtigt die Filterlebensdauer. 0000111691/150418/A MonoGo DE - 25...
-
Page 27: Entsorgung
Ebenfalls den EG-Konformitätserklärung für Maschinen HEPA- Kassettenfilter Wir, Plymovent Manufacturing B.V., Koraalstraat 9, 1812 RK austauschen Alkmaar, die Niederlande, erklären hiermit eigenverantwortlich Der Summer Unzu- Vorfilter Vorfilter-Kassette dass die Produkte: gibt ein reichende gesättigt austauschen - MonoGo akustisches Absaug- HEPA-Filter HEPA- - MonoGo plus Warnsignal leistung gesättigt Kassettenfilter austauschen worauf sich diese Erklärung bezieht, hergestellt sind: Absaugarm Rauch Reibung ist Reibung einstellen;... -
Page 28: Avant-Propos
Suggestions et conseils en vue de faciliter Description générale l’exécution des divers travaux ou manipulations. AttEntIon Le MonoGo est une unité de filtration stationnaire avec un Remarque avec complément d’information pour ventilateur intégré et un bras d’aspiration. Il comprend un l’utilisateur. Remarque attirant l’attention de préfiltre à... -
Page 29: Transport De La Machine
70°C (158°F) Fonctionnement Humidité relative max. Le MonoGo fonctionne selon le principe de recyclage. La fumée SApte à l’usage extérieure de soudure est aspirée par le ventilateur intégré à la hotte du bras d’aspiration raccordé. L’air pollué passe à travers le transport de la machine préfiltre à... - Page 30 Évitez par conséquent toute liaison entre la pièce toujours être évacué en dehors de l’atelier. à souder et le MonoGo, afin qu’il soit impossible que le courant de soudage ne retourne au poste de soudage via le conducteur de protection du MonoGo.
-
Page 31: Equipement De Protection Individuelle (Epi)
- boulon M6x25 (8) Bras sur unité fixe Bras d’aspiration Pour installer le bras d’aspiration, procédez comme suit. En cas d’un MonoGo : bras tuyau ConsEIL - bras d’aspiration (pré-assemblé ; hors tuyau) Effectuez un contrôle d’équilibrage du bras avant de - tuyau fixer les tuyaux. -
Page 32: Montage De La Hotte
à toute autre application produisant des étincelles. Reportez-vous au chapitre 3 / Instructions de sécurité / Utilisation. 0000111691/011216/0MonoGoLincolnALWAlentec & Orionnon-branded0000000000/ddmmyy/0 Lincoln product name0000000000/ddmmyy/0 ALW 0000111691/150418/A MonoGo FR - 31 product name0000000000/ddmmyy/0 Alentec & Orion product name0000000000/ddmmyy/0 non-branded product name FR - 31... -
Page 33: Entretien
Le calendrier d’entretien indiqué peut varier en fonction des Le MonoGo est équipé d’un boîtier interrupteur séparé conditions de travail et d’exploitation. C’est pourquoi - outre le permettant de mettre en marche et d’arrêter l’unité. Fonctions calendrier d’entretien périodique indiqué dans ce manuel - il et indicateurs : est recommandé... -
Page 34: Préfiltre À Cassette
La flèche indique le sens du flux d’air cassette affecte la durée de vie du filtre. 0000111691/011216/0MonoGoLincolnALWAlentec & Orionnon-branded0000000000/ddmmyy/0 Lincoln product name0000000000/ddmmyy/0 ALW 0000111691/150418/A MonoGo FR - 33 product name0000000000/ddmmyy/0 Alentec & Orion product name0000000000/ddmmyy/0 non-branded product name FR - 33... -
Page 35: Pièces Détachées
Éliminez les polluants et la poussière, avec les filtres usagés, HEPA d’une manière professionnelle, conformément aux réglementations fédérales, gouvernementales ou locales. 0000111691/011216/0MonoGoLincolnALWAlentec & Orionnon-branded0000000000/ddmmyy/0 Lincoln product name0000000000/ddmmyy/0 ALW 0000111691/150418/A MonoGo FR - 34 product name0000000000/ddmmyy/0 Alentec & Orion product name0000000000/ddmmyy/0 non-branded product name FR - 34... -
Page 36: Déclaration De Conformité
DéCLArAtIon DE ConForMIté Déclaration CE de Conformité pour les machines Nous, soussignés, Plymovent Manufacturing B.V., Koraalstraat 9, 1812 RK Alkmaar, Pays-Bas, déclarons que les machines désignées ci-après : - MonoGo - MonoGo plus à lesquelles la présente déclaration se rapporte, sont... -
Page 37: Preámbulo
PREáMBuLO A no ser que se haya indicado específicamente, el contenido de este manual es aplicable al MonoGo y MonoGo plus acerca de este manual Este manual se editó en concepto de documento de referencia iNTRODuCCiÓN para usuarios profesionales, cualificados y debidamente autorizados. Utilizando dicho manual podrá instalar, hacer funcionar, mantener y reparar de una forma segura el producto Identificación del producto que se indica en la cubierta. La placa de características contiene los siguientes datos: Pictogramas y símbolos - denominación del producto - número de serie En el presente manual figuran los siguientes pictogramas y - tensión de conexión y frecuencia... -
Page 38: Product Description
Temperatura del proceso: Fig. 2.1 Componentes y elementos principales - min. 5°C (41°F) - nom. 20°C (68°F) - máx. 70°C (158°F) Funcionamiento Humedad relativa del aire El MonoGo trabaja según el principio de recirculación. Los máxima humos de soldadura se aspiran a través de la campana del Apto para uso en exteriores brazo de aspiración conectado mediante el ventilador empotrado. El aire contaminado pasa por el casete de prefiltro Transporte de la máquina y se limpia en el casete de filtro HEPA. El aire limpio vuelve al taller a través de la rejilla de salida El fabricante no acepta responsabilidad alguna por daños de encima de la unidad. -
Page 39: Datos Técnicos
- El circuito de retorno de la corriente de soldadura entre la de salvamento o similares. pieza de trabajo y la soldadora tiene una baja resistencia. - Tenga cuidado con las conducciones de gas y agua y los Por tanto, evite la conexión entre la pieza de trabajo y el cables eléctricos. MonoGo de modo que no exista la posibilidad de que la - Asegúrese de que la zona de trabajo esté bien iluminada. corriente de soldadura fluya de nuevo hacia la soldadora a - Esté atento y preste mucha atención a su trabajo. No instale través del conductor protector de toma de tierra del MonoGo. el producto nunca en estado de embriaguez o tras ingerir medicamentos. Servicio, mantenimiento y reparaciones - Observe los intervalos de mantenimiento proporcionados en este manual. -
Page 40: Instalación
Fig. 4.1 Montaje del soporte de pared - arandela M6 (8) - perno M6x25 (8) Brazo a unidad fija Brazo de aspiración Para instalar el brazo de aspiración, proceda de la siguente manera. En caso de MonoGo: brazo de tubo manguera - brazo de aspiración (premontado; excl. tubo manguera) CONSEjO - tubo manguera Compruebe el equilibrio del brazo antes de fijar las - abrazadera (2) mangueras. Consulte el apartado 6.3. -
Page 41: Uso
• Monte el cuello de la campana (H) en la campana (G). Fíjelo con la pinza. • Monte la caja de interruptores en una posición apropiada. • Monte el tubo manguera (A) a la campana. • Conecte la caja de interruptores a la unidad de filtro y a la • Fije el tubo manguera con una abrazadera de manguera red conforme al esquema eléctrico entregado por separado. (B). ¡aDVERTENCia! ¡Peligro de incendio! No utilice el producto para aplicación de pulido en combinación con amolado, soldadura y cualquier otra aplicación que genere chispas. Consulte el apartado 3 / Normativas de seguridad / Uso 0000111691/150418/A MonoGo ES - 40... -
Page 42: Panel De Mandos
Panel de mandos ¡aDVERTENCia! La falta de mantenimiento de los equipos puede El MonoGo tiene una caja de interruptores separada para provocar riesgos de incendios. encender y apagar la unidad. Controles e indicadores: Fig. 5.1 Los intervalos de mantenimiento que se indican a continuación A Zumbador (indicador de servicio) dependen de las condiciones de trabajo y servicio. Por esta razón y de forma adicional a las tareas de mantenimiento Luz indicadora Caja de interruptores con interruptor rotativo 0-1 regulares que se describen en este manual, se recomienda someter al equipo anualmente a una revisión completa. A estos efectos, diríjanse a su proveedor. Componente Tarea Frecuencia: cada X meses X =12 Unidad de filtro Caja Limpie el exterior por medio de un detergente no agresivo. -
Page 43: Brazo De Tubo Metálico (Kua)
SuBSaNaCiÓN DE FaLLOS • Retire el casete de prefiltro. • Desenrosque las tuercas de mariposa (C) y ponga las Si la unidad no funcionase o no lo hiciera de forma correcta, es pinzas (B) en la posición vertical. Asegúrese de que el posible que pueda subsanar el problema Vd. mismo con la tirador de la tuerca de mariposa esté en posición vertical. ayuda de la tabla de chequeo que se da a continuación. En • Levante suavemente y retire el filtro principal (D). caso contrario, se ruega dirigirse a su proveedor. • Elimine el casete de filtro HEPA usado conforme a la normativa nacional o local. ¡aDVERTENCia! Observe las normativas de seguridad que están escritas en el capítulo 3 cuando lleve a cabo las siguientes actividades. Fig. 6.2 Quitar el casete de filtro HEPA Fig. 6.3 • Ponga un nuevo casete de filtro HEPA en la unidad. Las clavijas laterales encajan exactamente en las hendiduras (A) en la caja. 7. La flecha indica la dirección del flujo de aire. Un casete de prefiltro colocado 6. La flecha indica la dirección del flujo de aire. incorrectamente afecta negativamente a la vida útil del filtro. 0000111691/150418/A MonoGo ES - 42... -
Page 44: Piezas De Recambio
Sustituya también defectuoso el casete del filtro Los abajo firmantes, Plymovent Manufacturing B.V., HEPA Koraalstraat 9, 1812 RK Alkmaar, Países Bajos, declaran, bajo El zumbador Casete de Sustituya el casete su exclusiva responsabilidad, que los productos: emitirá una rendimiento prefiltro de prefiltro - MonoGo señal acústica de la obstruido - MonoGo plus aspiración es Casete de filtro Sustituya el casete insuficiente HEPA obstruido de filtro HEPA son conforme a las disposiciones de las Directivas: - Directiva de máquinas 2006/42 EC El brazo de... -
Page 45: Identyfikacja Produktu
Identyfikacja produktu Niniejsza instrukcja jest przeznaczona do stosowania jako Tabliczka znamionowa zawiera, między innymi, następujące wytyczne dla profesjonalnych, dobrze wyszkolonych i dane: uprawnionych użytkowników, aby móc bezpiecznie instalować, - nazwa urządzenia obsługiwać, konserwować i naprawiać produkt wymieniony na - numer seryjny okładce niniejszego dokumentu. - napięcie zasilania i częstotliwość - pobór energii Piktogramy i symbole Poniższe piktogramy i symbole są używane w tej instrukcji: Ogólny opis MonoGo to stacjonarne urządzenie filtrujące ze zintegrowanym WSkaZÓWka wentylatorem i ramieniem odciągowym. Urządzenie posiada Sugestie i zalecenia, aby ułatwić wykonywanie wkład filtra wstępnego i kasetę filtra HEPA (oba jednorazowe). zadań i czynności. uWaGa 1.2.1 Intensywność użytkowania Uwaga z dodatkowymi informacjami dla Zalecamy używanie urządzenia MonoGo do sporadycznego użytkownika. Wskazówka zwraca uwagę spawania i spawania metodą TIG. Urządzenie MonoGo użytkownika na ewentualne problemy. -
Page 46: Transport Urządzenia
Zakres pracy Zobacz Rys. Fig. II na stronie 52. Warunki pracy urządzenia Temperatura pracy: - min. 5°C - normal. 20°C - maks. 70°C Rys. 2.1 Najważniejsze części i elementy Maksymalna wilgotność względna Użytkowanie Odpowiednie do stosowania na zewnatrz MonoGo pracuje zgodnie z zasadą recyrkulacji. Dymy Transport urządzenia spawalnicze są pobierany przez ssawę w ramieniu odciągowym dzięki wbudowanemu wentylatorowi. Zanieczyszczone Nie można przenosić odpowiedzialności na producenta za powietrze przechodzi przez kasetę filtra wstępnego i jest wszelkie szkody transportowe powstałe po dostarczeniu oczyszczane przez kasetę filtra HEPA. produktu. Oczyszczone powietrze jest zwracane do warsztatu poprzez kratkę wylotową na górze urządzenia. - Poruszaj urządzeniem i współpracującym ramieniem z odpowiednią ostrożnością. 2.2.1 Wskazanie wymiany filtra - Kompletnie zdemontować ramię odciągowe przed... - Page 47 - Upewnij się, że w warsztacie, w pobliżu produktu, znajduje - Podczas instalacji, należy zawsze używać środki ochrony się wystarczająca ilość gaśnic przeciwpożarowych indywidualnej (ŚOI), aby uniknąć obrażeń. Dotyczy to (zatwierdzonych odpowiednio dla klas pożarowych ABC). również osób, które wchodzą na obszar roboczy podczas - Nie pozostawiaj żadnych narzędzi ani innych przedmiotów w instalacji. urządzeniu ani na urządzeniu. - Podczas pracy na wysokości większej niż 2 metry używaj - Prąd spawania pomiędzy obrabianym przedmiotem a zabezpieczeń chroniących przed upadkiem (zwróć uwagę na spawarką ma niską odporność. W ten sposób unika się lokalne przepisy). związku między przedmiotem obrabianym i MonoGo, tak że - Nie instaluj produktu przed wejściami i wyjściami, które nie ma możliwości powrotu prądu spawania płynącego z muszą być używane w przypadku akcji ratunkowej. powrotem do spawarki poprzez przewód uziemienia w - Uważaj na wszelkie rury gazowe i wodne oraz kable MonoGo. elektryczne. - Upewnij się, że obszar roboczy jest dobrze oświetlony. Obsługa, konserwacja i naprawy - Bądź czujny i zachowaj uwagę przy pracy. Nie należy - Należy przestrzegać terminów konserwacji podanych w instalować produktu, gdy jesteś pod wpływem narkotyków, niniejszej instrukcji. Zwlekanie z czynnościami alkoholu lub leków.
- Page 48 Jednostka filtracyjna - stacjonarne urządzenie filtrujące, w tym wspornik ścienny - śruba M10x30 (2) + nakrętek zabezpieczających M10 (2) + podkładka (4) - podkładka M6 (8) - nakrętka M6x25 (8) Rys. 4.1 Montaż wspornika ściennego Ramię odciągowe Ramię do jednostki stacjonarnej W przypadku MonoGo: ramię elastyczne • Aby zainstalować ramię odciągowe, należy postępować w - ramię odciągowe (wstępnie zmontowane, z wyjątkiem następujący sposób. przewodu elastycznego) • - przewód elastyczny WSkaZÓWka - opaska zaciskowa (2) Wykonaj kontrolę równowagi ramienia przed - kołnierz obrotowy założeniem węży. Zobacz rozdział 6.3.
- Page 49 E (2x) D (2x) • Zamontuj ssawę (G) za pomocą śruby (F), 2 podkładek (E), 2 podkładek sprężystych (D) i nakrętki blokującej (C). • Zamontuj kołnierz (H) na ssawie (G). Zaczep go za pomocą klipsa. • Zamontuj węż (A) do ssawy. • Zamocuj węża do ssawy za pomocą opaski zaciskowej (B). Rys. 4.4 Montaż ssawy (ramię metalowe / KUA) Wyłącznik • Zainstaluj wyłącznik w odpowiedniej pozycji. • Podłączyć skrzynkę rozdzielczą do jednostki filtrującej i do sieci elektrycznej zgodnie z dostarczonym oddzielnie schematem elektrycznym UŻyTKOWANIE OSTRZEŻENIE! Zagrożenie pożarowe! Nie używać produktu do aplikacji polerowania w połączeniu ze szlifowaniem, spawaniem lub innych aplikacji, które generują iskry. Patrz rozdział 3 / Bezpieczeństwo / Użytkowanie. 0000111691/150418/A MonoGo PL - 48...
-
Page 50: Panel Sterowania
Panel sterowania OSTRZEŻENIE! Przekraczanie terminów konserwacji może Urządzenie MonoGo ma oddzielny wyłącznik, który umożliwia spowodować pożar. włączanie i wyłączanie urządzenia. Kontrolki i wskaźniki: Rys. 5.1 Podane interwały konserwacyjne mogą się różnić w zależności A Brzęczyk (wskaźnik serwisowy) od konkretnych warunków pracy i otoczenia. Dlatego też zaleca się, aby dokładnie kontrolować kompletny produkt raz Lampka kontrolki Wyłącznik obrotowy 0-1 na rok podczas okresowej konserwacji. W tym celu należy skontaktować się z dostawcą. komponenty Czynność Częstotliwość: każdego X miesiąca X =12 Jednostka filtracyjna Obudowa Wyczyść z zewnątrz przy użyciu łagodnych detergentów Wyczyść wewnątrz przy użyciu odkurzacza przemysłowego i usunąć pył z przedziału wkładu filtracyjnego Sprawdź materiał uszczelniający Rys. 5.1 Kontrolki i wskaźniki drzwi. Wymień w razie potrzeby. -
Page 51: Rozwiązywanie Problemów
Rys. 6.2 regulacji. • Odłączyć zasilanie urządzenia. • Otwórz przednie drzwiczki (A). • Wyjmij kasetę filtra wstępnego. ROZWIąZyWANIE PROBlEMóW • Poluzuj nakrętki motylkowe (C) i umieść zaciski (B) w Jeśli jednostka nie działa (prawidłowo), zapoznaj się z poniższą pozycji pionowej. Upewnij się, że uchwyt nakrętki listą kontrolną, aby sprawdzić, czy można naprawić tą usterkę motylkowej znajduje się w pozycji pionowej. we własnym zakresie. Jeżeli nie będzie to możliwe, należy • Delikatnie pociągnij i wyjmij filtr HEPA (D). skontaktować się z dostawcą lub autoryzowanym serwisem. • Utylizuj zużytą kasetę filtra HEPA zgodnie z lokalnymi przepisami. OSTRZEŻENIE Przestrzegaj przepisów bezpieczeństwa, które są napisane w rozdziale 3 podczas przeprowadzania czynności poniżej. Rys. 6.2 Usunięcie kasety filtra HEPA 7. Strzałka wskazuje kierunek przepływu powietrza. Nieprawidłowo umieszczona 6. Strzałka wskazuje kierunek przepływu powietrza kaseta filtra wstępnego wpływa na jego żywotność. 0000111691/150418/A MonoGo PL - 50... - Page 52 Deklaracja zgodności CE dla maszyn Wymień również kasetę filtra HEPA My, Plymovent Manufacturing B.V., Koraalstraat 9, 1812 RK Brzęczyk Słaba siła Filtr wstępny Wymień kasetę Alkmaar, Holandia, niniejszym oświadczamy, na własną emituje odciągu jest zatkany filtra wstępnego odpowiedzialność, że produkt (ów): sygnał Filtr HEPA jest Wymień kasetę - MonoGo akustyczny zatkany filtra HEPA MonoGo plus Ramię Rozchodzenie Ustawienia Dostosuj opór; którego dotyczy niniejsza deklaracja, jest / są zgodne z odciągowe się dymów; oporu nie są patrz rys./Fig. VI nie pozostaje brak właściwe na stronie 54 warunkami następujących dyrektyw:...
- Page 53 Installation height 29.4 inch 15.0 Dimensions Afmetingen 2100-3100 83-122 (7-10 ft.) Abmessungen Recommended installation height (E) + hole pattern Dimensions Aanbevolen installatiehoogte (E) + gatenpatroon Dimensiones Empfohlene Installationshöhe (E) + Bohrmuster Dimensioni Hauteur recommandée d’installation (E) + configuration des trous Wymiary Altura de instalación recomendada (E) + diseño de agujeros Fig. II Working range Altezza di installazione raccommandata (E) + disposizione dei fori Zalecana wysokość montażu (E) + wzór otworów EA-2 KUA-2 EA-3 KUA-3 EA-4 KUA-4 Working range Werkbereik Bereich Portée Alcance de trabajo 0000111691/150418/A MonoGo...
- Page 54 Fig. IV Positioning of the extraction arm 400-800 mm 800 mm (16-32 in.) 32 in.) Positioning of the extraction arm Positionering van de afzuigarm Positionierung des Absaugarms Positionnement du bras d’aspiration Posicionamiento del brazo de aspiración Posizionamento del braccio aspirante Ustawienie ramienia odciągowego Fig. V Reset Reset button Resetknop Rückstelltaste Bouton de réinitialisation Botón de reinicio Przycisk resetowania 0000111691/150418/A MonoGo...
- Page 55 Fig. VI Adjustment Adjustment of the extraction arm | Adjustment points Ajuste del brazo de aspiración | Puntos de ajuste Afstellen van de afzuigarm | Afstelpunten Regolazione del braccio | Punti di regolazione Einstellung des Absaugarms | Einstellpunkte Réglage du bras d’aspiration | Points de réglage Regulacja ramienia odciągowego | Punkty dostosowania E (2x) D (2x) 0000111691/150418/A MonoGo...
- Page 56 Fig. VII Exploded view EconomyArm 0000101944 0000101537 0000101917 0000101918 0000101919 0000101903 0000102989 0000101395 0000101912 0000101912 (2x) 0000101908 0000102409 0000101550 0000101911 0000101937 Exploded view hose tube arm (EconomyArm) Exploded view slangarm (EconomyArm) Explosionszeichnung Schlaucharm (EconomyArm) Vue éclatée du bras tuyau (EconomyArm) Vista de despiece brazo de tubo manguera (EconomyArm) Visa esplosa del braccio a tubo (EconomyArm) Widok ramienia z przewodem elastycznym (EconomyArm) 0000111691/150418/A MonoGo...
- Page 57 0000101912 Placa de fricción 83x10x3 mm Podkładka oporowa 83x10x3 (juego de 2) mm (zestaw 2 szt.) 0000101937 Malla de seguridad Ø 300 mm Siatka zabezpieczająca Ø 300 0000101944 Brida de conexión con rejilla Kołnierz przyłączeniowy z siatką 0000102409 Brida giratoria (cojinete de Kołnierz obrotowy bolas) (łożyskowany) 0000102989 Cuello de goma Ø 160 mm Opaska gumowa Ø 160 mm Ea-2 (2 m) 0000101917 Manguera L=2500 mm/Ø 161 Wąż L = 2500 mm/Ø 161 mm, mm, incl. 2 abrazaderas w tym. 2 opaski zaciskowe Ea-3 (3 m) 0000101919 Manguera L=3500 mm/Ø 161 Wąż L = 3500 mm/Ø 161 mm, mm, incl. 2 abrazaderas w tym. 2 opaski zaciskowe 0000111691/150418/A MonoGo...
- Page 58 0000101907 0000101395 0000101916 0000101903 0000102199 0000102396 0000102398 0000102400 0000102384 0000102387 0000102385 0000102388 0000102386 0000102389 0000101904 0000101905 0000101913 0000101914 0000102397 0000102399 0000102401 0000101912 (2x) 0000102960 0000101906 0000101915 0000101911 0000101908 0000101550 0000114072 0000101937 0000102525 Exploded view metal tube arm (KUA) Exploded view metalen arm (KUA) Explosionszeichnung Metallrohr-Arm (KUA) Vue éclatée du bras métallique (KUA) Vista de despiece brazo de tubo metálico (KUA) Visa esplosa del braccio metallico (KUA) Widok ramienia stalowego (KUA) 0000111691/150418/A MonoGo...
- Page 59 Rura zewnętrzna KUA-2 kua-3 (3 m) 0000101905 Manguera L=1000 mm/Ø 161 mm Wąż L = 1000 mm/Ø 161 mm 0000102385 Bastidor interior KUA-3/H, completo Stelaż wewnętrzny ramienia, komplet 0000102398 Tubo interior KUA-3 Rura wewnętrzna KUA-3 0000102399 Tubo exterior KUA-3 Rura zewnętrzna KUA-3 kua-4 (4 m) 0000101905 Manguera L=1000 mm/Ø 161 mm Wąż L = 1000 mm/Ø 161 mm 0000102386 Bastidor interior KUA-4/H, completo Stelaż wewnętrzny ramienia, komplet 0000102400 Tubo interior KUA-4 Rura wewnętrzna KUA-4 0000102401 Tubo exterior KUA-4 Rura zewnętrzna KUA-4 incl. 2 abrazaderas w tym. 2 opaski zaciskowe 0000111691/150418/A MonoGo...
- Page 60 Fig. IX Exploded view MonoGo | MonoGo plus 0000117141 0000117135 0000117136 0000100583 0000117142 0000111637 0000111628 0000111636 0000117114 0000117117 0000117128 0000117121 0000117118 0000117129 Exploded view filter unit (MonoGo | MonoGo plus Exploded view filterunit (MonoGo | MonoGo plus Explosionszeichnung Filtereinheit (MonoGo | MonoGo plus Vue éclatée de l’unité de filtration (MonoGo | MonoGo plus Vista de despiece unidad de filtración (MonoGo | MonoGo plus Visa esplosa unità filtrante (MonoGo | MonoGo plus Widok jednostka filtracyjna (MonoGo | MonoGo plus 0000111691/150418/A MonoGo...
- Page 61 MonoGo MonoGo plus EN | Spare parts NL | Reserveonderdelen DE | Ersatzteile FR | Pièces détachées 0000100583 Fan wheel FUA-3000 (IEC) Ventilatorwiel FUA-3000 (IEC) Ventilatorrad FUA-3000 (IEC) Roue de ventilateur FUA-3000 (IEC) 0000111628 HEPA filter cassette 15 m² HEPA filtercassette 15 m² HEPA-Kassettenfilter 15 m² Cassette filtrante HEPA 15 m² 0000111636 HEPA filter cassette 26 m² HEPA filtercassette 26 m² HEPA-Kassettenfilter 26 m² Cassette filtrante HEPA 26 m² 0000111637 Pre filter cassette 1 m² Voorfiltercassette 1 m² Vorfilter-Kassette 1 m² Préfiltre à cassette 1 m² 0000117114 Buzzer 230V...
- Page 62 0000111691/150418/A MonoGo...
- Page 63 0000111691/150418/A MonoGo...
- Page 64 0000111691/150418/A MonoGo www.plymovent.com...