Table des Matières
Publicité
Les langues disponibles
Les langues disponibles
Liens rapides
Operating Instructions (Quick Start Guide) /
Mode d'emploi (Guide de démarrage rapide) /
Bedienungsanleitung (Kurzanleitung) /
Istruzioni per l'uso (Guida di avvio veloce) / Handleiding (Snelstartgids) /
Manual de instrucciones (Guía de inicio rápido) /
Manual de instruções (Guia de início rápido) /
Инструкции по эксплуатации (Краткое руководство пользователя)
Multitrack Sequencer / Séquenceur Multipiste / Multitrack-Sequenzer /
Sequenziatore Multitraccia / Multitrack Sequencer /
Secuenciador Multipista / Sequenciador Multifaixas /
Мультиканальный секвенсор
pioneerdj.com/support/
For FAQs and other support information for this product, visit the above sites. / Concernant les questions les plus
fréquemment posées et les autres informations de support à propos de ce produit, veuillez vous rendre sur le site
ci-dessus. / Besuchen Sie für FAQs und andere Support-Informationen die oben aufgeführte Website. / Per FAQ e altre
informazioni di supporto per questo prodotto, visitare il sito sopra indicato. / Voor FAQ's en andere supportinformatie voor
dit product, bezoek de bovengenoemde website. / Para consultar las preguntas frecuentes y otra información de soporte
de este producto, visite el sitio de arriba. / Relativamente às FAQ e outras informações de apoio relacionadas com este
produto, visite o site em cima. / Ответы на часто задаваемые вопросы и другую информацию о поддержке данного
устройства см. на приведенном выше веб-сайте.
Publicité
Chapitres
Table des Matières

Manuels Connexes pour TORAIZ SQUID

Sommaire des Matières pour TORAIZ SQUID
- Page 1 Operating Instructions (Quick Start Guide) / Mode d’emploi (Guide de démarrage rapide) / Bedienungsanleitung (Kurzanleitung) / Istruzioni per l’uso (Guida di avvio veloce) / Handleiding (Snelstartgids) / Manual de instrucciones (Guía de inicio rápido) / Manual de instruções (Guia de início rápido) / Инструкции...
-
Page 2: Operating Environment
Thank you for buying this Pioneer DJ product. Please read through these operating instructions so you will know how to operate your model properly. After you have finished reading the instructions, put them away in a safe place for future reference. In some countries or regions, the shape of the power plug and power outlet may sometimes differ from that shown in the explanatory drawings. -
Page 3: Table Des Matières
Contents How to read this manual Thank you for buying this Pioneer DJ product. Be sure to read this manual and the Operating Instructions available on the Pioneer DJ site. Both documents include important information that you should understand before using this product. In particular, be sure to read “IMPORTANT SAFETY INSTRUCTIONS.”... -
Page 4: Before Starting
Before starting Features Viewing the Operating Instructions The SQUID is a standalone multitrack sequencer that can connect Instructions may also be provided in PDF files. various music production equipment and produce phrases Adobe® Reader® must be installed in order to view PDF-format files. -
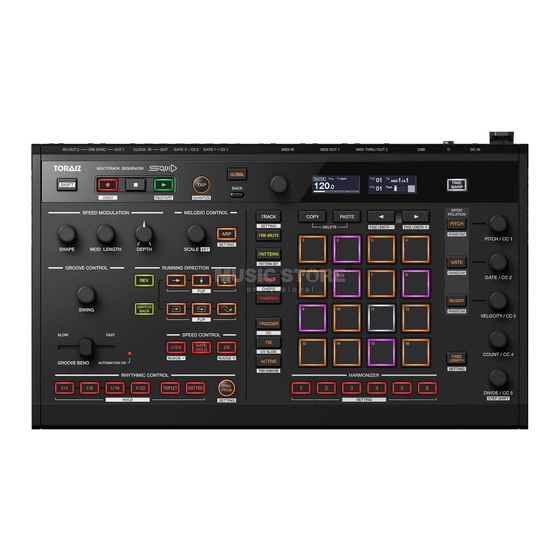
Page 5: Part Names
Part names For further details on each button and control, refer to “Part names and functions” section in the Operating Instructions. Control panel Global section Phrase arrangement section Step edit section Global section 1 SHIFT button 6 GLOBAL button 2 k (record) button 7 BACK button 3 g (stop) button 8 Rotary selector... - Page 6 Phrase arrangement section b SHAPE control (clockwise) button c MOD LENGTH control (counterclockwise) button d DEPTH control (skip back) button e SCALE control p GROOVE BEND slider f ARP button q AUTOMATION ON indicator g SWING control r 1/2X (half) button h REV button s GATE HOLD button (right) button...
- Page 7 Step edit section w TRACK button I 16 pads x TRK MUTE button J HARMONIZER buttons y PATTERN button K PITCH button z SCALE button L PITCH/CC1 control A TRANSPOSE button M GATE button B TRIGGER button N GATE/CC2 control C TIE button O VELOCITY button D ACTIVE button...
-
Page 8: Rear Panel
Rear Panel 1 Cable hook 8 CV OUT1 terminal 2 DC IN terminal 9 GATE OUT1 terminal 3 u button a CV OUT2 terminal Turns the power of this unit On/Off. b GATE OUT2 terminal w On/v Off c CLOCK OUT terminal This switch is between off and on for this unit. -
Page 9: Connections
Connections ! Be sure to turn off the power, disconnect the USB cable from this unit, and unplug the power cord from the power outlet whenever making or changing connections. ! Connect the power cord and a USB cable once all the connections between devices have been completed. ! Be sure to use the included power cord and AC adaptor. - Page 10 How to use the cable hook Hook the connection cable of the AC power adaptor to avoid accidentally disconnecting it from the unit. 1 Fit the connection cable of the AC adaptor into the cable hook. Secure the cable into place. 2 Connect the plug of the connection cable to the [DC IN] terminal.
-
Page 11: Operation
Playing demo patterns Creating a new project The SQUID has a pre-installed project including multiple demo patterns First, create a new project in order to create a pattern from scratch. which load automatically when the unit is turned on for the first time 1 Press the [GLOBAL] button. -
Page 12: Recording Notes In A Pattern
Recording notes in a pattern Using INTERPOLATION There are two basic ways to record notes in a pattern. By setting each parameter for the beginning step, the middle step(s), ! Step recording method and the end step, the unit automatically interpolates (supplements) You can record note information (muting status and parameters parameters for the steps in-between them. -
Page 13: Using Time Warp
Using TIME WARP Saving a project The Time Warp function can be used to automatically loop record the 1 Press the [GLOBAL] button. output from the unit so that you can call patterns previously played. The [GLOBAL] button lights up and the display shows the GLOBAL 1 Press the [TIME WARP] button. -
Page 14: Additional Information
AC adapter “Troubleshooting” section in the Operating Instructions of this unit, Power ..........AC 100 V to 240 V, 50 Hz/60 Hz or access the Pioneer DJ site and check [FAQ] for the [SQUID]. Rated current ..................0.4 A pioneerdj.com/support/ Rated output ................ DC 5 V, 2 A Also, check the connected devices. -
Page 16: Milieu De Fonctionnement
Nous vous remercions d’avoir acquis un produit Pioneer DJ. Veuillez lire attentivement ce mode d’emploi afin de connaître la manière d’utiliser l’appareilcomme il convient. Cela fait, conservez le mode d’emploi de façon à pouvoir vous y référer en cas de nécessité. Dans certains pays ou certaines régions, la forme de la fiche et de la prise d’alimentation est un peu différente de ce qui est montré... - Page 17 Sommaire Comment lire ce manuel Merci d’avoir acheté ce produit Pioneer DJ. Veuillez lire ce manuel et le mode d’emploi disponible sur le site Pioneer DJ. Ces deux documents comprennent des informations importantes que vous devez connaître avant d’utiliser ce produit. En particulier, veillez à...
-
Page 18: Avant Le Démarrage
Avant le démarrage Caractéristiques Affichage du mode d’emploi Le SQUID est un séquenceur multipiste autonome qui peut Les instructions peuvent également être fournies sous forme de successivement connecter divers équipements de production musicale fichiers PDF. et produire des phrases. Adobe® Reader® doit être installé pour pouvoir consulter les fichiers Les phrases peuvent être séquencées rapidement à... -
Page 19: Noms Des Pièces
Noms des pièces Pour plus de détails sur chaque bouton et chaque commande, reportez-vous à la section « Noms et fonctions des éléments » du mode d’emploi. Panneau de commande Section générale Section d’arrangement de phrases Section d’édition de pas Section générale 1 Bouton SHIFT 6 Bouton GLOBAL... - Page 20 Section d’arrangement de phrases b Commande SHAPE m Bouton (sens horaire) c Commande MOD LENGTH n Bouton (sens antihoraire) d Commande DEPTH o Bouton (saut arrière) e Commande SCALE p Curseur GROOVE BEND f Bouton ARP q Indicateur AUTOMATION ON g Commande SWING r Bouton 1/2X (moitié) h Bouton REV...
- Page 21 Section d’édition de pas w Bouton TRACK I 16 pads x Bouton TRK MUTE J Boutons HARMONIZER y Bouton PATTERN K Bouton PITCH z Bouton SCALE L Commande PITCH/CC1 A Bouton TRANSPOSE M Bouton GATE B Bouton TRIGGER N Commande GATE/CC2 C Bouton TIE O Bouton VELOCITY D Bouton ACTIVE...
-
Page 22: Panneau Arrière
Panneau arrière 1 Crochet pour câble 8 Prise CV OUT1 2 Prise DC IN 9 Prise GATE OUT1 3 Bouton u a Prise CV OUT2 Met cet appareil en marche/arrêt. b Prise GATE OUT2 w Marche/v Arrêt c Prise CLOCK OUT Ce commutateur passe de la marche à... -
Page 23: Raccordements
Raccordements ! Veillez à toujours mettre hors tension, débrancher le câble USB de cet appareil et débrancher le cordon d’alimentation de la prise secteur avant d’effectuer ou de modifier un raccordement. ! Branchez le cordon d’alimentation et un câble USB une fois tous les périphériques raccordés. ! Veillez à... -
Page 24: Comment Utiliser Le Crochet Pour Câble
Comment utiliser le crochet pour câble Accrochez le câble de raccordement de l’adaptateur secteur afin d’éviter de le débrancher accidentellement de l’appareil. 1 Faites passer le câble de raccordement de l’adaptateur secteur dans le crochet pour câble. Fixez solidement le câble. 2 Branchez la fiche du câble de raccordement dans la prise [DC IN]. -
Page 25: Fonctionnement
Lecture de motifs de démonstration Création d’un nouveau projet Le SQUID dispose d’un projet pré-installé incluant plusieurs motifs de Tout d’abord, créez un nouveau projet afin de réaliser un motif en démonstration qui se chargent automatiquement lors de la première partant de zéro. -
Page 26: Enregistrement De Notes Dans Un Motif
4 Lisez les 16 pads. Enregistrement de notes dans un motif Les notes sont enregistrées dans le motif lorsque vous tapez sur les pads. Il existe deux méthodes de base pour enregistrer des notes dans un 5 Appuyez à nouveau sur le bouton [k] motif. -
Page 27: Utilisation De Time Warp
Utilisation de TIME WARP Enregistrement d’un projet La fonction Time Warp peut servir à enregistrer automatiquement en 1 Appuyez sur le bouton [GLOBAL]. boucle la sortie de l’appareil afin que vous puissiez appeler les motifs Le bouton [GLOBAL] s’allume et le menu GLOBAL s’affiche à l’écran. précédemment lus. -
Page 28: Informations Complémentaires
Alimentation ........... CA 100 V à 240 V, 50 Hz/60 Hz de cet appareil ou sur le site Pioneer DJ et vérifiez la [FAQ] du Courant nominal ................0,4 A [SQUID]. Puissance nominale .............. CC 5 V, 2 A pioneerdj.com/support/ Vérifiez également les dispositifs raccordés. - Page 30 Vielen Dank, dass Sie sich für dieses Pioneer DJ-Produkt entschieden haben. Bitte lesen Sie diese Bedienungsanleitung gründlich durch, um sich mit der Bedienung des Geräts vertraut zu machen. Nachdem Sie die Bedienungsanleitung gelesen haben, legen Sie sie griffbereit zum Nachschlagen ab. In manchen Ländern oder Regionen können sich die Formen von Netzstecker und Netzsteckdose von denen in den Erklärungszeichnungen unterscheiden.
- Page 31 Inhalt Zum Lesen dieser Anleitung Vielen Dank, dass Sie sich für dieses Pioneer DJ-Produkt entschieden haben. Bitte achten Sie darauf, sowohl diese Anleitung als auch die auf der Pioneer DJ-Site verfügbare Bedienungsanleitung zu lesen. Beide Dokumente enthalten wichtige Informationen, die Sie verstehen sollten, bevor Sie dieses Produkt benutzen.
-
Page 32: Bevor Sie Anfangen
Bevor Sie anfangen Merkmale Aufrufen der Bedienungsanleitung Der SQUID ist ein eigenständiger Multitrack-Sequenzer, der Die Anleitungen können auch als PDF-Dateien bereitgestellt werden. verschiedene Geräte für die Musikproduktion verbinden und Um PDF-Dateien zu öffnen, muss Adobe® Reader® installiert sein. nachfolgend Phrasen produzieren kann. -
Page 33: Teilenamen
Teilenamen Ausführliche Informationen zu jeder Taste und jedem Bedienelement finden Sie im Abschnitt „Bezeichnungen und Funktionen der Komponenten“ in der Bedienungsanleitung. Bedienpult Globale Sektion Abschnitt für das Phrasenarrangement Abschnitt zur Step-Bearbeitung Globale Sektion 1 SHIFT-Taste 6 GLOBAL-Taste 2 k (Aufnahme)-Taste 7 BACK-Taste 3 g (Stopp)-Taste 8 Drehregler... - Page 34 Abschnitt für das Phrasenarrangement b SHAPE-Regler (im Uhrzeigersinn)-Taste c MOD LENGTH-Regler (gegen den Uhrzeigersinn)-Taste d DEPTH-Regler (zurück springen)-Taste e SCALE-Regler p GROOVE BEND-Schieberegler f ARP-Taste q AUTOMATION ON-Anzeige g SWING-Regler r 1/2X (halb)-Taste h REV-Taste s GATE HOLD-Taste (rechts)-Taste t 2X (doppelt)-Taste (unten)-Taste u RHYTHM-Tasten (Zickzack)-Taste...
- Page 35 Abschnitt zur Step-Bearbeitung w TRACK-Taste I 16 Pads x TRK MUTE-Taste J HARMONIZER-Tasten y PATTERN-Taste K PITCH-Taste z SCALE-Taste L PITCH/CC1-Regler A TRANSPOSE-Taste M GATE-Taste B TRIGGER-Taste N GATE/CC2-Regler C TIE-Taste O VELOCITY-Taste D ACTIVE-Taste P VELOCITY/CC3-Regler E COPY-Taste Q COUNT/CC4-Regler F PASTE-Taste R FIXED LENGTH-Taste S DIVIDE/CC5-Regler...
-
Page 36: Rückseite
Rückseite 1 Kabelhaken 8 CV OUT1-Anschluss 2 DC IN-Anschluss 9 GATE OUT1-Anschluss a CV OUT2-Anschluss 3 u-Taste Schaltet die Stromversorgung dieses Geräts ein/aus. b GATE OUT2-Anschluss w Ein/v Aus c CLOCK OUT-Anschluss Dieser Schalter schaltet das Gerät ein und aus. d CLOCK IN-Anschluss e DIN SYNC OUT1-Anschluss 4 USB-B-Anschluss... -
Page 37: Anschlüsse
Anschlüsse ! Schalten Sie die Stromversorgung aus, trennen Sie das USB-Kabel vom Gerät und ziehen Sie das Netzkabel aus der Netzsteckdose, bevor Sie Geräte anschließen oder die Anschlüsse ändern. ! Schließen Sie das Netzkabel und ein USB-Kabel an, nachdem alle Anschlüsse zwischen den Geräten vorgenommen wurden. ! Verwenden Sie immer das mitgelieferte Netzkabel und Netzteil. - Page 38 Verwendung des Kabelhakens Führen Sie das Verbindungskabel des Netzteils um den Haken, um ein versehentliches Abziehen von diesem Gerät zu vermeiden. 1 Führen Sie das Verbindungskabel des Netzteils in den Kabelhaken. Sichern Sie das Kabel. 2 Schließen Sie den Stecker des Verbindungskabels am [DC IN]-Anschluss an.
-
Page 39: Bedienung
Bedienung Wiedergabe von Demo-Patterns Erstellen eines neuen Projekts Der SQUID verfügt über ein vorinstalliertes Projekt mit mehreren Erstellen Sie zuerst ein neues Projekt, um ein Pattern von Grund auf Demo-Patterns, die automatisch geladen werden, wenn das Gerät zu erstellen. nach dem Kauf zum ersten Mal eingeschaltet wird. -
Page 40: Aufzeichnen Von Tönen In Einem Pattern
3 Drücken Sie die [d] (Wiedergabe)-Taste. Aufzeichnen von Tönen in einem Die [d] (Wiedergabe)-Taste leuchtet grün und ein Pattern wird im Aufnahmemodus wiedergegeben. Pattern 4 Geben Sie die 16 Pads wieder. Es gibt zwei grundlegende Methoden, um Töne in einem Pattern Die Töne werden im Pattern aufgezeichnet, wenn die Pads berührt aufzuzeichnen. -
Page 41: Verwenden Von Time Warp
Verwenden von TIME WARP Speichern eines Projekts Die Time Warp-Funktion kann genutzt werden, um automatisch die 1 Drücken Sie die [GLOBAL]-Taste. Ausgabe des Geräts als Loop aufzuzeichnen, sodass Sie zuvor Die [GLOBAL]-Taste leuchtet und das Display zeigt das GLOBAL- gespielte Patterns aufrufen können. Menü... -
Page 42: Zusätzliche Informationen
Stromversorgung ..100 V bis 240 V Wechselspannung, 50 Hz/60 Hz Bedienungsanleitung oder rufen Sie die Pioneer DJ-Site auf und Nennstrom ..................0,4 A lesen Sie die [FAQ] für den [SQUID]. Nennleistung ............Gleichstrom 5 V, 2 A pioneerdj.com/support/ Prüfen Sie auch die angeschlossenen Geräte. Wenn das Problem Allgemein –... -
Page 44: Condizioni Ambientali Di Funzionamento
Vi ringraziamo per avere acquistato questo prodotto Pioneer DJ. Vi preghiamo di leggere queste istruzioni per l’uso in modo da sapere usare correttamenteil proprio modello. Dopo aver letto queste istruzioni, riporle in un luogo sicuro per poterle consultare di nuovo al momento del bisogno. In alcuni paesi o regioni, la forma della spina di alimentazione e della presa di corrente possono non essere quelle delle illustrazioni. - Page 45 AVVERTIMENTO RIGUARDANTE IL FILO DI ALIMENTAZIONE Prendete sempre il filo di alimentazione per la spina. Non tiratelo mai agendo per il filo stesso e non toccate mai il filo con le mani bagnati, perchè questo potrebbe causare cortocircuiti o scosse elettriche. Non collocate l’unità, oppure dei mobili sopra il filo di alimentazione e controllate che lo stesso non sia premuto.
- Page 46 Indice Come leggere questo manuale Vi ringraziamo per avere acquistato questo prodotto Pioneer DJ. Leggere il presente manuale e le Istruzioni per l’uso disponibili sul sito Pioneer DJ. Entrambi i documenti includono informazioni importanti da comprendere prima di utilizzare questo prodotto. In particolare, accertarsi di leggere la sezione “NORME DI SICUREZZA IMPORTANTI”.
-
Page 47: Prima Di Iniziare
Prima di iniziare Caratteristiche Visualizzazione delle Istruzioni per l’uso SQUID è un sequenziatore multitraccia collegabile a varie apparecchiature di produzione di musica per la produzione di frasi in Le istruzioni sono ottenibili anche in file PDF. sequenza. Per visualizzare i file in formato PDF, è necessario installare Adobe®... -
Page 48: Nomi Delle Parti
Nomi delle parti Per ulteriori dettagli su ciascun pulsante e controllo, consultare la sezione “Nome delle varie parti e funzioni” nelle Istruzioni per l’uso. Pannello di controllo Sezione globale Sezione arrangiamento frase Sezione modifica step Sezione globale 1 Pulsante SHIFT 6 Pulsante GLOBAL 2 Pulsante k (registrazione) 7 Pulsante BACK... - Page 49 Sezione arrangiamento frase b Comando SHAPE m Pulsante (senso orario) c Comando MOD LENGTH n Pulsante (senso antiorario) d Comando DEPTH o Pulsante (torna indietro) e Comando SCALE p Cursore GROOVE BEND f Pulsante ARP q Indicatore AUTOMATION ON g Comando SWING r Pulsante 1/2X (metà) h Pulsante REV s Pulsante GATE HOLD...
- Page 50 Sezione modifica step w Pulsante TRACK I 16 pad x Pulsante TRK MUTE J Pulsanti HARMONIZER y Pulsante PATTERN K Pulsante PITCH z Pulsante SCALE L Comando PITCH/CC1 A Pulsante TRANSPOSE M Pulsante GATE B Pulsante TRIGGER N Comando GATE/CC2 C Pulsante TIE O Pulsante VELOCITY D Pulsante ACTIVE...
-
Page 51: Pannello Posteriore
Pannello posteriore 1 Gancio per il cavo 8 Terminale CV OUT1 2 Terminale DC IN 9 Terminale GATE OUT1 3 Pulsante u a Terminale CV OUT2 Accende/spegne questa unità. b Terminale GATE OUT2 w Acceso (On)/v Spento (Off) c Terminale CLOCK OUT Per questa unità, l’interruttore si trova tra off e on. -
Page 52: Collegamenti
Collegamenti ! Prima di fare o modificare collegamenti, accertarsi di spegnere l’apparecchio, di scollegare il cavo USB da questa unità e di scollegare il cavo di alimentazione dalla presa di corrente. ! Collegare il cavo di alimentazione e un cavo USB dopo che tutti i collegamenti tra i dispositivi sono stati completati. ! Utilizzare esclusivamente il cavo di alimentazione e l’adattatore CA inclusi. - Page 53 Come utilizzare il gancio per il cavo Agganciare il cavo di collegamento dell’adattatore di alimentazione CA onde evitare un suo scollegamento accidentale dall’unità. 1 Inserire il cavo di collegamento dell’adattatore CA nel gancio per il cavo. Fissare il cavo in posizione. 2 Collegare la spina del cavo di collegamento al terminale [DC IN].
-
Page 54: Funzionamento
Riproduzione di pattern demo Creazione di un nuovo progetto SQUID incorpora un progetto pre-installato che comprende più pattern Per prima cosa, creare un nuovo progetto in modo da creare un pattern demo che si caricano automaticamente quando l’unità viene accesa da zero. -
Page 55: Registrazione Di Note In Un Pattern
5 Premere nuovamente il pulsante [k] (registrazione). Registrazione di note in un pattern La luce del pulsante [k] (registrazione) si spegne e l’unità esce dalla modalità di registrazione. Esistono due modi di base per registrare note in un pattern. ! È possibile cambiare i parametri delle note registrate allo stesso ! Metodo di registrazione a step modo della registrazione a step. -
Page 56: Uso Di Time Warp
Uso di TIME WARP Salvataggio di un progetto È possibile utilizzare la funzione Time Warp per registrare 1 Premere il pulsante [GLOBAL]. automaticamente in loop l’uscita proveniente dall’unità in modo che sia Il pulsante [GLOBAL] si illumina e il display mostra il menu GLOBAL. possibile richiamare i pattern riprodotti in precedenza. -
Page 57: Ulteriori Informazioni
Alimentazione ........da CA 100 V a 240 V, 50 Hz/60 Hz oppure accedere al sito Pioneer DJ e controllare le [FAQ] per Corrente nominale ................0,4 A [SQUID]. Tensione nominale di uscita ..........CC 5 V, 2 A pioneerdj.com/support/ Inoltre, controllare i dispositivi collegati. - Page 58 Hartelijk dank voor uw aankoop van dit Pioneer DJ product. Lees deze gebruiksaanwijzing aandachtig door om bekend te raken met de juiste bedieningvan uw apparaat. Na het doorlezen van de gebruiksaanwijzing dient u deze te bewaren op een veilige plaats, voor latere naslag. In bepaalde landen of gebieden kan de vorm van de netsnoerstekker en het stopcontact verschillen van de afbeeldingen bij de onderstaande uitleg.
- Page 59 Inhoud Opmerkingen over deze handleiding Hartelijk dank voor uw aankoop van dit Pioneer DJ-product. Lees deze handleiding evenals de handleiding die u op de website van Pioneer DJ vindt. Beide documenten bevatten belangrijke informatie die u moet begrijpen voordat u dit product gaat gebruiken. Lees in het bijzonder het gedeelte "BELANGRIJKE VEILIGHEIDSINSTRUCTIES".
-
Page 60: Voor U Begint
Voor u begint Kenmerken De handleiding bekijken De SQUID is een autonome multitrack sequencer die verscheidene De handleiding kan ook in pdf-formaat worden aangeleverd. muziekproductieapparaten kan verbinden en opeenvolgende frasen Om bestanden in pdf-formaat te kunnen bekijken, moet Adobe® kan produceren. -
Page 61: Namen Van Onderdelen
Namen van onderdelen Voor meer informatie over de knoppen en regelaars raadpleegt u het hoofdstuk "Namen van onderdelen en functies" in de Handleiding. Bedieningspaneel Algemeen gedeelte Gedeelte voor frasearrangement Gedeelte voor stapbewerking Algemeen gedeelte 1 Knop SHIFT 6 Knop GLOBAL 2 Knop k (opnemen) 7 Knop BACK 3 Knop g (stoppen) - Page 62 Gedeelte voor frasearrangement b Regelaar SHAPE m Knop (rechtsom) c Regelaar MOD LENGTH n Knop (linksom) d Regelaar DEPTH o Knop (achterwaarts overslaan) e Regelaar SCALE p Schuifregelaar GROOVE BEND f Knop ARP q Indicator AUTOMATION ON g Regelaar SWING r Knop 1/2X (half) h Knop REV s Knop GATE HOLD...
- Page 63 Gedeelte voor stapbewerking w Knop TRACK I 16 pads x Knop TRK MUTE J Knoppen HARMONIZER y Knop PATTERN K Knop PITCH z Knop SCALE L Regelaar PITCH/CC1 A Knop TRANSPOSE M Knop GATE B Knop TRIGGER N Regelaar GATE/CC2 C Knop TIE O Knop VELOCITY D Knop ACTIVE...
-
Page 64: Achterpaneel
Achterpaneel 1 Kabelhaak 8 CV OUT1-aansluiting 2 DC IN-aansluiting 9 GATE OUT1-aansluiting 3 Knop u a CV OUT2-aansluiting Zet dit apparaat aan/uit. b GATE OUT2-aansluiting w aan/v uit c CLOCK OUT-aansluiting Deze schakelaar staat voor dit apparaat tussen uit en aan. d CLOCK IN-aansluiting e DIN SYNC OUT1-aansluiting 4 USB-B-aansluiting... -
Page 65: Aansluitingen
Aansluitingen ! Schakel altijd eerst de stroom uit, koppel de USB-kabel los van dit apparaat en trek de stekker uit het stopcontact alvorens u enige aansluiting maakt of verbreekt. ! Sluit het netsnoer en een USB-kabel pas aan nadat alle aansluitingen tussen de apparaten volledig zijn gemaakt. ! Gebruik alleen het netsnoer en de netstroomadapter die zijn meegeleverd. - Page 66 De kabelhaak gebruiken Haak de aansluitkabel van de netstroomadapter vast om te voorkomen dat die per ongeluk wordt losgekoppeld van het apparaat. 1 Plaats de aansluitkabel van de netstroomadapter in de kabelhaak. Maak de kabel vast. 2 Steek de stekker van de aansluitkabel in de [DC IN]- uitgang.
-
Page 67: Bediening
Bediening Demopatronen afspelen Een nieuw project maken De SQUID is voorzien van een vooraf geïnstalleerd project met Maak eerst een nieuw project aan als u vanaf nul wilt beginnen met het meerdere demopatronen die automatisch laden wanneer het apparaat maken van een patroon. -
Page 68: Noten Opnemen In Een Patroon
5 Druk opnieuw op de knop [k] (opnemen). Noten opnemen in een patroon Het licht van de knop [k] (opnemen) gaat uit en het apparaat verlaat de opnamemodus. Er zijn twee basismethoden om noten in een patroon op te nemen. ! U kunt de parameters van de opgenomen noten op dezelfde manier ! Stapsgewijze opnamemethode wijzigen als in de stapsgewijze opname. -
Page 69: Time Warp Gebruiken
TIME WARP gebruiken Een project opslaan U kunt de functie Time Warp gebruiken om het geluid van het apparaat 1 Druk op de knop [GLOBAL]. automatisch in een loop af te spelen zodat u eerder afgespeelde De knop [GLOBAL] gaat branden en op het display verschijnt het patronen kunt oproepen. -
Page 70: Aanvullende Informatie
Stroomvoorziening ....100 V tot 240 V wisselstroom, 50 Hz/60 Hz van dit apparaat, of ga naar de website van Pioneer DJ en bekijk de Nominale stroom ................0,4 A [FAQ] voor de [SQUID]. Nominaal vermogen ..........5 V gelijkstroom, 2 A pioneerdj.com/support/ Controleer ook de aangesloten apparaten. -
Page 72: Entorno De Funcionamiento
Le damos las gracias por la adquisición de este producto Pioneer DJ. Lea a fondo estas instrucciones de utilización para que aprenda a utilizar correctamente su modelo. Después de haber terminado de leer estas instrucciones, guárdelas en un lugar seguro para, en caso de ser necesario, consultarlas en el futuro. - Page 73 Contenido Cómo leer este manual Gracias por adquirir este producto Pioneer DJ. Asegúrese de leer este manual y el Manual de instrucciones disponible en el sitio de Pioneer DJ. Ambos incluyen información importante que debe entender antes de utilizar esta unidad. Concretamente, lea con atención las “INSTRUCCIONES IMPORTANTES DE SEGURIDAD”.
-
Page 74: Antes De Empezar
Antes de empezar Características Consulta del Manual de instrucciones El SQUID es un secuenciador multipista autónomo capaz de conectar Las instrucciones también están disponibles en formato PDF. diferentes equipos de producción musical y producir frases. Para ver archivos en formato PDF, debe tener Adobe® Reader®... -
Page 75: Nombres De Los Controles
Nombres de los controles Para obtener más información sobre cada botón y control, consulte “Nombres y funciones de los controles” en el Manual de instrucciones. Panel de control Sección global Sección de arreglo de frase Sección de edición de paso Sección global 1 Botón SHIFT 6 Botón GLOBAL... - Page 76 Sección de arreglo de frase b Control SHAPE m Botón (sentido horario) c Control MOD LENGTH n Botón (sentido antihorario) d Control DEPTH o Botón (salto hacia atrás) e Control SCALE p Barra deslizante GROOVE BEND f Botón ARP q Indicador AUTOMATION ON g Control SWING r Botón 1/2X (mitad) h Botón REV...
- Page 77 Sección de edición de paso w Botón TRACK I 16 pads x Botón TRK MUTE J Botones HARMONIZER y Botón PATTERN K Botón PITCH z Botón SCALE L Control PITCH/CC1 A Botón TRANSPOSE M Botón GATE B Botón TRIGGER N Control GATE/CC2 C Botón TIE O Botón VELOCITY D Botón ACTIVE...
-
Page 78: Panel Trasero
Panel trasero 1 Gancho para cables 8 Terminal CV OUT1 2 Terminal DC IN 9 Terminal GATE OUT1 3 Botón u a Terminal CV OUT2 Desconecta/conecta la alimentación de esta unidad. b Terminal GATE OUT2 w Encendido/v Apagado c Terminal CLOCK OUT Este interruptor permite encender y apagar esta unidad. -
Page 79: Conexión De Entradas Y Salidas
Conexiones ! Asegúrese de desconectar la alimentación, desconectar el cable USB de esta unidad y desenchufar el cable de alimentación de la toma de corriente siempre que haga o cambie conexiones. ! Conecte el cable de alimentación y un cable USB después de terminar las conexiones entre los aparatos. ! Asegúrese de usar el cable de alimentación y el adaptador de CA incluidos. - Page 80 Utilización del gancho para cables Ponga el cable de conexión del adaptador de CA para evitar desconectarlo accidentalmente de la unidad. 1 Coloque el cable de conexión del adaptador de CA en el gancho para cables. Fije el cable en su posición. 2 Conecte la clavija del cable de conexión al terminal [DC IN].
-
Page 81: Operación
En primer lugar, cree un nuevo proyecto para crear un patrón desde cero. El SQUID incorpora un proyecto preinstalado que incluye varios patrones de demostración, que se cargan automáticamente la primera 1 Pulse el botón [GLOBAL]. vez que se enciende la unidad después de comprarla. -
Page 82: Grabación De Notas En Un Patrón
5 Pulse el botón [k] (grabación) de nuevo. Grabación de notas en un patrón La luz del botón [k] (grabación) se apaga y la unidad sale del modo de grabación. Hay dos grandes formas de grabar notas en un patrón. ! Puede modificar los parámetros de las notas grabadas del mismo ! Método de grabación por pasos modo que en la grabación por pasos. -
Page 83: Uso De Time Warp
Uso de TIME WARP Guardar un proyecto La función Time Warp puede usarse para grabar automáticamente en 1 Pulse el botón [GLOBAL]. bucle la salida de la unidad para recuperar patrones reproducidos con El botón [GLOBAL] se ilumina y en la pantalla aparece el menú anterioridad. -
Page 84: Información Adicional
Alimentación .......... CA 100 V a 240 V, 50 Hz/60 Hz esta unidad o acceda al sitio de Pioneer DJ y consulte el apartado Corriente nominal ................0,4 A [FAQ] del [SQUID]. Potencia nominal ..............CC 5 V, 2 A pioneerdj.com/support/ Adicionalmente, compruebe los dispositivos conectados. - Page 86 Obrigado por adquirir este produto da Pioneer DJ. Leia atentamente estas instruções de funcionamento de modo a saber como utilizar correctamente oseu modelo. Após terminar de ler as instruções, coloque-as num local seguro para futura referência. Em alguns países ou regiões, a forma da ficha de alimentação e da tomada por vezes podem diferir das apresentadas nos desenhos explicativos. Contudo, o método para ligar e utilizar a unidade é...
- Page 87 Índice Como ler este manual Obrigado por adquirir este produto da Pioneer DJ. Certifique-se de que lê este manual e o Manual de instruções disponível no site da Pioneer DJ. Ambos os documentos incluem informações importantes que deve compreender antes de utilizar este produto.
-
Page 88: Antes De Começar
Antes de começar Características Visualizar o Manual de instruções O SQUID é um sequenciador Multifaixas autónomo capaz de Podem também estar disponíveis instruções nos ficheiros PDF. ligar diverso equipamento de produção musical e produzir frases Para ser possível visualizar os ficheiros de formato PDF, deve sucessivamente. -
Page 89: Nomes De Peças
Nomes de peças Para informação mais detalhada sobre cada botão e cada controlo, consulte a secção “Nomes de peças e funções” no Manual de instruções. Painel de controlo Secção global Secção de arranjo da frase Secção de edição gradual Secção global 1 Botão SHIFT 6 Botão GLOBAL 2 Botão k (gravação) - Page 90 Secção de arranjo da frase b Controlo SHAPE m Botão (no sentido dos ponteiros do relógio) c Controlo MOD LENGTH n Botão (no sentido contrário ao dos ponteiro do relógio) d Controlo DEPTH o Botão (saltar para trás) e Controlo SCALE p Deslizador GROOVE BEND f Botão ARP q Indicador AUTOMATION ON...
- Page 91 Secção de edição gradual w Botão TRACK I 16 painéis táteis x Botão TRK MUTE J Botões HARMONIZER y Botão PATTERN K Botão PITCH z Botão SCALE L Controlo PITCH/CC1 A Botão TRANSPOSE M Botão GATE B Botão TRIGGER N Controlo GATE/CC2 C Botão TIE O Botão VELOCITY D Botão ACTIVE...
-
Page 92: Painel Posterior
Painel posterior 1 Gancho para cabo 8 Terminal CV OUT1 2 Terminal DC IN 9 Terminal GATE OUT1 3 Botão u a Terminal CV OUT2 Desliga/liga a alimentação desta unidade. b Terminal GATE OUT2 w Ligado/v Desligado c Terminal CLOCK OUT Nesta unidade, este interruptor encontra-se entre ligado e d Terminal CLOCK IN desligado. -
Page 93: Ligar Entradas E Saídas
Ligações ! Certifique-se de que desliga a alimentação, desliga o cabo USB desta unidade e o cabo de alimentação da tomada sempre que fizer ou mudar as ligações. ! Ligue o cabo de alimentação e o cabo USB, depois de terminar de fazer todas as ligações entre os dispositivos. ! Certifique-se de que utiliza o cabo de alimentação incluído e o transformador de CA. - Page 94 Como usar o gancho para cabo Prenda o cabo de ligação ao transformador de CA para evitar a desconexão acidental da unidade. 1 Coloque o cabo de ligação do transformador de CA no gancho para cabo. Fixe o cabo no lugar. 2 Ligue a ficha do cabo de ligação ao terminal [DC IN].
-
Page 95: Funcionamento
Funcionamento Reproduzir padrões de demonstração Criar um novo projeto O SQUID apresenta um projeto previamente instalado que inclui vários Primeiro, crie um novo projeto para criar um padrão a partir do zero. padrões de demonstração que carregam automaticamente quando a 1 Prima o botão [GLOBAL]. -
Page 96: Gravar Notas Num Padrão
5 Prima novamente o botão [k] (gravação). Gravar notas num padrão A luz do botão [k] (gravação) desliga e a unidade sai do modo de gravação. Existem duas formas básicas de gravar notas num padrão. ! Pode alterar os parâmetros das notas gravadas da mesma forma ! Método de gravação gradual que faz na gravação gradual. -
Page 97: Utilizar Time Warp
Utilizar TIME WARP Guardar um projeto A função Time Warp pode ser utilizada para gravar automaticamente 1 Prima o botão [GLOBAL]. em loop a emissão da unidade de forma a poder chamar todos os O botão [GLOBAL] acende e o visor apresenta o menu GLOBAL. padrões anteriormente reproduzidos. -
Page 98: Informação Complementar
Alimentação ........... CA 100 V a 240 V, 50 Hz/60 Hz de instruções desta unidade ou aceda ao site da Pioneer DJ e Corrente nominal ................0,4 A verifique a secção [Centros de assistência] relativa ao [SQUID]. Saída nominal ............... CC 5 V, 2 A pioneerdj.com/support/ Verifique também os dispositivos ligados. - Page 100 Благодарим вас за покупку данного изделия Pioneer DJ. Пожалуйста, внимательно изучите данные инструкции по эксплуатации для надлежащего использования данной модели. По завершению изучения инструкций, храните их в надежном месте для справок в будущем. В некоторых странах или регионах форма вилки питания и розетки может иногда отличаться от того, что отображено на иллюстрациях. Однако...
- Page 101 Содержание Как следует читать данное руководство Благодарим Вас за покупку этого изделия компании Pioneer DJ. Внимательно ознакомьтесь с данным руководством и Инструкциями по эксплуатации, доступными на сайте Pioneer DJ. В этих документах содержится важная информация, которую необходимо изучить перед началом работы с устройством. В...
-
Page 102: Описание
До начала Описание Просмотр Инструкций по эксплуатации SQUID — это отдельный мультиканальный секвенсор, который позволяет подключить различное оборудование для создания Инструкции могут быть представлены в виде PDF-файлов. музыки и создавать фразы. Для просмотра PDF-файлов требуется установить Adobe® Фразы можно быстро объединить в последовательность с... -
Page 103: Названия Компонентов
Названия компонентов Для получения дополнительной информации о каждой кнопке и ручке см. “Названия деталей и функции” в Инструкциях по эксплуатации. Панель управления Общий раздел Раздел аранжировки фразы Раздел редактирования шага Общий раздел 1 Кнопка SHIFT 6 Кнопка GLOBAL 2 Кнопка k (запись) 7 Кнопка... - Page 104 Раздел аранжировки фразы b Ручка SHAPE m Кнопка (по часовой стрелке) c Ручка MOD LENGTH n Кнопка (против часовой стрелки) d Ручка DEPTH o Кнопка (пропустить назад) e Ручка SCALE p Ползунок GROOVE BEND f Кнопка ARP q Индикатор AUTOMATION ON g Ручка...
- Page 105 Раздел редактирования шага w Кнопка TRACK I 16 площадок x Кнопка TRK MUTE J Кнопки HARMONIZER y Кнопка PATTERN K Кнопка PITCH z Кнопка SCALE L Ручка PITCH/CC1 A Кнопка TRANSPOSE M Кнопка GATE B Кнопка TRIGGER N Ручка GATE/CC2 C Кнопка...
-
Page 106: Задняя Панель
Задняя панель 1 Крючок для кабеля 8 Терминал CV OUT1 2 Терминал DC IN 9 Терминал GATE OUT1 3 Кнопка u a Терминал CV OUT2 Включение и отключение питания данного устройства. b Терминал GATE OUT2 w Вкл/v Выкл c Терминал CLOCK OUT Данный... -
Page 107: Подключение Входов И Выходов
Подключения ! При выполнении или изменении подключений обязательно отключите питание, отсоедините кабель USB от данного устройства и отсоедините силовой кабель от розетки. ! После завершения всех подключений между устройствами подключите силовой кабель и кабель USB. ! Используйте только поставляемый силовой кабель и адаптер переменного тока. ! Смотрите... - Page 108 Использование крючка кабеля Зафиксируйте кабель подключения адаптера переменного тока с помощью крючка во избежание случайного отсоединения от устройства. 1 Закрепите соединительный кабель адаптера переменного тока с помощью крючка кабеля. Закрепите кабель на месте. 2 Подключите вилку соединительного кабеля к терминалу [DC IN]. Если кабель с левой стороны крючка...
-
Page 109: Воспроизведение Демошаблонов
Управление Воспроизведение демошаблонов Создание нового проекта SQUID имеет предустановленный проект, включающий несколько Сначала создайте новый проект для создания шаблона. демошаблонов, которые загружаются автоматически при 1 Нажмите кнопку [GLOBAL]. включении устройства в первый раз после покупки. Кнопка [GLOBAL] загорится и на дисплее отобразится меню... -
Page 110: Запись Нот В Шаблон
5 Нажмите кнопку [k] (запись) еще раз. Запись нот в шаблон Подсветка кнопки [k] (запись) отключится, и устройство выйдет из режима записи. Существует два основных способа записи нот в шаблон. ! Вы можете изменять параметры записанных нот точно так же, ! Способ... -
Page 111: Использование Time Warp
Использование TIME WARP Сохранение проекта Функцию Time Warp можно использовать для автоматического 1 Нажмите кнопку [GLOBAL]. петлевания записи, выводящейся из устройства, для вызова Кнопка [GLOBAL] загорится и на дисплее отобразится меню шаблонов, воспроизведенных ранее. GLOBAL. 1 Нажмите кнопку [TIME WARP]. 2 Поверните... -
Page 112: Дополнительная Информация
устранения” в Инструкциях по эксплуатации этого устройства Номинальный выход ..........5 В пост. тока, 2 A или откройте сайт Pioneer DJ и просмотрите [Сервисные Общий раздел – Основной блок центры] для [SQUID]. pioneerdj.com/support/ Энергопотребление Кроме того, проверьте состояние подключенных устройств. DC IN ............5 В пост. тока, 1 200 мА... -
Page 113: Серийный Номер
Примечание: Корпорация Пайонир Диджей устанавливает следующую продолжительность срока службы официально поставляемых на Российский рынок товаров. Аудио и видеооборудование: 7 лет Переносное аудиооборудование: 6 лет Другое оборудование (наушники, микрофон и т.д.): 5 лет D3-7-10-6b_B1_Ru Информация для покупателей в ЕАЭС: Уполномоченной организацией в соответствии с требованиями ТР ТС 004/2011, 020/2011, 017/2011 является... - Page 116 © 2019 Pioneer DJ Corporation. All rights reserved. © 2019 Pioneer DJ Corporation. Tous droits de reproduction et de traduction réservés. PDJ_001_all С а Ма а Printed in Malaysia / Imprimé en Malaisie <DRH1508-A>...