Publicité
Les langues disponibles
Les langues disponibles
Liens rapides
This Owner's Manual is provided and hosted by Appliance Factory Parts.
KITCHENAID 5KPM50BGR4
Owner's Manual
Shop genuine replacement parts for KITCHENAID
5KPM50BGR4
Find Your KITCHENAID Mixer Parts - Select From 532 Models
-------- Manual continues below --------
Publicité

Manuels Connexes pour KitchenAid 5KPM50BGR4


Sommaire des Matières pour KitchenAid 5KPM50BGR4
- Page 1 This Owner's Manual is provided and hosted by Appliance Factory Parts. KITCHENAID 5KPM50BGR4 Owner's Manual Shop genuine replacement parts for KITCHENAID 5KPM50BGR4 Find Your KITCHENAID Mixer Parts - Select From 532 Models -------- Manual continues below --------...
- Page 2 ® OOR INTENSIEF GEBRUIK EBRUIKSAANWIJZING IXERS IXER NSTRUCTIONS ’ OBOTS DE CUISINE ODE D EMPLOI EBRAUCHSANLEITUNG ÜCHENMASCHINE ’ STRUZIONI D NSTRUCCIONES PARA BATIDORA 1 2 4 6 8 10 9706978A...
- Page 3 Belangrijke veiligheidsvoorschriften ................3 Wat u moet weten over uw mixer Onderdelen van mixer model 5K45SS..............4, 5 Onderdelen van mixer model 5K5SS/5KPM5...........6, 7 Gebruik van de hulpstukken van KitchenAid ............8 ® Speling tussen garde en kom ................8 Onderhoud en reinigen ..................8 Planetaire mixbeweging ..................9...
- Page 4 WAARSCHUWING OM BRANDGEVAAR, ELEKTRISCHE 11. Gebruikmaking van hulpstukken die niet SCHOKKEN, LETSEL OF SCHADE TE door KitchenAid zijn aanbevolen, kan VOORKOMEN, DIENT U BIJ GEBRUIK VAN DE brand, elektrische schokken of letsel MIXER ELEMENTAIRE VOORZORGS- veroorzaken. MAATREGELEN IN ACHT TE NEMEN, 12.
- Page 5 Onderdelen van mixer model 5K45SS Hulpstuknaaf Motorkop Hulpstukknop Hendel voor vergrendeling van motorkop (niet afgebeeld) Snelheids- regelaar As van garde Platte garde Roestvrij- stalen kom van 4,3 L (4,5 qt) Klemplaat voor kom Roestvrijstalen draadgarde Deeghaak...
- Page 6 VERGRENDELEN VAN DE MOTORKOP IN GEHEVEN STAND BEVESTIGEN VAN KOM • Duw de hendel omhoog naar de stand • Controleer of de snelheidsregelaar op OFF UNLOCK [ONTGRENDELEN] en houd (UIT) staat. hem daar. • Trek de motorkap achterover. • Kantel de motorkop naar achteren. •...
- Page 7 Onderdelen van mixer model 5K5SS / 5KPM5 Hulpstuknaaf Motorkop Hulpstukknop Hendel voor omhoog- brengen van kom (niet afgebeeld) Snelheidsregelaar 1 2 4 6 8 10 Veerslot en pen voor kom As van (niet afgebeeld) garde Paspennen Komsteunen Platte garde Roestvrijstalen kom van 4,8 liter (5 quart) Roestvrijstalen draadgarde...
- Page 8 BEVESTIGEN VAN KOM • Controleer of de snelheidsregelaar op OFF [UIT] staat. • Zet de hendel voor het omhoogbrengen van de kom in de stand Omlaag. • Breng de komsteunen over de paspennen. • Duw de achterzijde van de kom naar beneden totdat de pen van de kom in het veerslot springt.
- Page 9 Gebruik van de hulpstukken van KitchenAid ® Zie de Gebruiks- en Onderhoudshandleiding voor de Hulpstukken van de Staande Mixer voor de snelheidsinstellingen en de gebruikstijden. Draadgarde voor mengsels waar lucht in Platte garde voor normale tot dikke mengsels, zoals bijvoorbeeld voor:...
- Page 10 Planetaire mixbeweging Uw KitchenAid mixer werkt sneller en Tijdens het mixen maakt de ® grondiger dan de meeste andere elektrische platte menghaak mixers. Daarom moet de mixingtijd in de ronddraaiende bewegingen in meeste recepten worden aangepast om over- de kom en tegelijkertijd mixen te voorkomen.
- Page 11 De aanwijzingen in dit boekje kunnen worden de kom niet geheel zijn gemengd, hangt de gebruikt om uw favoriete recepten aan te passen garde niet ver genoeg in de kom. Zie “Speling voor gebruik met uw KitchenAid ® mixer. Voor tussen garde en kom.”...
- Page 12 6. Ontgrendel de kop (van model 5K45SS) en breng hem omhoog of laat de kom (van model 5K5SS/5KSM5) zakken en verwijder het deeg van de haak. N.B.: Deze aanwijzingen geven een voorbeeld van het maken van brood met de snelle mixmethode.
- Page 13 KITCHENAID IS NIET AANSPRAKELIJK VOOR SCHADE VAN INCIDENTELE AARD OF VOORTVLOEIEND UIT HET GEBRUIK VAN DE MIXER. Technische gegevens kunnen zonder voorafgaande kennisgeving gewijzigd worden. KitchenAid Europa, Inc.
- Page 14 ® EAVY EBRUIKSAANWIJZING IXERS IXER NSTRUCTIONS ’ OBOTS DE CUISINE ODE D EMPLOI EBRAUCHSANLEITUNG ÜCHENMASCHINE ’ STRUZIONI D NSTRUCCIONES PARA BATIDORA 1 2 4 6 8 10 9706978A...
- Page 15 Table of Contents Important Safety Instructions..................3 About Your Mixer Model 5K45SS Mixer Features .................4, 5 Model 5K5SS/5KPM5 Mixer Features..............6, 7 Using your KitchenAid ® Attachments..............8 Beater To Bowl Clearance..................8 Care and Cleaning ....................8 Planetary Mixing Action ..................9 Mixer Use......................9 Speed Control Guide.....................9 Mixing Tips......................10...
- Page 16 WARNING TO REDUCE THE RISK OF FIRE, ELECTRICAL 11. The use of attachments not SHOCK, INJURY TO PERSONS, OR DAMAGE recommended by KitchenAid may WHEN USING THE MIXER, FOLLOW BASIC cause fire, electrical shock or injury. PRECAUTIONS, INCLUDING THE FOLLOWING: 12.
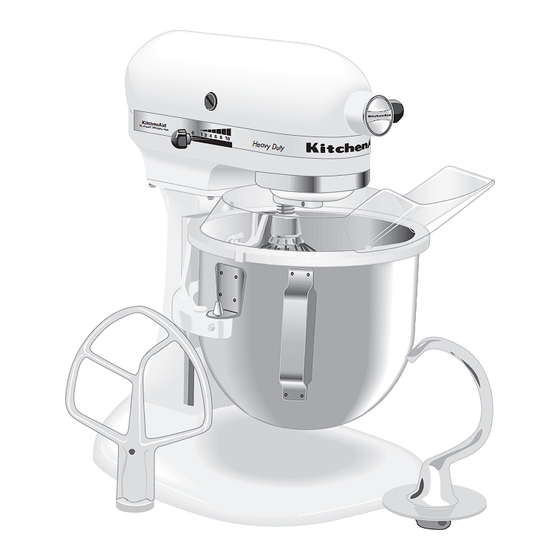
- Page 17 5K45SS Mixer Features Attachment Hub Motor Head Attachment Knob Motor Head Locking Lever Speed (not shown) Control Beater Shaft Lever Flat Beater 4.5 Qt (4.3 L) Stainless Steel Bowl Wire Whip Bowl Clamping Plate Dough Hook...
- Page 18 TO LOCK MOTOR HEAD IN RAISED POSITION TO ATTACH BOWL • Push locking lever up into UNLOCK • Be sure speed control is OFF. position and hold. • Tilt motor head back. • Tilt motor head back. • Place bowl on bowl-clamping plate. •...
- Page 19 5K5SS/5KPM5 Mixer Features Motor Head Attachment Hub Attachment Knob Speed Control Lever 1 2 4 6 8 10 Bowl Lift Handle (not shown) Spring Latch and Bowl Pin (not shown) Beater Shaft Locating Pins Bowl Support Flat Beater Wire Whip Dough Hook 5 Qt (4.8 L) Stainless Steel Bowl...
- Page 20 TO ATTACH BOWL • Be sure speed control is OFF. • Place bowl lift handle in down position. • Fit bowl supports over locating pins. • Press down on back of bowl until bowl pin snaps into spring latch. • Sit pouring shield on bowl. •...
- Page 21 Using Your KitchenAid ® Attachments See the Stand Mixer Attachments Use and Care Guide for speed settings and operating times. Flat Beater, for normal to heavy Wire Whip for mixtures which need mixtures, such as: to incorporate air, such as:...
- Page 22 Planetary Mixing Action Your KitchenAid Mixer will mix faster and During operation, the flat ® more thoroughly than most other electric beater moves around the mixers. Therefore, the mixing time in most stationary bowl, at the recipes must be adjusted to avoid same time turning in the overbeating.
- Page 23 The Pouring Shield can be used to The mixing instructions found in this book simplify adding ingredients. can be used to convert your favorite recipes for use with your KitchenAid Mixer. ® NOTE: If ingredients in very bottom of...
- Page 24 6. Unlock and raise head on 5K45SS or lower bowl on 5K5SS/5KSM5 and remove dough from hook. NOTE: These instructions illustrate bread making with the Rapid Mix method. When using the conventional method, dissolve yeast in warm water in warmed bowl. Add remaining liquids and dry ingredients –...
- Page 25 Service Center. misuse, abuse, or installation/operation not in accordance with local electrical codes. KITCHENAID DOES NOT ASSUME ANY RESPONSIBILITY FOR INCIDENTAL OR CONSEQUENTIAL DAMAGES. Specifications subject to change without notice. KitchenAid Europa, Inc. Nijverheidslaan 3 Box 5 Strombeek-Bever (Brussels) 1853 BELGIUM ®Registered trademark/...
- Page 26 ® OUR SERVICE INTENSE EBRUIKSAANWIJZING IXERS IXER NSTRUCTIONS ’ OBOTS DE CUISINE ODE D EMPLOI EBRAUCHSANLEITUNG ÜCHENMASCHINE ’ STRUZIONI D NSTRUCCIONES PARA BATIDORA 1 2 4 6 8 10 9706978A...
- Page 27 Table des matières Mesures de sécurité importantes ................3 Votre robot Caractéristiques du robot modèle 5K45SS............4,5 Caractéristiques du robot modèle 5K5SS/5KMP5 ..........6,7 Utilisation de vos accessoires KitchenAid ............8 ® Distance batteur bol....................8 Entretien et nettoyage ...................8 Mouvement planétaire...................9 Utilisation du robot ....................9 Guide de réglage des vitesses ................9...
- Page 28 8.Ne pas laisser le robot marcher tout seul ou 20.CARACTÉRISTIQUES ÉLECTRIQUES : à proximité du bord du plan de travail. Lors Votre robot KitchenAid ® fonctionne sous d’emploi du robot en forte charge ou à...
- Page 29 Caractéristiques du robot modèle 5K45SS Moyeu de fixation des accessoires Bouton de fixation Tête des accessoires Levier de verrouillage de la Levier de tête (non illustré) contrôle de Axe du batteur la vitesse Batteur plat Bol en acier inoxydable de 4,25 litres Fouet en acier Plaque de...
- Page 30 ARRÊT MARCHE VERROUILLER LE COMPARTIMENT MOTEUR EN POSITION LEVÉE POUR ATTACHER LE BOL • Poussez le levier de verrouillage vers le • Assurez-vous que le levier de contrôle de haut dans la position UNLOCK la vitesse est sur OFF (ARRÊT). (DÉVERROUILLÉ) et maintenez-le dans •...
- Page 31 Caractéristiques des robots modèles 5K5SS/5KPM5 Tête Moyeu de fixation des accessoires Bouton de fixation des accessoires Levier de contrôle de la vitesse 1 2 4 6 8 10 Levier de levée Crochet à ressort et de la tête (non goupille du bol (non illustré) illustrés) Axe du...
- Page 32 POUR ATTACHER LE BOL • Assurez-vous que le levier de contrôle de la vitesse est sur OFF (ARRÊT). • Placez le levier de levée de la tête en position basse. • Placez les supports du bol sur les goupilles de positionnement. •...
- Page 33 Utilisation de vos accessoires KitchenAid ® Voir le Guide d’utilisation et d’entretien des accessoires du batteur sur socle pour les réglages de vitesse et les durées de fonctionnement. Le fouet pour les mélanges légers Le batteur plat pour les mélanges comme : normaux ou épais comme :...
- Page 34 Mouvement planétaire Votre robot KitchenAid ® mélange plus Lorsqu’il est en mouvement, rapidement et plus complètement que la le batteur tourne autour du plupart des autres robots. La durée de bol fixe tout en tournant malaxage de la plupart des recettes doit autour de son axe propre être donc ajustée pour éviter de trop battre.
- Page 35 Conseils Convertir votre recette pour ce robot batteur en mouvement. Utilisez le Les instructions de mélange de ce livret verseur/protecteur pour ajouter des doivent être utilisées pour convertir vos ingrédients de façon simple. recettes préférées pour le robot KitcheAid ® N.B.
- Page 36 6. Déverrouillez et levez la tête du 5K45SS ou descendez le bol du 5K5SS/5KSM5 et décollez la pâte du crochet. N.B. : Ces instructions illustrent la fabrication de la pâte à pain selon la méthode rapide. Pour la méthode conventionelle, dissolvez la levure dans un bol d’eau tiède, lui-même préalablement tiédi.
- Page 37 Contacter le revendeur chez qui vous avez acheté l'appareil pour obtenir le nom du Dans le cas où votre robot ne fonctionne centre de service agréé KitchenAid le plus pas, faites les vérifications suivantes : proche. 1. Votre robot est-il branché ?
- Page 38 ® LEISTUNGSSTARK EBRUIKSAANWIJZING IXERS IXER NSTRUCTIONS ’ OBOTS DE CUISINE ODE D EMPLOI EBRAUCHSANLEITUNG ÜCHENMASCHINE ’ STRUZIONI D NSTRUCCIONES PARA BATIDORA 1 2 4 6 8 10 9706978A...
- Page 39 Inhaltsverzeichnis Wichtige Sicherheitshinweise...................3 Über Ihre Küchenmaschine Ausstattung Ihrer Küchenmaschine (Modell 5K45SS) ........4, 5 Ausstattung Ihrer Küchenmaschine (Modell 5K5/5KPM5) ......6, 7 Benutzung Ihrer KitchenAid -Zusatzgeräte............8 ® Abstand vom Schläger zur Schüssel ..............8 Pflege und Säuberung ...................8 Planetmischverfahren....................9 Benutzung der Küchenmaschine ................9 Geschwindigkeitseinstellungen................9...
- Page 40 Verwendung des Produkts. VORSICHT UM DAS RISIKO EINES FEUERS, ELEKTRISCHEN 11. Die Benutzung von Zusatzgeräten, die nicht von SCHOCKS, SCHOCKS, EINES PERSONEN- ODER KitchenAid empfohlen werden, kann Feuer, ® SONSTIGEN SCHADENS BEI DER BENUTZUNG DER elektrischen Schock oder Verletzungen KÜCHENMASCHINE ZU VERRINGERN, BEFOLGEN...
- Page 41 Ausstattung Ihrer Küchenmaschine (Modell 5K45SS) Zusatzgerätenabe Motorkopf Zusatzgeräteknopf Motorkopfverrie- gelungshebel (nicht abgebildet) Geschwindig- keitskontroll- Schlägerwelle hebel Flachschläger 4,28-Liter- Edelstahlschüssel Schneebesen Schüsselverriegelungsplatte Knethaken...
- Page 42 ZUR ENTFERNUNG DES FLACHSCHLÄGERS, DES SCHNEEBESENS ODER DES KNETHAKENS • Schalten Sie den Geschwindigkeitshebel auf AUS. • Kippen Sie den Motorkopf zurück. • Drücken Sie den Schläger so weit wie möglich nach oben und drehen Sie ihn nach links. • Ziehen Sie den Schläger von der Welle. ZUR BEFESTIGUNG DER SCHÜSSEL •...
- Page 43 Ausstattung Ihrer Küchenmaschine (Modell 5K5SS/5KPM5) Motorkopf Zusatzgerätenabe Zusatz- geräteknopf Geschwindigkeits- kontrollhebel 1 2 4 6 8 10 Schüsselhe- begriff (nicht Federverriegelung abgebildet) und Schüsselstift (nicht abgebildet) Schläger- welle Haltestifte Schüsselhalter 4,8-Liter- Flachschläger Edelstahl- Knethaken Schneebesen Schüssel...
- Page 44 ZUR BEFESTIGUNG DER SCHÜSSEL • Achten Sie darauf, dass die Geschwindigkeitskontrolle auf AUS geschaltet ist. • Stellen Sie den Schüsselgriff nach unten. • Setzen Sie die Schüsselträger auf die Haltestifte. • Drücken Sie den hinteren Teil der Schüssel nach unten, bis der Schüsselstift in die Federverriegelung einrastet.
- Page 45 Benutzung Ihrer KitchenAid ® -Zubehörteile Hinweise zu Geschwindigkeitseinstellungen und Zubereitungsdauer finden Sie in der Gebrauchsanleitung für die Aufsätze der Küchenmaschine. Flachschläger für normale bis schwere Schneebesen für Mischungen, welche Luft enthalten müssen, wie z.B.: Mischungen wie z.B.: Eier Biskuitteig Kuchenteig...
- Page 46 Planetmischverfahren Schüssel erreicht. Ihre KitchenAid Während des Betriebes bewegt ® Küchenmaschine kann schneller und gründlicher sich der Flachschläger in der rühren als die meisten anderen elektrischen feststehenden Schüssel so, Küchenmaschinen. Deshalb muß die Rührzeit bei dass er sich gleichzeitig in...
- Page 47 Die Gebrauchsanweisungen in diesem Buch HINWEIS: Wenn die Zutaten ganz am Boden können dazu benutzt werden, Ihre der Schüssel nicht gründlich gemischt sind, dann Lieblingsrezepte an die KitchenAid ® liegt der Schläger nicht tief genug in der Küchenmaschine anzupassen. Um Ihnen dabei zu Schüssel.
- Page 48 6. Entriegeln und heben Sie den Kopf (bei Modell 5K45SS) oder senken Sie die Schüssel (bei Modell 5K5SS/5KSM5) und entfernen Sie den Teig vom Haken. ANMERKUNG: Diese Illustrationen zeigen Brotherstellung nach der Rapid-Mix-Methode. Wenn die konventionelle Methode benutzt wird, lösen Sie die Hefe in warmem Wasser in einer angewärmten Schüssel auf.
- Page 49 Missbrauch, unsachgemäße Benutzung oder dadurch entstanden sind, dass der Einbau/Betrieb nicht den örtlichen elektrischen Normen entsprach. KITCHENAID HAFTET NICHT FÜR BEILÄUFIG ENTSTANDENE ODER FOLGESCHÄDEN. Änderungen vorbehalten. KitchenAid Europa, Inc. Nijverheidslaan 3 Box 5 Strombeek-Bever (Brüssel) 1853 BELGIEN ®Die Marke sowie die Silhouette der Küchenmaschine...
- Page 50 ® ER USO INTENSO EBRUIKSAANWIJZING IXERS IXER NSTRUCTIONS ’ OBOTS DE CUISINE ODE D EMPLOI EBRAUCHSANLEITUNG ÜCHENMASCHINE ’ STRUZIONI D NSTRUCCIONES PARA BATIDORA 1 2 4 6 8 10 9706978A...
- Page 51 Indice Importanti precauzioni di sicurezza................3 Il vostro Mixer Caratteristiche del Mixer Modello 5K45SS............4,5 Caratteristiche del Mixer Modello 5K5SS/5KPM5 ..........6,7 Uso degli accessori KitchenAid ................8 ® Spazio tra fruste e ciotola..................8 Cura e pulizia......................8 Moto planetario .....................9 Uso del Mixer......................9 Guida alla regolazione della velocità ..............10 Suggerimenti sull’uso del mixer................11...
- Page 52 PER RIDURRE IL RISCHIO DI INCENDI, esaminato, riparato o regolato. SCOSSE ELETTRICHE, LESIONI ALLE 11. L’uso di accessori non raccomandati da PERSONE O DANNI, QUANDO SI USA IL KitchenAid ® può provocare incendi, scosse elettriche o lesioni alle persone. MIXER SI DOVRÀ RICORRERE A SEMPLICI PRECAUZIONI DI BASE, 12.
- Page 53 Caratteristiche del Mixer 5K45SS Alloggiamento per accesori Testa del Manopola di sicurezza motore per accessori Leva per il blocco del Leva di motore (non regolazione visibile) della Albero dello velocità sbattitore Frusta piatta Ciotola in acciaio inox da 4,3 litri Piatto di bloccaggio Frusta per montare della ciotola...
- Page 54 SPENTO ACCESO PER SERRARE LA TESTA DEL MOTORE IN POSIZIONE RIALZATA COME MONTARE LA CIOTOLA • Premere la leva di bloccaggio in alto nella • Assicurarsi che il dispositivo di velocità sia posizione UNLOCK (APERTO) e tenere spento (OFF). fermo. •...
- Page 55 Caratteristiche del mixer 5K5SS/5KPM5 Testa del motore Alloggiamento per accessori Manopola di sicurezza per accessori Leva di regolazione della Leva di velocità 1 2 4 6 8 10 sollevamento della ciotola (non visibile) Fermo a molla e perno Albero della ciotola (non visibile) dello sbattitore Perni di posizionamento...
- Page 56 COME MONTARE LA CIOTOLA • Accertarsi che il dispositivo di regolazione della velocità sia spento (OFF). • Abbassare la leva di sollevamento della ciotola. • Mettere is supporti della ciotola sopra i perni di posizionamento. • Spingere verso il basso la parte posteriore della ciotola, fino a quando il perno della COME MONTARE LA FRUSTA PIATTA, ciotola entri in uno scatto del dispositivo di...
- Page 57 Uso degli accessori KitchenAid ® Consultare la Guida di utilizzo e manutenzione degli accessori del mixer per le impostazioni della velocità e i tempi di funzionamento. Frusta piatta: per preparati normali o Frusta per montare: per preparati che devono incorporare aria, quali:...
- Page 58 Moto planetario della frusta nella ciotola. Il Mixer Durante il funzionamento, KitchenAid mescolerà più rapidamente e in la frusta piatta si muove ® modo più completo di altri mixer elettrici. Di all’interno della ciotola, che conseguenza, i tempi necessari alla...
- Page 59 è preparate con il Mixer KitchenAid ® nella posizione corretta. Vedere “Spazio tra frusta e ciotola”.
- Page 60 6. Sbloccare e sollevare la testa del motore nel modello 5K45SS o abbassare la ciotola neimodelli 5K5SS/5KSM5 e staccare l’impasto dalla frusta. NOTA: queste istruzioni illustrano la preparazione del pane con il metodo Rapid Mix. Sciogliere il lievito in acqua tiepida nella ciotola preriscaldata quando si usa il metodo convenzionale.
- Page 61 LA KITCHENAID NON SI ASSUME ALCUNA RESPONSABILITÀ PER DANNI ACCIDENTALI O CONSEQUENZIALI. Le specifiche sono soggette a modifiche senza preavviso. KitchenAid Europa, Inc. Nijiverheidslaan 3 box 5...
- Page 62 ® USO PESADO EBRUIKSAANWIJZING IXERS IXER NSTRUCTIONS ’ OBOTS DE CUISINE ODE D EMPLOI EBRAUCHSANLEITUNG ÜCHENMASCHINE ’ STRUZIONI D NSTRUCCIONES PARA BATIDORA 1 2 4 6 8 10 9706978A...
- Page 63 Instrucciones importantes de seguridad ..............3 Acerca de su batidora Características de la batidora 5K45SS..............4, 5 Características de la batidora 5K5SS/5KPM5 ..........6, 7 Usando sus accesorios KitchenAid ..............8 ® Espacio entre el batidor y el bol ................8 Cuidado y limpieza ....................8 Acción planetaria de batido..................9...
- Page 64 20.REQUERIMIENTOS ELÉCTRICOS: Su para evitar lesiones, y/o daño a la batidora. batidora KitchenAid ® opera en una 8.Nunca haga funcionar la mezcladora sola o corriente regular domiciliaria de 220-240 cerca del borde de la superficie de trabajo.
- Page 65 Características de la batidora 5K45SS Base para fijación de accesorios Perilla de fijación Cabezal con motor de accesorios Palanca de ajuste del cabezal con motor (no se muestra) Palanca de control de Eje del batidor velocidad Batidor plano Bol de acero inoxidable de 4,5 cuartos (4,3 L)
- Page 66 • Presione el batidor hacia arriba tanto como sea posible y rote hacia la izquierda. • Tire del batidor en dirección contraria al eje del mismo. SOLTAR FIJAR PARA ENGANCHAR EL BOL • Asegúrese de que el control de velocidad esté...
- Page 67 Características de la batidora 5K5SS/5KPM5 Cabezal con motor Base para fijación de accesorios Perilla de fijación de accesorios Palanca de control de 1 2 4 6 velocidad 8 10 Manivela para elevar el bol (no Clavija del bol y se muestra) resorte de fijación (no Eje del...
- Page 68 PARA ENGANCHAR EL BOL • Asegúrese de que el control de velocidad esté APAGADO (OFF). • Coloque la manija de levantar el bol en la posición inferior. • Coloque los soportes del bol sobre las clavijas de colocación. • Presione hacia abajo la parte posterior del bol hasta que la clavija del bol calce dentro del cierre a resorte.
- Page 69 Usando sus aditamentos de KitchenAid ® Consulte el Manual de uso y cuidado para ver los ajustes de velocidad y tiempos de funcionamiento de los aditamentos de la batidora con base. Batidor de alambre para masas que Batidor plano para mezclas normales a necesitan la incorporación de aire, tales...
- Page 70 Acción planetaria de mezclado Su batidora KitchenAid ® mezclará más rápida El batidor plano se mueve y completamente que la mayoría de las otras alrededor del bol fijo durante batidoras eléctricas. Por consiguiente, la la operación y al mismo duración de mezclado en la mayoría de las...
- Page 71 NOTA: Vea “Espacio entre batidor y tazón” si recetas favoritas para usar con su batidora de los ingredientes en el fondo del tazón no están KitchenAid. completamente mezclados. Se requerirán sus propias observaciones y Mezclas de tortas...
- Page 72 6. Suelte y eleve el cabezal en el 5K45SS o baje el bol en el 5K5SS/5KPM5 y extraiga la masa del gancho. NOTA: Estas instrucciones ilustran la elaboración de pan con el método Rapid Mix. Cuando use el método convencional disuelva la levadura en agua caliente en el bol calentado.
- Page 73 3. Si el batidor plano golpea el tazón, apague la por un centro de servicio autorizado de batidora. Vea "Espacio entre batidor y tazón". KitchenAid. Llame al representante de quien fue Si su batidora funcionara mal o fallara en comprada la unidad para obener el nombre de la operar, por favor verifique lo siguiente: instalación autorizada de servicio más cercana de...