Aiphone JK-1MED Manuel D'installation Et D'utilisation
Masquer les pouces
Voir aussi pour JK-1MED:
- Manuel d'installation et d'utilisation (19 pages) ,
- Manuel d'installation et d'utilisation (18 pages) ,
- Manuel d'installation et d'utilisation (18 pages)
Table des Matières
Publicité
Les langues disponibles
Les langues disponibles
Liens rapides
FK1462 Ⓑ P0109YI
JK-1MED
HANDS FREE COLOR VIDEO INTERCOM MASTER MONITOR STATION
INTERPHONE VIDEO COULEUR MAINS LIBRES MONITEUR MAÎTRE
HANDENVRIJE KLEURENVIDEOFONIE MONITOR-HOOFDPOST
JK-1MED
Master monitor station
Moniteur maître
Monitor-hoofdpost
INSTALLATION & OPERATION MANUAL
MANUEL D'INSTALLATION ET D'UTILISATION
INSTALLATIE- EN GEBRUIKSHANDLEIDING
Publicité
Table des Matières

Manuels Connexes pour Aiphone JK-1MED


Sommaire des Matières pour Aiphone JK-1MED
- Page 1 FK1462 Ⓑ P0109YI JK-1MED HANDS FREE COLOR VIDEO INTERCOM MASTER MONITOR STATION INTERPHONE VIDEO COULEUR MAINS LIBRES MONITEUR MAÎTRE HANDENVRIJE KLEURENVIDEOFONIE MONITOR-HOOFDPOST JK-1MED Master monitor station Moniteur maître Monitor-hoofdpost INSTALLATION & OPERATION MANUAL MANUEL D’INSTALLATION ET D’UTILISATION INSTALLATIE- EN GEBRUIKSHANDLEIDING...
-
Page 2: General Precautions
4. For power supply, use Aiphone power supply model or model specified for use 14. Talk within 50 cm (20") or less from the unit. If you stand too far away, it may be with system. -
Page 3: Mounting Locations
Allow at least 5 cm (2") of open space from the center of the mounting sunlight. space on either side. bracket in order to mount the master monitor station. JK-1MED + 15 cm + 5 cm + 5 cm (6") (2") (2") - Page 4 WIRING Insert wires securely into each terminal as shown. DOOR Video door station JK-1MED Master monitor station JK-DA OPTION JK-DV JK-DVF CONNECTOR A1 A2 Optional call extension speaker IER-2 DC 18 V Power supply NP: Non-polarized PS-1810DIN/ PS-1820 P: Polarized...
- Page 5 1MED/during communication between a door station and the JK-1MED/during terminals (when open between terminals) monitoring from the JK-1MED (screen playing recorded pictures is not output). [2] Options output (AC/DC 24 V, 1.6 A N/O dry closure contact) (Minimum Contact : 100 mV DC, 0.1 mA)
- Page 6 MOUNTING Back wiring Mounting screws x 2 1-gang box JK-1MED 83,5 mm (3-5/16") Mounting bracket 1. Press RELEASE button (to insert or remove the wire). 2. Insert the cable into the terminal. (3/8") Surface wiring * When a 1-gang box is not mounted, the cable can be routed as surface wiring to the top or...
-
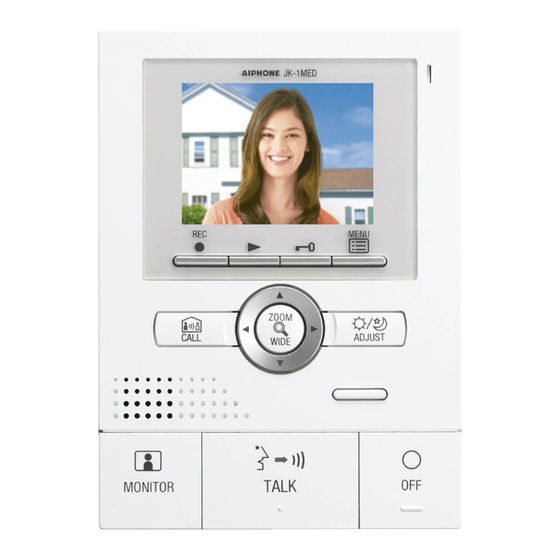
Page 7: Operating Method
OPERATING METHOD Main symbols and function descriptions To operate this unit, check the symbol and then press the appropriate operation button This is not a touch-panel operation. Symbol Function description Do not press on the LCD or subject it to high To manually record. -
Page 8: Select The Language
7-2 SELECT THE LANGUAGE After performing steps 1 and 2 in section 7-1, select "LANGUAGE" In the SELECT THE LANGUAGE screen, press , , , and buttons to select the language. in the "INITIAL SETTING" screen and press MENU button ( Press MENU button (... -
Page 9: Initial Setting
7-5 EXTERNAL INPUT SETTING When optional units operate (for example, when a sensor is activated or call button is pressed), the master monitor station and sub master station will receive an alert sound. Also, when notification at door is enabled, the door station also receives an alert sound. - Page 10 7-7 Automatic night volume adjustment This automatically lowers the communication volume at the door station In the "NIGHT TIME DOOR VOLUME CONTROL" screen, press button or button to select "ENABLE". only at night.Initial setting: "Disabled" After performing step 1 in section 7-1, select "COMMUNICATION" and press MENU button ( Press...
- Page 11 7-9 Press-to-talk setting In the "PTT SETTING" screen, press button or button to select This disables the press-to-talk setting during communication with a door station (section 8-1). ON or OFF. Initial setting: (press-to-talk enabled) After performing step 1 in section 7-1, select "COMMUNICATION" and press MENU button ( Press...
- Page 12 OPERATIONS 8-1 Answering a door call (HANDS-FREE mode, PTT mode) Press CALL button. Instant voice call function Even without answering, door area can be seen and heard with video and audio (for approximately 45 seconds). Inside sound is not heard outside. Chime tone sounds, caller is seen on video monitor, and outside sound is heard.
- Page 13 8-3 Entrance monitoring Press MONITOR button in the standby mode. Press OFF button to end communication. The video monitor displays the image from the door station and the NOTES: 1. To talk to the visitor during entrance monitoring, momentarily press incoming audio is heard.
- Page 14 8-6 Pan/tilt operation When a zoom picture is displayed, press , , , or button. • []: Up • []: Down • []: Left • []: Right • Moving diagonally is also possible. [Zoom picture] The image range of the zoom picture and wide picture differs. The edges of the wide picture do not display with the zoom picture.
-
Page 15: Manual Recording
8-9 Backlight adjustment, Night sensitivity adjustment To perform adjustment To cancel adjustment Press ADJUST button when the image is difficult to see. Press ADJUST button during adjustment. • Automatic adjustment to a more visible screen is performed. The • The adjust icon will disappear and the screen returns to the pre- adjust icon displays at this time. - Page 16 8-12 Play recorded picture If there are automatically recorded pictures, such as those taken while you were * In the manual, screen icons and button icons are explained together. out, the play LED (red) flashes. * In addition, the operations shown below are also possible in the play screen.
-
Page 17: Technical Precautions
(Minimum Contact : 100 mV DC, 0.1 mA) • Communication: <HANDS-FREE mode> Hands-free: 1, 2, 3 or 5 min. (Aiphone's EL-12S is recommended.) • Dimensions: <PTT mode> Press-to-talk, release to listen: 1, 2, 3 or 5 185 (H) x 135 (W) x 27 (D) (mm) min. -
Page 18: Précautions Générales
16. Lors de la communication, si vous parlez avant que l ’ autre personne ait terminé sa 4. Pour le bloc d ’ alimentation, utilisez l ’ alimentation Aiphone ou un modèle spécifié conversation, votre voix risque de ne pas être perçue clairement. La communication avec le système. -
Page 19: Emplacements De Montage
Prévoyez un espace d ’ au cm du centre du support de montage afin rayons du soleil. moins 5 cm de chaque côté. de monter le moniteur maître. JK-1MED + 15 cm + 5 cm + 5 cm 2-2 Méthode de câblage, longueur de câblage Raccordez les appareils de poste à... -
Page 20: Bloc D'alimentation
CABLAGE Insérez correctement les câbles dans chaque borne, comme indiqué sur le schéma. DOOR Poste de porte vidéo JK-1MED Moniteur maître JK-DA OPTION JK-DV JK-DVF CONNECTOR A1 A2 Haut-parleur d’extension d’appel en option IER-2 DC 18 V Bloc d’alimentation NP: Non polarisé... -
Page 21: Poste Secondaire Audio
’ environnement d ’ installation. N/F : 3 k Ω minimum Un signal vidéo est émis uniquement pendant un appel d'un poste de porte vers le JK-1MED/pendant la communication entre un poste de porte et le JK-1MED/ Courant de court- 10 mA maximum pendant la surveillance à... -
Page 22: Montage
MONTAGE Câblage arrière Vis de montage x 2 Boîte simple JK-1MED 83,5 mm Support de montage 1. Appuyer sur le bornier (pour insérer ou retirer le câble) 2. Introduire le câble dans la borne. Câblage saillant * Lorsqu ’ une boîte simple n ’ est pas fixée, le câble peut être acheminé comme un câblage... -
Page 23: Methode De Fonctionnement
METHODE DE FONCTIONNEMENT Symboles principaux et description des fonctions Pour faire fonctionner cette unité, vérifiez le symbole et appuyez ensuite sur le bouton de fonctionnement approprié. Il ne s ’ agit pas d ’ un écran tactile. Symbole Description des fonctions N ’... -
Page 24: Selectionner La Langue
7-2 SELECTIONNER LA LANGUE Après avoir effectué les étapes 1 et 2 de la section 7-1, sélectionnez Sur l'écran "SELECTIONNER LA LANGUE", appuyez sur les “ LANGUE ” dans l ’ écran “ PROGRAMMATION INITIALE ” et boutons "", "", "" et "" pour sélectionner la langue. appuyez sur le bouton MENU ( Appuyez sur le bouton... -
Page 25: Programmation D'entree Externe
7-5 PROGRAMMATION D’ENTREE EXTERNE Lorsque des appareils en option fonctionnent (par exemple, quand un capteur est activé ou que le bouton d ’ appel (CALL) est enfoncé), le moniteur maître et le moniteur secondaire reçoivent un son d ’ alerte. De même, lorsque la notification à la porte est activée, le moniteur maître reçoit également un son d ’ alerte. Ces opérations doivent être effectuées par un installeur. -
Page 26: Réglage Automatique Du Volume De Nuit
7-7 Réglage automatique du volume de nuit Sur l ’ écran “REGLAGE VOLUME DE LA COM DE NUIT” , appuyez Cela réduit automatiquement le volume de communication au poste de porte, uniquement pendant la nuit. Configuration initiale : “ Désactivé ” sur le bouton ... -
Page 27: Réglage De La Fonction Appuyer Pour Parler
7-9 Réglage de la fonction appuyer pour parler Cela désactive le paramètre “ appuyer pour parler ” pendant la communication Sur l'écran "PROGRAMMATION DU MODE MANUEL", appuyez sur le bouton ou le bouton pour sélectionner ON ou OFF. avec un poste de porte (section 8-1). -
Page 28: Mode Manuel
FONCTIONNEMEN 8-1 Répondre à un appel du portier (mode MAINS LIBRES, mode MANUEL) Appuyez sur le bouton d ’ appel CALL. Fonction d’écoute vocal instantané Même si vous ne répondez pas, la zone autour de la porte est visible et audible à... -
Page 29: Surveillance De L'entrée
8-3 Surveillance de l’entrée Appuyez sur le bouton surveillance MONITOR en mode veille. Appuyez sur le bouton OFF pour mettre fin à la communication. Le moniteur vidéo affiche l ’ image du poste de porte et le son entrant REMARQUES: 1. Pour communiquer avec le visiteur lors de la surveillance de l ’ entrée, Faite une se fait entendre. -
Page 30: Fonctionnement De Caméra Verticale Et Horizontale
8-6 Fonctionnement de caméra verticale et horizontale Lorsqu ’ une image de zoom est affichée, appuyez sur les boutons , , , ou . • []: Haut • []: Bas • []: Gauche • []: Droite [Image Zoom] • Le déplacement en diagonale est également possible. Le cadre de l ’... -
Page 31: Réglage De Contre-Jour, Réglage De Sensibilité Nocturne
8-9 Réglage de contre-jour, réglage de sensibilité nocturne Pour réaliser le réglage Pour annuler le réglage ADJUST lorsque l ’ image est peu visible. Appuyez sur le bouton de réglage Appuyez sur le bouton de réglage ADJUST pendant le réglage. •... -
Page 32: Lire L'image Enregistrée
8-12 Lire l’image enregistrée * Dans ce manuel, les icônes d ’ écran et les icônes de bouton sont expliquées ensemble. Si des images ont été enregistrées automatiquement, par exemple lors de votre absence, la LED de lecture (rouge) clignote. * De plus, les opérations décrites ci-dessous sont également possibles sur l ’... -
Page 33: Effacer L'image Enregistrée
Carillon et image, environ 45 secondes (Surcharge minimum: 100 mV c.c, 0,1 mA) • Communication: (le modèle EL-12S d ’ Aiphone est recommandé.) <mode MAINS LIBRES> Mains libres : 1, 2, 3 ou 5 min. • Dimensions: <Mode manuel> Appuyez pour parler, relâchez pour 185(H) x 135(L) x 27(P) mm. -
Page 34: Algemene Voorzorgsmaatregelen
100-240 V. Zo niet, kunnen ruis en storingen optreden. een elektrische schok veroorzaken. Als het toestel defect is of niet goed werkt, trek de stekker uit of schakel de JK-1MED 5. Steek geen metalen of brandbare voorwerpen in de openingen van de behuizing. -
Page 35: Installatie
Laat minstens 5 cm vrije vanaf het midden van de montagesteun aan rechtstreeks zonlicht. ruimte aan beide zijden. voor de montage van de monitor-hoofdpost. JK-1MED + 15 cm + 5 cm + 5 cm 2-2 Bekabelingsmethode, bekabelingsafstand Bedraad de toestellen van post naar post (in serie). - Page 36 BEDRADING Steek de draden degelijk in de juiste aansluitklem zoals afgebeeld. DOOR Videodeurpost JK-1MED Monitor-hoofdpost JK-DA OPTION JK-DV JK-DVF CONNECTOR A1 A2 Optionele extra bel IER-2 DC 18 V Voeding NP: Niet-gepolariseerd PS-1810DIN/ PS-1820 P: Gepolariseerd Geluid afkomstig van de IER-2...
- Page 37 (wanneer open tussen aansluitingen) Er wordt alleen een videosignaal verzonden tijdens de oproep van een buitenpost naar de JK- 1MED/tijdens een gesprek tussen een buitenpost en de JK-1MED/tijdens bewaking vanaf de JK-1MED (er worden geen opgenomen beelden van de schermweergave verzonden).
- Page 38 MONTAGE Bekabeling in de muur Montageschroeven x 2 inbouwdoos JK-1MED 83,5 mm Montagesteun 1. Druk op de ontgrendelknop om de draad in te steken of los te maken. 2. Steek de kabel in de aansluiting. Bekabeling bovenop de muur * Als er geen inbouwdoos gemonteerd is, kan de kabel aan de boven- of onderzijde van het...
- Page 39 BEDIENINGSMETHODE Voornaamste symbolen en beschrijving van de functies Om dit toestel te bedienen, kijkt u welk symbool op het scherm wordt weergegeven bij elke resp. drukknop en drukt u op de juiste bedieningsknop. Dit is geen aanraakscherm. Symboolveld Functiebeschrijving Druk niet op het lcd-scherm en onderwerp Manueel opnemen.
-
Page 40: Taal Instellen
7-2 TAAL INSTELLEN Na het uitvoeren van stappen 1 en 2 in deel 7-1 kiest u "TAAL" in Druk op het scherm "KIES UW TAAL" (SELECT THE LANGUAGE) het "ALGEMENE INSTELLINGEN"-scherm en drukt u op de op de knoppen " ", "... - Page 41 7-5 INSTELLING INGANG EXTERN CONTACT (EXT INGANG) Wanneer het externe contact aangesloten op deze ingang geactiveerd wordt (bijvoorbeeld: detector of drukknop-contact), geven de hoofd- en bijposten een waarschuwingsgeluid weer. Wanneer het bevestigingssignaal aan de deur ingeschakeld is, geeft de deurpost eveneens een waarschuwingsgeluid weer. Deze bewerkingen moeten worden uitgevoerd door een installateur.
- Page 42 7-7 Automatische demping van het gespreksvolume ’s nachts. Hiermee kan het gespreksvolume aan de deurpost tijdens de nacht Op het "DEMPING DEURVOLUME'S NACHTS"-scherm (deurvolumeregeling 's nachts) drukt u op de -knop of de -knop automatisch worden verlaagd. Oorspronkelijk is deze instelling gedeactiveerd. om "ACTIVEREN"...
-
Page 43: Beelden Opnemen
7-9 “Druk om te spreken”-instelling Dit stelt de "druk-om-te-spreken"-instelling tijdens het gesprek met een In het "DRUKKEN OM TE SPREKEN"-menu kiest u AAN of UIT. deurpost (deel 8-1) buiten werking. Oorspronkelijke instelling AAN ("druk om te spreken"-modus beschikbaar) Na het uitvoeren van stap 1 in deel 7-1 kiest u "COMMUNICATIE" en drukt u op de MENU-knop ( Druk op de... - Page 44 BEDIENING 8-1 Een deuroproep beantwoorden (handenvrije modus, “druk om te spreken”-modus) Druk op de beldrukknop. Spraakoproepfunctie Zelfs zonder te beantwoorden, krijgt u binnen beeld en geluid van de deurpost (gedurende ca. 45 seconden). Het geluid van binnen is niet hoorbaar buiten. De beltoon weerklinkt, u ziet de bezoeker op het beeldscherm en hoort het geluid van buiten.
-
Page 45: Interne Gesprekken
8-3 Ingangsbewaking In rust-modus, druk op de MONITOR-knop. Druk op de OFF-knop om de verbinding te verbreken. U krijgt op de binnenpost beeld & geluid van buiten. OPMERKINGEN: 1. Als u tijdens de bewaking wilt spreken met de bezoeker, drukt u kortstondig op de Als u niet op de spreek-knop TALK drukt, hoort de bezoeker geen spreek-knop... - Page 46 8-6 Pan/Tilt-functie Wanneer een zoombeeld wordt weergegeven, drukt u op , , , of . • []: naar boven • []: naar beneden • []: naar links • []: naar rechts • Diagonaal bewegen is ook mogelijk. [Zoombeeld] Het beeldbereik van het zoombeeld en het breedhoekbeeld verschilt. De hoeken van het zoombeeld worden niet weergegeven met het zoombeeld.
-
Page 47: Handmatige Opname
8-9 Beeldoptimalisatie Bij ongunstige licht-situaties (tegenlicht of te laag verlichtingsniveau) kan het Optimalisatie terug uitschakelen resultaat verbeterd worden om de bezoeker meer herkenbaar in beeld te brengen. Druk nogmaals op de ADJUST-knop. Wanneer de bezoeker niet goed herkenbaar is, druk op de ADJUST-knop. - Page 48 8-12 Opgenomen beeld weergeven Als er automatisch beelden zijn opgenomen, bijvoorbeeld tijdens uw afwezigheid, * In de handleiding worden de scherm- en knopsymbolen samen uitgelegd. knippert de weergave-LED (rood). * Daarnaast zijn ook de onderstaande bewerkingen mogelijk in het weergavescherm. •...
-
Page 49: Technische Gegevens
“ HANDENVRIJ ” : 1, 2, 3 of 5 min. (minimum belasting: 100 mV DC, 0,1 mA) " DRUKKEN OM TE SPREKEN " : 1, 2, 3 of 5 min. (De EL-12S van Aiphone wordt aanbevolen.)) • Beeldscherm: • Afmetingen: 3-1/2 "... - Page 50 - 50 -...
- Page 51 - 51 -...
-
Page 52: Garantie
Aiphone warrants thats its products have no material or workmanship defects under normal use conditions for two years after delivery to the end user. Aiphone will perform repair or replacement free of charge if the product is defective and the warranty applies to the defect. Aiphone reserves unto itself the sole right to make the final decision whether there is a defect in materials and/or workmanship and whether or not the product is under warranty.