Publicité
Les langues disponibles
Les langues disponibles
Liens rapides
Publicité

Manuels Connexes pour Vitrifrigo OCX2

Sommaire des Matières pour Vitrifrigo OCX2
- Page 1 MANUALE ISTRUZIONI ICE MAKER OCX2 GRAZIE PER AVER ACQUISTATO UN PRODOTTO VITRIFRIGO...
- Page 3 Sommario 1. INTRODUZIONE 2. AVVERTENZE GENERALI Destinazione del prodotto Ricevimento Installazione Manutenzione e sicurezza (tutti i modelli) Smaltimento 3. SCOPO DEL MANUALE Identificazione del costruttore 4. DESCRIZIONE DELL’APPARECCHIO 5. INSTALLAZIONE Incasso dell’apparecchio, con condensatore ventilato (IM-CL e IM-XT) Incasso dell’apparecchio, con motore remoto ventilato Regolazione del profilo per incasso Totale/Parziale Fissaggio dell’apparecchio 6.
- Page 4 1. INTRODUZIONE Gentile cliente, grazie per aver scelto un nostro prodotto. La Vitrifrigo si augura che Lei possa rimanere completamente soddisfatto dell’acquisto effettuato. Il presente manuale è considerato parte integrante del frigorifero e deve seguire il percorso di vendita fino all’utilizzatore.
- Page 5 • È fatto assoluto divieto di utilizzare il frigorifero per usi diversi da quelli previsti. • Questo apparecchio non prevede il contatto diretto con gli alimenti • L’apparecchio può essere utilizzato da bambini di età non inferiore a 8 anni e da persone con ridotte capacità...
- Page 6 • Non tentare di smontare, modificare o riparare il frigorifero. • Per eventuali problemi di funzionamento rivolgersi presso il centro assistenza Vitrifrigo più vicino; in ogni caso avvalersi di personale qualificato. • Non conservare sostanze esplosive in questo apparecchio, come bombolette per aerosol con propellente infiammabile.
- Page 7 Vitrifrigo s.r.l. Via Mazzini 75 - fraz. Montecchio - 61022 VALLEFOGLIA(PU) – Italia tel. +39 0721 154500 - fax. +39 0721 497739 e-mail info@vitrifrigo.com - www.vitrifrigo.com 4. DESCRIZIONE DELL’APPARECCHIO • L’etichetta riportante matricola e dati tecnici è posizionata all’interno del produttore di ghiaccio.
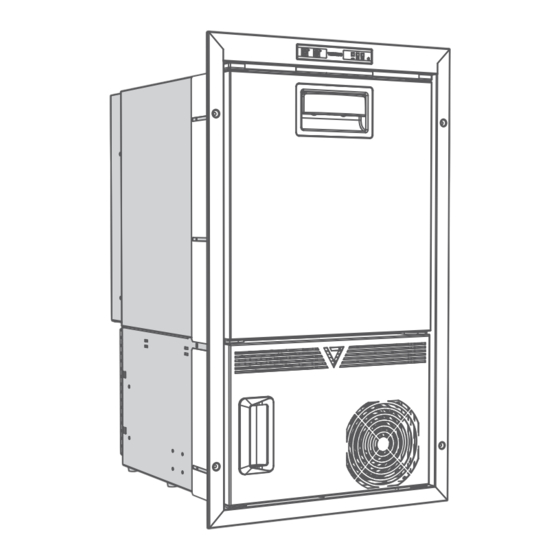
- Page 8 IM XR • A) Pannello di controllo F) Elettrovalvola B) Impianto refrigerante G) Scheda elettronica C) Condensatore H) Cubettiera D) Mascherina I) Rilevatore livello ghiaccio E) Sportello frontale J) Vaschetta raccogli ghiaccio IM XT • A) Mascherina G) Vaschetta raccogli ghiaccio B) Sportello frontale H) Connettore alimentazione C) Pannello di controllo...
- Page 9 IM CL • A) Pannello di controllo I) Impianto refrigerante B) Sportello frontale J) Condensatore C) Griglia protezione motore K) Serbatoio (solo refill) D) Sportellino frontale/Mascherina L) Pompa (solo refill) E) Cubettiera M) Sensore livello (solo refill) F) Rilevatore livello ghiaccio N) Tappo del serbatoio G) Vaschetta raccogli ghiaccio O) Innesto tubo acqua...
- Page 10 Le aperture di ventilazione da prevedere per la versione IM-CL sono: • Nella parte inferiore posteriore in corrispondenza della griglia protezione motore, con dimensione non inferiore a 250mm (per l’altezza) e per la dimensione del frigorifero (per la larghezza); nella parte superiore posteriore/top non inferiore a 50mm (per l’altezza) e per la dimensione del frigorifero (per la larghezza).
- Page 11 Fissaggio dell’apparecchio. Per il fissaggio dell’apparecchio nello spazio d’incasso utilizzare unicamente i fori presenti nell’apposito profilo di fissaggio (Allegato 3). 6. COLLEGAMENTO ELETTRICO ATTENZIONE l’operatore deve essere in grado di poter disconnettere l’apparecchio dalla rete elettrica. Assicurarsi quindi che nelle vicinanze dell’apparecchio ci sia un punto di accesso alla rete di alimentazione elettrica e/o che l’impianto sia provvisto di un interruttore magnetotermico differenziale onnipolare da 6A tipo AC sensibilità...
- Page 12 Avviamento modello “REFILL” Avviare la macchina tenendo premuto qualche secondo il pulsante di avvio A. Aprire lo sportellino ed estrarre in serbatoio, svitare il tappo presente sulla parte superiore del serbatoio e versare acqua potabile attraverso il bocchettone nel serbatoio (min.2 litri / max.7 litri).
- Page 13 Al raggiungimento della temperatura prefissata ha inizio il ciclo di espulsione del ghiaccio dalla cubettiera (il ciclo di produzione+espulsione può durare dai 25 ai 30 min.*). ESPULSIONE Una volta a temperatura il termostato attiva la resistenza e il motorino. Le lame estrattrici premeranno sul ghiaccio fino a che non si sarà...
- Page 14 Attendere che la brina presente all’interno della vasca sia completamente sciolta. Asciugare accuratamente le pareti interne del fabbricatore. Lasciare la porta semi aperta, utilizzando la vent-position presente sulla staffa , affinché possa realizzarsi un ricambio d’aria e non si crei umidità all’interno della vasca. Per le versioni REFILL svuotare e pulire il serbatoio.
- Page 15 Problema Controllare che non manchi la corrente l’interruttore “STAND-BY” sia attivo ed il led acceso l’interruttore automatico dell’impianto elettrico non sia disinserito L’apparecchio non funziona la spina sia efficiente e correttamente inserita nella presa di corrente. la presa di corrente sia efficiente. Per tale verifica collegare alla presa un apparecchio la cui funzionalità...
- Page 16 INSTRUCTION MANUAL ICE MAKER OCX2 THANK YOU FOR PURCHASING A VITRIFRIGO PRODUCT...
- Page 17 Index 1. INTRODUCTION 2. GENERAL WARNINGS Destination of the product Receipt Installation Maintenance and safety (all models) Disposal 3. PURPOSE OF THE MANUAL Identification of the manufacturer 4. DESCRIPTION OF THE APPLIANCE 5. INSTALLATION Recessed appliance, with ventilated condenser (IM-CL and IM-XT) Appliance recess, with ventilated remote motor Profile adjustment for Total/Partial recess Fixing the appliance...
- Page 18 This manual is considered an integral part of the refrigerator and must follow the sales path to the user. The same can be consulted at the Vitrifrigo website www.vitrifrigo.com. Each refrigerator, before being shipped, is thoroughly checked and tested to ensure it operates correctly.
- Page 19 • Follow the installation instructions given in this manual carefully. • It is absolutely forbidden to use the appliance for uses other than those intended. • The appliance may be used by children aged 8 and older and by people with reduced physical, sensory or mental abilities, and by people lacking experience or the necessary knowledge, provided that use is supervised or done after suitable instruction has been given regarding the safe use of the appliance and once there is...
- Page 20 • Do not attempt to disassemble, modify or repair the appliance. • For any operational problems contact the Vitrifrigo Service Centre closest to you; in any case, request the assistance of a suitably qualified person. • Do not store explosive substances in this appliance such as aerosol cans with flammable propellant.
- Page 21 Via Mazzini 75 - fraz. Montecchio - 61022 VALLEFOGLIA(PU) – Italia tel. +39 0721 154500 - fax. +39 0721 497739 e-mail info@vitrifrigo.com - www.vitrifrigo.com 4. DESCRIPTION OF THE APPLIANCE The label stating the serial number and technical data is positioned inside the ice maker in the upper right hand side.
- Page 22 IM XR • A) Control panel F) Solenoid valve B) Refrigeration system G) Electronic board C) Condenser H) Ice cube tray D) Mask I) Ice level detector E) Front door J) Ice collector tray IM XT • A) Mask G) Ice collector tray B) Front door H) Power connector C) Control panel...
- Page 23 IM CL • A) Control panel I) Refrigeration system B) Front door J) Condenser C) Motor protection grille K) Tank (only refill) D) Front flap/Mask L) Pump (only refill) E) Ice cube tray M) Level sensor (only refill) F) Ice level detector N) Tank cap G) Ice collector tray O) Water pipe connection...
- Page 24 The ventilation openings to be provided for the IM-CL version are: • In the lower rear part at the motor protection grille, with a size not less than 250mm (for the height) and for the size of the refrigerator (for the width); in the upper rear/top not less than 50mm (for the height) and for the size of the refrigerator (for the width), see fig.1a.
- Page 25 Fixing the appliance To secure the appliance in the built-in space, use only the holes in the relevant fastening profile (Annex 3). 6. ELECTRICAL CONNECTION ATTENTION The operator must be able to disconnect the appliance from the mains electricity. Therefore, make sure that there is an access point to the power supply network near the appliance and/or that the system is equipped with an omnipolar differential magnetothermic switch, 6A type AC sensitivity 30 mA, with minimum 3mm contact opening.
- Page 26 “REFILL” Model start-up Start the machine by keeping the start button A pressed for a few seconds. Open the hatch and remove the tank, unscrew the cap on the top of the tank and pour drinking water through the filler into the tank (min.2 litres/max.7 litres). In order to completely disconnect the tank from the machine, disengage the water syphon tube by pressing the release ring on the coupling and simultaneously pulling the tube upwards.
- Page 27 When the pre-set temperature is reached, the cycle of ejection of the ice from the ice cube tray begins (the production+ejection cycle can last from 25 to 30 min.*). EJECTION Once at temperature, the thermostat activates the resistance and the motor. The extracting blades will press on the ice until it detaches;...
- Page 28 take place and so that no humidity is created inside the tray. For the REFILL versions, empty and clean the tank. 10. CLEANING THE ICE MAKER Before starting to clean the ice maker, make sure it is not connected to the mains electricity. If connected, unplug the appliance from the electrical supply.
- Page 29 Problems Check that it is energised the “STAND-BY” switch A is active and the LED is on the automatic circuit breaker of the electrical system is not disconnected The appliance does not work the plug is efficient and correctly inserted into the socket and the power outlet works.
- Page 30 MANUEL D’INSTRUCTIONS ICE MAKER OCX2 MERCI D’AVOIR ACHETÉ UN PRODUIT VITRIFRIGO...
- Page 31 Index 1. INTRODUCTION 2. AVERTISSEMENTS Destination du produit Réception Installation Maintenance et sécurité (tous les modèles) Élimination de l’appareil 3. BUT DU MANUEL Identification du constructeur 4. DESCRIPTION DE L’APPAREIL 5. INSTALLATION Encaissement de l’appareil, avec condenseur ventilé (IM-CL et IM-XT) Encastrement de l’appareil, avec moteur à...
- Page 32 Ce manuel peut être consulté à l’intérieur du site web de Vitrifrigo www.vitrifrigo.com. Chaque réfrigérateur, avant d’être expédié, est soumis à des contrôles et à des tests pour s’assurer de son bon fonctionnement.
- Page 33 • Suivez exclusivement les instructions d’installation de ce manuel. • Il est strictement interdit d’utiliser l’appareil pour des usages autres que ceux prévus. • Cet appareil ne prévoit pas de contact direct avec les aliments. • L’appareil peut être utilisé par des enfants d’au moins 8 ans et par des personnes ayant des capacités physiques, sensorielles ou mentales réduites, ou manquant d’expérience ou de connaissances nécessaires, à...
- Page 34 • En cas d’anomalies de fonctionnement de l’appareil, contacter le centre d’assistance Vitrifrigo le plus proche ; dans tous les cas, faire appel à du personnel qualifié. • Ne conservez pas de substances explosives dans cet appareil, telles que des bombes aérosols contenant des agents propulseurs inflammables.
- Page 35 Via Mazzini 75 - fraz. Montecchio - 61022 VALLEFOGLIA(PU) – Italia tel. +39 0721 154500 - fax. +39 0721 497739 e-mail info@vitrifrigo.com - www.vitrifrigo.com 4. DESCRIPTION DE L’APPAREIL L’étiquette avec le numéro de série et les données techniques se trouve à l’intérieur de la machine à...
- Page 36 IM XR • A) Panneau de commande F) Électrovanne B) Installation de réfrigération G) Carte électronique C) Condenseur H) Bac à glaçons D) Protection I) Capteur niveau de la glace E) Portillon frontal J) Cuve de récupération des glaçons IM XT •...
- Page 37 IM CL • A) Panneau de commande I) Installation de réfrigération B) Portillon frontal J) Condenseur C) Grille de protection moteur K) Réservoir (seulement refill) D) Rabat frontal/ Protection L) Pompe (seulement refill) E) Bac à glaçons M) Capteur de niveau (seulement refill) F) Capteur niveau de la glace N) Bouchon du réservoir G) Cuve de récupération des glaçons...
- Page 38 Les ouvertures de ventilation à prévoir pour la version IM-CL sont situées : • Sur la partie inférieure arrière, au niveau de la grille de protection du moteur, de dimensions non inférieures à 250 mm (pour la hauteur) et proportionnées aux dimensions du réfrigérateur (pour la largeur) ;...
- Page 39 Fixation de l’appareil Pour la fixation de l’appareil dans l’espace d’encaissement, utiliser uniquement les trous présents sur le profil de fixation (Annexe 3). 6. BRANCHEMENT ÉLECTRIQUE ATTENTION L’opérateur doit pouvoir débrancher l’appareil du secteur. Vérifier la présence près de l’appareil d’un point d’accès au secteur d’alimentation électrique et/ou que l’installation soit munie d’un interrupteur magnétothermique différentiel omnipolaire de 6A du type CA sensibilité...
- Page 40 Démarrage modèle “REFILL” Démarrer la machine en maintenant le bouton de démarrage A enfoncé pendant quelques secondes. Ouvrir le volet E et extraire le réservoir, dévisser le bouchon situé sur la partie supérieure du réservoir et verser de l’eau potable à travers la goulotte dans le réservoir (min.2 litres / max.7 litres).
- Page 41 Lorsque la température programmée est atteinte, le cycle d’expulsion des glaçons du bac démarre (le cycle de production+expulsion peut durer de 25 à 30 min.*). EXPULSION Quand la température est atteinte, le thermostat active l’élément chauffant et le moteur. Les lames d’extraction resteront sur le glaçon jusqu’à ce qu’il se détache ;...
- Page 42 d’air puisse avoir lieu et qu’aucune humidité ne soit créée à l’intérieur de la cuve. Pour les versions REFILL, vider et nettoyer le réservoir. 10. NETTOYAGE DE LA MACHINE À GLAÇONS Avant le nettoyage, vérifier que la machine ne soit pas connectée au système électrique. Dans le cas contraire, débrancher la fiche de la prise de courant.
- Page 43 Problème Contrôler que Il n’y ait pas de panne de courant l’interrupteur « STAND-BY » A soit actif et que le voyant lumineux soit allumé le disjoncteur du système électrique ne soit pas coupé L’appareil ne fonctionne pas la fiche soit efficace et correctement branchée dans la prise de courant et que la prise de courant soit efficace.
- Page 44 HANDBUCH ICE MAKER OCX2 WIR DANKEN IHNEN SICH FÜR EIN VITRIFRIGO PRODUKT ENTSCHIEDEN ZU HABEN...
- Page 45 Inhaltsverzeichnis 1. EINFÜHRUNG 2. ALLGEMEINE HINWEISE Bestimmungszweck des Produkts Erhalt Installation Wartung und Sicherheit Entsorgung 3. ZIEL DES HANDBUCHES Angabe des Herstellers 4. BESCHREIBUNG DES GERÄTS 5. INSTALLATION Einbaugerät, mit belüftetem Kondensator (IM-CL und IM-XT) Einbau des Gerätes mit belüftetem Außenmotor Einstellen des eingebauten Profils Total/Teilweise Befestigung des Gerätes 6.
- Page 46 1. EINLEITUNG Lieber Kunde, vielen Dank, dass Sie sich für ein Produkt von uns entschieden haben. Vitrifrigo hofft, dass Sie mit Ihrem Kauf vollkommen zufrieden sind. Das vorliegende Handbuch ist integraler Bestandteil des Kühlschrankes und muss diesem vom Kauf bis zum Endnutzer begleiten.
- Page 47 werden. • Es ist absolut verboten, das Gerät für einen anderen als den vorgesehenen Zweck zu verwenden. • Das Gerät kann von Kinder mit einem Mindestalter von 8 Jahre und von Personen mit eingeschränkten körperlichen, sensoriellen oder mentalen Fähigkeiten sowie ohne Erfahrung und ohne das notwendige Wissen verwendet werden, sofern diese beim Gebrauch überwacht werden oder Anweisungen zum sicheren Gebrauch und Erläuterungen über die damit verbundenen Gefahren erhalten haben.
- Page 48 • Eisbereiter der IM-Serie sollten bei eingebauter Installation verwendet werden. ACHTUNG Um Gefahren durch eine Instabilität des Gerätes zu vermeiden, muss es gemäß den Anweisungen fixiert werden. Wartung und Sicherheit • Die Wartung des Geräts darf nur von qualifiziertem Personal durchgeführt werden •...
- Page 49 Via Mazzini 75 - fraz. Montecchio - 61022 VALLEFOGLIA(PU) – Italia tel. +39 0721 154500 - fax. +39 0721 497739 e-mail info@vitrifrigo.com - www.vitrifrigo.com 4. BESCHREIBUNG DES GERÄTS Das Typenschild mit der Seriennummer und den technischen Daten befindet sich im oberen rechten Teil im Eisbereitersinneren.
- Page 50 IM XR • A) Bedienfeld F) Magnetventil B) Kühlmittelsystem G) Elektronische Karte C) Kondensator H) Eiswürfeleinheit D) Maske I) Eisniveau-Anzeige E) Haustür J) Eissammelwanne IM XT • A) Maske G) Eissammelwanne B) Haustür H) Stromversorgungsanschluss C) Bedienfeld I) Elektronische Karte D) Magnetventil J) Kühlmittelsystem E) Eiswürfeleinheit...
- Page 51 IM CL • A) Bedienfeld I) Kühlmittelsystem B) Haustür J) Kondensator C) Motorschutzgitter K) Behälter (nur refill) D) Vorderklappe/Maske L) Pumpe (nur refill) E) Eiswürfeleinheit M) Füllstandssensor (nur refill) F) Eisniveau-Anzeige N) Tankdeckel G) Eissammelwanne O) Wasserschlauchkupplung H) Elektronische Karte 5.
- Page 52 Die für die IM-CL-Version vorzusehenden Lüftungsöffnungen sind: • Im unteren hinteren Teil am Motorschutzgitter, mit einer Größe von nicht weniger als 250mm (für die Höhe) und für die Größe des Kühlschranks (für die Breite); im oberen hinteren/oberen Teil nicht weniger als 50mm (für die Höhe) und für die Größe des Kühlschranks (für die Breite), siehe Abb.1a.
- Page 53 Befestigung des Gerätes Zur Befestigung des Geräts im Einbauraum dürfen nur die Löcher im Befestigungsprofil verwendet werden (Anhang 3). 6. ELEKTRISCHER ANSCHLUSS ACHTUNG Der Bediener muss das Gerät vom Stromnetz trennen können. Stellen Sie daher sicher, dass sich in der Nähe des Geräts ein Zugangspunkt zum Stromversorgungsnetz befindet und/oder dass das System mit einem allpoligen magnetothermischen Differentialschutzschalter 6A mit einer AC-Empfindlichkeit von 30 mA und einer Mindestkontaktöffnung von 3 mm ausgestattet ist.
- Page 54 Starten modell “REFILL” Starten Sie die Maschine, indem Sie den Startknopf A einige Sekunden lang gedrückt halten. Öffnen Sie die Klappe und ziehen Sie den Behälter heraus, schrauben Sie den am oberen Teil des Behälters vorhandenen Deckel P ab und gießen Sie Trinkwasser durch den Stutzen in den Behälter (min.2 Liter / max.7 Liter).
- Page 55 Wenn die eingestellte Temperatur erreicht ist, beginnt der Zyklus des Eis-Ausschußes aus der Eiswürfeleinheit (der Zyklus Produktion+Ausschuß kann von 25 bis 30 min.* dauern). AUSSCHUß Sobald die Temperatur erreicht ist, aktiviert das Thermostat das Heizelement und den Motor. Die Abziehklingen drücken so lange auf das Eis, bis es sich löst;...
- Page 56 keine Feuchtigkeit im Inneren der Wanne entsteht. Bei den Versionen REFILL den Tank entleeren und reinigen. 10. REINIGUNG DES EISBEREITERS Stellen Sie vor dem Reinigen sicher, dass der Eisbereiter nicht an die elektrische Stromversorgung angeschlossen ist. Andernfalls den Stecker aus der Steckdose herausziehen. AUSSENSEITE Die Außenseite des Eisbereiters mit lauwarmem Wasser reinigen, mit kaltem Wasser nachwischen und mit einem weichen Tuch trocknen.
- Page 57 Problem Kontrollieren Sie, dass Es keinen Stromausfall gibt der “STAND-BY”-Schalter A aktiv ist und die LED leuchtet der Schutzschalter der elektrischen Anlage nicht ausgeschaltet ist Das gerät funktioniert nicht der Stecker effizient ist und ordnungsgemäß in die Steckdose eingesteckt ist. Die Steckdose effizient ist.
- Page 58 MANUAL DE INSTRUCCIONES ICE MAKER OCX2 GRACIAS POR HABER COMPRADO UN PRODUCTO VITRIFRIGO...
- Page 59 Índice 1. INTRODUCCIÓN 2. ADVERTENCIAS GENERALES Destino del producto Recepción Instalación Mantenimiento y seguridad Eliminación 3. FINALIDAD DEL MANUAL Identificación del fabricante 4. DESCRIPCIÓN DEL APARATO 5. INSTALACIÓN Empotrado del aparato, con condensador ventilado (IM-CL e IM-XT) Empotrado del aparato, con motor remoto ventilado Regulación del perfil para empotrado Total/Parcial Fijación del aparato 6.
- Page 60 Este manual se considera parte integrante del frigorífico y debe seguir el recorrido de venta hasta el usuario. El mismo se puede consultar en el sitio web de Vitrifrigo www. vitrifrigo.com. Cada frigorífico, antes de su envío, se somete a controles y pruebas para asegurar su correcto funcionamiento.
- Page 61 • El aparato puede ser utilizado por niños de al menos 8 años de edad y por personas con capacidades físicas, sensoriales o mentales reducidas, o que carezcan de experiencia o de los conocimientos necesarios, siempre que sean supervisados o después de haber recibido instrucciones para el uso seguro del aparato y para la comprensión de los peligros inherentes al mismo.
- Page 62 No intentar desmontar, modificar o reparar el aparato. • Para eventuales problemas de funcionamiento, comunicarse con el centro de asistencia Vitrifrigo más cercano; en cualquier caso, utilizar personal cualificado. • No conservar sustancias explosivas en este aparato, como latas de aerosol con propulsor inflamable.
- Page 63 Via Mazzini 75 - fraz. Montecchio - 61022 VALLEFOGLIA(PU) – Italia tel. +39 0721 154500 - fax. +39 0721 497739 e-mail info@vitrifrigo.com - www.vitrifrigo.com 4. DESCRIPCIÓN DEL APARATO La etiqueta con la matrícula y los datos técnicos está colocada en el interior del fabricador en la parte superior del lado derecho.
- Page 64 IM XR • A) Panel de control F) Electroválvula B) Instalación refrigerante G) Tarjeta electrónica C) Condensador H) Cubitera D) Mascarilla I) Detector de nivel de hielo E) Puerta frontal J) Cubeta recoge hielo IM XT • A) Mascarilla G) Cubeta recoge hielo B) Puerta frontal H) Conector alimentación C) Panel de control...
- Page 65 IM CL • A) Panel de control I) Instalación refrigerante B) Panel de control J) Condensador C) Rejilla protección motor K) Depósito (solo refill) D) Puertita frontal/Mascarilla L) Bomba (solo refill) E) Cubitera M) Sensore de nivel (solo refill) F) Detector de nivel de hielo N) Tapón del depósito G) Cubeta recoge hielo O) Empalme tubo agua...
- Page 66 Las aperturas de ventilación a prever para la versión IM-CL son: • En la parte inferior posterior a nivel de la rejilla de protección del motor, con dimensión no inferior a 250mm (para la altura) y para la dimensión del frigorífico (para el ancho);...
- Page 67 Fijación del aparato Para la fijación del aparato en el espacio de empotrado utilizar únicamente los agujeros presentes en el respectivo perfil de fijación (Anexo 3) 6. CONEXIÓN ELÉCTRICA ATENCIÓN El operador debe ser capaz de poder desconectar el aparato de la red eléctrica.
- Page 68 Puesta en marcha modelo “REFILL” Poner en marcha la máquina manteniendo presionado algunos segundos el botón de encendido A. Abrir la puertita y extraer el depósito, desenroscar el tapón presente en la parte superior del depósito y verter agua potable a través de la boca de llenado en el depósito (mín.2 litros / máx.7 litros).
- Page 69 Al alcanzar la temperatura prefijada tiene inicio el ciclo de expulsión del hielo de la cubitera (el ciclo de producción+expulsión puede durar de los 25 a los 30 min.*). EXPULSIÓN Una vez en temperatura el termostato activa la resistencia y el motorcito. Las hojas extractoras presionarán en el hielo hasta que no se haya despegado;...
- Page 70 vent-position presente en la abrazadera, para que pueda realizarse un intercambio de aire y no se cree humedad dentro de la cubeta. Para las versiones REFILL vaciar y limpiar el depósito. 10. LIMPIEZA DEL FABRICADOR Antes de proceder a la limpieza asegurarse de que el fabricador no esté conectado a la instalación eléctrica.
- Page 71 Problema Controlar que no falte corriente el interruptor “STAND-BY” A esté activo y el led encendido el interruptor automático de la instalación eléctrica no esté desactivado El aparato no funciona el enchufe sea eficiente y esté correctamente conectado en la toma de corriente.
- Page 72 ALLEGATI - ANNEXES Allegato MISURE DEL MODELLO E DI INCASSO Annex MODELS AND RECESS MEASUREMENTS MODEL ICE MAKER (mm) (mm) (mm) IM-CL IM-XT IM-XR** RECESS MODEL (mm) (mm) (mm) ICE MAKER IM-CL IM-XT IM-XR** **Dimensioni del motore remoto: (mm) 170 (A)x192(B)x366(C) Allegato INSTALLAZIONI Annex...
- Page 73 CONDENSATORE VENTILATO VENTILATED CONDENSER INSTALLAZIONE APPARECCHIO ICE MAKER XT APPLIANCE INSTALLATION ICE MAKER XT MOTORE REMOTO VENTILATO VENTILATED REMOTE MOTOR INSTALLAZIONE APPARECCHIO ICE MAKER XR APPLIANCE INSTALLATION ICE MAKER XR ALLEGATI ANNEXES...
- Page 74 Allegato FISSAGGI DISPOSITIVO Annex INSTALLATIONS FIG.1 - FISSAGGIO MEDIANTE PROFILO FIXING WITH FITTING FRAME NOTE NOTES ALLEGATI ANNEXES...
- Page 75 ALLEGATI ANNEXES...
- Page 76 - è conforme alla Direttiva Bassa Tensione (LVD) 2014/35 CE - è conforme alla Direttiva Compatibilità Elettromagnetica (EMC) 2014/30 CE UE DECLARATION OF CONFORMITY Vitrifrigo srl, with Registered Office in via Mazzini 75, 61022 locality Montecchio, VALLEFOGLIA, Italy declares under its own responsibility that the product:...
- Page 77 IDENTIFICAZIONE PRODOTTO / PRODUCT IDENTIFICATION ICE MAKER OCX2 ALLEGATI ANNEXES...
- Page 78 VITRIFRIGO S.r.l. Via Mazzini, 75 Fraz. Montecchio 61022 Vallefoglia (PU) tel. +39 0721.154.500 fax +39 0721.497.739 www.vitrifrigo.com REV 01 - 2023 Made in Italy...