Table des Matières
Publicité
Les langues disponibles
Les langues disponibles
Liens rapides
Publicité
Table des Matières

Manuels Connexes pour Lupine PIKO R


Sommaire des Matières pour Lupine PIKO R
- Page 1 PIKO R MANUEL D’UTILISATION/ OWNERS MANUAL Piko R...
-
Page 2: Table Des Matières
Diagnostic des pannes Données techniques Notes récentes English Read this manual before using 19 Operation 20-21 Programming Dim Levels & Runtimes Bluetooth Remote 24-25 Mounting 26-30 Operation SmartCore Batteries Care and Storage an Charging Troubleshooting Technical data Miscellaneous 2 Piko R... -
Page 3: D'abord Lire, Ensuite Allumer
Tous les composants de la Piko sont étanches et peuvent être utilisés même dans les circonstances les plus défa- vorables. La lampe est conforme à l'indice de protection IP 68, cependant, ce n'est pas une lampe de plongée et elle NE convient PAS à une utilisation sous l'eau Piko R... -
Page 4: Fonctionnement
Une longue pression permet d'éteindre la lampe. Remarque: en fonction de la température extérieure, la puissance maximale ne sera atteinte qu'à condition d'espérimenter un vent de déplacement su sant. En l'absence de refroidissement, la puissance est progressivement réduite. 4 Piko R... -
Page 5: Signification De La Couleur Des Led
Une fois la batterie complètement déchargée, le projecteur est contraint de s'éteindre, alors : attention! Remarque: pour une utilisation exclusive avec 2 W ou moins, il n'y a pas de réserve disponi- ble. Piko R... -
Page 6: Programmation
6x bleu (ca 13 sec) Bluetooth Connect Modus clignote 1x verde (ca 14 sec) Exemple: Pour passer au mode en niveaux, maintenez le bouton jusqu'à ce que la LED rouge clignote trois fois, puis relâchez le bouton. 6 Piko R... -
Page 7: Niveaux Et Durées D'éclairage
Niveaux et durées d'éclairage Autonomie Autonomie Autonomie Autonomie Piko R 4/X 4 Piko R 7/X 7 Piko RX Duo 15 W 1500 lm 1:45 h 3:30 h 2-niveaux 25 h 1.2 W 150 lm 20 h 40 h 1:45 h... -
Page 8: Bluetooth
Les émetteurs sont enregistrés par ordre dans la tête de la lampe puis à nouveau e acés. Si on veut brancher sa tête de lampe à nouveau exclusivement sur un émetteur, il peut alors être né- cessaire de relier un émetteur jusqu’à 3 fois avec la tête de lampe. 8 Piko R... -
Page 9: Activer/Désactiver Durablement La Lumière Led Sur Le Bouton
T5 pour vis Torx. Mettre le nouveau bouton de cellule CR 2032 comme sur l’image et fer mer à nouveau le boîtier. Resserrer les vis pour que la jointure bleue visible soit comprimée. Tourne-vis T5 Torx: (article nr. 137) Piko R... -
Page 10: Fixation De La Lampe De Casque
Fixation alternative : voir page 7. En lez la ne bande Velcro sur le côté de l'inscription Lupine d'environ 4 cm par le côté gauche du porte lampe avant de la plier et de la fixer. -
Page 11: Fixation De La Lampe Frontale Piko
Avec un câble d'extension, il est possible de transporter la batterie dans une poche de veste ou un sac à dos. Le câblage correspondant peut être remplacé par un boîtier pour batterie FastClick sur la bande frontale Piko R Piko... -
Page 12: Options De Fixation Supplémentaires
Piko, ainsi que pour le système de batterie FastClick. Détails: www.lupine.de Support GoPro: Notre Piko peut être xée sur un logement standard GoPro grâce à un support en CNC que nous avons spécialement développé. Article N ° 1070 1 2 Piko R... -
Page 13: Fixation
3. Resserrez doucement, puis fermement la vis. Comblez le trou taraudé avec le bouchon d'obturation fourni. 4. La tête de la lampe et le support peuvent maintenant . Piko R... -
Page 14: Fixation De La Batterie
Types de batterie: La batterie Lupine commune dispose d'une sangle sur sa face arrière per- mettant de la fixer avec une bande Velcro. En outre, les batteries appelées SmartS- core disposent d'un témoin de niveau de... -
Page 15: Fonctionnement De La Batterie
Permis par l'éclairage successif de chaque LED en continu. Pour éteindre,appuyez sur le bouton à nouveau. Remarque: le témoin de charge s'éteint seul au bout de quelques secon- des. Si ce n'est pas le cas, il est possible que la lumière arrière soit activée. Piko R... -
Page 16: Maintenance, Stockage Et Charge
Avertissement! Ce chargeur ne doit être utilisé que pour des batteries lithium- ion rechargeables. Il NE convient PAS au chargement des batteries Ni-MH! Ne pas utiliser de piles sèches! - Risque d'explosion! Ce chargeur peut être ouvert UNIQUEMENT par son fabricant 1 6 Piko R... - Page 17 La lampe ne réagit pas à Le bouton de lampe et Voir chapitre Bluetooth. l’émetteur ne sont pas connec- l‘émetteur. tés l’un avec l‘autre. Bouton de cellule vide ou L’émetteur ne s’allume pas Voir chapitre Bluetooth. paspader mal installé. Piko R...
-
Page 18: Plage D'utilisation
Capacité de la batterie / tension nominale: Piko R 4/X 4: 3 h Piko R 4/X 4: 3.3 Ah / 7.2 V Li-Ion Piko R 7/X 7: 5:30 h Piko R 7/X 7: 6.6 Ah / 7.2 V Li-Ion Piko RX Duo: 2 h (par batterie) Piko RX Duo: 2 x 2.0 Ah / 7.2 V Li-Ion... -
Page 19: Safety Instructions
Bluetooth module or light. Heat generation: The housing of Piko R may heat up; so make sure that you always keep the light at a safe distance to any combustible or flammable materials. Could cause fire or death! However, quiescent operation (without cooling the light housing via airflow or the like) is possible at any time and will not damage the product. -
Page 20: Operation
The light outputs the maximum amount of light only if airflow lowers the temperature of the light sufficiently. If the light is not cooled by airflow, its power is reduced incrementally to prevent the LEDs and electronic elements from overheating. 2 0 Piko R... - Page 21 So slow down! Note: The burn time remaining after the red LED is illuminated depends on the total battery capacity, the ambient tempera- ture and the battery's age. Piko R...
-
Page 22: Programming
Programming Light Levels: By default, the Piko R operates in the 3-step mode, several other light programs are available. They are very easy to select by simply keeping the button pressed until the button's red LED (blue LED) flashes once, twice, etc. When taking your finger off the button accordingly, the setting will be saved. -
Page 23: Dim Levels & Runtimes
Dim Levels and Runtimes Output Runtime Runtime Runtime Piko R 4/X 4 Piko R 7/X 7 Piko RX Duo 15 W 1500 lm 1:45 h 3:30 h 2-Step 25 h 1.2 W 150 lm 20 h 40 h 1:45 h... -
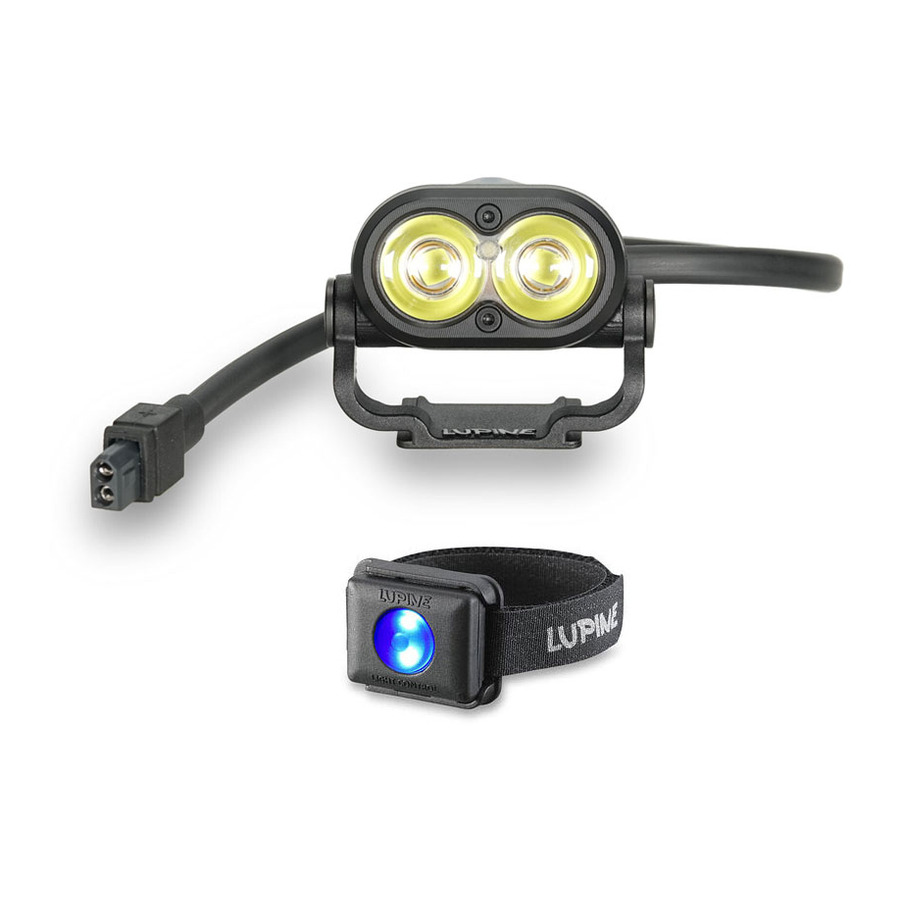
Page 24: Bluetooth Remote
Up to 4 transmitters may be connected to one lamp. The transmitter are stored in the lamp in turn. If you want to use only one transmitter again to control your lamp, it might be necessary to connect this transmit- ter up to 4 times with the lamp. 2 4 Piko R... - Page 25 T5 torx screw driver. Insert the new CR 2016 button cell as shown and close the transmitter again. Tighten the screws until the blue sealing is visibly squeezed. T5 torx screw driver: (Art.No. 137) Piko R...
- Page 26 No tools are required for mounting this lamp. The helmet mount is already mounted to the lighthead. You can attach this helmet light to almost any kind of helmet with ventilation openings. First attach the thin velcro with the Lupine logo to one site of the helmetmount.
- Page 27 Art.No. 835 3.3 Ah Art.No. 842 3.3 Ah Smartcore With the provided extension, the battery may be carried in your backpack, a pocket etc. The FastClick backpart of Piko RX 4 can be replaced by a cable guide backpart. Piko R Piko...
- Page 28 It is available for the lamphead and the FastClick-system to put a battery on the helmet. Details: www.lupine.de GoPro mount: By help of our CNC machined mount, you can put the Piko R on the standard mount for GoPro. Art. No. 1070 2 8 Piko R...
-
Page 29: Mounting
Mounting Quick Release For mounting the Piko R on a handlebar different CNC Quick Release mounts are available. Have a look at www.lupine.de For mounting, please first loosen the screws on the helmet mount/headband. Only one screw but both o-rings are requi- red for mounting the Piko R on the bar. -
Page 30: Mounting Batteries
13.2Ah 6.6Ah 3.3Ah 3.3Ah FastClick batteries dont have a loop for a velcro. However they can be directly put into the clicksystem of the FastClick headbelt or 3M clicksystem. 3 0 Piko R... -
Page 31: Operation Smartcore Batteries
5 LEDs will operate continuously. To switch off the taillight, simply press the pad again. Moving light: Press the touch pad three times to activate the moving light. To switch it off press the button another time. Piko R... -
Page 32: Charging Batteries
Warning! This charger is to be used to charge rechargeable Li-Ion batteries only. It is NOT suitable for charging NiMH batteries! Do NOT use non-rechargeable batteries. – Risk of explosion! This charger may be opened ONLY by the manufacturer! 3 2 Piko R... - Page 33 With the battery plugged in, Faulty LED unit. LED unit needs replacement. the power LEDs do not come Get in touch with Lupine. on, but the PCS LEDs flash. The runtime is too short. Discharged battery. Charge battery.
-
Page 34: Technical Data
180 g Charging time: Battery capacity/ nominal voltage: Piko R 4/X 4: 3.3 Ah / 7.2 V Li-Ion Piko R 4/X 4: 3 hours Piko R 7/X 7: 6.6 Ah / 7.2 V Li-Ion Piko R 7/X 7: 5:30 hours Piko RX Duo: 2 x 2.0 Ah / 7.2 V Li-Ion... -
Page 35: Miscellaneous
The product's two year warranty applies to all components, as well as any manufacturing defect. The warranty does not include the battery, however. In addition, any modification or improper use of the product will void the warranty. Kaufdatum/Händlerstempel Purchase date/Dealer stamp Piko R... - Page 36 Lupine Lighting Systems GmbH Winnberger Weg 11 92318 Neumarkt Germany Phone: +49 (0) 91 81 - 50 94 90 Fax: +49 (0) 91 81 - 50 94 915 E-mail: info @lupine.de 3 6 Piko R...