Table des Matières
Publicité
Les langues disponibles
Les langues disponibles
Liens rapides
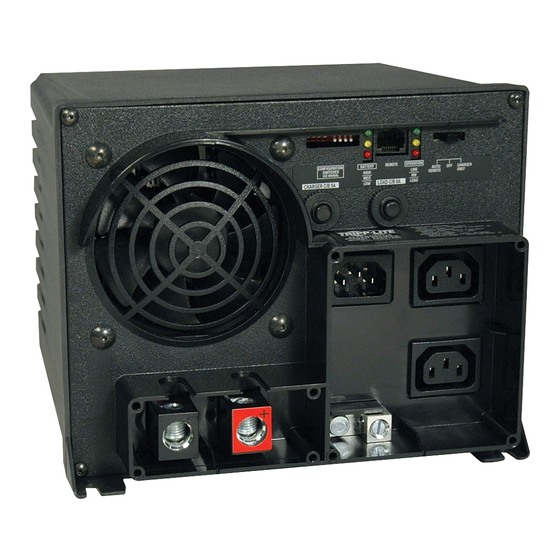
APSX Models Input
Invert:
Charge:
Quiet Mobile Power
Congratulations! You've purchased the most advanced, feature-rich Inverter/Charger designed as an alternative energy source for residential,
commercial or recreational vehicle applications. Tripp Lite Inverter/Chargers are the quiet alternative to gas generators—with no fumes, fuel or
noise to deal with! You get AC electricity anywhere and anytime you need it: utility power disruptions, rolling down the highway, dry camping in
majestic back country or parked overnight at a money-saving non-electric site. Inverter/Chargers provide your equipment with utility- or
generator-supplied AC electricity (filtered through premium ISOBAR® surge protection) whenever available. In addition, your Inverter/Charger
automatically recharges your connected battery bank. Whenever blackouts, brownouts or high voltages occur, your Inverter/Charger immediately
and automatically switches to battery power.
Better for
Your Equipment
Premium Protection Levels
• Built-In ISOBAR
Surge Protection
®
• Automatic Overload Protection
Ideal Output for All Loads
• Frequency-Controlled Output
• Automatic Load Switching
• Balanced Load Sharing
Safety
Feature Identification
Operation
Configuration
Battery Selection
Mounting
Battery Connection
Owner's Manual
PowerVerter
DC-to-AC Inverter/Chargers
Output
12 VDC
230V, 50 Hz. AC
230V, 50 Hz. AC
12 VDC
Better for
Your Batteries
Faster Battery Recharge
• High-Amp, 3-Stage Battery Charger
Critical Battery Protection
• High-Efficiency DC-to-AC Inversion
WARRANTY REGISTRATION
Register your product today and be
automatically entered to win an ISOBAR
surge protector in our monthly drawing!
www.tripplite.com/warranty
1111 W. 35th Street, Chicago, IL 60609 USA • www.tripplite.com/support
Copyright © 2019 Tripp Lite. All rights reserved. PowerVerter
®
APS Models
Input
Invert:
12 VDC
Charge:
120V, 60 Hz. AC
2
AC Input/Output Connection
3
Service/Maintenance
4-5
Troubleshooting
5-6
Warranty
7
Español
8
Français
Русский
9
is a registered trademark of Tripp Lite.
®
1
Output
120V, 60 Hz. AC
12 VDC
Better for
You
Quiet, Simple, Maintenance-Free
Operation
• Multi-Function Lights & Switches
• Moisture-Resistant Construction*
* Inverter/Chargers are moisture-resistant, not
waterproof.
10
10
11
12
13
25
37
Publicité
Table des Matières

Manuels Connexes pour Tripp-Lite PowerVerter APSX


Sommaire des Matières pour Tripp-Lite PowerVerter APSX
- Page 1 Owner’s Manual PowerVerter ® DC-to-AC Inverter/Chargers APSX Models Input Output APS Models Input Output Invert: 12 VDC 230V, 50 Hz. AC Invert: 12 VDC 120V, 60 Hz. AC Charge: 230V, 50 Hz. AC 12 VDC Charge: 120V, 60 Hz. AC 12 VDC Quiet Mobile Power Congratulations! You've purchased the most advanced, feature-rich Inverter/Charger designed as an alternative energy source for residential,...
-
Page 2: Important Safety Instructions
Important Safety Instructions SAVE THESE INSTRUCTIONS! This manual contains important instructions and warnings that should be followed during the installation, operation and storage of this product. Location Warnings • Although your Inverter/Charger is moisture resistant, it is NOT waterproof. Flooding the unit with water will cause it to short circuit and could cause personal injury due to electric shock. -
Page 3: Feature Identification
Feature Identification Identify the premium features on your specific model and quickly locate instructions on how to maximize their use. Configuration DIP Switches: optimize Inverter/Charger AC Output Receptacles operation depending on your application. See Configuration AC Input Receptacle (230V Models): attach input cord to section for setting instructions. -
Page 4: Indicator Lights
Operation Switch Modes Indicator Lights (Continued) After configuring, mounting and connecting your Inverter/Charger, you “INV” (Inverting) Yellow LED: This light will are able to operate it by switching between the following operating ILLUMINATE CONTINUOUSLY whenever connected modes as appropriate to your situation: equipment is receiving battery-supplied, inverted AC power (in the absence of a utility/generator source or “AUTO/REMOTE”: Switch to this mode when you need... -
Page 5: Configuration
Operation Resetting Your Inverter/Charger to Restore AC Power Your Inverter/Charger may cease supplying AC power or DC charging power in order to protect itself from overload or to protect your electrical system. To restore normal functioning: Overload Reset: Switch operating mode switch to “DC OFF” and remove some of the connected electrical load (i.e., turn off some of the AC devices drawing power which may have caused the overload of the unit). - Page 6 Configuration Group B DIP Switches (Select Models Only) Select AC Input Current Sharing—OPTIONAL B1 B2 Your Inverter/Charger features a high-output battery charger that can draw a significant amount of AC power from your utility source or generator when charging at its maximum rate. If your unit is supplying its full AC power rating to its connected heavy electrical loads at the same time as this high charging occurs, the AC input circuit breaker could trip, resulting in the complete shut off of pass-though utility power.
-
Page 7: Battery Selection
Battery Selection Select Auxiliary Battery Type (if any) Select “Deep Cycle” batteries to receive optimum performance from your Inverter/Charger. Do not use ordinary car or starting batteries or batteries rated in Cold Cranking Amps (CCA). If the batteries you connect to the Inverter/Charger are not true Deep Cycle batteries, their operational lifetimes may be significantly shortened. - Page 8 Mounting WARNING! Mount your Inverter/Charger BEFORE DC battery and AC power connection. Failure to follow these instructions may lead to personal injury and/or damage to the Inverter/Charger and connected systems. Tripp Lite manufactures a variety of different Inverter/Chargers with a variety of different mounting options for use in vehicular or non-vehicular applications.
-
Page 9: Battery Connection
Battery Connection Connect your Inverter/Charger to your batteries using the following procedures: • Connect DC Wiring: Though your Inverter/Charger is a high-efficiency converter of electricity, its rated output capacity is limited by the length and gauge of the cabling running from the battery to the unit. Use the shortest length and largest diameter cabling (maximum 2/0 gauge) to fit your Inverter/Charger’s DC Input terminals. -
Page 10: Ac Input/Output Connection
AC Input/Output Connection To avoid overloading your Inverter/Charger, match the power requirements of the equipment you plan to run at any one time (add their total watts) with the output wattage capacity of your Inverter/Charger model (see Specifications). Do not confuse “continuous” wattage with “peak” wattage ratings. - Page 11 Troubleshooting Try these remedies for common Inverter/Charger problems before calling for assistance. Call Tripp Lite Customer Service at (773) 869-1234 before returning your unit for service. SYMPTOM PROBLEMS CORRECTIONS No AC Output Unit is not properly connected to utility power Connect unit to utility power.
- Page 12 Limited Warranty Tripp Lite warrants its Inverter/Chargers to be free from defects in materials and workmanship for a 24 month period from the date of retail purchase by end user. Tripp Lite’s obligation under this warranty is limited to repairing or replacing (at its sole option) any such defective products. To obtain service under this warranty you must obtain a Returned Material Authorization (RMA) number from Tripp Lite or an authorized Tripp Lite service center.
- Page 13 Manual del Propietario PowerVerter ® Inversores/Cargadores de CD a CA Modelos APSX Entrada Salida Modelos APSX Entrada Salida Inversión: 12 VCD 230V, 50 Hz. CA Inversión: 12 VCD 120V, 60 Hz. CA Carga: 230V, 50 Hz. CA 12 VCD Carga: 120V, 60 Hz.
-
Page 14: Instrucciones De Seguridad Importantes
Instrucciones de Seguridad Importantes ¡GUARDE ESTAS INSTRUCCIONES! Este manual contiene instrucciones y advertencias importantes que deben seguirse durante la instalación, operación y almacenamiento de este producto. Advertencias acerca de la Ubicación • Aunque su inversor/cargador es resistente a la humedad, NO es a prueba de agua. Si moja la unidad podría ocurrir un cortocircuito y alguien podría resultar herido debido a descarga eléctrica. -
Page 15: Identificación De Características
Identificación de Características Identifique las características premium en su modelo específico y encuentre rápidamente las instrucciones sobre cómo maximizar su uso. Interruptores para Configuración: optimizan el funcionamiento Tomacorrientes de Salida del inversor/cargador dependiendo de su aplicación. Consulte la Tomacorriente de Entrada (Modelos de 230V): conectan el sección de Configuración par ver las instrucciones. -
Page 16: Luces Indicadoras
Operación Modos de Conmutación Luces Indicadoras (Continuación) LED Amarillo “INV” (Invirtiendo): Está luz SE Después de configurar, instalar y conectar su inversor/cargador, ya puede operarlo alternando entre los siguientes modos de operación MANTENDRÁ ENCENDIDA mientras el equipo según lo adecuado para su situación: conectado esté... - Page 17 Operación Reprogramación de su Inversor/Cargador para Restaurar la Alimentación de CA Su inversor/cargador puede dejar de suministrar alimentación de CA o alimentación de carga de CD a fin de protegerse contra sobrecarga o para proteger su sistema eléctrico. Para restaurar el funcionamiento normal: Reprogramación de la Sobrecarga: Cambie el interruptor de modo de operación a “DC OFF”...
- Page 18 Configuración Interruptores para Configuración de Grupo B (Solo modelos selectos) Seleccione Compartir Corriente de Entrada de CA -OPCIONAL B1 B2 Su inversor/cargador cuenta con un cargador de batería de salida elevada que puede extraer una significativa cantidad de alimentación de CA de su fuente de la red pública o el generador cuando se carga a su índice máximo.
- Page 19 Selección de la Batería Seleccione Tipo de Batería Auxiliar (si la hubiere) Seleccione las baterías de “Ciclo Profundo” para que su inversor/cargador tenga un rendimiento óptimo. No utilice baterías comunes de automóviles o de arranque o aquellas baterías con valor nominal de Amperaje de Arranque en Frío (CCA). Si las baterías que conecta al inversor/cargador no son verdaderas baterías de ciclo profundo, sus vidas útiles operacionales pueden acortarse significativamente.
- Page 20 Montaje ¡ADVERTENCIA! Monte su inversor/cargador ANTES de hacer la conexión de la batería de CD y la alimentación de CA. Si no sigue estas instrucciones, pueden producirse lesiones personales o daño al inversor/cargador y los sistemas conectados. Tripp Lite fabrica una variedad de inversores/cargadores distintos con varias opciones diferentes de montaje para utilizar en aplicaciones vehiculares o no vehiculares.
-
Page 21: Conexión De La Batería
Conexión de la Batería Conecte su inversor/cargador a las baterías mediante los siguientes procedimientos: • Conecte el Cableado de CD: Aunque su inversor/cargador es un conversor de electricidad altamente eficiente, su capacidad de salida nominal se ve limitada por la longitud y calibre del cableado que recorre desde la batería hasta la unidad. -
Page 22: Conexión De Entrada/Salida De Ca
Conexión de Entrada/Salida de CA Para evitar sobrecargar su inversor/cargador, equipare los requisitos de energía del equipo que planea hacer funcionar en algún momento (agregue sus watts totales) con la capacidad de la potencia de salida de su modelo de inversor/cargador (consulte las Especificaciones). No confunda potencia “continua”... -
Page 23: Solución De Problemas
Solución de Problemas Intente estas soluciones para problemas comunes con el inversor/cargador antes de llamar para solicitar ayuda. Antes de devolver su unidad para reparación, llame al Servicio al Cliente de Tripp Lite al (773) 869-1234. SÍNTOMA PROBLEMAS CORRECCIONES No hay salida de CA La unidad no está... -
Page 24: Garantía Limitada
Garantía Limitada Tripp Lite garantiza que su inversor/cargador no presente fallas de materiales ni de fabricación por un período de 24 meses a contar de la fecha de compra al por menor por parte del usuario final. La obligación de Tripp Lite conforme a esta garantía se limita a reparar o sustituir (a su juicio) los productos defectuosos. Para recibir servicio de acuerdo con esta garantía, debe obtener un número de Autorización de Devolución de Material (RMA) de Tripp Lite o un centro de servicio autorizado de Tripp Lite. -
Page 25: Powerverter ® Onduleur/Chargeurs Cc-À-Ca
Manuel d’utilisateur PowerVerter ® Onduleur/chargeurs CC-à-CA Modèle SX Entrée Sortie Modèle PAS Entrée Sortie Ondul: 12 VCC 230V, 50 Hz. CA Ondul: 12 VDC 120V, 60 Hz. CA Charge: 230V, 50 Hz. CA 12 VCC Charge: 120V, 60 Hz. CA 12 VCC Puissance mobile silencieuse Félicitations ! Vous avez acheté... -
Page 26: Instructions De Sécurité Importantes
Instructions de sécurité importantes SAUVEGARDEZ CES INSTRUCTIONS ! Ce manuel contient les instructions et les avertissements importants qui devraient être suivis pendant l’installation, l’exécution et l’entreposage de ce produit. Avertissements d’emplacement • Bien que votre onduleur/chargeur soit résistant à l’humidité, il N’EST PAS imperméable à l’eau. Inonder l’unité avec de l’eau entraînera un court circuit et peut causer un dommage corporel dû... -
Page 27: Identification De Caractéristiques
Identification de caractéristiques Identifiez les caractéristiques supérieures sur votre modèle particulier et localisez rapidement les instructions sur la façon dont vous pouvez maximiser leur utilisation. Configuration de commutateurs DIP : optimisez le Prises de sortie alternative fonctionnement de l’onduleur/chargeur selon votre application. Prise d’entrée alternative. -
Page 28: Fonctionnement
Fonctionnement Les modes des commutateurs Les voyants lumineux (suite) DEL jaune de « INV » : Cette lumière S’ILLUMINERA Après avoir configuré, monté et connecté votre onduleur/chargeur, vous pouvez le mettre en marche en changeant entre les modes CONTINUELLEMENT lorsque le matériel connecté opérationnels suivants selon les besoins : reçoit alimentation CA fournie par batterie, inversée (en l’absence d’une source de service de /générateur... -
Page 29: Remise À L'état Initial De Votre Onduleur/Chargeur Pour Restituer L'alimentation Ca
Fonctionnement Remise à l’état initial de votre onduleur/chargeur pour restituer l’alimentation CA Votre onduleur/chargeur peut cesser d’assurer l’alimentation CA ou l’électricité de charge CC afin de se protéger contre la surcharge ou protéger votre système électrique. Pour restituer le fonctionnement normal : Remise en circuit après surcharge : Passer le commutateur de mode opérationnel au «... -
Page 30: Interrupteurs Dip Du Groupe B (Modèles Choisis Seulement)
Configuration Interrupteurs DIP du groupe B (modèles choisis seulement) Choisir partage de courant d’entrée CA — FACULTATIF B1 B2 Votre onduleur/chargeur comporte un chargeur de batterie à haut rendement qui peut tirer une quantité importante d’alimentation CA de votre source de service ou générateur en chargeant à son régime maximum. Si votre unité fournit sa pleine alimentation CA évaluant à ses charges électriques lourdes connectées en même temps que cette charge élevée se produit, le disjoncteur d’entrée alternative pourrait se déclencher, ayant pour résultat la fermeture complète de passage de service. -
Page 31: Apparier La Capacité D'ampère-Heure De Batterie À Votre Application
Choix de batterie Choisir le type de batterie auxiliaire (le cas échéant) Choisir les batteries « à charge poussée » pour recevoir la performance optimale de votre onduleur/chargeur. Ne pas utiliser des batteries ordinaires de voiture ou des batteries de démarrage ou des batteries de démarrage à froid (ADF). Si les batteries que vous connectez à l’onduleur/chargeur ne sont pas de véritables batteries à... -
Page 32: Montage Horizontal
Montage AVERTISSEMENT ! Monter votre onduleur/chargeur AVANT de connecter la batterie CC et l’alimentation CA. Tout manquement au suivi de ces instructions peut entrainer des blessures corporelles et/ou des dommages à l’onduleur/chargeur et aux systèmes connectés. Tripp Lite fabrique une variété de différents onduleur/chargeurs avec une série de différentes options de montage pour l’usage dans des applications véhiculaires ou non-véhiculaires Tripp Lite recommande le montage permanent de votre onduleur/chargeur dans l’une des configurations illustrées ci-dessous. -
Page 33: Connexion De Batterie
Connexion de batterie Connecter votre onduleur/chargeur à vos batteries en employant les procédures suivantes : • Connecter le CC : Bien que votre onduleur/chargeur soit un convertisseur d’électricité à haut rendement, son débit de sortie évalué est limité par la longueur et le calibre de câblage de la batterie à l’unité. Utiliser la longueur la plus courte et le diamètre de câble le plus grand (calibre maximum 2/0) pour ajuster les bornes d’entrée CC de votre onduleur/chargeur. -
Page 34: Connexion Entrée/Sortie Ca
Connexion entrée/sortie CA Pour éviter de surcharger votre onduleur/chargeur, apparier les puissances requises du matériel que vous prévoyez d’utiliser n’importe quand (ajouter leurs watts totaux) de la capacité de puissance en watts de sortie de votre modèle d’onduleur/chargeur (voir les caractéristiques). Ne pas confondre la puissance en watts «... -
Page 35: Dépannage
Dépannage Essayer ces solutions pour des problèmes courants d’onduleur/chargeur avant de demander de l’aide. Appeler le service-client de Tripp Lite au (773) 869-1234 avant de renvoyer votre unité pour le service. SYMPTÔME PROBLÈMES CORRECTIONS Aucune sortie CA Output L'unité n'est pas correctement connectée au Connecter l'unité... -
Page 36: Garantie Limitée
Garantie limitée Tripp Lite garantit ses onduleur/chargeurs pour être exempts des défauts en matériaux et de fonctionnement pendant les 24 mois de la date d’achat au détail par l’utilisateur final. L’engagement de Tripp Lite sous cette garantie est limité à réparer ou à substituer (à son option unique) de tels produits défectueux. Pour obtenir le service sous cette garantie vous devez obtenir un numéro d’autorisation de retour d’article de Tripp Lite ou d’un centre de services autorisé... -
Page 37: Руководство Пользователя
Руководство пользователя Преобразователи постоянного тока в переменный / зарядные устройства PowerVerter ® Модели серии APSX Вход Выход Модели серии APS Вход Выход Преобразование: 12 В= 230 В, 50 Гц. Переменный ток Преобразование: 12 В= 120 В, 60 Гц. Переменный ток Зарядка: 230 В, 50 Гц. - Page 38 Важные указания по технике безопасности СОХРАНИТЕ НАСТОЯЩИЕ УКАЗАНИЯ! В настоящем руководстве содержатся важные указания и предупреждения, которые необходимо соблюдать в процессе установки, эксплуатации и хранения данного изделия. Предупреждения относительно места установки • Влагозащищенность преобразователя/зарядного устройства НЕ означает, что он является водонепроницаемым. Попадание воды внутрь устройства приведет к короткому замыканию и может...
-
Page 39: Схема Расположения Функциональных Элементов
Схема расположения функциональных элементов Установите, какие из выдающихся свойств относятся к вашей конкретной модели, что позволит вам быстро найти указания о том, как использовать их с максимальной эффективностью. DIP-переключатели конфигураций: оптимизируют работу преобразователя/зарядного Входные клеммы постоянного тока: соединяются с клеммами батареи. Указания см. в устройства... -
Page 40: Порядок Эксплуатации
Порядок эксплуатации Переключение режимов Световые индикаторы (продолжение) СИД желтого цвета "INV" ("ПРЕОБР.") (преобразование): этот световой После настройки, монтажа и подключения преобразователя/зарядного устройства вы можете эксплуатировать его путем переключения между следующими рабочими режимами в индикатор будет ГОРЕТЬ НЕПРЕРЫВНО всякий раз, когда на подключенное соответствии... - Page 41 Порядок эксплуатации Сброс преобразователя/зарядного устройства для восстановления электропитания переменного тока Ваш преобразователь/зарядное устройство может прекратить подачу электропитания переменного тока или зарядного питания постоянного тока для защиты своих цепей от перегрузки или вашей электрической системы. Для восстановления нормального функционирования: Сброс перегрузки: переведите переключатель рабочих режимов в положение "DC OFF" ("ПОСТ.ТОК ВЫКЛ.") и снимите некоторые из подключенных электрических нагрузок (т.е. отключите некоторые...
- Page 42 Настройка DIP-переключатели группы В (только для отдельных моделей) Выбор схемы распределения входного переменного тока — ОПЦИОНАЛЬНО B1 B2 Преобразователь/зарядное устройство оснащается высокопроизводительным устройством подзарядки батарей, которое может потреблять значительную мощность переменного тока из сетевого источника или генератора при осуществлении зарядки на своей максимальной скорости. Если устройство подает всю свою номинальную мощность переменного тока подключенным к нему высокомощным потребителям одновременно с...
- Page 43 Подбор батарей Выбор типа вспомогательных батарей (при использовании таковых) Для обеспечения оптимальной производительности своего преобразователя/зарядного устройства выбирайте батареи многократного цикла глубокого заряда-разряда. Не используйте обычные автомобильные или пусковые аккумуляторы, а также батареи, в качестве номинала которых указывается ток холодного запуска (CCA). Если батареи, подключаемые вами к преобразователю/зарядному устройству, фактически не являются...
- Page 44 Монтаж ВНИМАНИЕ! Монтаж преобразователя/зарядного устройства должен быть произведен ДО его подключения к батарее постоянного тока и источнику питания переменного тока. Невыполнение этих указаний может привести к получению травм и/или повреждению преобразователя/зарядного устройства и подключенных к нему систем. Компания Tripp Lite выпускает целый ряд различных преобразователей/зарядных устройств с разными вариантами монтажа для использования на транспортных средствах и в других целях.
- Page 45 Порядок подключения батарей Подключите преобразователь/зарядное устройство к батареям в следующем порядке: • Подсоединение проводов постоянного тока: несмотря на то что преобразователь/зарядное устройство представляет собой высокоэффективный инвертор, его номинальная выходная мощность ограничивается длиной и калибром кабелей, ведущих от батареи к устройству. Для подключения к клеммам постоянного тока на входе преобразователя/зарядного устройства следует использовать максимально короткие...
-
Page 46: Уход И Техническое Обслуживание
Входной/выходной разъем питания переменного тока Во избежание перегрузки преобразователя/зарядного устройства необходимо согласовать параметры потребляемой мощности оборудования, которое планируется когда-либо к нему подключать (путем сложения их полных мощностей в ваттах), с выходной мощностью используемой модели преобразователя/зарядного устройства (см. технические характеристики). Не следует путать номинальную “длительную” мощность... -
Page 47: Выявление И Устранение Неисправностей
Выявление и устранение неисправностей Перед обращением за помощью попробуйте воспользоваться указанными способами решения наиболее распространенных проблем с преобразователями/зарядными устройствами. Перед возвратом своего устройства на техническое обслуживание позвоните в отдел обслуживания клиентов компании Tripp Lite по тел. (773) 869-1234. СИМПТОМ ПРОБЛЕМЫ СПОСОБЫ... -
Page 48: Ограниченная Гарантия
Ограниченная гарантия Компания Tripp Lite гарантирует отсутствие дефектов конструкционных материалов и изготовления преобразователей/зарядных устройств в течение 24 месяцев с даты приобретения конечным пользователем в розничной торговой сети. Обязательства компании Tripp Lite по настоящей гарантии ограничиваются ремонтом или заменой (по ее единоличному усмотрению) любых таких дефектных изделий. Для получения услуг по данной гарантии необходимо...