Harken UNIT 1 Manuel D'instructions
Masquer les pouces
Voir aussi pour UNIT 1:
- Manuel d'installation (34 pages) ,
- Manuel d'utilisation (8 pages)

Manuels Connexes pour Harken UNIT 1


Sommaire des Matières pour Harken UNIT 1
- Page 1 MKIII Jib Reefing & Furling Systems UNIT 1 English • Deutsch • Français • Italiano...
- Page 2 MKIII Jib Reefing & Furling Systems UNIT 1 English • Deutsch • Français • Italiano...
- Page 3 Thanks for buying a Harken Jib Reefing and Furling System. It will give you reliable service with minimal maintenance, but does require proper assembly and basic care. This manual is an important part of the total reefing system. Please take the time to read it carefully before assembling or using your furling system.
- Page 4 Problemi E Soluzioni – Questo capitolo del manuale spiega come risolvere gli eventuali problemi. La garanzia di sette anni è riportata a pagina 37. List of Parts 37 – 38 Listes de pièces Teile-Liste Elenco Dei Componenti February 2000 Unit 1 MKIII...
- Page 5 Schiff eine andere Grösse montiert ist, sollten Sie sich strallo sia esso in cavo o in tondino. mit HARKEN in Verbindung setzen. Es sind verschiedene Le Unit 1 est disponible avec un axe de chape de La Unit 1 è disponibile con perni da 12.5 mm ( ").
- Page 6 Ref. Art. -Nr. Art. -Nr. Art. -Nr. ■ Threaded Headstay Stud Num. Num. Num. " — Order a Harken threaded stud to match headstay wire or rod size. " — ■ Dyform Wire ® 6 mm — 7 mm —...
- Page 7 ■ Der Teile-Karton enthält Teile in Blister più piccoli. Verpackung sowie eine Schachtel mit kleinen Teilen. Pieces Principales Haupt-Komponenten Componenti Principali Unit 1 MKIII January 1999...
-
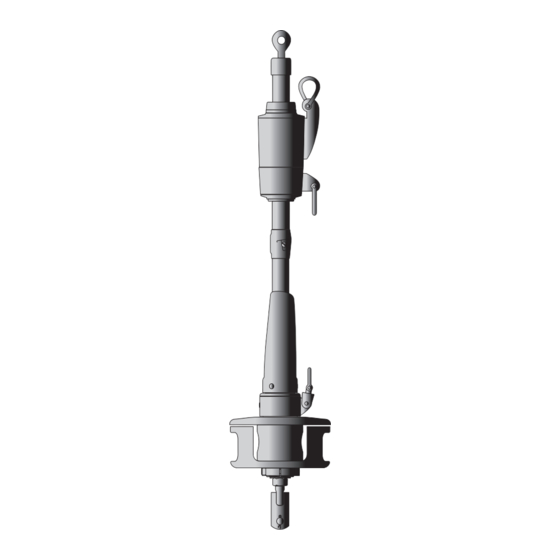
Page 8: Main Components
45'8" (13.92 m) you should order one extra foil extrusion, Part 807. (1) 24" (610 mm) Special Bottom Foil Extrusion. ■ The main components box contains parts packaged on the display card plus a smaller parts box. Main Components Torque Tube Halyard Swivel Feeder Drum Assembly January 1999 Unit 1 MKIII... - Page 9 Cima di dacron da 8 mm lunga 21.3 m. Feuillets destinés au propriétaire: contenant Handbuch, Garantiekarte und weitere Confezione per l'armatore contenente il les instructions de montage, la carte Informationen. manuale d'istruzione, la garanzia e altre de garantie et d'autres informations. informazioni. Unit 1 MKIII February 2000...
-
Page 10: Important
70' (21.3 m ) of " 1 Instant Adhesive (8 mm) Dacron braid 1 Loctite (Blue) ® 1 Owner's Package 1 Loctite (Red) ® Contains the instruction manual, warranty card and other information 1 Feeder with Screw March 2003 Unit 1 MKIII... - Page 11 ■ Diamètre de ralingue des Liekbandes so bemessen, dass es unterhalb in modo che sia 450-600 mm sotto la penna della vela. Le Unit 1 utilise de la ralingue numéro 6 ( " ou des Einfädlers sitzt. Dies verhindert ein Verhaken im Questo permetterà...
- Page 12 Sailmaker Instructions Luff Tape • Tack and Head Shackles • Suncover ■ Sail Type The Harken furler will work with conventional sails or sails with built in shaping devices such as Aeroluff ® Pirini Luff or foam luff. Connector ■ Luff Length Note offsets above and below the sail.
- Page 13 Un primaire Loctite est disponible catalizzatore Loctite per usi a temperature inferiore è pour des températures extrêmement basses, disponibile presso i rivenditori Loctite o alla Harken Rotes Loctite bindet nur ab unter Sauerstoff- demandez à votre vendeur ou à Harken.
-
Page 14: Work Area
5 minutes after assembly. Loctite primer is available for lower temperatures, ask your local Loctite dealer or Harken. Red Loctite only cures when no oxygen is present. Excess adhesive on the surface of the foils will remain sticky and will not cure. - Page 15 Ein weiterer Toggel am unteren Ende ist nicht notwen- la parte inferiore dell'arridatoio. Uno snodo supplemen- Votre enrouleur Harken possède un cardan à la partie dig, kann jedoch montiert werden, falls das Vorstag tare non è necessario ma può essere usato se inférieure du ridoir.
- Page 16 This adapter, Harken part 941, may be purchased from your Jib Furling dealer or distributor. You will also need a standard marine eye which can be purchased from your rigger. This marine eye will be swaged to the upper end of the headstay.
- Page 17 N'utilisez que les embouts à sertir fournis par Gewinde korrekt sind. Usare solo terminali a pressare forniti dalla Harken Harken pour être sur que la longueur et le filetage Lassen Sie den Draht nur von einem erfahrenen Italy per essere sicuri che lunghezza e filettatura sont corrects.
- Page 18 18 " (464 mm) will limit headstay adjustment. Use only swage studs provided by Harken to insure that the length and threads are correct. Have the wire swaged by a reputable rigger. Improperly applied swage studs are prone to failure and bent or “banana”...
- Page 19 N'utilisez que des embouts Norseman ou Sta-Lok four- Verwenden Sie nur Norseman- oder Sta-Lok-Terminals nis par Harken pour être sûr que les dimensions et le der Firma HARKEN, damit Sie sicher sein können, dass Usare solo terminali Sta-Lok o Norseman forniti dalla filetage sont corrects.
- Page 20 Change the headstay length measurement to relfect the use of this toggle. " Use only rod adapter studs provided by Harken to insure the length and threads are correct. (337 mm) Length Check: Check your length by placing the rod fitting alongside the rod with the nosepiece in its proper position.
- Page 21 200mal den Draht- sur un diamètre inférieur à 200 fois son tondino, far attenzione a non avvolgerlo più Durchmesser gerollt werden. propre diamètre. stretto di 200 volte il diametro del tondino stesso. Unit 1 MKIII February 2000...
- Page 22 If you ship a rod headstay to a service center do not coil Norseman and Sta-Lok units require the same number of foils tighter than 200 times the rod's diameter. and connectors as shown above. Identify the parts you need and set them aside at this time. November 2001 Unit 1 MKIII...
- Page 23 à 63.5 mm et 82.5 mm Mass. Die Mitte der Markierungen sind 63.5 mm a 63.5 mm e 82.5 mm dal punto in de la coup du profil. bzw. 82.5 mm vom abgeschnittenen Ende entfernt. cui si è tagliato l'estruso. Unit 1 MKIII January 1999...
- Page 24 " (6 mm) drill bit. Use the dimples in the foil as a guide. The center of the dimples will be at 2 " and 3 " (63.5 mm and 82.5 mm) from the cut end of the foil. November 2001 Unit 1 MKIII...
- Page 25 Unterstes Profil um 140 mm kürzen und Löcher bohren, wie auf Seite 12 beschrieben. Dovete usare un connettore superiore nascosto di tipo intermo (pag. 16). Accorciare l'estruso inferiore di 140 mm e fare i fori per le viti come descritto a p. 12. Unit 1 MKIII January 1999...
- Page 26 46' 8" (14.224 m) " (445 mm) ■ You will use a recessed top connector (page 16). ■ Shorten the bottom foil 5 " (140 mm) and drill screw -holes as described on P. 12. January 1999 Unit 1 MKIII...
- Page 27 Ogni volta che si taglia lo strallo, assicurarsi di pulire attentamente la parte interna dei pezzi di estruso dai trucioli. Non pulire la parte interna dei pezzi di estruso può far incastrare i connettori durante il montaggio. Unit 1 MKIII October 2001...
- Page 28 If you make any cuts in the foils be sure to carefully clean all shavings from inside the foils. Failure to deburr or clean the inside of the foils may cause them to seize to the connector during installation. May 2006 Unit 1 MKIII...
- Page 29 L'aide de deux personnes aufzuschieben. sera probablement nécessaire pour faire passer vengono infilati nello strallo, potrebbero essere necessarie due persone per questa operazione. les profils sur les connecteurs. Unit 1 MKIII January 1999...
- Page 30 January 1999 Unit 1 MKIII...
- Page 31 Schaft nicht berührt. Sollte er nicht diversamente inserirlo di 25 mm. pas toucher l'embout du rod. Si non, ne mettez en passen, versenken Sie den Verbinder 25 mm tief retrait le connecteur supérieur que de 25 mm. im Top Profil. Unit 1 MKIII February 2000...
- Page 32 If it does, recess the top connector as far as needed to clear the shank of the terminal. If it does not fit into the top foil, recess the top connector 1" (25 mm). November 2001 Unit 1 MKIII...
- Page 33 Die Montage bei Rod entspricht der Montage L'installazione dei terminali per tondino è iden- pour le câble serti à cette phase du montage. beim Walzterminal. tica a quella per i terminali a pressare per cavo a questo punto. Unit 1 MKIII November 2001...
- Page 34 Because the lower end of the wire is open you will not "free" a Rod installations are identical to swaged wire at this point. connector, but will simply slip one onto the wire and to the top of the headstay. November 2001 Unit 1 MKIII...
- Page 35 Profile Le curvature del tondino rendono difficile far scor- faire passer les profils sur les connecteurs. aufschieben. rere i pezzi di estruso sui connettori. Più lo strallo è dritto, più facilmente scorrerà l'estruso sui connettori. Unit 1 MKIII January 1999...
- Page 36 The curves in the rod may make it more difficult to slide extrusions over the connectors. The straighter the rod can be held, the more easily foils will pass over connectors. January 1999 Unit 1 MKIII...
- Page 37 Profil über die Verbinder. Le curvature del tondino rendono difficile far scor- profils sur les connecteurs. rere i pezzi di estruso sui connettori. Più lo strallo è dritto, più facilmente scorrerà l'estruso sui connettori. Unit 1 MKIII February 2000...
- Page 38 The curves in the rod may make it more difficult has been assembled. to slide extrusions over the connectors. The straighter the rod can be held, the more easily foils will pass over connectors. November 2001 Unit 1 MKIII...
- Page 39 Astuce: Quand il est dans la bonne position, Tip: Wenn der Wirbel richtig montiert ist, Suggerimento: una volta posizionata nel l'autocollant Harken est dans le bon sens. steht der HARKEN Aufkleber richtig herum. modo corretto, la piccola scritta Harken si leggerà...
- Page 40 See page 27 for details. completely over the bottom connector to expose as much wire as possible. After the terminal is attached, secure the bottom foil as described in Step 4. November 2001 Unit 1 MKIII...
- Page 41 Schrauben Sie die Trommeleinheit auf das Stag Assemblare il tamburo avvitandolo sullo strallo bis die farbige Markierung nicht mehr sichtbar ist. fino a che il segno colorato sulla filettatura scompaia. Unit 1 MKIII October 2001...
- Page 42 Do NOT use the plastic locking cylinder. Thread the locking collar onto the drum Thread the drum assembly onto the stay assembly as far as it will go. until the colored mark on the threads does not show. November 2001 Unit 1 MKIII...
- Page 43 Suggerimento: per controllare il totale di filettatura Gewindes zu überprüfen, messen Sie von der * scoperta, con terminali Norseman e Sta-Lok, misu- Oberkante Trommeleinheit. rare dalla sommità del* tamburo che è pari con la sommità dell'arridatoio. Unit 1 MKIII January 1999...
- Page 44 Tip: To check amount of exposed thread, measure from top of Lok, measure from top of *hub extension which is even with *hub extension which is even with top of the turnbuckle. top of the turnbuckle. January 1999 Unit 1 MKIII...
- Page 45 Norseman/Sta-Lok per impedirgli di girare. tourner la terminaison basse de l'étai avec une clef à fourche (voir tableau page 7) dans le cas Norseman ou Stalok; avec une pince étau dans le cas d'un rod. Unit 1 MKIII January 1999...
- Page 46 Norseman/Sta-Lok and Rod Instructions There is no need to hold the foils up out of the way. During tensioning hold the terminal to prevent it from turning. Norseman/Sta-Lok Installation Rod Installation November 2001 Unit 1 MKIII...
- Page 47 Klemmhülse. quindi serrarlo energicamente tenendo fermo il Norseman ou Sta-lok ou du rod, et serrez la con- terminale. venablement tandis que vous tenez la pince étau. Unit 1 MKIII January 1999...
- Page 48 Secure the lower locking device as described above. To lock the upper terminal, thread the locking collar UP until it touches the terminal body, then tighten it firmly while holding the terminal. Norseman/Sta-Lok Installation Rod Installation January 1999 Unit 1 MKIII...
- Page 49 L'installazione dei terminali per tondino è iden- Les instructions pour le rod sont les mêmes que tisch mit der Walz-Montage. tica a quella per i terminali a pressare per cavo a pour le câble serti à cette phase. questo punto. Unit 1 MKIII February 2000...
- Page 50 Insert the torque tube screws and use the 5 mm allen wrench to securely clamp the foils in a raised position. Norseman/Sta-Lok Instructions Rod Instructions Norseman/Sta-Lok installations are identical to swaged Rod installations are identical to swaged wire at this point. wire at this point. February 2000 Unit 1 MKIII...
-
Page 51: Montage Spécial
Konus liegen, und der Kern um die vorgegebene Länge aus dem Konus herausragen. Prüfen Sie, dass die Drähte gleichmassig am Konus liegen, und keiner im Spalt. Unit 1 MKIII October 2001... - Page 52 "wedge" and the cor- rect amount of coring is protruding below the "wedge". Make sure no outer strands are in the slot in the wedge. November 2001 Unit 1 MKIII...
- Page 53 Loctite auf dem Gewinde des et assurez vous qu'il n'y a pas de Loctite sur le filetage ponendo particolare attenzione nell'assicurarsi che la Gewindeterminals befindet. destiné à être vissé dans le ridoir. Loctite rossa non sia sull'asta filettata. Unit 1 MKIII January 1999...
- Page 54 Insert the two cotter pins and spread. Clean excess Loctite from the terminal body using special care to insure that no red Loctite is present on the threaded stud. November 2001 Unit 1 MKIII...
-
Page 55: Mise En Fonctionnement
Schritten ins Cockpit geführt. in cinque passaggi. Usare bozzelli Bullet Harken per i rinvii di prua e inter- Harken Bullet Blöcke egnen sich als vordere und mit- Utilisez les poulies Harken pour cet usage. Utilisez une medi. - Page 56 ® aftermost lead block. Harken part 266 is a lead block kit with three 166 bullet blocks; four 061 stanchion mount bases; one 019 ratchet block; and a 3" (75 mm) cleat. Use the lead block kit or choose the best configuration of blocks for your needs.
- Page 57 écoutes. man unter Umständen auch die Schot lösen und das e svolgere la vela facendola girare attorno allo strallo Segel um das Vorstag herum abwickeln. manualmente. Unit 1 MKIII January 1999...
- Page 58 Severe halyard wraps can only be cleared by going aloft and freeing the halyard. If the sail will not furl or unfurl, it may be possible to remove the jib sheets and manually wrap the sail around the headstay. January 1999 Unit 1 MKIII...
- Page 59 Profilstag ihn nicht berührt. Se la propria barca necessita di una guida per drizza prenez la référence: 944. usate un Harken 944. Der Fallabweiser sollte das Fall nicht zu stark ablenken, Le guide drisse doit être monté le plus haut possible La guida per drizza deve essere montata il più...
- Page 60 Restrainers tend to limit sail luff length and may cause problems if not properly installed. If your boat needs a halyard restrainer, use Harken part 944. The restrainer should be mounted as high as possible on the face of the mast. Position the restrainer so that the foils will not hit it when under load.
-
Page 61: Utilisation
Spannern: eine Talje aus Blöcken, mechanische rendimento, prendere in considerazione la possibilità d'une cascade plus un palan comme Harken vous le Spanner, wie sie von der Firma HARKEN angeboten di installare un tendipaterazzo sia esso un paranco o propose, ou d'un ridoir hydraulique, vous améliorerez... - Page 62 They permit a very tight headstay to be eased when the boat is not in use. For best performance, consider adding a backstay adjuster, either a block and tackle, a mechanical adjuster like those offered by Harken, or a hydraulic adjuster.
- Page 63 La forza necessaria è proporzionale all'intensità hängt von der Windstärke ab. Eine Winsch sollte bei de la force du vent, mais un Unit 1 ne devrait jamais del vento, ma questo modello di avvolgifiocco Harken der Typ 1 jedoch nicht erforderlich sein. Wenn das imposer l'utilisation d'un winch pour enrouler.
- Page 64 The furling line should pull readily. The amount of force required is related to the amount of wind, but a Unit 1 should never require the use of a winch to furl. If the sail will not furl, or if furling requires a great deal of effort, there is a problem with the system. Consult the Troubleshooting Guides on page 36.
- Page 65 Votre enrouleur comporte un système de verrouillage gerüstet. Damit kann das eingerollte Segel blockiert Gli avvolgifiocco Harken sono dotati di un'opzione di qui peut être utilisé après une réduction ou quand vous werden, entweder als Sicherung des Reffs oder wenn "bloccaggio"...
- Page 66 You may also lock your system by aligning the holes in the bottom of the drum and the basket and insert- ing a shackle or padlock. Be sure that mooring lines are not placed across the furling line where they may cause chafe. February 2000 Unit 1 MKIII...
- Page 67 ■ Conversione da regata Pour la transformation, descendez l'émerillon de drisse Zum Regattieren bleibt der Fallwirbel unterhalb des Per usare gli avvolgifiocco Harken durante le regate sous l'engageur et démontez le guide anti-usure de Einfädlers, Korb und Trommel werden entfernt. So si deve abbassare la girella superiore sotto il feeder, drosse, le capot en inox, et le tambour.
- Page 68 (see page 25 and 24). Thread the drum off and slip the torque tube and halyard swivel off. 6) Slip the torque tube back on the foils and re-attach the lower unit. 7) Re-attach the headstay to the boat. February 2000 Unit 1 MKIII...
- Page 69 ■ Pulizia e lubrificazione ■ Reinigung und Schmierung Gardez votre enrouleur propre. Quand vous lavez le Tenere l'avvolgifiocco Harken sempre pulito. Quando si Halten Sie Ihre Anlage sauber. Spritzen Sie beim bateau, n'hésitez pas à asperger l'enrouleur de savon lava la barca, risciacquare anche l'unità con sapone e Reinigen des Decks die Anlage mit Wasser und unter et d'eau claire.
-
Page 70: Cleaning And Lubricating
Inspect the foil to make sure that it has not dropped into the torque tube. Periodically inspect wire for signs of wear or unraveling. ■ Replacing Line To replace the line refer to Step 1 on page 28. February 2000 Unit 1 MKIII... -
Page 71: Troubleshooting Guide
Piece was not secured at stud and was car- Check for missing connector inside of foil extrusions. If connector is ried up inside of a foil. not inside extrusion call Harken for a special split top connector. Too many connectors Too many strung on wire. -
Page 72: Causes De Disfonctionnement
La drosse n'est pas correctement passée au travers Tirer la drosse à travers la fenêtre du guide anti usure. entre le guide anti usure d'une fenêtre du guide. et une des flasques plastique du tambour. October 2001 Unit 1 MKIII... -
Page 73: Mögliche Ursache
Schoten abschlagen. Leine ganz abrollen und umgekehrt laden. Reffleinenführung und sich in die Genua. Trommelschutz evtl. neu ausrichten. Leine verklemmt Leine wurde nicht durch ein Fenster im Korb eingeführt. Leine neu durch Fenster fädeln. zwischen Korb und Spule/Trommel. Unit 1 MKIII October 2001... - Page 74 Risciacquare i cuscinetti con acqua dolce e lubrificare con uno spray lubrificante a secco. La scotta di avvolgimento si è incattivata all'interno del Il modo migliore per prevenire accavallamenti è usare un bozzello Harken Hexaratchet piccolo 019 tamburo. come bozzello più a poppa per assicurare il giusto sforzo sulla scotta quando si svolge la vela.
- Page 75 Parts List – MKIII Unit 1 - Upper Assembly & Components • 807 Extrusion - 7' Luff • 809 Connector - 8.890" Bottom • 810 Connector - 7" • HFG186 Split Top Connector (Not Shown, Optional) • 812 Feeder HFS192 Fastener - 10-32 x "...
- Page 76 Stud - " Swage • 873 Stud - 6 mm Swage • 874 Stud - 7 mm Swage • 879 Stud - 8 mm Swage Unit 1 Sta-Lok Studs HFG151 Stud-Cap - " ID x 4" Red • 821 Stud - "...
-
Page 77: Garantie
Garantie Garantie Garanzia ■ La garantie limitée de 7 ans sur les enrouleurs Harken. ■ Sieben-jährige Garantie auf Harken Roll/ReffAnlagen. Garanzia Harken di sette anni per avvolgifiocco e sistemi di riduzione. Que couvre cette garantie limitée . Was deckt die Garantie? Tous défauts de matériaux ou de fabrication. - Page 78 After Harken determines that you need replacement or repair parts under warranty, we will ship these parts directly to you or to your dealer or rigger at no charge. Do not purchase repair parts! Harken will not reimburse you for the expense of buying repair parts.
- Page 79 • Web: www.harken.com.au Email: info.harken.com.au Harken New Zealand, Ltd. 30-36 Fanshawe Street Auckland 1001, New Zealand Telephone: (64) 9-303-3744 Fax: (64) 9-307-7987 • Web: www.harken.co.nz Email: harken@harken.co.nz Please visit: http://www.harken.com/dealers/dealers.php for an up-to-date list of Harken dealers and distributors 4863/9-09...