Table des Matières
Publicité
Les langues disponibles
Les langues disponibles
Liens rapides
Publicité
Chapitres
Table des Matières

Manuels Connexes pour Muller Light 404013

Sommaire des Matières pour Muller Light 404013
- Page 1 . s o s i m p l e . Simple via remote control. Smart home ready. STARTER SET 404013 Bedienungs- und Montageanleitung BEDIENUNGSANLEITUNG ab Seite 2 MODE D‘EMPLOI à partir de la page 26...
-
Page 2: Table Des Matières
INHALT Bedienung ...........11 Allgemeines ..........02 Grundfunktionen ........12 Auf einen Blick / Lieferumfang ....02 Szenen .............13 Einleitung..........03 Zeichenerklärung ........03 Gruppenfunktionen .........14 Sicherheitssymbole .........04 Reset ............19 Reinigung ............20 Bestimmungsgemäßer Gebrauch ....04 Sicherheitshinweise ...... -
Page 3: Zeichenerklärung
Sehr geehrte Kundin, sehr geehrter Kunde! Diese Bedienungsanleitung enthält wichtige Informationen zur Inbetriebnahme und Verwendung. Lesen Sie die Bedienungsanleitung, insbesondere die Sicher- heitshinweise, sorgfältig durch, bevor Sie die Leuchtmittel einsetzen. Die Nichtbeachtung dieser Bedienungsanleitung kann zu schweren Verlet- zungen und zu Schäden an den Leuchtmitteln führen. Bewahren Sie die Bedienungsanleitung für die weitere Nutzung auf. -
Page 4: Sicherheitssymbole
HINWEIS! Dieses Signalwort warnt vor möglichen Sachschäden. Dieses Symbol gibt Ihnen nützliche Zusatzinformationen zur Handhabung oder zum Betrieb. Bitte aufmerksam lesen. Sicherheitssymbole Diese Lampe keiner Feuchtigkeit oder Nässe aussetzen Diese Lampe nicht in Reflektorgehäusen verwenden Diese Lampe nicht in geschlossenen Leuchten verwenden Nicht dimmbar über konventionelle Dimmer Bestimmungsgemäßer Gebrauch Dieses Starter Set dient zu Beleuchtungszwecken und kann mit der... -
Page 5: Sicherheitshinweise
Sicherheitshinweise HINWEIS! • Dieser Artikel kann von Kindern ab 8 Jahren und darüber sowie von Personen mit verringerten physischen, sensorischen oder mentalen Fähigkeiten oder Mangel an Erfahrung und Wissen benutzt werden, wenn sie beaufsichtigt oder bezüglich dessicheren Gebrauchs des Artikels unterwiesen wurden und die daraus resultierenden Gefah- ren verstehen. - Page 6 GEFAHR durch elektrischen Stromschlag • Stellen Sie vor der Benutzung sicher, dass die vorhandene Netzspan- nung mit der benötigten Betriebsspannung des Artikels übereinstimmt (siehe „Technische Daten“). • Achten Sie beim Einlegen der Batterien auf die richtige Polarität. • Tauschen Sie immer alle Batterien gleichzeitig aus. Verwenden Sie keine unterschiedlichen Typen oder gebrauchte und neue Batterien miteinander.
- Page 7 • Vermeiden Sie Kontakt der Batterieflüssigkeit mit Haut, Augen und Schleimhäuten. Bei Kontakt spülen Sie die betroffenen Stellen sofort mit reichlich klarem Wasser und suchen Sie umgehend einen Arzt auf. • Achten Sie beim Einlegen der Batterien auf die richtige Polarität. •...
-
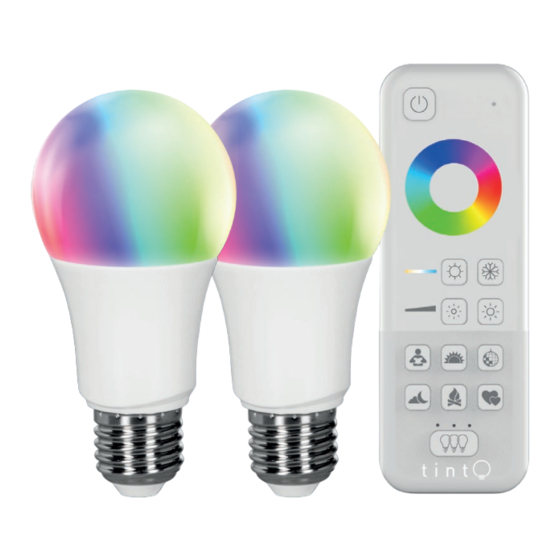
Page 8: Tint-Fernbedienung
tint-Fernbedienung 2 Resonanzanzeige 1 Standby-Taste 3 Farbsteuerung 4 Weißsteuerung 5 Helligkeits- steuerung 6 Szenen-Taste 8 Szenen-Taste „Arbeitslicht“ „Party“ 9 Szenen-Taste 11 Szenen-Taste „Nachtlicht“ „Romantik“ 7 Szenen-Taste 10 Szenen-Taste „Sonnenuntergang“ „Lagerfeuer“ 12 Gruppenanzeige 13 Gruppentaste „3 Leuchtdioden“ tint-STARTER SET ANLEITUNG... -
Page 9: Inbetriebnahme
14 Reset-Taste 15 Batteriefach für 2 Batterien LR03 (AAA) Inbetriebnahme Leuchtmittel einsetzen Sie können die Leuchtmittel in unterschiedliche Leuchten einsetzen, z.B. in eine Deckenleuchte und eine Stehleuchte oder in eine Schreibtischleuchte. Einzige Voraussetzung ist, dass die Leuchten jeweils über eine passende Fassung verfügen. -
Page 10: Batterien Einlegen
Batterien einlegen 1. Öffnen Sie das Batteriefach auf der Rückseite der tint-Fernbedienung. 2. Legen Sie 2 Batterien des Typs LR03 (AAA) / 1,5 V so ein, wie auf dem Boden des Batteriefachs abgebildet. Beachten Sie die richtige Polarität der Batterien (+/-). 3. -
Page 11: Bedienung
VORSICHT! Vergewissern Sie sich, dass sich keine Rohre oder Leitungen an der Bohrstelle befinden. 1. Trennen Sie die beiden Hälften der Halterung, indem Sie mit einem kleinen Schraubenzieher eine Hälfte nach oben hebeln (Abb. 1) 2. Nutzen Sie die Rückseite der Halterung als Schablone, um die Bohrstel- len zu markieren. -
Page 12: Grundfunktionen
Es handelt sich bei der tint-Fernbedienung um eine Funkfernbedienung. • Sie müssen mit der tint-Fernbedienung nicht auf die Leuchtmittel „zielen“,um sie zu bedienen. • Die tint-Fernbedienung durchdringt auch feste Materialien wie z.B. Wände, Türen und Fenster. • Die maximale Reichweite beträgt (abhängig von den Hindernissen zwischen tint-Fernbedienung und Leuchtmittel) ca. -
Page 13: Szenen
Helligkeit einstellen Durch kurzes Drücken stellen Sie fest hinterlegte Hel- ligkeitsstufen ein: 100%, 80%, 50%, 20%, 10% und 5%. Durch langes Drücken stellen Sie die gewünschte Helligkeitsstufe stu- fenlos selbst ein. Szenen Unter Szenen versteht man fest vordefinierte Lichteinstellungen. Eine Szene wird durch einen kurzen Druck auf die jeweilige Taste aktiviert. Szene „Arbeitslicht“: 100% neutrale, helle Beleuchtung Szene „Sonnenuntergang“: Startet bei warmweißem Licht (50%) und dimmt dann nach 15 Minuten weiter herunter. -
Page 14: Gruppenfunktionen
Gruppenfunktionen Eine Gruppe wählen Wenn Sie mehrere Leuchtmittel eingesetzt haben, sind diese zu Beginn in der ersten Gruppe zusammengefasst. Dadurch können Sie mit einem Tas- tendruck mehrere Leuchtmittel gleichzeitig bedienen. Das ist z.B. praktisch, wenn Sie in einem Raum mehrere „Beleuchtungssituationen“ haben. Beispiel: •... - Page 15 • Mit der tint-Fernbedienung können Sie maximal 4 Gruppen steuern, wobei die vierte Gruppe die Zusammenfassung der anderen drei Gruppen darstellt. • Machen Sie sich vorher Gedanken, welche Leuchtmittel zu einer Gruppe zusammengefasst werden sollen und versuchen Sie Gruppen logisch und nachvollziehbar aufzubauen. Dadurch können Sie beim späteren Gebrauch die jeweilige Gruppe über die Gruppentaste ohne langes Ausprobieren schnell ansprechen.
- Page 16 Binden Sie jedes Leuchtmittel einzeln und nacheinander ein und schalten Sie andere tint-Leuchtmittel während des Verbindens spannungslos. 1. Ziehen Sie den Netzstecker, entfernen Sie das alte Leuchtmittel und drehen Sie das neue tint-Leuchtmittel in die Fassung. 2. Stecken Sie den/die Netzstecker wieder ein und stellen Sie die ent- sprechenden Leuchtenschalter auf I bzw.
- Page 17 6. Falls gewünscht können Sie durch wiederholtes Drücken der Grup- pentaste eine andere Gruppe auswählen (mittlere Leuchtdiode = Gruppe 2 etc.). Nach ca. 10 Sekunden wird das neue Leuchtmittel zu der ausgewähl- ten Gruppe hinzugefügt und die Resonanzanzeige hört auf zu blinken. Warten Sie diese Zeit ab und drücken Sie in dieser Zeit keine Taste.
- Page 18 Ein Leuchtmittel aus einer Gruppe in eine andere Gruppe einbinden 1. Schalten Sie ggf. die Leuchtmittel mit der tint-Fernbedienung aus (Standby). 2. Wählen Sie über die Gruppentaste die Gruppe aus, die Sie ändern möchten. (Möchten Sie z.B. aus der Gruppe 2 ein Leuchtmittel zur Gruppe 1 hinzufügen, drücken Sie so oft die Gruppentaste, bis die mittlere Leuchte oberhalb der Gruppentaste leuchtet.) 3.
-
Page 19: Reset
Reset Zurücksetzen auf 100% Licht Die tint Leuchtmittel können ganz bequem per Lichtschalter auf die Ein- stellung warmweiß und 100% Helligkeit zurückgesetzt werden. Das kann z. B. dann erforderlich sein, wenn Sie die Leuchtmittel zuvor gedimmt haben und die Batterien der Fernbedienung leer sind. Diese Funktion darf auch im Regelfall verwendet werden, wenn Sie die tint-Fernbedienung gerade nicht griffbereit haben. -
Page 20: Reinigung
Jedes Leuchtmittel wird dabei einzeln und nacheinander eingebunden. Gehören z.B. drei Leuchtmittel zu der Gruppe, müssen Sie den Vorgang „Neues Leuchtmittel einbinden“ 3x wiederholen. Reset des tint-Leuchtmittels/Kopplungsmodus Ein Reset des tint-Leuchtmittels ist nur im Ausnahmefall erforderlich, z.B. wenn die Fernbedienung zurückgesetzt werden musste, oder wenn Sie die Leuchtmittel in ein Smart Home Gateway einbinden möchten. -
Page 21: Smart Home Ready
Smart Home Ready: Die tint Produkte von MÜLLER-LICHT sind steuerbar über den aktuellsten Zigbee Funkstandard 3.0 und kompatibel mit zahlreichen Lichtsteue- rungssystemen wie zum Beispiel Philips Hue (ohne Hue Entertainment und ohne HomeKit-Integration), Osram Lightify, dem Sprachassistenten von Amazon (über Amazon Echo Plus)*, und vielen weiteren. Zum Einbinden in ein Zigbee Gateway starten Sie auf der zugehörigen App den Suchvorgang und schalten Sie die Lampe ein. -
Page 22: Fehlersuchtabelle
Fehlersuchtabelle Problem Mögliche Ursache Keine Funktion. Die Batterien in der tint-Fernbe- dienung sind leer und müssen gewechselt werden. Die Leuchtmittel selbst sind aus- geschaltet oder die Netzstecker sind nicht eingesteckt. Sie haben über die Gruppentaste eine falsche bzw. gar keine Grup- pe ausgewählt. - Page 23 Problem Mögliche Ursache Das Leuchtmittel hat sich in die Stellen Sie sicher, in welcher falsche Gruppe eingebunden. Gruppe sich das Leuchtmittel befindet. Gehen Sie vor wie in „Leuchtmittel aus einer Gruppe in eine andere Gruppe einbinden“ beschrieben. Das Leuchtmittel lässt sich nicht Bitte prüfen Sie, ob sich das in ein fremdes System einbinden.
-
Page 24: Technische Daten
Problem Mögliche Ursache In welcher Gruppe befindet sich Durch einfaches Ein- und Aus- mein Leuchtmittel gerade? schalten der Gruppen können Sie feststellen, in welcher Gruppe sich Ihr gewünschtes Leuchtmit- tel befindet. Antworten auf weitere häufig gestellte Fragen finden Sie unter www.mueller-licht.de/tint Technische Daten Frequenzband des drahtlosen RF-Modus: 2405-2480,0 MHz... -
Page 25: Entsorgen
Der vollständige Text der EU-Konformitätserklärung ist unter der folgen- den Internetadresse verfügbar: www.mueller-licht.de/tint Entsorgen Altgeräte dürfen nicht im normalen Hausmüll entsorgt werden. Entspre- chend Richtlinie 2012/19/EU ist das Gerät am Ende seiner Lebensdauer einer geordneten Entsorgung zuzuführen. Dabei werden im Gerät enthal- tene Wertstoffe der Wiederverwertung zugeführt und die Belastung der Umwelt vermieden. - Page 26 CONTENU Utilisation ............35 Généralités ..........26 Fonctions de base ........36 En bref / Volume de livraison ....26 Scènes .............37 Introduction ..........26 Légende ...........27 Fonctions du groupe .......38 Symboles de sécurité ......28 Réinitialisation.........43 Nettoyage ...........
-
Page 27: Légende
Chère cliente, cher client ! Ce mode d’emploi contient des informations importantes concernant la mise en service et l‘utilisation. Avant d’installer les ampoules, veuillez lire soigneusement le mode d’emploi, en particulier les consignes de sécurité. Le non-respect de ce mode d’emploi peut entraîner de graves blessures et endommager led ampoules. -
Page 28: Utilisation Conforme
AVIS! Ce mot de signalisation met en garde concernant d‘éventuels dommages matériels. Ce symbole fournit des informations complémentaires utiles concernant la manipulation ou l’utilisation. Veuillez lire ce docu- ment avec attention. Consignes de sécurité Ne pas exposer cette lampe à l‘humidité ou à l’eau Ne pas utiliser cette lampe dans les boîtiers de réflecteur Ne pas utiliser cette lampe dans les luminaires fermés Régulation impossible par le variateur conventionnel... -
Page 29: Consignes De Sécurité
Consignes de sécurité AVIS! • Le présent article peut être utilisé par des enfants à partir de 8 ans, ainsi que par des personnes présentant des capacités physiques, sensorielles ou mentales diminuées, ou un manque d’expérience et de connaissances si elles sont sous surveillance ou ont été infor- mées sur l’utilisation sûre de l‘article et les dangers qui en résultent. - Page 30 DANGER lié au courant électrique • Avant utilisation, vérifiez que la tension secteur disponible correspond à la tension de service requise par l‘article (voir « Caractéristiques techniques »). • Lors de l’insertion des piles, veillez à la bonne polarité. • Remplacez toujours toutes les piles en même temps. N’utilisez pas des types différents et ne mélangez pas des piles neuves et usagées.
- Page 31 • En cas de contact, rincez immédiatement et abondamment les zones concernées à l‘eau claire et consultez tout de suite un médecin. • Lors de l’insertion des piles, veillez à la bonne polarité. • Remplacez toujours toutes les piles en même temps. •...
-
Page 32: Télécommande Tint
Télécommande tint 1 Touche 2 Affichage de la de mise en résonance veille 3 Commande de la couleur 4 Commande du blanc 5 Commande de la lumino- sité 8 Touche de la 6 Touche de la scène « Fête » scène «... -
Page 33: Mise En Service
14 Touche de remise à zéro 15 Compartiment pour 2 piles LR03 (AAA) Mise en service Insérer l‘ampoule Vous pouvez insérer l’ampoule fournie dans différentes lampes, par exemple, dans un plafonnier ou un lampa- daire ou encore une lampe de bureau. La seule condition préalable est que les lampes doivent disposer d’une douille adaptée. -
Page 34: Insérer Les Piles
Insérer les piles 1. Ouvrez le compartiment pour piles au dos de la télécommande tint. 2. Insérez les 2 piles de type LR03 (AAA)/1,5 V comme l‘indique l‘illustration figurant sur le fond du compartiment pour piles. Respectez la polarité correcte des piles (+/-). 3. -
Page 35: Utilisation
ATTENTION! Assurez-vous que l’emplacement prévu ne comporte ni tuyaux, ni conduites. 1. Séparez les deux moitiés du support en soulevant une moitié vers le haut à l’aide d‘un petit tournevis (fig. 1) 2. Utilisez l‘arrière du support comme gabarit pour marquer les trous de perçage. -
Page 36: Fonctions De Base
• Vous n’avez pas besoin de « viser » les ampoules avec la télécommande tint pour les commander. • La télécommande tint pénètre également au travers de matériaux durs, tels que murs, portes et fenêtres. • La porté maximale est d‘env. 30 mètres en champ libre (en fonction des obsta- cles situés entre la télécommande tint et les ampoules). -
Page 37: Scènes
Réglage de la luminosité Par une pression courte, réglez des niveaux de lumino- sité définis : 100 %, 80 %, 50 %, 20 %, 10 % et 5 %. Par une pression longue, réglez vous-même le niveau de luminosité souhaité. Scènes Les scènes désignent les réglages d’éclairage prédéfinis. -
Page 38: Fonctions Du Groupe
Fonctions du groupe Sélectionner un groupe Si vous avez installé plusieurs ampoules, elles sont regroupées au départ dans le premier groupe. Ainsi, d’une pression sur un bouton, vous pouvez commander plusieurs ampoules simultanément. Ce dispositif est pratique, par exemple, si plusieurs « situations d’éclairage » cohabitent au sein d‘un même espace. - Page 39 • La télécommande tint permet de contrôler jusqu’à 4 groupes, le qua- trième groupe représentant l’ensemble des trois autres. • Au préalable, réfléchissez aux ampoules qui doivent être regroupées et essayez de constituer des groupes de façon logique et comp- réhensible.
- Page 40 Si vous utilisez une ampoule tint white qui ne fournit que de la lumi- ère blanche, les fonctions d‘éclairage couleur ne sont pas disponibles. L‘ampoule s‘arrête. 1. Débranchez la prise secteur, retirez l‘ancienne ampoule et tournez la nouvelle ampoule tint dans sa douille. 2.
- Page 41 appuyant plusieurs fois sur la touche du groupe (voyant du milieu = groupe 2, etc.). Après environ 10 secondes, la nouvelle ampoule est ajoutée au groupe sélectionné et l‘affichage de résonance cesse de clignoter. Patientez pendant ce délai et n‘appuyez sur aucune touche. Le processus est alors terminé...
- Page 42 Raccordement de l’ampoule d’un groupe avec un autre groupe 1. Éteignez au besoin les ampoules au moyen de la télécommande tint (veille). 2. Au moyen de la touche du groupe, sélectionnez le groupe que vous souhaitez modifier. (Par exemple, si vous souhaitez ajouter une ampoule du groupe 2 au groupe 1, appuyez de manière répétée sur la touche du groupe jusqu‘à...
-
Page 43: Réinitialisation
Réinitialisation Réinitialisation à une luminosité de 100 % Les ampoules tint peuvent être réinitialisées très facilement avec l‘interrupteur sur le réglage blanc chaud et à une luminosité de 100 %. Cela peut s’avérer nécessaire, par ex. lorsque vous avez tamisé l’ampoule au préalable et que les piles de la télécommande sont vides. -
Page 44: Nettoyage
Chaque ampoule est intégrée individuellement l‘une après l‘autre. Si par exemple trois ampoules appartiennent au groupe, vous devez répéter le processus « Raccordement d‘une nouvelle ampoule » 3 fois. Réinitialisation de l‘ampoule tint/du mode de couplage Une réinitialisation de l‘ampoule tint n‘est nécessaire que dans des cas exceptionnels, par exemple, si la télécommande a dû... -
Page 45: Smart Home Ready
Smart Home Ready : Les produits tint de MÜLLER-LICHT peuvent être commandés au moyen de la dernière norme radio Zigbee 3.0 et sont compatibles avec de nombreux systèmes de commande de l‘éclairage, par exemple Philips Hue (sans Hue Entertainment and HomeKit), l‘assistant linguistique d‘Amazon*, Osram Lightify et bien d‘autres. -
Page 46: Tableau De Recherche D'erreurs
Tableau de recherche des erreurs Problème Cause possible Sans fonction. Les piles de la télécommande tint sont déchargées et doivent être remplacées. Les ampoules sont désactivées ou la prise secteur n’est pas branchée. Au moyen de la touche du groupe, vous avez sélectionné... - Page 47 Problème Cause possible L‘ampoule a été intégrée au mau- Vérifiez le groupe dans lequel vais groupe. l'ampoule se trouve. Procédez comme le décrit la section « Rac- cordement de l’ampoule d’un groupe avec un autre groupe ». Impossible d'intégrer l’ampoule à Veuillez vérifier si l‘ampoule est un groupe tiers.
-
Page 48: Déclaration De Conformité
Données techniques : Bande de fréquence du module RF sans fil : 2405-2480,0 MHz <20 mW Puissance de transmission maximale : Portée de radio (champ libre) : 30 m <0,5 W Consommation de veille par lampe : Tension réseau : 220−240 V Fréquence du secteur : 50/60 Hz... -
Page 49: Élimination
Élimination Les appareils usagés ne peuvent pas être éliminés avec les ordures ménagères. Selon la directive 2012/19/UE, l‘appareil en fin de durée de vie doit être soumis à une élimination contrôlée. Les matériaux contenus dans l‘appareil sont soumis à un recyclage et l‘environnement n‘est pas pollué. Déposez l‘ancien appareil sans frais auprès d‘un point de collecte pour déchets électroniques ou d‘un centre de recyclage. - Page 50 CONTENT General information ........50 Operation .............59 At a glance ..........50 Basic functions ........60 Included with the item ......50 Scenes .............61 Group function .........62 Explanation of symbols ......51 Safety Instructions ........52 Reset ............67 Proper use ..........
-
Page 51: Explanation Of Symbols
..59 Dear customers! ..60 This user manual contains important information on start-up ..61 and use. Before using the bulbs, please read through the user ..62 manual carefully. This particularly applies for the safety notes..67 Failure to follow this user manual may result in severe injury or damage ..68 the bulbs. -
Page 52: Safety Instructions
This symbol gives useful additional information for handling or operation. Please read carefully. Safety Instructions Do not expose this lamp to moisture Do not use this lamp in reflector housings Do not use this lamp in closed luminaires Not dimmable by conventional dimmers Proper use This Starter Set can be used for lighting purposes and can be controlled with the associated remote control. -
Page 53: Safety Notes
Safety Notes NOTICE! • These bulbs may be used by children ages eight and over as well as persons with impaired physical, sensory or mental capacities or tho- se lacking experience and knowledge if they are supervised or have been instructed in how to safely use the light and have understood the risks associated with using it. - Page 54 DANGER of electric shock • Before use, make sure that the existing power voltage matches the required operating voltage of the item (see „Technical data“) • When inserting the batteries, pay attention to the right polarity. • Do not use different types and do not use a used battery and a new battery with each other.
- Page 55 • Do not use different types and do not use a used battery and a new battery with each other. ATTENTION! CAUTION against damage to property • Remove the batteries from the remote control when they are drained or if you are not using the item for a long time. In this way, you avoid damage that can result from leakage.
-
Page 56: Tint Remote Control
tint remote control 1 Standby 2 Feedback display button 3 Colour control 4 White control 5 Brightness control 8 “Party” 6 “Working light” scene button scene button 11 “Romantic” 9 “Night lights” scene button scene button 10 “Campfire” 7 “Sunset” scene button scene button »... -
Page 57: Setup
14 Reset button 15 Battery compart- ment for 2 batteries LR03 (AAA) Setup Fitting the bulbs You can insert the two supplied bulbs into different fit- tings, e.g. into a ceiling light and a free-standing lamp or a desk lamp. The only requirement is that the lights each have a suitable E27 socket. -
Page 58: Inserting The Batteries
Inserting the batteries 1. Open the battery compartment at the rear of the tint remote control. 2. Insert 2 LR03 (AAA) / 1.5v batteries as shown on the bottom of the battery compartment. Ensure the correct polarity of the batteries (+/-). 3. -
Page 59: Operation
ATTENTION! Make sure there are no pipes or wires in the wall where you intend to drill. 1. Separate the two halves of the bracket. (fig. 1) 2. Use the rear of the bracket as a stencil to mark where you will drill. 3. -
Page 60: Basic Functions
• You do not need to “aim” at the bulbs with the tint remote control to operate them. • The tint remote control will also penetrate solid materials such as walls, doors and windows. • The maximum range (depending on the obstacles between the tint remote control and the bulbs) is approx. -
Page 61: Scenes
Set brightness Short-press to select permanently stored brightness levels: 100%, 80%, 50%, 20%, 10% and 5%. Long-press to set the desired brightness on a continuous scale. Scenes ‘Scenes’ are pre-defined light settings. Activate a scene by short-pressing the corresponding button on the remote control. -
Page 62: Group Function
Group functions This is a group The bulbs in the starter set are in the first group to begin with. This allows you to control several bulbs with only one button. This is useful if you have more than one ‘lighting situation’ in a room, for example. Example: •... - Page 63 • Think beforehand about which bulbs you want to group together and try to make the groups logical and comprehensible. This means you will be able to use the groups later using the group button quickly and without having to waste time testing them. Using the group button •...
- Page 64 If you are using a tint white bulb that only emits white light, the coloured light features will not be available. The bulb will be switched off. 1. Unplug the lamp at the mains, remove the old bulb and screw the new tint bulb into the socket.
- Page 65 6. If desired, you can select a different group by repeatedly pressing the group button (middle LED = group 2 etc.). After approx. 10 seconds, the new bulb will be added to the selected group and the feedback display will stop blinking. Wait this long, not pressing any buttons during this time.
- Page 66 Shift a bulb from one group into another group 1. Switch the bulb off (to standby) with the tint remote control if neces- sary. 2. Select the group you would like to change using the group button. (If you would like to add a bulb from group 2 to group 1, for example, press the group button repeatedly until the middle LED above the group button lights up).
-
Page 67: Reset
Reset Reset to 100% light The tint light bulbs can be easily reset by light switch to the basic setting of warm white and 100% brightness. This may be necessary, for example, if you have dimmed the bulbs before and the remote control‘s batteries are empty. -
Page 68: Cleaning
Resetting the tint bulb Resetting the tint bulb is only required in exceptional cases, such as when the remote control has had to be reset or when you want to incorporate the bulb into a smart home gateway. 1. Switch the tint bulb on and off 5 times 2. -
Page 69: Smart Home Ready
Smart Home Ready: The tint products produced by MÜLLER-LICHT can be controlled using the latest Zigbee radio standard 3.0 and are compatible with a range of light control systems, such as Philips Hue (without Hue Entertainment and HomeKit), Osram Lightify, Amazon’s voice assistant (with Amazon Echo Plus), and many more. -
Page 70: Troubleshooting
Troubleshooting Problem Possible causes Bulb is not working. The batteries in the tint remote control are dead and must be replaced. The bulb itself is switched off or the mains plug is not plugged in. You have selected the wrong group, or have not selected a group, using the group button. - Page 71 Problem Possible causes I cannot add a bulb to a new Please check whether the bulb is system. in coupling mode. I cannot add the bulb. The bulb is already assigned to a remote control or a gateway. Please remove it from the existing network Bring it closer to the remote control...
-
Page 72: Technical Data
Technical data Frequency band of wireless RF mode: 2405-2480.0 MHz <20 mW Maximum transmission power: Radio range (free field): 30 m <0.5W Standby consumption per lamp: Mains voltage: 220-240V Mains frequency: 50/60 Hz Environmental conditions: Temperature (operation): -20 ° C ... 40 ° C Temperature (storage): -25 °... -
Page 73: Dispose
Dispose Old appliances must not be disposed of with normal household waste. In accordance with Directive 2012/19/EU, the device must be disposed of properly at the end of its service life. The recyclable materials contained in the device are recycled and pollution of the environment is avoided.Return the old device free of charge to a collection point for electrical waste or a recycling yard. - Page 74 404013 2x LED bulb white+color 806 9,5 1800-6500 60x120 40401 & tint remote control + color Ebenfalls erhältlich: tint Erweiterungslampen | Également disponible: Lampes d’extension tint | Also available: tint extension lamps 404000 LED bulb white+color 806 9,5 1800-6500 60x120...
- Page 75 Discover the whole world of tint... 404013 ... www.mueller-licht.de/tint 404010 404005 404011 404015 404006 404019 404000 404001 404008 tint-STARTER SET INSTRUCTION MANUAL...
- Page 76 www.mueller-licht.de/tint MÜLLER-LICHT International GmbH Goebelstr. 61/63 D-28865 Lilienthal Tel. +800 44003311 service@mueller-licht.de Nachdruck, auch auszugsweise, nur mit schriftlicher Genehmigung des Urhebers. • Irrtum und Änderung vorbehalten. Reproduction, en tout ou en partie, uniquement avec la permission écrite de l‘auteur. • Sauf erreur ou omission. Full or partial reproduction subject to prior written approval.