Table des Matières
Publicité
Les langues disponibles
Les langues disponibles
Liens rapides
Publicité
Chapitres
Table des Matières
Dépannage

Manuels Connexes pour Yamaha R-N500


Sommaire des Matières pour Yamaha R-N500
- Page 1 Network Receiver Réseau Ampli-Tuner OWNER’S MANUAL MODE D’EMPLOI...
- Page 2 We Want You Listening For A Lifetime Yamaha and the Electronic Industries Association’s Consumer Electronics Group want you to get the most out of your equipment by playing it at a safe level. One that lets the sound come through loud and clear without annoying blaring or distortion –...
- Page 3 “OFF” requirements. Modifications not expressly approved by and “ON”, please try to eliminate the problem by using Yamaha may void your authority, granted by the FCC, one of the following measures: to use the product.
- Page 4 12 Only voltage specified on this unit must be used. Using this unit with a higher voltage than specified is dangerous and may cause fire, damage to this unit, and/or personal injury. Yamaha will not be held responsible for any damage resulting from use of this unit with a voltage other than specified.
-
Page 5: Table Des Matières
Contents INTRODUCTION ADVANCED OPERATION Useful features ............2 Configuring playback settings for different Supplied accessories ........... 3 playback sources (OPTION menu)......33 Controls and functions ..........4 OPTION menu items ........... 33 Configuring various functions (SETUP menu) ..34 Front panel ..............4 Front display .............. -
Page 6: Introduction
• Selecting songs and starting/stopping playback • Playing back music from the iPhone or Android device • To download the application or see the latest information, access the App Store or Google Play and search for “NP Controller.” For details, please visit Yamaha website. -
Page 7: Supplied Accessories
Supplied accessories Supplied accessories Check that the following accessories are supplied with the product. Remote control AM antenna FM antenna Batteries (x2) (AAA, R03, UM-4) CODE SET SOURCE RECEIVER SLEEP SPEAKERS DIMMER COAX1 COAX2 OPT1 OPT2 LINE1 LINE2 LINE3 PHONO TUNER PRESET TUNING... -
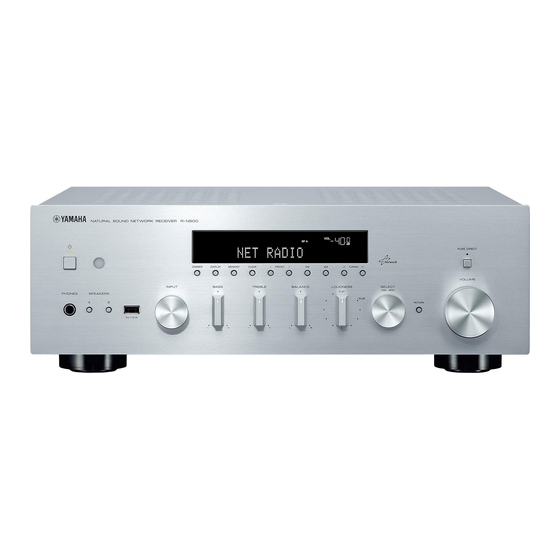
Page 8: Controls And Functions
Selects the tuning frequency when TUNER is selected as Switch the remote control ID between ID1 and ID2 when using the input source (p.17). multiple Yamaha receivers or amplifiers (p.37). B PURE DIRECT and indicator 4 DIMMER Allows you to listen to a source in the purest possible Changes the brightness level of the front display. - Page 9 Controls and functions F INPUT selector Selects the input source you want to listen to. G BASS control Increases or decreases the low frequency response. The center position produces a flat response (p.15). H TREBLE control Increases or decreases the high frequency response. The center position produces a flat response (p.15).
-
Page 10: Front Display
Controls and functions Front display VOL. SLEEP SP A STEREO TUNED SP B MUTE 1 Information display Displays the current status (such as input name sound mode name). You can switch the information that is displayed when you press DISPLAY (p.32). 2 STEREO Lights up when the unit is receiving a stereo FM radio signal. -
Page 11: Rear Panel
REMOTE IN/OUT jacks of this unit, using cables with 3 ANTENNA terminals monaural miniplugs. For connecting to FM and AM antennas (p.12). Up to six Yamaha components (including this unit) can be 4 COAXIAL 1-2 jacks connected. For connecting to audio components equipped with a Rear panel of R-N500 coaxial digital output (p.10). -
Page 12: Remote Control
This section describes the function of each key on the Input selection keys remote control used to control this unit or other Select an input source for playback. components made by Yamaha or other manufacturers. COAX 1-2 COAXIAL 1-2 jacks OPT 1-2... -
Page 13: Using The Remote Controls
Controls and functions Using the remote controls ■ Installing batteries AAA, R03, UM-4 batteries ■ Operation range The remote controls transmit a directional infrared beam. Be sure to aim the remote controls directly at the remote control sensor on the front panel of this unit. Approximately 6 m (20 ft) 30°... -
Page 14: Preparation
PREPARATION Connections Connections Connecting speakers and source components CAUTION • Do not connect this unit or other components to the main power until all connections between components are complete. • All connections must be correct: L (left) to L, R (right) to R, “+” to “+” and “–” to “–”. If the connections are faulty, no sound will be heard from the speakers, and if the polarity of the speaker connections is incorrect, the sound will be unnatural and lack bass. -
Page 15: Connecting The Speakers
Connections ■ Connecting via banana plug Connecting the speakers Tighten the knob and then insert the banana plug into the end of the corresponding terminal. ■ Setting the speaker impedance Under its default settings, the unit is configured for 8-ohm speakers. -
Page 16: Connecting The Fm And Am Antennas
The antennas for receiving FM and AM broadcasts are included with this unit. In general, these antennas should provide sufficient signal strength. Connect each antenna correctly to the designated terminals. Note If you experience poor reception quality, install an outdoor antenna. Consult the nearest authorized Yamaha dealer or service center about outdoor antennas. AM antenna (included) •... -
Page 17: Connecting To A Network
Connections Connecting to a network You can enjoy Internet radio or music files stored on media servers, such as PCs and Network Attached Storage (NAS), on the unit. Connect the unit to your router with a commercially-available STP network cable (CAT-5 or higher straight cable). Network Attached Storage Internet (NAS) -
Page 18: Basic Operation
BASIC OPERATION Playback Playback CAUTION Extreme caution should be exercised when you play back CDs encoded in DTS. If you play back a CD encoded in DTS on a CD player that does not support DTS, only noise will be heard, and this noise may damage your speakers. - Page 19 Playback ■ Adjusting the BASS and TREBLE ■ Adjusting the LOUDNESS control controls LOUDNESS VOLUME TREBLE HOME BASS PLAYING SETUP OPTION The BASS and TREBLE controls adjust high and low frequency response. VOLUME +/– ENTER VOLUME The center position produces a flat response. DISPLAY RETURN POP-UP...
-
Page 20: Using The Sleep Timer
Playback Using the sleep timer Use this feature to automatically set this unit to standby mode after a certain amount of time. The sleep timer is useful when you are going to sleep while this unit is playing or recording a source. CODE SET SOURCE RECEIVER... -
Page 21: Listening To Fm/Am Radio
Listening to FM/AM radio Listening to FM/AM radio • “Wrong Station!” is displayed on the front display if you enter a FM/AM tuning frequency that is out of receivable range. Make sure that the entered frequency is correct. LINE1 LINE2 LINE3 PHONO When the signal reception for an FM radio station is unstable,... -
Page 22: Automatic Preset Tuning (Fm Stations Only)
Listening to FM/AM radio Automatic preset tuning VOL. SP A 01:FM 87.5 MHz (FM stations only) You can use the automatic preset tuning function to Preset number Frequency automatically register FM stations as presets. This When scanning is complete, “FINISH” is displayed function enables this unit to automatically tune in to FM and then the display returns to original state. -
Page 23: Recalling A Preset Station
Listening to FM/AM radio Recalling a preset station Clearing a preset station You can recall preset stations that were registered using Clear radio stations registered to the preset numbers. automatic station preset or manual station preset. TUNER TUNER LINE1 LINE2 LINE3 PHONO TUNER... -
Page 24: Playing Back Ipod Music
Playing back iPod music Playing back iPod music You can play back iPod music on the unit using a USB cable supplied with the iPod. Note Playback of iPod content An iPod may not be detected by the unit or some features may not be compatible, depending on the model or software version of the Follow the procedure below to operate the iPod contents iPod. - Page 25 Playing back iPod music ■ Repeat/shuffle settings Use the following remote control keys to control playback. You can configure the repeat/shuffle settings of your iPod. External device Function operation keys If the input source is “USB,” press REPEAT Resumes playback from pause. or SHUFFLE repeatedly to select the Stops playback.
-
Page 26: Playing Back Music Stored On A Usb Storage Device
Playing back music stored on a USB storage device Playing back music stored on a USB storage device You can play back music files stored on a USB storage device on the unit. Refer to the instruction manuals for the USB storage device for more information. - Page 27 Playing back music stored on a USB storage device Use the following remote control keys to control playback. External device Function operation keys Resumes playback from pause. Stops playback. Stops playback temporarily. Skips forward/backward. Displays the top menu of the USB device. HOME Displays information about the song that's NOW PLAYING...
-
Page 28: Playing Back Music Stored On Media Servers (Pcs/Nas)
• For Windows Media Player 11 Start the Windows Media Player 11 on your PC. Select “Library” then “Media Sharing”. Check the “Share my media to” box, select the “R-N500” icon, and click “Allow”. Click “Turn on media streaming.” Click “OK” to exit. -
Page 29: Playback Of Pc Music Contents
Playing back music stored on media servers (PCs/NAS) Use the following remote control keys to control Playback of PC music contents playback. Follow the procedure below to operate the PC music External device Function contents and start playback. operation keys Resumes playback from pause. -
Page 30: Listening To Internet Radio
Listening to Internet radio Listening to Internet radio You can listen to Internet radio stations from all over the world. Notes • To return to the previous state, press RETURN. • To use this function, the unit must be connected to the Internet •... -
Page 31: Playing Back Itunes/Ipod Music Via A Network (Airplay)
Playing back iTunes/iPod music via a network (AirPlay) Playing back iTunes/iPod music via a network (AirPlay) The AirPlay function allows you to play back iTunes/iPod music on the unit via network. Select a song and start playback. The unit automatically selects “AirPlay” as the input source and starts playback. -
Page 32: Listening To Pandora Service
Listening to Pandora service Listening to Pandora service The Pandora service is available in the U.S.A, Press NET repeatedly to select “Pandora” as Australia, New Zealand only. the input source. If you have not set up your Pandora account on the unit yet, Pandora is a free, personalized Internet radio service “Sign in”... -
Page 33: Creating Pandora Stations
Listening to Pandora service If you select “Activation” in Step 2 Press OPTION. Write down the URL and active code shown in the front display. Use the cursor keys (B / C) to select “Create VOL. SP A Station” and press ENTER. http://www.pan Use the cursor keys to enter the name of an Use a web browser on your PC to access the URL... -
Page 34: Playback Of Pandora Stations
Listening to Pandora service Playback of Pandora stations Perform the following procedure if you needed. If you have created Pandora stations, follow the procedure below to select a Pandora station to be played. If you want to set a rating of track When the playback information is displayed, press LINE1 LINE2... -
Page 35: Deleting Pandora Stations
Listening to Pandora service Deleting Pandora stations Editing the Pandora accounts The created Pandora station can be deleting in the You can register up to 8 Pandora accounts on the unit. following procedures. Follow the procedure below to add or remove Pandora accounts, or switch to another Pandora account. -
Page 36: Switching Information On The Front Display
Switching information on the front display Switching information on the front display When you select USB or a network source as the input source, you can switch playback information on the front display. HOME PLAYING SETUP OPTION ENTER VOLUME DISPLAY RETURN DISPLAY POP-UP... -
Page 37: Advanced Operation
ADVANCED OPERATION Configuring playback settings for different playback sources (OPTION menu) Configuring playback settings for different playback sources (OPTION menu) You can configure separate playback settings for different playback sources. This menu allows you to easily configure settings during playback. ■... -
Page 38: Configuring Various Functions (Setup Menu)
Configuring various functions (SETUP menu) Configuring various functions (SETUP menu) You can configure the unit’s various functions. SETUP menu items HOME PLAYING SETUP OPTION SETUP Menu item Function Page Cursor keys ENTER VOLUME ENTER Displays the network DISPLAY RETURN Information RETURN information on the unit. -
Page 39: Network Setup
Configuring various functions (SETUP menu) Network Setup Use the Cursor keys (B / C) or numeric keys to change a value. Configures the network settings. ■ Information To exit from the menu, press SETUP. Displays the network information on the unit. ■... -
Page 40: Max Volume
Configures the DC OUT jack setting. Default Power Mode +16.5 dB Selects how to supply power to the Yamaha AV accessory connected to the DC OUT jack. Supplies power through the DC OUT jack Cont continuously regardless of the power state (on/ (default) standby) of the unit. -
Page 41: Configuring The System Settings (Advanced Setup Menu)
Change the unit’s remote control ID so that it matches the ADVANCED SETUP menu items remote control’s ID (default: ID2). When using multiple Yamaha AV receivers, you can set each remote control with a unique remote control ID for its corresponding Item... -
Page 42: Restoring The Default Settings (Init)
Configuring the system settings (ADVANCED SETUP menu) Restoring the default settings (INIT) Checking the firmware version (VERSION) INIT CANCEL VERSION xx.xx Restores the default settings for the unit. Check the version of firmware currently installed on the Choices unit. Restores the default settings for the unit. Does not perform an initialization. -
Page 43: Controlling External Devices With The Remote Control
Controlling external devices with the remote control Controlling external devices with the remote control You can use the unit’s remote control to operate external devices (such as CD players) if you have registered the remote control code of the external device. Notes •... -
Page 44: Registering The Remote Control Codes For Playback Devices
Controlling external devices with the remote control ■ Playback device operations Registering the remote control Once you have registered the remote control code for your codes for playback devices playback device, you can control it using the following keys after selecting the input source or scene. You can use the unit’s remote control to operate playback devices if you have registered their remote control codes. -
Page 45: Resetting Remote Control Codes
Controlling external devices with the remote control Resetting remote control codes You can reset the remote control codes assigned to each input selection keys to the factory default. CODE SET CODE SET SOURCE RECEIVER SLEEP SPEAKERS DIMMER HOME PLAYING SETUP OPTION SETUP ENTER... -
Page 46: Updating The Unit's Firmware Via The Network
Updating the unit’s firmware via the network Updating the unit’s firmware via the network New firmware that provides additional features or product improvements will be released as needed. If the unit is connected to the Internet, you can download the firmware via the network and update it. Notes •... -
Page 47: Additional Information
As a safety precaution, capability to turn on the power This unit fails to turn three times consecutively. If the unit is in is disabled. Contact your nearest Yamaha dealer or — this condition, the standby indicator on the service center to request repair. - Page 48 Troubleshooting Problem Cause Remedy page The + and – wires are connected in Connect the speaker wires to the correct + and – There is a lack of bass reverse at the amplifier or the speakers. phase. and no ambience. Incorrect cable connections.
- Page 49 Troubleshooting ■ Tuner Problem Cause Remedy page The particular characteristics of the FM Check the antenna connections. FM stereo stereo broadcasts being received may Try using a high-quality directional FM antenna. reception is cause this problem when the transmitter is noisy.
- Page 50 Troubleshooting ■ USB and network Problem Cause Remedy page The USB device is not connected to the Turn off the unit, reconnect your USB device, and The unit does not — USB jack securely. turn the unit on again. detect the USB device.
- Page 51 Troubleshooting ■ Remote control Problem Cause Remedy page Wrong distance or angle. The remote control will function within a maximum The remote control range of 6 m (20 ft) and no more than 30 degrees off- does not work nor axis from the front panel.
-
Page 52: Error Indications On The Front Display
Error indications on the front display Error indications on the front display Message Cause Remedy Access to the PC is denied. Configure the sharing settings and select the unit as a device to Access denied which music contents are shared (p.24). The unit cannot access the USB device. -
Page 53: Trademarks
Trademarks Trademarks “Made for iPod,” “Made for iPhone,” and “Made for iPad” mean that an electronic accessory has been designed to connect specifically to iPod, iPhone, or iPad, respectively, and has been certified by the developer to meet Apple performance standards. Apple is not responsible for the operation of this device or its compliance with safety and regulatory standards. -
Page 54: Specifications
Specifications Specifications AUDIO SECTION FM SECTION • Minimum RMS Output Power • Tuning range (20 Hz to 20 kHz, 0.04% THD, 8 ) ......80W + 80W [U.S.A. and Canada models] ......87.5 to 107.9 MHz • Dynamic power per channel (IHF) [Asia and General models] .. -
Page 55: Index
Index Index FM/AM radio tuning ............17 FORMAT (Signal Info, OPTION menu) ....... 33 ADVANCED SETUP menu.......... 37 AirPlay................27 AM antenna connection ..........12 Gateway ................. 35 AM radio listening ............17 Audio device connection ..........10 Audio file format (PC/NAS).......... 24 Headphones .............. - Page 56 Index Network Update (Network Setup, SETUP menu)..36 Sleep timer ..............16 NewFwAvailable............42 SP IMP. (ADVANCED SETUP menu)......37 NOW PLAYING key (Internet radio)......26 Speaker cable connection..........11 NOW PLAYING key (iPod) ......... 20 Speaker impedance ..........11, 37 NOW PLAYING key (Pandora) ........
- Page 58 Comme les sons trop forts causent des lésions auditives qui ne peuvent être détectées qu’à long terme, lorsqu’il est trop tard, Yamaha et le Groupe des Entreprises Électroniques Grand Public de l’Association des Industries Électroniques vous déconseillent l’écoute prolongée à des volumes excessifs.
- Page 59 être déterminé en Toute modification non approuvée expressément par « ÉTEIGNANT » et en « RALLUMANT » le produit, Yamaha peut invalider l’autorisation, accordée par la l’utilisateur est invité à essayer de corriger le problème FCC, d’utiliser ce produit.
- Page 60 1 Pour utiliser l’appareil au mieux de ses possibilités, lisez 14 Ne tentez pas de modifier ni de réparer l’appareil. Consultez attentivement ce mode d’emploi. Conservez-le soigneusement le service Yamaha compétent pour toute réparation qui serait pour référence. requise. Le coffret de l’appareil ne doit jamais être ouvert, quelle que soit la raison.
- Page 61 Table des matières INTRODUCTION OPÉRATIONS AVANCÉES Fonctionnalités utiles..........2 Configuration de réglages de lecture distincts Accessoires fournis ............. 3 pour différentes sources de lecture Commandes et fonctions ..........4 (menu OPTION)............33 Panneau avant ..............4 Éléments du menu OPTION........33 Afficheur de la face avant..........
- Page 62 • Lecture de musique sur iPhone ou appareil Android • Pour télécharger l’application ou lire les dernières informations en date, surfez sur l’App Store ou Google Play et cherchez « NP Controller ». Pour plus de détails, rendez-vous sur le site internet de Yamaha.
- Page 63 Accessoires fournis Accessoires fournis Vérifiez que les accessoires suivants sont fournis avec le produit. Télécommande Antenne AM Antenne FM Piles (x2) (AAA, R03, UM-4) CODE SET SOURCE RECEIVER SLEEP SPEAKERS DIMMER COAX1 COAX2 OPT1 OPT2 LINE1 LINE2 LINE3 PHONO TUNER PRESET TUNING MEMORY...
-
Page 64: Commandes Et Fonctions
Commandes et fonctions Commandes et fonctions Panneau avant 4 5 6 7 8 9 1 A (alimentation) 7 CLEAR Met l’unité sous ou hors tension (veille). Efface une station FM/AM présélectionnée lorsque la source d’entrée sélectionnée est TUNER (p.19). Remarque 8 Afficheur de la face avant En mode veille, cet appareil consomme une faible quantité... - Page 65 Commandes et fonctions F Sélecteur INPUT Sélectionne la source d’entrée que vous souhaitez écouter. G Commande BASS Augmente ou réduit la réponse dans les basses fréquences. La position centrale produit une réponse plate (p.15). H Commande TREBLE Augmente ou réduit la réponse dans les hautes fréquences. La position centrale produit une réponse plate (p.15).
-
Page 66: Afficheur De La Face Avant
Commandes et fonctions Afficheur de la face avant VOL. SLEEP SP A STEREO TUNED SP B MUTE 1 Affichage des informations Affiche le statut actuel (nom d’entrée et nom du mode sonore par exemple). Vous pouvez changer les informations affichées en appuyant sur DISPLAY (p.32). -
Page 67: Panneau Arrière
1 Prises PHONO B Prises REMOTE IN/OUT Pour le raccordement à un tourne-disque (p.10). Si vous possédez un autre composant Yamaha doté comme cet appareil de connecteurs REMOTE pour 2 Prises OPTICAL 1-2 commande à distance, un émetteur infrarouge n’est pas Pour le raccordement à... -
Page 68: Télécommande
Cette section décrit la fonction de chaque touche de la Touches de sélection d’entrée télécommande utilisée pour commander cet appareil ou Sélectionnez une source d’entrée pour la lecture. d’autres composants fabriqués par Yamaha ou d’autres COAX 1-2 Prises COAXIAL 1-2 fabricants. -
Page 69: Utilisation Des Télécommandes
Commandes et fonctions Utilisation des télécommandes ■ Installation des piles Piles AAA, R03, UM-4 ■ Portée de la télécommande Les télécommandes émettent un faisceau infrarouge directionnel. Veillez à diriger les télécommandes directement vers le capteur de télécommande situé sur le panneau avant de cet appareil. -
Page 70: Préparations
PRÉPARATIONS Raccordements Raccordements Raccordement des enceintes et des composants source ATTENTION • Ne raccordez pas cet appareil ou d’autres composants au secteur tant que toutes les connexions entre les composants ne sont pas établies. • Toutes les connexions doivent être correctes : L (gauche) à L, R (droite) à R, « + » à « + » et « – » à « – ». Si le raccordement est défectueux, aucun son n’est émis par l’enceinte, et si la polarité... -
Page 71: Raccordements Des Enceintes
Raccordements ■ Raccordement via une fiche banane Raccordements des enceintes Serrez le bouton et insérez la fiche banane dans l’extrémité de la borne correspondante. ■ Réglage de l’impédance des enceintes L’unité est configurée pour des enceintes 8 ohms par défaut. Lorsque vous raccordez des enceintes 4 à 6 ohms, Fiche banane réglez l’impédance d’enceinte sur «... -
Page 72: Raccordement Des Antennes Fm Et Am
Branchez correctement chaque antenne sur les bornes prévues à cet effet. Remarque Si la réception devait être mauvaise, installez une antenne extérieure. Pour de plus amples détails concernant cette question, veuillez consulter un revendeur ou service après-vente Yamaha. Antenne AM (fournie) •... -
Page 73: Raccordement À Un Réseau
Raccordements Raccordement à un réseau Vous pouvez écouter la radio Internet ou lire des fichiers de musique stockés sur des serveurs multimédias, de type PC et « Network Attached Storage » (NAS), sur l’unité. Raccordez l’unité à votre routeur au moyen d’un câble de réseau STP (câble droit CAT-5 ou supérieur) disponible dans le commerce. -
Page 74: Opérations De Base
OPÉRATIONS DE BASE Lecture Lecture ATTENTION Soyez extrêmement attentif lorsque vous lisez des CD codés en DTS. Si vous lisez un CD codé en DTS sur un lecteur de CD qui ne prend pas en charge le DTS, vous n’entendrez que du bruit. Celui-ci peut endommager vos enceintes. - Page 75 Lecture ■ Réglage des commandes BASS et ■ Réglage de la commande LOUDNESS TREBLE LOUDNESS VOLUME TREBLE HOME BASS PLAYING SETUP OPTION Les commandes BASS et TREBLE permettent de régler la réponse dans les hautes et les basses fréquences. VOLUME +/– ENTER VOLUME La position centrale produit une réponse plate.
-
Page 76: Utilisation De La Minuterie De Veille
Lecture Utilisation de la minuterie de veille Cette fonction permet de mettre automatiquement l’appareil en mode veille après un certain laps de temps. La minuterie de veille est utile lorsque vous allez vous coucher alors que l’appareil lit ou enregistre une source. CODE SET SOURCE RECEIVER... -
Page 77: Écoute D'émission Fm/Am
Écoute d’émission FM/AM Écoute d’émission FM/AM Remarques Syntonisation FM/AM • Lorsque vous appuyez sur les touches numériques de la télécommande pendant une syntonisation présélectionnée, un numéro de présélection est sélectionné. Réglez le mode de LINE1 LINE2 LINE3 PHONO syntonisation sur le mode de syntonisation de fréquence à l’aide TUNER TUNER des touches TUNING H / I avant d’enfoncer les touches... -
Page 78: Syntonisation Automatique (Uniquement Pour Les Stations Fm)
Écoute d’émission FM/AM Syntonisation automatique VOL. SP A 01:FM 87.5 MHz (uniquement pour les stations FM) Vous pouvez utiliser la fonction de mise en mémoire Numéro de présélection Fréquence automatique de stations pour présélectionner Une fois le balayage terminé, « FINISH » s’affiche, automatiquement des stations FM. -
Page 79: Rappel D'une Station Présélectionnée
Écoute d’émission FM/AM Rappel d’une station Effacement d’une station présélectionnée présélectionnée Vous pouvez rappeler des stations présélectionnées qui ont Effacez les stations radio enregistrées sur les numéros de été mises en mémoire à l’aide de la fonction de mise en présélection. -
Page 80: Lecture De Musique Sur Un Ipod
Lecture de musique sur un iPod Lecture de musique sur un iPod Grâce au câble USB fourni avec l’iPod, vous pouvez lire la musique qu’il contient sur l’unité. Remarque Lecture du contenu d’un iPod L’iPod peut ne pas être détecté par l’unité. Certaines fonctions risquent de ne pas être compatibles selon le modèle ou la version Suivez la procédure ci-après pour utiliser le contenu de du logiciel de l’iPod. - Page 81 Lecture de musique sur un iPod ■ Réglages pour une lecture aléatoire/ Utilisez les touches de télécommande suivantes pour contrôler la lecture. répétée Vous pouvez configurer les réglages de lecture aléatoire/ Touches répétée de votre iPod. d’opération Fonction d’appareil externe Si la source d’entrée correspond à...
-
Page 82: Lecture De Musique Stockée Sur Un Dispositif De Stockage Usb
Lecture de musique stockée sur un dispositif de stockage USB Lecture de musique stockée sur un dispositif de stockage USB Sur l’unité, vous pouvez lire des fichiers de musique stockés sur un dispositif de stockage USB. Reportez-vous au mode d’emploi du dispositif de stockage USB pour plus d’informations. L’unité... - Page 83 Lecture de musique stockée sur un dispositif de stockage USB • Pour revenir à l’écran précédent, appuyez sur RETURN. • Vous pouvez changer les informations de lecture affichées sur l’afficheur de la face avant en appuyant plusieurs fois sur DISPLAY (p.32). •...
-
Page 84: Lecture De Musique Stockée Sur Des Serveurs Multimédias (Pc/Nas)
Choisissez « Bibliothèque », puis « Partage des fichiers multimédias ». Cochez la case « Partager mes fichiers multimédias dans », cliquez sur l’icône « R-N500 » puis sur « Autorisé ». Cliquez sur « Activer la diffusion multimédia Cliquez sur « OK » pour quitter. -
Page 85: Playback Of Pc Music Contents
Lecture de musique stockée sur des serveurs multimédias (PC/NAS) Utilisez les touches de télécommande suivantes pour Playback of PC music contents contrôler la lecture. Suivez la procédure ci-après pour utiliser le contenu Touches musical du PC et démarrer la lecture. d’opération Fonction d’appareil... -
Page 86: Écoute De La Radio Internet
Écoute de la radio Internet Écoute de la radio Internet Vous pouvez écouter les stations de radio Internet du monde entier. Remarques • Pour revenir à l’écran précédent, appuyez sur RETURN. • Pour utiliser cette fonction, l’unité doit être raccordée à Internet •... -
Page 87: Lecture De Musique Issue D'itunes Ou D'un Ipod Via Un Réseau (Airplay)
Lecture de musique issue d’iTunes ou d’un iPod via un réseau (AirPlay) Lecture de musique issue d’iTunes ou d’un iPod via un réseau (AirPlay) La fonction AirPlay vous permet de lire de la musique issue d’iTunes ou d’un iPod sur l’unité via un réseau. Sélectionnez un morceau et démarrez la lecture. -
Page 88: Écoute Du Service Pandora
Écoute du service Pandora Écoute du service Pandora Le service Pandora est uniquement disponible aux Appuyez à plusieurs reprises sur NET pour États-Unis, en Australie et en Nouvelle-Zélande. sélectionner « Pandora » comme source Pandora est un service de radio Internet personnalisé et d’entrée. -
Page 89: Création De Stations Pandora
Écoute du service Pandora Si vous sélectionnez « Activation » à l’étape 2 Appuyez sur OPTION. Prenez note de l’adresse Internet et du code actif apparaissant sur l’afficheur de la face avant. Utilisez les touches de curseur (B / C) pour VOL. -
Page 90: Écoute De Stations Pandora
Écoute du service Pandora Écoute de stations Pandora Si nécessaire, effectuez la procédure suivante. Si vous avez créé des stations Pandora, effectuez la Pour évaluer une plage procédure ci-dessous pour sélectionner la station Pandora Quand les informations de lecture sont affichées, que vous voulez écouter. -
Page 91: Suppression De Stations Pandora
Écoute du service Pandora Suppression de stations Pandora Modification de comptes Pandora La procédure suivante décrit la suppression d’une station Vous pouvez enregistrer jusqu’à 8 comptes Pandora sur Pandora que vous avez créée. l’appareil. Effectuez la procédure ci-dessous pour ajouter ou supprimer des comptes Pandora ou pour passer d’un compte Pandora à... -
Page 92: Changement Des Informations Présentées Sur L'afficheur De La Face Avant
Changement des informations présentées sur l’afficheur de la face avant Changement des informations présentées sur l’afficheur de la face avant Si vous avez sélectionné une source USB ou une source réseau comme source d’entrée, vous pouvez changer les informations de lecture présentes sur l’afficheur de la face avant. HOME PLAYING SETUP... -
Page 93: Opérations Avancées
OPÉRATIONS AVANCÉES Configuration de réglages de lecture distincts pour différentes sources de lecture (menu OPTION) Configuration de réglages de lecture distincts pour différentes sources de lecture (menu OPTION) Vous pouvez configurer des réglages de lecture distincts pour différentes sources de lecture. Ce menu permet de configurer facilement les paramètres durant la lecture. -
Page 94: Configuration Des Diverses Fonctions (Menu Setup)
Configuration des diverses fonctions (menu SETUP) Configuration des diverses fonctions (menu SETUP) Ce menu permet de régler les divers paramètres de l’appareil. Éléments de menu SETUP HOME PLAYING SETUP OPTION SETUP Élément de menu Fonction Page Touches de curseur ENTER VOLUME ENTER Affiche les informations... -
Page 95: Network Setup
Configuration des diverses fonctions (menu SETUP) Network Setup Utilisez les touches de curseur (B / C) ou les touches numériques pour modifier une valeur. Configure les réglages de réseau. ■ Information Pour quitter le menu, appuyez sur SETUP. Affiche les informations réseau sur l’unité. ■... -
Page 96: Max Volume
Sélectionne le mode d’alimentation de l’accessoire AV Plage de réglage -30,0 dB à +15,0 dB (incréments de 5,0 dB), +16,5 dB Yamaha connecté à la prise DC OUT. Alimente l’appareil externe via la prise DC OUT en Réglage par défaut Cont continu, que l’unité... -
Page 97: Configuration Des Paramètres Du Système (Menu Advanced Setup)
(par défaut sous tension. : ID2). Lors de l’utilisation de plusieurs récepteurs AV Les nouveaux réglages prennent effet. Yamaha, vous pouvez régler chaque télécommande avec un seul ID de commande pour leur récepteur Éléments de menu ADVANCED correspondant. -
Page 98: Restauration Des Réglages Par Défaut (Init)
Configuration des paramètres du système (menu ADVANCED SETUP) Restauration des réglages par Vérification de la version du défaut (INIT) microprogramme (VERSION) INIT CANCEL VERSION xx.xx Restaure les réglages par défaut de l’unité. Vérifiez la version du microprogramme actuellement installé sur l’unité. Choix Restaure les réglages par défaut de l’unité. -
Page 99: Commande D'appareils Externes Avec La Télécommande
Commande d’appareils externes avec la télécommande Commande d’appareils externes avec la télécommande Vous pouvez utiliser la télécommande de l’unité pour contrôler les appareils externes de type lecteurs de CD si vous avez enregistré le code de télécommande de l’appareil externe. Remarques •... -
Page 100: Enregistrement Des Codes De Télécommande Pour Des Appareils De Lecture
Commande d’appareils externes avec la télécommande ■ Commande d’un appareil de lecture Enregistrement des codes de Une fois le code de télécommande associé à votre appareil télécommande pour des appareils de lecture enregistré, vous pouvez le commander à l’aide des touches suivantes après avoir sélectionné la source de lecture d’entrée ou la scène. -
Page 101: Réinitialisation Des Codes De Télécommande
Commande d’appareils externes avec la télécommande Réinitialisation des codes de télécommande Vous pouvez initialiser les codes de télécommande assignés à chaque touche de sélection d’entrée et retrouver les assignations d’usine. CODE SET CODE SET SOURCE RECEIVER SLEEP SPEAKERS DIMMER HOME PLAYING SETUP OPTION... -
Page 102: Mise À Jour Du Microprogramme De L'unité Via Le Réseau
Mise à jour du microprogramme de l’unité via le réseau Mise à jour du microprogramme de l’unité via le réseau De nouveaux microprogrammes proposant des fonctions supplémentaires ou des améliorations du produit seront publiés le cas échéant. Si l’unité est connectée à Internet, vous pouvez télécharger le microprogramme via le réseau et le mettre à jour. -
Page 103: Informations Complémentaires
Reportez-vous au tableau suivant si l’appareil ne fonctionne pas comme il devrait. Si le problème que vous rencontrez n’est pas mentionné ci-dessous, ou encore si les actions correctives suggérées sont sans effet, mettez l’appareil en mode veille, débranchez le cordon d’alimentation et prenez contact avec le revendeur ou le service après-vente agréé Yamaha le plus proche. - Page 104 Guide de dépannage Voir la Anomalies Causes possibles Actions correctives page Les raccordements des câbles sont Raccordez correctement les câbles. Si l’anomalie Seule l’enceinte de incorrects. persiste, il se peut que les câbles soient défectueux. gauche ou de droite émet des sons. Réglage incorrect de la commande Réglez la commande BALANCE sur la position BALANCE.
- Page 105 Guide de dépannage ■ Syntoniseur Voir la Anomalies Causes possibles Actions correctives page Les caractéristiques particulières des Vérifiez les raccordements de l’antenne. La réception émissions FM stéréophoniques reçues Essayez d’utiliser une antenne FM directionnelle de FM en sont à l’origine de cette anomalie si bonne qualité.
- Page 106 Guide de dépannage ■ USB et réseau Voir la Anomalies Causes possibles Actions correctives page Le dispositif USB n’est pas correctement Mettez l’unité hors tension, rebranchez votre L’unité ne détecte pas — raccordé à la prise USB. dispositif USB et remettez l’unité sous tension. le dispositif USB.
- Page 107 Guide de dépannage ■ Télécommande Voir la Anomalies Causes possibles Actions correctives page Distance ou angle incorrect. La télécommande fonctionne jusqu’à une portée de 6 La télécommande ne m et à un angle de 30 degrés maximum par rapport au fonctionne pas panneau avant.
-
Page 108: Signalement D'erreurs Sur L'afficheur De La Face Avant
Signalement d’erreurs sur l’afficheur de la face avant Signalement d’erreurs sur l’afficheur de la face avant Message Causes possibles Actions correctives L’accès au PC est refusé. Configurez les paramètres de partage et sélectionnez l’unité Access denied comme un appareil sur lequel des contenus musicaux sont partagés (p.24). -
Page 109: Marques Commerciales
Marques commerciales Marques commerciales « Made for iPod », « Made for iPhone », et « Made for iPad » signifient qu’un accessoire électronique a été conçu pour se raccorder spécifiquement à un iPod, un iPhone ou un iPad et a été certifié par le développeur pour répondre aux normes de performance Apple. -
Page 110: Caractéristiques Techniques
Caractéristiques techniques Caractéristiques techniques SECTION AUDIO SECTION FM • Puissance de sortie minimum efficace • Gamme de syntonisation (20 Hz à 20 kHz, 0,04% DHT, 8 ) ......80W + 80W [Modèles pour les États-Unis et le Canada] ..87,5 à 107,9 MHz •... -
Page 111: Index
Index Index Fichier audio (dispositif de stockage USB) ....22 Fichier audio, format (PC/NAS) ........24 Afficheur de la face avant, changement Filter (MAC Filter, menu SETUP) ........ 35 d’informations............32 FM, écoute d’émissions ..........17 AirPlay................27 FORMAT (Signal Info, menu OPTION) ....... 33 Aléatoire (PC/NAS)............ - Page 112 Index Network Update (Network Setup, menu SETUP)..36 Touche MODE..............8 NewFwAvailable............42 Touche MUTE ..............8 NOW PLAYING key (PC/NAS)........25 Touche NOW PLAYING (dispositif de stockage USB) ........22 Touche NOW PLAYING (iPod) ........20 Pandora, compte ............28, 31 Touche NOW PLAYING (Pandora)......
-
Page 113: Information About Software
❚ Information about software PARTICULAR PURPOSE ARE DISCLAIMED. IN NO EVENT SHALL THE FOUNDATION OR ❚ Information sur le logiciel CONTRIBUTORS BE LIABLE FOR ANY DIRECT, This product uses the following free software. INDIRECT, INCIDENTAL, SPECIAL, EXEMPLARY, For information (copyright, etc) about each software, read OR CONSEQUENTIAL DAMAGES (INCLUDING, the original sentences stated below. - Page 114 The authors make NO WARRANTY or representation, THE SOFTWARE IS PROVIDED “AS IS”, WITHOUT either express or implied, with respect to this software, its WARRANTY OF ANY KIND, EXPRESS OR IMPLIED, quality, accuracy, merchantability, or fitness for a INCLUDING BUT NOT LIMITED TO THE particular purpose.
- Page 115 ■ About PNG Reference Library 4. Neither the name of the University nor the names of its contributors may be used to endorse or promote ibpng versions 1.2.6, August 15, 2004, through 1.4.5, products derived from this software without specific December 9, 2010, are Copyright ©...
- Page 116 2. Redistributions in binary form must reproduce the above copyright notice, this list of conditions and the following disclaimer in the documentation and/or other Do not disassemble, decompile, or reverse engineer the materials provided with the distribution. software included in Yamaha AV products.
-
Page 117: List Of Remote Control Codes
LIST OF REMOTE CONTROL CODES LISTE DES CODES DE COMMANDE Ausind 0171 Clatronic 0161, 0171, 0282, Durabrand 0031, 0051, 0179, Autovox 0171, 0282, 0337, 0320, 0323, 0337, 0215 0339, 0342 0340, 0342, 0343, 0349 Aventura 0051 A.R. Systems 0320 0350, 0351 Dwin 0178 0277, 0282... - Page 118 0012, 0014, 0015, Magnafon 0171, 0277, 0341, Fujitsu Siemens 0504, 0505, 0507, Hinari 0320, 0323, 0340, 0056, 0064, 0065, 0342 0510, 0511 0343, 0344, 0349, 0067, 0169, 0174, Funai 0051, 0058, 0059, 0350 Magnavox 0008, 0009, 0010, 0297, 0314, 0344, 0013, 0026, 0032, 0112, 0113, 0115, Hisawa...
- Page 119 Philips 0008, 0009, 0010, Radiotone 0161, 0320, 0323, 0277, 0282, 0320, Neckermann 0161, 0282, 0320, 0011, 0012, 0032, 0323, 0337, 0341, 0339, 0342, 0346, 0350 0048, 0049, 0052, 0342, 0344, 0349, 0349, 0350, 0351 Rank 0344 0122, 0128, 0134, 0008, 0021, 0024, 0382 0320, 0349, 0350 0186, 0187, 0213,...
- Page 120 Toshiba 0018, 0019, 0040, Daewoo 1009, 1025, 1030, Supra 0323, 0343 Yamaha 0008, 0026, 0050, 0041, 0046, 0073, 1038, 1069, 1223 Supre-Macy 0057 0053, 0080, 0081, 0100, 0103, 0108, Supreme 0055, 0107 0082, 0083, 0086, Dansai 1008, 1009, 1029 0109, 0111, 0121,...
- Page 121 1031 Linksys 1016 1113, 1116, 1117, Solavox 1030 XR-1000 1068, 1069 Lloyd’s 1069 1122, 1126, 1210, Sonic Blue 1022, 1123 Yamaha 1064, 1065 Loewe Opta 1028, 1031 1211 Sonneclair 1008 Yamishi 1008, 1029 Logik 1008, 1029 Philips Magnavox 1076 Sonoko...
- Page 122 Desay 2205 Kawasaki 2149 Panasonic 2011, 2024, 2034, Alba 2064, 2165, 2186, Kennex 2362 2042, 2058, 2062, 2337, 2346 Diamond 2354, 2355 Kenwood 2041, 2151, 2348 Alco 2149 DiamondVision 2225, 2232 2066, 2067, 2093, KeyPlug 2362 2116, 2117, 2118, Alize 2361 Disney 2010, 2028...
- Page 123 Scientific Labs 2355 Toshiba 2086 Filmnet Cablecrypt Scott 2161, 2357 TRANScontinents2363, 2367 Victor 2475 3111 Seeltech 2364 Transonic 2367 Yamaha 2089, 2118 Filmnet Comcrypt 2161, 2355, 2363, Trio 2362 3111 2380 Trutech 2242 Finlux 3097 DVD Recorder Sharp 2006, 2040, 2088,...
- Page 124 Grothusen 4001, 4049 Proscan 3066, 3093 Alltech 4217 DIRECTV 4056, 4064, 4067, Grundig 4004, 4006, 4015, Pulsar 3122 Alpha 4053 4068, 4070, 4071, 4035, 4211, 4218, PVP Stereo Visual Matrix Alpha Digital 4104 4074, 4107, 4116, 4222, 4246 3018 Alphastar 4077 4119, 4121, 4122, Hänsel &...
- Page 125 4055, 4217 Rainbow 4004 Techniland 4012 Motorola 4019, 4088, 4090, 4066, 4093, 4112, TechniSat 4014, 4021, 4026, Yamaha 5082, 5095, 5114 4091 4113, 4116, 4118, 4027, 4038, 4039, Multichoice 4222, 4246 4119, 4197, 4122, 4053, 4212, 4213, CD Recorder Multitec...
- Page 128 © 2013 Yamaha Corporation Printed in Malaysia ZH44700...