Table des Matières
Publicité
Les langues disponibles
Les langues disponibles
Liens rapides
Publicité
Table des Matières

Manuels Connexes pour GoodHome bamia GHMF71


Sommaire des Matières pour GoodHome bamia GHMF71
- Page 1 bamia GHMF71 3663602434399 V10319...
-
Page 2: Table Des Matières
EN Contents FR Contenu PL Zawartość RO Cuprins Preparation Préparation Czynności wstępne Pregătire Installation Installation Montaż Instalare Utilisation Użytkowanie Utilizare Care and Maintenance Entretien et maintenance Czyszczenie i konserwacja Îngrijire și întreținere... - Page 3 EN IMPORTANT - Please read FR IMPORTANT : lire PL WAŻNE — przed użyciem RO IMPORTANT - Citiți cu carefully the separate attentivement le guide de należy się uważnie zapoznać atenție ghidul separat safety guide before use. sécurité avant utilisation. z dołączonymi oddzielnie privind siguranța înainte de informacjami dotyczącymi utilizarea produsului.
-
Page 4: Installation
EN Installation FR Installation PL Montaż RO Instalare Installation Montaż • This appliance must be installed correctly by a • To urządzenie musi zostać prawidłowo zamontowane qualified person, strictly following the manufacturer’s przez wykwalifikowaną osobę, ściśle przestrzegającą instructions. instrukcji producenta. •... -
Page 5: Installation Of Built-In Ovens
EN Installation FR Installation PL Montaż RO Instalare 35 mm 35 mm >= 5mm >= 5mm 35 mm Installation of Built-in Ovens Montaż piekarników do zabudowy • For correct installation, this appliance can be fitted • Aby zapewnić prawidłową instalację, urządzenie under the work surface in a built under housing unit or można zamontować... - Page 6 EN Installation FR Installation PL Montaż RO Instalare The diagram above shows the air circulation requirements including a slot that should be cut into the plinth if fitted. It is essential when installing your oven there is adequate air circulation around the appliance to ensure the correct operation of the appliance.
- Page 7 EN Installation FR Installation PL Montaż RO Instalare Important: Do not lift the appliance by the door handle to avoid potential damage to the glass and hinges. Caution! If the supply cord is damaged, it must be replaced by the manufacturer, its service agent or similarly qualified persons in order to avoid a hazard.
- Page 8 EN Installation FR Installation PL Montaż RO Instalare [09] [07] x 2 [07] [08] [08] x 2 [09] x 2 Once the oven has been lifted into place inside the appliance housing, locate the two holes in the casing of the oven and fix it into place using [07], [08] and [09]. Caution: Do not over tighten the screws [07] to avoid damage to the oven or appliance housing - use a screwdriver only! Une fois que le four est placé...
-
Page 9: Electrical Installation
EN Installation FR Installation PL Montaż RO Instalare Electrical Installation All installation must be carried out by a competent person or qualified electrician. Before connecting the mains supply ensure that the mains voltage corresponds to the voltage on the rating plate. Direct Connection The appliance must be connected directly to the mains using an omnipolar circuit breaker with a minimum opening of 3 mm between the contacts. -
Page 10: Installation Électrique
EN Installation FR Installation PL Montaż RO Instalare Installation électrique Toute l’installation doit être effectuée par une personne compétente ou un électricien qualifié. Avant de raccorder le câble d’alimentation, s’assurer que la tension de secteur correspond à la tension indiquée sur la plaque signalétique. Raccordement direct L’appareil doit être raccordé... -
Page 11: Instalacja Elektryczna
EN Installation FR Installation PL Montaż RO Instalare Instalacja elektryczna Montaż musi zostać wykonany przez osobę kompetentną lub wykwalifikowanego elektryka. Przed podłączeniem zasilania upewnić się, czy napięcie zasilania odpowiada napięciu na tabliczce znamionowej. Podłączenie bezpośrednie Urządzenie należy podłączyć bezpośrednio do sieci zasilającej, korzystając z wyłącznika wielobiegunowego o minimalnym odstępie między stykami wynoszącym 3 mm. - Page 12 EN Installation FR Installation PL Montaż RO Instalare Conectarea la alimentarea electrică Instalarea trebuie să fie realizată în totalitate de o persoană competentă sau de un electrician calificat. Înainte de conectarea la rețeaua electrică, asigurați-vă că tensiunea rețelei corespunde cu tensiunea de pe plăcuța de identificare.
-
Page 13: Before You Start
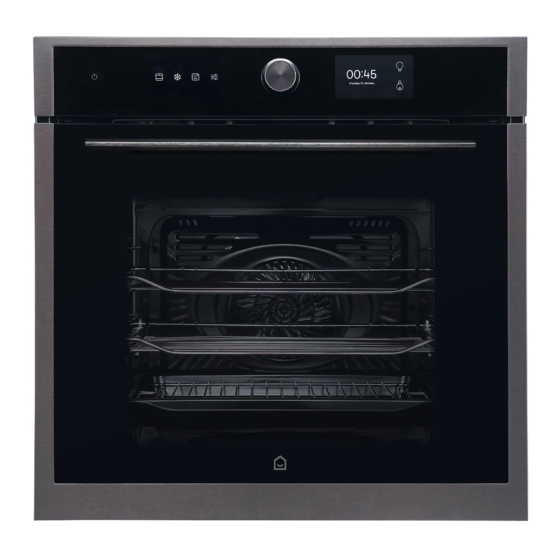
EN Use FR Utilisation PL Użytkowanie RO Utilizare Before you start WARNING: Read the instructions before using the appliance. Switch on the appliance at the switched fused connection unit. The appliance will beep once and is ready for use. Function and setting Control panel Oven lamp (x 2) Mains cable (at rear, not shown) -
Page 14: Użytkowanie
EN Use FR Utilisation PL Użytkowanie RO Utilizare Turning the oven on and off 1. Touch the Master On/Off Key once to turn on the oven, and once more to turn it off. The oven will beep once to confirm in each case. 2. -
Page 15: Using Your Oven
EN Use FR Utilisation PL Użytkowanie RO Utilizare Reset to factory default options 1. Touch the Factory Reset Key and the reset message appears on the Right Touch Screen. 2. Touch the Tick or Cross to reset or cancel and return to the Settings menu. Using your oven Before first use •... -
Page 16: Practical Cooking Advice
EN Use FR Utilisation PL Użytkowanie RO Utilizare 150-250°C The inner heating element and the upper heating element are both Double grill working. Ideal for grilling flat items and for browning foods. (180°C) 30-220°C Only the lower heating element is working. Ideal for pies or pastries where a Bottom crispy base is desired. - Page 17 EN Use FR Utilisation PL Użytkowanie RO Utilizare GRILL & FAN Food Temperature setting (ºC) Recommended shelf Cooking time in minutes position from the bottom Chicken 55-65 Goose 75-88 Roasted joint of pork 135-150 DOUBLE GRILL Toast Choosing a Cooking Mode •...
- Page 18 EN Use FR Utilisation PL Użytkowanie RO Utilizare Adjusting the temperature • Eject the 360° Control Knob (if necessary) and rotate it to set the desired temperature on the Right Touch Screen. Adjusting the timer (optional) • If required, touch the Timer Dial and rotate the 360° Control Knob to set the timer from 1 minute to 4 hours.
- Page 19 EN Use FR Utilisation PL Użytkowanie RO Utilizare Using Defrost To defrost manually 1. From the Main Menu, choose the Defrost Key to enter the Defrost Menu. There is one option shown on the Left Touch Screen and the Timer options are shown on the Right Touch Screen. 07:15 Timer 2.
- Page 20 EN Use FR Utilisation PL Użytkowanie RO Utilizare 4. On the Right Touch Screen select the Temperature and Time required, for example: Standard Mode, 180°C, 01:30. 5. Touch the “Save a preset” Key to store this to memory. 6. The Preset number created will be displayed on the screen; touch the Tick to exit and the Preset is shown in the Left Touch Screen.
- Page 21 EN Use FR Utilisation PL Użytkowanie RO Utilizare Child Lock Wherever the padlock is shown on screen, the Child Lock can be applied. This will deactivate both screens and the 360° Control Knob. To Lock Touch the padlock and a large padlock will then show in the centre of the Right Touch Screen. 19:45 Thursday 21 June To Unlock...
-
Page 22: Avant De Commencer
EN Use FR Utilisation PL Użytkowanie RO Utilizare Avant de commencer AVERTISSEMENT : lire les instructions avant d’utiliser l’appareil. Mettre l’appareil en marche sur l’unité de raccordement avec fusibles et interrupteur. L’appareil émet un signal sonore et est prêt à l’emploi. Fonction et réglage Panneau de commande Lampe du four (x 2) -
Page 23: Allumage Et Arrêt Du Four
EN Use FR Utilisation PL Użytkowanie RO Utilizare Allumage et arrêt du four 1. Appuyer sur la touche principale de marche/arrêt une fois pour allumer le four, et une fois de plus pour l’éteindre. Le four émet un signal sonore pour confirmer dans chaque cas. 2. -
Page 24: Utilisation Du Four
EN Use FR Utilisation PL Użytkowanie RO Utilizare Réglage du volume d’alerte 1. Appuyer sur la touche principale de volume . La commande correspondante apparaît sur l’écran tactile droit. 2. Tourner le bouton de commande 360° pour sélectionner le réglage du volume entre 0 et 3. Le volume par défaut est 3. - Page 25 EN Use FR Utilisation PL Użytkowanie RO Utilizare Pour une cuisson économe en énergie. La plage de température du thermostat est plus grande et chute à une température plus basse 140-240°C pour économiser de l’énergie. Le four chauffe jusqu’à une température ÉCO plus élevée, puis s’arrête et bascule ensuite sur des températures (140°C)
- Page 26 EN Use FR Utilisation PL Użytkowanie RO Utilizare STANDARD Aliments Réglage de la Position de la grille Temps de cuisson en température (°C) recommandée à partir du bas minutes Petits gâteaux 175-185 16-19 Génoise 180-185 20-25 Pizza 205-210 18-23 Gâteau aux pommes et à la 185-195 25-50 levure...
- Page 27 EN Use FR Utilisation PL Użytkowanie RO Utilizare TOURNER ET APPUYER Conseil rapide : à partir du menu principal, il suffit de tourner le bouton de commande 360° dans le sens horaire ou antihoraire pour accéder instantanément au mode de cuisson Standard à sa température par défaut de 180°C.
- Page 28 EN Use FR Utilisation PL Użytkowanie RO Utilizare Remarque : si la cuisson ne commence pas, le four revient au menu principal après cinq minutes. Touche d'éclairage du four (orange s'il Touche d'arrêt de cuisson fonctionne) Heure actuelle Température interne du four (ne s'affiche pas quand la température sélectionnée est atteinte) Minuterie Touche de pause de cuisson...
-
Page 29: Préréglages
EN Use FR Utilisation PL Użytkowanie RO Utilizare Préréglages Il est possible de créer et de sauvegarder jusqu’à 12 préréglages reprenant les réglages favoris de l’utilisateur. Ces préréglages peuvent être utilisés à tout moment. Chaque préréglage peut comprendre le mode de cuisson ou de décongélation, la température et le temps de cuisson. Création d’un préréglage 1. -
Page 30: Verrouillage
EN Use FR Utilisation PL Użytkowanie RO Utilizare 3. Appuyer sur le préréglage sur l’écran de gauche pour le sélectionner. Il est possible de sélectionner la fonction boost si le préréglage comprend cette option. Appuyer ensuite sur la touche de démarrage sur l’écran de droite pour commencer la cuisson. -
Page 31: Przed Rozpoczęciem Użytkowania
EN Use FR Utilisation PL Użytkowanie RO Utilizare Przed rozpoczęciem użytkowania OSTRZEŻENIE: Przed rozpoczęciem korzystania z urządzenia zapoznać się z instrukcją obsługi. Włączyć urządzenie za pomocą zestawu wyłącznika z bezpiecznikiem. Urządzenie wyemituje pojedynczy sygnał dźwiękowy i będzie gotowe do użycia. Funkcje i ustawienia Panel sterowania Oświetlenie piekarnika (x 2) -
Page 32: Włączanie I Wyłączanie Piekarnika
EN Use FR Utilisation PL Użytkowanie RO Utilizare Włączanie i wyłączanie piekarnika 1. Dotknąć raz głównego przycisku wł./wył. aby włączyć piekarnik. Dotknąć ponownie, aby go wyłączyć. Piekarnik wyemituje pojedynczy sygnał dźwiękowy, aby potwierdzić wybór w każdym przypadku. 2. Po dziesięciu minutach bezczynności piekarnik automatycznie się wyłączy. 3. -
Page 33: Przed Pierwszym Użyciem
EN Use FR Utilisation PL Użytkowanie RO Utilizare Przywracanie domyślnych ustawień fabrycznych 1. Dotknąć przycisku przywracania ustawień fabrycznych na prawym ekranie dotykowym zostanie wyświetlony komunikat o resetowaniu. 2. Dotknąć pola wyboru lub krzyżyka aby zresetować lub anulować i powrócić do menu ustawień. Korzystanie z piekarnika Przed pierwszym użyciem •... - Page 34 EN Use FR Utilisation PL Użytkowanie RO Utilizare Działa tylko górny element grzejny. 150-250°C Najlepsze rezultaty uzyskuje się, stosując górną półkę do mniejszych Grill (180°C) potraw i dolną do większych. Idealne do szybkiego pieczenia i przyrumieniania. Wewnętrzny i górny element grzejny działają łącznie z wentylatorem. Najlepsze rezultaty uzyskuje się, stosując górną...
- Page 35 EN Use FR Utilisation PL Użytkowanie RO Utilizare KONWEKCYJNY Małe wypieki 165-170 20 - 23 (jednowarstwowe) Biszkopt 160-165 30 - 40 Pizza 170-175 19 - 25 Szarlotka (jednowarstwowa) 170-175 60 - 70 Małe wypieki 2 (głęboka taca) 165-170 20-23 (dwuwarstwowe) 4 (płytka taca) Szarlotka (dwuwarstwowa) 2 (głęboka taca)
-
Page 36: Ustawianie Temperatury
EN Use FR Utilisation PL Użytkowanie RO Utilizare Timer ºC ºC Przycisk wyjścia Pokrętło regulacji temperatury Bieżący tryb pieczenia Bieżąca godzina Przycisk podwyższenia mocy (jeśli dotyczy) Pokrętło timera Przycisk blokady przed dziećmi Przycisk menu głównego Przycisk zatrzymania pieczenia Przycisk oświetlenia piekarnika Przycisk rozpoczęcia pieczenia (pomarańczowy, gdy włączone) Ustawianie temperatury... - Page 37 EN Use FR Utilisation PL Użytkowanie RO Utilizare Przycisk oświetlenia piekarnika (pomarańczowy, Przycisk zatrzymania pieczenia gdy włączone) Bieżąca godzina Wewnętrzna temperatura piekarnika (nie jest wyświetlana po osiągnięciu wybranej temperatury) Timer Przycisk wstrzymania pieczenia Gdy ustawiony: pokazuje pozostały czas Na środku wyświetlacza pojawi się duża ikona pauzy, a oba ekrany zostaną...
- Page 38 EN Use FR Utilisation PL Użytkowanie RO Utilizare 3. Na lewym ekranie dotykowym wybrać przycisk trybu pieczenia lub przycisk trybu rozmrażania . Uwaga: Jeśli został wybrany przycisk trybu pieczenia, wybrać żądany tryb pieczenia z dwóch ekranów w zwykły sposób. 4. Na prawym ekranie dotykowym wybrać żądaną temperaturę i czas, na przykład: Tryb standardowy, 180°C, 01:30.
- Page 39 EN Use FR Utilisation PL Użytkowanie RO Utilizare Usuwanie nastawy 1. W menu nastaw znaleźć zapisaną pozycję, przesuwając palcem od prawej do lewej strony, stosownie do potrzeb. 2. Dotknąć przycisku usuwania aby usunąć nastawę. 3. Na koniec dotknąć pola wyboru lub przycisku anulowania aby potwierdzić...
-
Page 40: Înainte De A Începe
EN Use FR Utilisation PL Użytkowanie RO Utilizare Înainte de a începe AVERTISMENT: Citiți instrucțiunile înainte de utilizarea aparatului. Porniți aparatul de la unitatea de conectare cu comutator de siguranță. Aparatul va emite un semnal sonor o dată și este pregătit pentru utilizare. Funcție și setare Panou de control Lampă... - Page 41 EN Use FR Utilisation PL Użytkowanie RO Utilizare Pornirea și oprirea cuptorului 1. Apăsați butonul principal de Pornire/Oprire o dată pentru a porni butonul și încă o dată pentru a-l opri. În fiecare caz, cuptorul va emite un semnal sonor de confirmare. 2.
- Page 42 EN Use FR Utilisation PL Użytkowanie RO Utilizare Resetați opțiunile implicite din fabrică 1. Atingeți butonul de resetare setări din fabrică iar pe ecranul tactil dreapta apare mesajul resetare. 2. Atingeți bifa sau crucea pentru a reseta sau a anula și a reveni la meniul Setări. Utilizarea cuptorului Înainte de prima utilizare •...
- Page 43 EN Use FR Utilisation PL Użytkowanie RO Utilizare Elementul interior de încălzire și elementul superior de încălzire funcționează împreună cu ventilatorul. Cele mai bune rezultate sunt obținute folosind raftul de sus pentru 50 °C - 250 °C Grătar și preparate mai mici și raftul de jos pentru preparate mai mari. Ventilatorul ventilator (180 °C) reduce căldura puternică...
- Page 44 EN Use FR Utilisation PL Użytkowanie RO Utilizare Tartă cu mere 170-175 60 - 70 (un singur strat) Prăjituri mici (strat dublu) 2 (tavă adâncă) 165-170 20-23 4 (tavă puțin adâncă) Tartă cu mere (strat dublu) 2 (tavă adâncă) 170-175 65-75 4 (tavă...
- Page 45 EN Use FR Utilisation PL Użytkowanie RO Utilizare Buton de ieșire Disc de selectare temperatură Mod de gătire curent Timp curent Buton de amplificare (dacă există) Disc de selectare temporizator Buton de blocare pentru copii Buton meniu principal Buton de oprire gătire Buton de lumină...
- Page 46 EN Use FR Utilisation PL Użytkowanie RO Utilizare Oprire gătire Atingeți în orice moment butonul de oprire gătire pentru a opri cuptorul și a anula temporizatorul. Folosirea funcției de Decongelare Pentru decongelare manuală 1. Din Meniul principal, alegeți butonul Decongelare pentru a accesa meniul Decongelare.
- Page 47 EN Use FR Utilisation PL Użytkowanie RO Utilizare Notă: Dacă este ales butonul Mod de gătire, selectați Modul de gătire dorit de la cele două ecrane, ca de obicei. 4. Pe ecranul tactil dreapta, selectați temperatura și timpul dorit, de exemplu: Mod standard, 180 °C, 01:30.
- Page 48 EN Use FR Utilisation PL Użytkowanie RO Utilizare 19:45 Thursday 21 June Pentru deblocare Atingeți și mențineți apăsat lacătul mare de pe ecran și se va afișa o cronometrare de trei secunde până la eliberare. NOTĂ: Puteți în continuare să opriți cuptorul de la butonul principal de Pornire/Oprire atunci când Blocarea pentru copii este activă.
-
Page 49: Accessories
EN Use FR Utilisation PL Użytkowanie RO Utilizare Accessories Akcesoria Always ensure all accessories are safely fixed to the side Przed użyciem należy zawsze upewnić się, że wszystkie rails and level before use. akcesoria są bezpiecznie umocowane w prowadnicach bocznych i wypoziomowane. To attach the side rails to the internal racks, follow these steps and ensure they are fully secure before attaching Aby przymocować... - Page 50 EN Use FR Utilisation PL Użytkowanie RO Utilizare [06] x 1 [05] x 1 [06] x 1 [02] x 2...
-
Page 51: Care And Maintenance
EN Care & maintenance Entretien et maintenance PL Czyszczenie i konserwacja RO Îngrijire și întreținere Care & maintenance Warning! Always switch the appliance off and unplug the power plug before cleaning and maintenance. • Clean the appliance regularly to ensure its safe use and reliability. •... -
Page 52: Cleaning The Oven Door
EN Care & maintenance Entretien et maintenance PL Czyszczenie i konserwacja RO Îngrijire și întreținere Cleaning the oven door WARNING! Do not force the door during removal to avoid breakage or injury. Disassemble the oven door for cleaning Fully open the door. 2. -
Page 53: Entretien Et Maintenance
EN Care & maintenance Entretien et maintenance PL Czyszczenie i konserwacja RO Îngrijire și întreținere Replacing the top bulb: Unscrew the glass cover by turning it counter-clockwise. 2. Replace the bulb with a new one of the same type. Handle the new bulb with a cloth to avoid risk of premature failure. -
Page 54: Nettoyage Des Accessoires
EN Care & maintenance Entretien et maintenance PL Czyszczenie i konserwacja RO Îngrijire și întreținere Nettoyage des accessoires Nettoyer les accessoires à l’eau chaude savonneuse à l’aide d’un chiffon humide, d’une brosse douce ou d’une éponge. Sécher soigneusement avant utilisation. Nettoyage de l’intérieur du four Ouvrir la porte et retirer tous les accessoires. -
Page 55: Remplacement Des Ampoules
EN Care & maintenance Entretien et maintenance PL Czyszczenie i konserwacja RO Îngrijire și întreținere 5. Après nettoyage, remonter la porte dans l’ordre inverse. Démontage de la vitre intérieure en vue du nettoyage Appuyer sur les encoches des deux côtés de la porte et tirer vers le haut. 2. -
Page 56: Fonctionnement Du Ventilateur De Refroidissement
EN Care & maintenance Entretien et maintenance PL Czyszczenie i konserwacja RO Îngrijire și întreținere 4. Replacer le cache. Fonctionnement du ventilateur de refroidissement Lorsque la cuisson est terminée, le ventilateur de refroidissement continue de fonctionner pendant un court instant jusqu’à... - Page 57 EN Care & maintenance Entretien et maintenance PL Czyszczenie i konserwacja RO Îngrijire și întreținere Czyszczenie bocznych prowadnic i osłon Wyjąć wszystkie akcesoria z wnętrza piekarnika. 2. Ostrożnie wymontować prowadnice boczne z osłon w sposób pokazany na rysunku. 3. Wyjąć boczne osłony z wnętrza piekarnika. 4.
-
Page 58: Wymiana Żarówek
EN Care & maintenance Entretien et maintenance PL Czyszczenie i konserwacja RO Îngrijire și întreținere Wyjmowanie wewnętrznej szyby do czyszczenia Nacisnąć wycięcia po obu stronach drzwi i pociągnąć je do góry, wysuwając z ramy. 2. Wyjąć szybę z drzwi. 3. Wyczyścić szybę wilgotną szmatką, miękką szczotką lub delikatną gąbką, a następnie wytrzeć do sucha. W przypadku silnych zabrudzeń... -
Page 59: Îngrijire Și Întreținere
EN Care & maintenance Entretien et maintenance PL Czyszczenie i konserwacja RO Îngrijire și întreținere Rozwiązywanie problemów: Błąd E01 Po wykryciu przerwy lub zwarcia w obwodzie czujnika temperatury na wyświetlaczu pojawia się kod błędu E01. W takim przypadku należy wykonać następujące czynności: Odłączyć... - Page 60 EN Care & maintenance Entretien et maintenance PL Czyszczenie i konserwacja RO Îngrijire și întreținere Curățarea ușii cuptorului AVERTISMENT! Nu forțați ușa în timpul demontării, pentru a evita ruperea sau deteriorarea. Dezasamblați ușa cuptorului pentru curățare Deschideți complet ușa. 2. Trageți complet în afară ambele siguranțe ale balamalelor. 3.
- Page 61 EN Care & maintenance Entretien et maintenance PL Czyszczenie i konserwacja RO Îngrijire și întreținere Înlocuirea becurilor Avertisment! Lăsați capacele becurilor să se răcească înainte de a înlocui becurile. Notă! Înlocuiți doar cu becuri rezistente la temperaturi înalte, cu următoarele specificații: 2 x bec cu halogen G9 de 25 W 220-240 V, T 300 °C.
- Page 62 Addresses Manufacturer • Fabricant • Producent • Producător: Kingfisher International Products Limited, 3 Sheldon Square, London, W2 6PX, United Kingdom www.kingfisher.com/products Kingfisher International Products B. V . Rapenburgerstraat 175E 1011 VM Amsterdam The Netherlands Distributor: B&Q plc, Chandlers Ford, Hants, SO53 3LE United Kingdom www.diy.com Screwfix Direct Limited, Trade House,...