
Manuels Connexes pour Leister WELDPLAST S6


Sommaire des Matières pour Leister WELDPLAST S6
- Page 1 ® WELDPLAST Leister Technologies AG Galileo-Strasse 10 CH-6056 Kaegiswil/Switzerland Tel. +41 41 662 74 74 +41 41 662 74 16 www.leister.com sales@leister.com...
- Page 2 Deutsch Bedienungsanleitung English Operating Instructions Français Instructions d’utilisation Italiano Istruzioni d’uso Español Instrucciones de funcionamiento...
- Page 3 Bedienungsanleitung (Original-Bedienungsanleitung) Bedienungsanleitung vor Inbetriebnahme aufmerksam lesen und zur weiteren Verfügung aufbewahren. Leister WELDPLAST S6 Hand-Extruder Anwendung Hand-Extruder zum Schweissen von thermoplastischen Kunststoffen aus PE- und PP- Schweissdraht mit Durchmesser von 4 und 5 mm (andere Materialien auf Anfrage) in den Bereichen Behälterbau, Apparatebau, Rohrleitungsbau und Deponiebau.
-
Page 4: Entsorgung
Konformität (Im Sinne der EG-Maschinenrichtlinie 2006/42/EC; Anhang II A) Leister Technologies AG, Galileo-Strasse 10, CH-6056 Kaegiswil/Schweiz bestätigt, dass dieses Produkt in der von uns in Verkehr gebrachten Ausführung die Anforderungen der folgenden EG-Richtlinien erfüllt. Richtlinien: 2006/42, 2014/30, 2014/35, 2011/65 Harmonisierte Normen:... -
Page 5: Bedienung
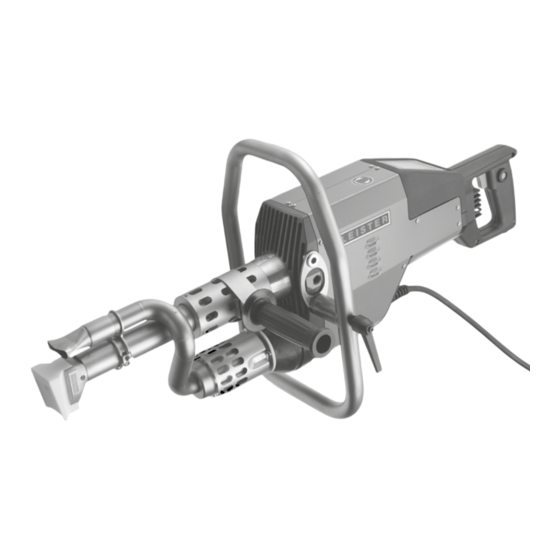
Bedienung Gerätebeschreibung 1. Hauptschalter 9. Vorwärmdüse 2. Ein-/Ausschalter Antrieb 10. Rohrklemme 3. Potentiometer 11. Schutzrohr 4. Arretierung Antrieb 12. Schweissdraht-Einführung 5. Display 13. Gerätegriff 6. Handgriff 14. Netzanschlussleitung 7. Mantelheizung 15. Führungsgriff 8. Schweissschuh 16. Heissluftgebläse 32 Bedieneinheit 17. Schweissprogramm 18. - Page 6 Bedienung Arbeitsumgebung / Sicherheit Der Hand-Extruder darf nicht in explosionsgefährdeter bzw. entzündbarer Um gebung einge- setzt werden. Auf sicheren Stand bei der Arbeit achten. Das Anschlusskabel und der Schweiss- draht müssen frei beweglich sein und dürfen den Anwender oder Dritte bei der Arbeit nicht behin- dern.
-
Page 7: Stromversorgung
Bedienung Stromversorgung Bei einer Verlängerungsleitung ist ein Mindestquerschnitt von 3 x 4 mm zu verwenden, muss für den Einsatzort (z.B. im Freien) zugelassen und entsprechend gekennzeichnet sein. Bei Verwendung eines Stromaggregates zur Energieversorgung gilt für die Nennleistung des Stro- maggregates: 2 × Nennleistung Hand-Extruder. Startvorgang Die Temperaturüberwachung verhindert das Anfahren des Hand-Extruders im kalten Zustand. -
Page 8: Tastenfunktionen
Bedienung Software und Menüführung Der Handschweissextruder Weldplast ist mit einer komfortablen Bedienersoftware ausgestattet, die dem Anwender die Arbeit und den Umgang mit dem Extruder erleichtert. Tastenfunktionen Die Tasten sprechen durch leichtes Antippen an. • Arbeitsfenster Funktionen Arbeitsfenster Menüauswahl Kontrast einstellen Heizung on/off Cursorposition ändern Selektierter Wert [+]... - Page 9 Bedienung Einstellen der Parameter im Arbeitsfenster Der Cursor (31) zeigt an, welcher Parameter eingestellt werden kann. Nach dem Einschalten befindet sich der Cursor auf der Position «SPEED». Im Arbeitsfenster können folgende Parameter mit der Select-Taste (28) angewählt und mit den Up-Taste (29) und Down-Taste (27) in ihren Werten verändert werden.
- Page 10 Bedienung Einstellen der PLAST- und AIR-Temperaturen • Durch Drücken der Select-Taste (28) den Cursor auf die Position « PLAST» bzw. «AIR» stellen • Den Temperaturwert über die Up-Taste (29) oder Down-Taste (27) einstellen Überwachung der Schweissparameter Die Soll- und Istwerte der AIR- und PLAST-Temperaturen werden stän- dig überwacht.
- Page 11 Bedienung Starten des Schweissvorganges • Nach Bedarf den entsprechenden Schweissschuh (8) montieren • Potentiometer (3) auf max. einstellen • Ist die Betriebstemperatur erreicht (Status Bereit* ), kann mit dem Schweissen begonnen werden • Ein-/Ausschalter Antrieb (2) betätigen • Schweissdraht mit dem Durchmesser 4 oder 5 mm in die Schweissdraht-Einführung (12) einführen •...
- Page 12 Bedienung Weitere Einstellungen Kontrasteinstellung Bei ungünstigen Lichtverhältnissen und Umgebungstemperaturschwankungen kann im Arbeitsfenster über die Back-Taste (25) der Kontrast am Display eingestellt werden. Heizungen on / off Bei längerem Unterbruch (Standby) kann im Arbeitsfenster die Heizung für PLAST und AIR über die Enter- Taste (26) ausgeschaltet werden.
- Page 13 Bedienung Menüführung Menü Menü Auswahl Selektieren Funktionen Auswahl Selektieren und Zurück Zurück zum Arbeitsfenster Auswahl...
- Page 14 Bedienung Schweissparameter-Programmierung Freie Menü Einstellung Programm selektieren Auswahl Eingabe Der Hand-Extruder ist für folgende thermoplastische Kunststofftypen geeignet: • PP/ PE-HD / PE-LD Die Programme 1 – 3 sind mit entsprechend voreingestellten Werten versehen, die während des Schweissvorgan- ges angepasst werden können. Die Anpassungen werden nicht gespeichert! Die freien Einstellungen 1 –...
- Page 15 Bedienung Schweissschuhwechsel • Der Schweissschuhwechsel muss am betriebswarmen Gerät vorgenommen werden. Nur mit temperaturfesten Handschuhen arbeiten. Verbrennungsgefahr! • Demontage Das betriebswarme Gerät abschalten und vom elektrischen Netz trennen – Den Schweissschuh (8) mit Schweissschuhhalter (34) durch Lösen der Klemmschrauben (35) von der Extrudierdüse (36) entfernen –...
-
Page 16: Fehlermeldungen
Fehlerbehandlung Fehlermeldungen Tritt ein Fehler auf, wird dieser in der Statusanzeige (30) eingeblendet (z. B. Motor ist überhitzt). Err04 Anzeige ErrXX Beim Auftreten eines Fehlers werden die Heizungen für AIR und PLAST sowie der Antriebsmotor ausgeschaltet ! Sollte dies nicht geschehen, ist das Gerät sofort vom Netz zu trennen! ErrXX Weiteres Vorgehen bei Statusanzeige Antrieb (30) •... - Page 17 • Die Vorrichtung ist für zwei Schweissdrahtrollen mit ø 300 mm ausgelegt • Um eine optimale Drahtabwicklung zu gewährleisten, ist der Schweissdraht durch die dafür vorgesehene Öse (41) zu führen Schweissschuh-Sortiment WELDPLAST S6 standard Leister Technologies AG bietet für alle gebräuchlichen Nahtformen entsprechende Schweissschuhe in diver- sen Grössen an: Rohling V-Naht Kehlnaht Überlappnaht...
-
Page 18: Service Und Reparatur
24 Stunden einen fachgerechten und zuverlässigen Reparatur-Service mit Original- Ersatzteilen gemäss Schaltplänen und Ersatzteillisten. • Erscheint beim WELDPLAST S6 nach dem Einschalten des Gerätes die Service-Anzeige mit dem Service-Code 1, sollte der Kohlestand von einer autorisierten Leister-Service-Stelle kontrolliert und die Antriebs-Kohlebürs- ten gegebenenfalls ausgewechselt werden. - Page 19 (Translation of operating instructions) Read the operating manual carefully before commissioning and keep it on hand for later consultation. Leister WELDPLAST S6 Handheld extrusion welder Application Handheld extrusion welder for welding thermoplastic materials using a PE or PP welding rod with a diameter of 4 or 5 mm (other materials on request) in the fields of tank construction, apparatus engineering, pipeline construction, and landfill construction.
-
Page 20: Technical Data
Conformity (pursuant to EC Machinery Directive 2006/42/EC; Appendix II A) Leister Technologies AG, Galileo-Strasse 10, 6056 Kaegiswil, Switzerland confirms that this product fulfills the requirements of the following EU Guidelines in the models that we have made available for purchase. -
Page 21: Operating Unit
Operation Device description 1. Main switch 9. Pre-heating nozzle 2. On/off switch for drive 10. Pipe clamp 3. Potentiometer 11. Protective pipe 4. Drive locking device 12. Welding rod insertion point 5. Display 13. Device handle 6. Handle 14. Power supply cord 7. -
Page 22: Workstation
Operation Work environment/Safety The handheld extrusion welder may not be used in areas with explosion and/or ignition hazards. Ensure a stable position during work. The connection cable and welding rod must be able to move freely and must not hinder the user or third parties while working. Place the handheld extrusion welder on a fireproof support! Hot metal parts and the warm air jet must be kept at a sufficient distance from the support and walls. - Page 23 Operation Current supply When using an extension cable, it must have a minimum cross-section of 3 x 4 mm , and it must be authorized for the utilization site (e.g., outdoors) and be marked accordingly. When a power generator is used as an energy supply, the following applies for its nominal output: 2 ×...
-
Page 24: Key Functions
Operation Software and menu navigation The Weldplast handheld extrusion welder is equipped with convenient operating software, which makes it easier for the user to work with the welder. Key functions The keys react to a light touch. • Working window Working window functions Menu selection Setting the contrast... - Page 25 Operation Setting the parameters in the working window The cursor (31) indicates which parameter can be set. After the device has been switched on, the cursor is in the “SPEED” position. The following parameters can be selected with the Select key (28) in the working window and their values can be changed with the Up key (29) and the Down key (27).
- Page 26 Operation Setting the PLAST and AIR temperatures • Press the Select key (28) to move the cursor to the “PLAST” or “AIR” position • Set the temperature value with the Up key (29) or the Down key (27) Monitoring the welding parameters The setpoint and actual values of the AIR and PLAST temperatures are constantly monitored.
-
Page 27: Starting The Welding Process
Operation Starting the welding process • Mount the relevant welding shoe (8) if necessary • Set the potentiometer (3) to max. • When the device reaches the operating temperature (Ready* status), it is ready to start welding • Press on/off switch for drive (2) •... -
Page 28: Other Settings
Operation Other settings Contrast setting In case of unfavorable lighting conditions and ambient temperature fluctuations, use the Back key (25) in the working window to adjust the display contrast. Heating on/off In case of a longer interruption (standby), use the Enter key (26) to switch off the heating for PLAST and AIR. Activating key lock 1. - Page 29 Operation Menu navigation Menu Menu Selection Select Functions Selection Select and Back Back to working window Selection...
- Page 30 Operation Programming the welding parameters Free Menu setting Select program Selection Enter The handheld extrusion welder is suitable for the following types of thermoplastic materials: • PP/PE-HD/PE-LD Programs 1 – 3 are preset with suitable values which can be adapted during the welding process. The adjustments are not saved! The free settings 1 –...
- Page 31 Operation Changing the welding shoe • The welding shoe must be changed when the device is warm. Work only with temperature-resistant gloves. Risk of burning! • Removal Switch off the device while warm and disconnect it from the mains – Remove the welding shoe (8) with the welding shoe holder (34) by unfastening the clamping screws (35) from the extruder nozzle (36) –...
-
Page 32: Error Handling
Error handling Error messages If an error occurs, this is displayed in the status display (30) Err04 (e.g., motor has overheated). Display ErrXX If an error occurs, the heating for AIR and PLAST as well as the drive motor are switched off. If this does not happen, disconnect the device from the mains immediately! ErrXX Subsequent procedure for drive status display (30) -
Page 33: Accessories
• To ensure optimal rod dispensing, the welding rod should be passed through the lug (41) provided Welding shoe range WELDPLAST S6 standard Leister Technologies AG offers suitable welding shoes in various sizes for all common seam forms: Blank V-seam... -
Page 34: Service And Repair
• Every time the welding shoe is changed, clean the extruder nozzle (36) of welding residue. Service and repair • Repairs shall be assigned exclusively to authorized Leister Service centers. These guarantee a professional and reliable repair service within 24 hours with original spare parts in accordance with circuit diagrams and spare parts lists. - Page 35 (Traduction de la notice d’utilisation d’origine) Lire attentivement la présente notice d’utilisation avant la mise en service et la conserver pour consultation ultérieure. Leister WELDPLAST S6 Extrudeuse manuelle Application Extrudeuse manuelle pour souder des matériaux thermoplastiques avec fil à souder en polyéthylène (PE) et en polypropylène (PP) en 4 et 5 mm de diamètre (autres matériaux sur demande) dans les domaines de la construction...
-
Page 36: Conformité
(Au sens de la directive machines 2006/42/CE ; annexe II A) Leister Technologies AG, Galileo-Strasse 10, CH-6056 Kaegiswil / Suisse confirme que ce produit correspond, en ce qui concerne la version commercialisée par notre entreprise, aux réglementations figurant dans les directives européennes désignées ci-dessous. -
Page 37: Utilisation
Utilisation Description de l’appareil 1. Interrupteur principal 9. Buse de préchauffage 2. Interrupteur Marche/Arrêt de l’entraînement 10. Collier de serrage 3. Potentiomètre 11. Tube de protection 4. Commande de blocage 12. Entrée de fil à souder 5. Affichage 13. Poignée de l’appareil 6. - Page 38 Utilisation Environnement de travail / Sécurité L’extrudeuse manuelle ne doit pas être utilisée dans un environnement à risques d’explosion ou d’incendie. Veiller à une bonne stabilité pendant l’utilisation. Le câble de raccordement et le fil à souder doivent pouvoir bouger librement et ne doivent pas entraver le mouvement de l’utilisa- teur ou d’une tierce personne pendant l’utilisation.
-
Page 39: Alimentation En Courant
Utilisation Alimentation en courant Dans le cas de l’utilisation d’un câble rallonge, il convient d’utiliser une section minimale de 3 x 4 mm et le lieu d’utilisation (p. ex. en extérieur) doit être homologué et caractérisé en fonction. Dans le cas de l’utilisation d’un groupe électrogène pour l’alimentation électrique, la puissance nominale du groupe électrogène doit correspondre à : 2 ×... -
Page 40: Logiciel Et Navigation Par Menu
Utilisation Logiciel et navigation par menu L’extrudeuse manuelle pour soudage Weldplast est équipée d’un logiciel opérateur convivial facilitant à l’utilisateur le travail et la manipulation de l’extrudeuse. Fonctions des touches Les touches se laissent commander facilement, en appuyant légèrement dessus. •... -
Page 41: Réglage Des Paramètres Dans La Fenêtre De Travail
Utilisation Réglage des paramètres dans la fenêtre de travail Le curseur (31) indique les paramètres qui peuvent être réglés. Après la mise en marche, le curseur se trouve en position « SPEED » (vitesse). Les paramètres suivants peuvent être sélectionnés dans la fenêtre de travail au moyen de la touche Sélection (28) et leurs valeurs peuvent être modifiées au moyen de la touche Haut (29) et de la touche Bas (27). -
Page 42: Réglage Des Températures Plast Et Air
Utilisation Réglage des températures PLAST et AIR • Placer le curseur sur la position « PLAST » ou « AIR » en appuyant sur la touche Sélection (28) • Régler la valeur de température au moyen de la touche Haut (29) ou de la touche Bas (27) Contrôle des paramètres de soudage Les valeurs effectives et de consigne des températures AIR et PLAST sont sous surveillance permanente. - Page 43 Utilisation Démarrage de l’opération de soudage • Si nécessaire, monter le patin de soudage (8) adéquat • Régler le potentiomètre (3) sur maximum • Une fois la température de fonctionnement atteinte (état Prêt*), démarrer le soudage • Actionner l’interrupteur Marche/Arrêt de l’entraînement (2) •...
-
Page 44: Autres Réglages
Utilisation Autres réglages Réglage du contraste Si les conditions de lumière et les fluctuations de la température ambiante sont défavorables, régler le contraste sur l’affichage au moyen de la touche Retour (25) dans la fenêtre de travail. Chauffages Marche/Arrêt Lors d’une interruption prolongée (standby), il est possible d’éteindre le chauffage pour PLAST et AIR au moyen de la touche Entrée (26) dans la fenêtre de travail. -
Page 45: Navigation Par Menu
Utilisation Navigation par menu Menu Menu Sélection Sélectionner Fonctions Sélection Sélectionner et Retour Retour à la fenêtre de travail Sélection... -
Page 46: Programmation Des Paramètres De Soudage
Utilisation Programmation des paramètres de soudage Réglage Menu libre Sélectionner le programme Sélection Saisir L’extrudeuse manuelle est appropriée aux types de matériaux thermoplastiques suivants : • PP/PE-HD/PE-LD Les programmes 1 – 3 sont dotés de paramètres présélectionnés que l’on peut ajuster pendant le processus de soudage. -
Page 47: Changement Du Patin De Soudage
Utilisation Changement du patin de soudage • Le changement du patin de soudage doit être effectué sur l’appareil à l’état chaud. Ne travailler qu’avec des gants résistants aux températures élevées. Risque de brûlures ! • Démontage Éteindre l’appareil à l’état chaud et le déconnecter du courant de secteur. –... -
Page 48: Élimination D'erreurs
Élimination d’erreurs Messages d’erreur En cas d’erreur, cette dernière est signalée dans l’affichage d’état (30) Err04 (p. ex le moteur est surchauffé). ErrXX Affichage En cas d’erreur, les chauffages pour AIR et PLAST ainsi que le moteur d’entraînement s’arrêtent immédiatement ! Si ce n’est pas le cas, débrancher immédiatement l’appareil du secteur ! Autre procédure sur l’affichage d’état de fonctionnement entraînement (30) ErrXX... -
Page 49: Accessoires
• Afin de garantir un enroulement optimal du fil, guider le fil à souder dans l’œillet (41) prévu à cet effet Assortiment de patins de soudage WELDPLAST S6 standard Leister Technologies AG offre des patins de soudage pour toutes les versions de soudure courantes en différentes dimensions :... -
Page 50: Entretien
24 heures, avec des pièces de rechange d’origine selon schémas de connexions et listes de pièces détachées. • Si avec la WELDPLAST S6, le message de service avec le code de service 1 s’affiche après la mise en marche de l’appareil, un service Leister autorisé devra contrôlé... - Page 51 (Traduzione delle istruzioni originali) Prima della messa in servizio leggere attentamente le presenti istruzioni per l’uso e conservarle per una futura consultazione. Leister WELDPLAST S6 Estrusore manuale Applicazione Estrusore manuale per la saldatura di materiali termoplastici con filo per saldatura in PE e PP del diametro di 4 e 5 mm (altri materiali su richiesta) per i settori della costruzione di recipienti, apparecchiature, tubazioni e discariche.
-
Page 52: Smaltimento
Conformità (Ai sensi della Direttiva macchine 2006/42/CE, Allegato II A) Leister Technologies AG, Galileo-Strasse 10, CH-6056 Kaegiswil/Svizzera conferma che il prodotto, nella versione da noi commercializzata, è conforme alle seguenti direttive CE. Direttive: 2006/42, 2014/30, 2014/35, 2011/65 Norme armonizzate: EN ISO 12100, EN 55014-1, EN 55014-2, EN 61000-6-2, EN 61000-3-12, EN 61000-3-11, EN 62233, EN 60335-1, EN 60335-2-45, EN 50581 Kaegiswil, 05.02.2019... - Page 53 Comando Descrizione dell’apparecchio 1. Interruttore principale 9. Ugello di preriscaldamento 2. Interruttore di avvio/arresto del motore 10. Fascetta stringitubo 3. Potenziometro 11. Tubo di protezione 4. Bloccaggio azionamento 12. Foro di inserimento per filo di saldatura 5. Display 13. Maniglia dell’apparecchio 6.
-
Page 54: Regolazione Dell'impugnatura
Comando Ambiente di lavoro / Sicurezza È vietato utilizzare l’estrusore manuale in ambienti o aree a rischio di esplosione e/o in cui sia pre- sente un rischio di infiammabilità. Durante le operazioni di lavoro accertarsi che l’apparecchio risulti perfettamente stabile. Il cavo di allacciamento e il filo per saldatura devono potersi muovere libera- mente e non devono ostacolare l’utente o terze persone nello svolgimento delle operazioni di lavoro. -
Page 55: Procedura Di Avvio
Comando Alimentazione elettrica Se si utilizza un cavo di prolunga, il cavo deve avere una sezione minima di 3 x 4 mm , essere omo- logato per il luogo operativo prescelto (per es. all’aperto) e recare le relative marcature. Qualora si utilizzi un gruppo elettrogeno per l’alimentazione di energia, la sua potenza nominale deve essere pari al doppio della potenza nominale dell’estrusore manuale. -
Page 56: Funzioni Dei Tasti
Comando Software e struttura del menu L’estrusore per saldatura manuale Weldplast è dotato di un comodo software di controllo che agevola il lavoro e l’uso dell’apparecchio da parte dell’utente. Funzioni dei tasti I tasti reagiscono tramite una leggera pressione. • Finestra di lavoro Funzioni finestra di lavoro Selezione del menu Regolazione del contrasto... - Page 57 Comando Impostazione dei parametri nella finestra di lavoro Il cursore (31) indica quale parametro può essere impostato. Dopo l’accensione, il cursore si trova sulla posizione “SPEED”. Nella finestra di lavoro si possono selezionare i parametri seguenti con il tasto di selezione (28) e modificare i rispettivi valori con il tasto Su (29) e il tasto Giù...
- Page 58 Comando Regolazione delle temperature PLAST e AIR • Premendo il tasto di selezione (28), portare il cursore sulla posizione “PLAST” o “AIR” • Impostare il valore di temperatura tramite il tasto Su (29) o il tasto Giù (27) Monitoraggio dei parametri di saldatura I valori nominali e reali delle temperature AIR e PLAST vengono costante- mente monitorati.
- Page 59 Comando Avvio del processo di saldatura • Montare il pattino di saldatura (8) corrispondente al lavoro da effettuare • Regolare il potenziometro (3) sul valore max. • Al raggiungimento della temperatura di esercizio (stato Pronto*) si può iniziare con la saldatura •...
- Page 60 Comando Ulteriori regolazioni Regolazione del contrasto In caso di condizioni di luce sfavorevoli e di variazioni della temperatura ambiente, nella finestra di lavoro è possibile regolare il contrasto del display tramite il tasto Indietro (25). Riscaldamenti on/off In caso di interruzione prolungata (standby), nella finestra di lavoro è possibile disinserire il riscaldamento per PLAST e AIR tramite il tasto Invio (26).
-
Page 61: Struttura Del Menu
Comando Struttura del menu Menu Menu Selezione Selezionare Funzioni Selezione Selezionare e Indietro Indietro alla finestra di lavoro Selezione... - Page 62 Comando Programmazione dei parametri di saldatura Libera Menu impostazione Selezionare programma Selezione Immissione L’estrusore manuale è indicato per i seguenti tipi di materiali termoplastici: • PP/PE-HD/PE-LD I programmi 1 – 3 sono dotati di specifici valori preimpostati che possono essere adattati durante il processo di saldatura.
- Page 63 Comando Cambio del pattino di saldatura • Il cambio del pattino di saldatura deve avvenire con l’apparecchio a temperatura di esercizio. Lavorare solo con guanti termoresistenti indossati. Pericolo di scottature! • Smontaggio Spegnere l’apparecchio ancora caldo e scollegarlo dalla rete –...
-
Page 64: Trattamento Degli Errori
Trattamento degli errori Messaggi di errore Se si verifica un errore, esso viene visualizzato nella schermata di stato (30) Err04 (per es. Motore surriscaldato). Indicazione ErrXX Al verificarsi di un errore, i riscaldamenti per AIR e PLAST nonché il motore di azionamento vengono subito disinseriti! Qualora ciò... - Page 65 • Per garantire uno svolgimento ottimale del filo per saldatura, si deve inserire il filo attraverso l’apposito occhiello (41) Gamma pattini di saldatura WELDPLAST S6 standard Leister Technologies AG offre pattini di saldatura di varie misure, adatti a ogni tipo di filo per saldatura: Pezzo grezzo Saldatura a V...
-
Page 66: Assistenza E Riparazioni
(36). Assistenza e riparazioni • Le riparazioni devono essere eseguite esclusivamente dai centri di assistenza Leister autorizzati. Questi assicu- rano riparazioni sicure e affidabili entro 24 ore, con parti di ricambio originali come da schemi elettrici ed elenco parti di ricambio. - Page 67 (Traducción de las instrucciones de servicio originales) Leer las instrucciones de servicio con atención antes de la puesta en servicio y conservarlas para futuras consultas. Leister WELDPLAST S6 Extrusora manual Aplicación Extrusora manual para la soldadura de fibras sintéticas termoplásticas de hilo de soldadura de PE y PP con un diámetro de 4 y 5 mm (otros materiales a petición) en el ámbito de la construcción de recipientes, construcción de...
-
Page 68: Datos Técnicos
Conformidad (Según lo estipulado en la Directiva de máquinas 2006/42/CE, anexo II A) Leister Technologies AG, Galileo-Strasse 10, CH-6056 Kaegiswil/Suiza confirma que este producto, en el modelo comercializado por nosotros, cumple los requisitos de las siguientes directivas de la CE. -
Page 69: Descripción Del Equipo
Manejo Descripción del equipo 1. Interruptor principal 9. Tobera de precalentamiento 2. Interruptor On/Off del accionamiento 10. Abrazadera de tubo 3. Potenciómetro 11. Tubo de protección 4. Dispositivo de sujeción del accionamiento 12. Entrada del hilo de soldadura 5. Pantalla 13. - Page 70 Manejo Entorno de trabajo/seguridad La extrusora manual no debe empelarse en entornos inflamables o con peligro de explosión. Asegurarse de contar con un apoyo firme durante el trabajo. El cable de conexión de red y el hilo de soldadura tienen que poder moverse libremente y no deben molestar al usuario ni a terceros. Colocar la extrusora manual sobre una base ignífuga.
-
Page 71: Fuente De Alimentación
Manejo Fuente de alimentación En caso de usar un cable de prolongación hay que emplear una sección mínima de 3 x 4 mm , que esté autorizada para su uso en el lugar de aplicación (p. ej. al aire libre) y que cuente con las marcas correspondientes. -
Page 72: Funciones De Teclas
Manejo Software y navegación de menú La extrusora manual Weldplast está equipada con un software de manejo muy cómodo que le facilita el trabajo y el manejo de la extrusora al usuario. Funciones de teclas Las teclas se accionan mediante un contacto ligero. •... - Page 73 Manejo Ajuste de los parámetros en la ventana de trabajo El cursor (31) indica qué parámetros se pueden ajustar. Después de encender el dispositivo, el cursos se encuentra en la posición «SPEED». En la ventana de trabajo se pueden seleccionar los siguientes parámetros con la tecla Seleccionar (28) y se pue- den modificar los sus valores con las teclas Arriba (29) y Abajo (27).
- Page 74 Manejo Ajuste de las temperaturas PLAST y AIR • Mediante el accionamiento de la tecla Seleccionar (28), desplazar el cursor a la posición «PLAST» o «AIR» • Ajustar el valor de temperatura mediante la tecla Arriba (29) o Abajo (27) Supervisión de los parámetros de soldadura Los valores nominales y reales de las temperaturas AIR y PLAST se super- visan de forma continua.
-
Page 75: Desconexión Del Equipo
Manejo Inicio del proceso de soldadura • Montar la zapata de soldadura (8) correspondiente en función de las exigencias • Ajustar el potenciómetro (3) al máximo • Una vez alcanzada la temperatura de funcionamiento (estado Listo*) se puede iniciar el proceso de soldadura •... -
Page 76: Otros Ajustes
Manejo Otros ajustes Ajuste del contraste En caso de condiciones lumínicas desfavorables y fluctuaciones de la temperatura ambiente, puede ajustarse el contraste de la pantalla en la ventana de trabajo mediante la tecla Volver (25). Calefacción on/off En caso de interrupción prolongada del trabajo (modo Standby), puede desconectarse la calefacción para PLAST y AIR mediante la tecla Intro (26). - Page 77 Manejo Navegación de menú Menú Menú Selección Seleccionar Funciones Selección Seleccionar y Volver Volver a la ventana de trabajo Selección...
- Page 78 Manejo Programación de los parámetros de soldadura Ajuste Menú libre Selección del programa Selección Entrada La extrusora manual es adecuada para los siguientes tipos de plásticos termoplásticos: • PP/HDPE/LDPE Los programas 1-3 disponen de valores preajustados que pueden ajustarse durante el proceso de soldadura. Dichas ajustes no se guardan.
- Page 79 Manejo Cambio de zapata de soldadura • El cambio de zapata de soldadura debe realizarse con el equipo a temperatura de funcionamiento. No trabaje sin usar guantes termorresistentes. Peligro de quemaduras. • Desmontaje Desconectar el equipo a temperatura de funcionamiento y desenchufarlo de la red eléctrica –...
-
Page 80: Subsanación De Errores
Subsanación de errores Mensajes de error Si se produce un error, dicho error se muestra en la indicación de estado (30) Err04 (p. ej. Sobrecalentamiento del motor). Indicación ErrXX Si se produce un error, se desconectan las calefacciones para AIR y PLAST, así como el motor de accionamiento. Si esto no sucede, el equipo debe desconectarse inmediatamente de la red. -
Page 81: Accesorios
• Para garantizar un desbobinado óptimo del hilo, el hilo de soldadura debe pasar por la armella (41) prevista para ello Surtido de zapatas de soldadura WELDPLAST S6 estándar Leister Technologies AG ofrece zapatas de soldadura adecuadas para todas las formas de costura habituales y en distintos tamaños: Pieza en bruto... -
Page 82: Asistencia Y Reparaciones
Asistencia y reparaciones • Solo el servicio técnico de Leister está autorizado a realizar reparaciones en el equipo. Este garantiza un servicio de reparación profesional y de confianza en un plazo de 24 horas con piezas de repuesto originales conforme a los esquemas de conexiones y a las listas de piezas de repuesto. - Page 84 ® © Copyright by Leister Your authorised Service Centre is: Leister Technologies AG Galileo-Strasse 10 CH-6056 Kaegiswil/Switzerland Tel. +41 41 662 74 74 +41 41 662 74 16 www.leister.com sales@leister.com...