
Manuels Connexes pour ProBreeze PB-AC01


Sommaire des Matières pour ProBreeze PB-AC01
- Page 1 instruction manual mode d'emploi bedienungsanleitung manuale di istruzioni manual de instrucciones MODEL PB�AC01 9000 BTU portable air conditioner...
-
Page 2: Table Des Matières
Portable Air Conditioner Thank you for choosing to purchase a product from Pro Breeze. Please read the entire manual carefully prior to first use and keep in a safe place for future reference. Contents Safety Warning Specific Information Regarding R290 Refrigerant Gas Caution ┃... - Page 3 • • This appliance can be used by children Do not use pressurised containers (e.g. aged from eight years above and persons aerosol cans) or other flammable substances with reduced physical, sensory or mental near the appliance. • capabilities or lack of experience and Do not use the appliance near petrol, knowledge if they have been given flammable gases, ovens, or other heating...
-
Page 4: Specific Information Regarding R290 Refrigerant Gas
Specific Information • Maintenance and repairs that require the Regarding R290 assistance of other qualified personnel must Refrigerant Gas be performed under the supervision of an individual specified in the use of flammable refrigerants. • The appliance must be installed, used and CAUTION stored in an area that is greater than 13m². - Page 5 Caution • Do not operate the appliance if the room temperature is greater than 32°C in cooling mode or lower than 5°C in dehumidifying mode. Specification • Input Voltage: 220V-240V~ • Frequency: 50Hz • Cooling Capacity: 9000 BTU/H • Refrigerant: R290 •...
-
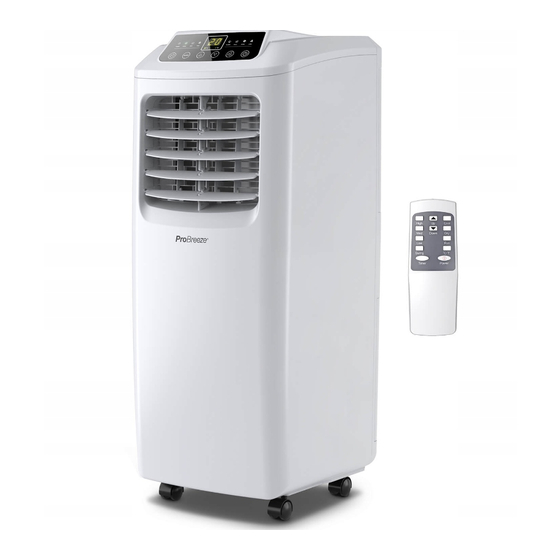
Page 6: Parts
Parts Front View Control panel Horizontal louvre Vertical louvre Body Wheels Rear View Handle/remote control storage Body C-shaped buckle Power cord Heat exhaust hose connector Power cord tidy Wheels Evaporator filter Radiating filter Condenser filter Drain cap. Accessories Remote control Heat exhaust hose short connector Heat exhaust hose Sliding window sealing board assembly... -
Page 7: Control Panel
Control Panel TIMER COOL SLEEP FULL HIGH Buttons moving from right to left Remote Control • Power button • Fan speed Button • Down Button Cool mode High fan • Up button button speed button • Mode Button High Cool Dehumidifying Low fan •... -
Page 8: Installation
Installation Prior to and after installation adhere to the below: • When moving the appliance to the chosen location ensure it is kept in an upright position. • Do not place or use the appliance, power cord, or any accessories in a bathroom, wet, or damp place. - Page 9 Heat Exhaust Hose Installation Unlock and fully open the c-shaped buckle. Place the lip of the circular connector over Bottom step the bottom step of the heat exhaust hose connector. Firmly push the circular connector down into the heat exhaust hose connector to lock it into place.
-
Page 10: Assembly Installation
Hinged Window Sealing Fabric Frame Assembly Installation Side A Open window and clean frame and casement surfaces of dust and particles. Stick the velcro tape around the entire window frame. Never stick to the window Casement seal as doing so will prohibit the window from closing fully. -
Page 11: Controls
Controls • Dehumidifying Mode - Ideal for reducing room humidity in humid and damp times of year. The appliance will dehumidify the room if Power Button the room temperature is greater than or equal to 17°C and the fan operates at the low fan Turn the appliance on and off. - Page 12 Timer Button Set a turn-on or turn-off timer between 1-24 hours. Select the desired settings prior to turn-off To check the remaining time till turn-off Setting a turn-on timer: press the timer button. To cancel the turn-off timer press the timer button twice.
-
Page 13: Emptying The Water Tank
Emptying the Water Tank When the water tank is full 10 beeps will sound; the water tank full indicator light will illuminate, and the appliance will pause operation to prevent the water tank from overflowing. To empty the water tank: Turn off the appliance and unplug it from the wall socket. -
Page 14: Connecting The Water Hose For Continuous Draining ┃ Cleaning
Connecting the Water Hose for Continuous Draining For long-term use, it is recommended to connect a water hose for continuous drainage. To attach the water hose: Unscrew the drain cap, unplug the drain plug, and store safely. Insert the water hose into the water outlet. Ensure the water hose end has a suitable drainage outlet (e.g a drain or bucket). -
Page 15: Filter Cleaning
Filter cleaning Clean the appliances evaporator and condenser filter once every two weeks. To access the filters: Gripping position Grip the evaporator and condenser filters at the gripping position and gently remove. Use a firm brush and/or vacuum cleaner to clean the filters of any dust and particles. -
Page 16: Safety Features
Safety Features Compressor Delay Protection Anti-Frost Protection To protect the compressor, apart from when the If the compressor operates continuously for appliance and compressor are activated for the more than 10 minutes and the internal pipe first time after being turned on via the power temperature drops to below 0°C for more than button, there will be a three minute delay 20 seconds the compressor and water spraying... -
Page 17: Disposal
Poor cooling. Draw curtains. There is direct sunlight. Doors and windows are open or there are Close doors and windows and remove other heat sources. other heat sources. Dirty filters. Clean filters. Air inlet or air outlet clogged. Remove the obstruction. Noisey. - Page 18 Mobiles Klimagerät Vielen Dank, dass Sie sich für ein Produkt von Pro Breeze entschieden haben. Wir bitten Sie, die gesamte Gebrauchsanweisung vor der ersten Inbetriebnahme sorgfältig zu lesen und für den späteren Gebrauch aufzubewahren. Seite Inhaltsverzeichnis Sicherheitswarnung Spezifische Information zu dem R290 Kältemittel Achtung ┃...
- Page 19 • Kinder sollten nicht mit dem Gerät spielen. bevor Sie es ausgeschaltet haben. • • Reinigung und Benutzerwartung dürfen Nehmen Sie keine Veränderungen an dem nicht von Kindern ohne Aufsicht durch- Gerät vor und verwenden Sie nur das vom geführt werden. Hersteller mitgelieferte Zubehör.
-
Page 20: Risk Of Fire
Spezifische Information anerkannten spezifischen Genehmigung zu dem R290 nachweisen. Kältemittel • Wartungen sowie Reparaturen, die die Unterstützung einer qualifizierten Person erfordern, müssen unter Aufsicht einer Person durchgeführt werden, die für die • Das Gerät muss in einem Bereich mit einer Verwendung von brennbaren Kältemitteln Fläche größer als 15 m²... -
Page 21: Technische Daten
Achtung • Verwenden Sie das Gerät nicht bei Raumtemperaturen von mehr als 32 °C im Kühlmodus und bei nicht weniger als 5 °C im Entfeuchtungsmodus. Technische Daten • Eingangsspannung: 220 V - 240 V ~ • Frequenz: 50 Hz • Kühlleistung: 9000 BTU/Stunden •... - Page 22 Teile Frontansicht Bedienfeld Horizontaler Lüftungsschlitz Vertikaler Lüftungsschlitz Gehäuse Rollfüße Rückansicht Griff mit Einschub für die Fernbedienung Gehäuse C-förmige Klemme Netzkabel Wärmeabluftschlauchanschluss Netzkabelhalter Räder Verdunster-Filter Feinfilter Kondensator-Filter Wasserablaufventil Zubehör Fernbedienung Kurzer Anschluss Wärmeabluftschlauch Wärmeabluftschlauch Dichtungsrahmen für Schiebefenster Rundes Verbindungsstück Textildichtungsrahmen für Klappfenster Dichtungsklettband Wasserschlauch 21 | Deutsch...
- Page 23 Bedienfeld TIMER COOL SLEEP FULL HIGH Tasten von rechts nach links Fernbedienung • Ein-/Ausschalter • Lüfter-Geschwindigkeitstaste • Runter'-Taste Taste hohe Kühlmodus- Lüfterge- • Hoch'-Taste Taste schwindigkeit • Modus-Taste High Cool Taste niedrige Entfeuchtungs- • Timer-Taste Lüfterge modus-Taste TEMP schwindigkeit Lüftungsmodus Sleep Schlafmodus- Temperaturän-...
- Page 24 Installation Bitte befolgen Sie vor und nach der Installation folgende Hinweise: • Achten Sie beim Platzieren des Geräts an der gewünschten Stelle darauf, dass es in aufrechter Position bewegt wird. • Platzieren oder verwenden Sie das Gerät, das Netzkabel oder jegliches Zubehör nicht in einem Badezimmer oder in einer anderen feuchten oder nassen Umgebung.
- Page 25 Wärmeabluftschlauch anschließen Die C-förmige Klemme entriegeln und voll öffnen. Den Rand des runden Verbindungsstücks Untere Stufe über die unterste Stufe des Wärmeab- luftschlauchanschlusses platzieren. Drücken Sie das runde Verbindungsstück fest in den Wärmeabluftschlauchan- schluss herunter, um es fest zu verriegeln. Rundes Verbindungsstück Dann bringen Sie die C-förmige Klemme wieder an zum Sichern.
- Page 26 Textildichtungsrahmen für Fensterrahmen Klappfenster anbringen Seite A Öffnen Sie das Fenster und reinigen Sie den Rahmen und die Fensterflügel von Staub und Partikeln. Kleben Sie das Klettband rund um den Fensterflügel gesamten Fensterrahmen. Kleben Sie das Klettband niemals an das Fensterbrett, da sich das Fenster dann nicht mehr ganz schließen lässt.
-
Page 27: Bedienelemente
Bedienelemente Geschwindigkeit weiter läuft. Sobald die Raumtemperatur unter 15°C sinkt, stoppt die Entfeuchtung und der Ventilator läuft bei Hauptschalter (EIN/AUS) niedriger Geschwindigkeit weiter. Hinweis: Der Wärmeabluftschlauch muss angeschlossen Zum Ein- und Ausschalten des Geräts. sein, um die feuchtheiße Luft nach außen zu leiten. - Page 28 Einstellung einer Ausschaltzeituhr: Um den Schlafmodus zu deaktivieren, drücken Sie die Schlafmodus-Taste auf der Fernbedi- enung oder die Timer-Taste und die Vergewissern Sie sich, dass das Gerät ans Runter-Taste auf dem Bedienfeld gleichzeitig. Stromnetz angeschlossen ist. Drücken Sie den Hauptschalter, um das Gerät einzuschalten.
-
Page 29: Wassertank Entleeren
Wassertank entleeren Wenn der Wassertank voll ist, werden Sie 10 Pieptöne hören. Die Kontrollleuchte für den vollen Wassertank blinkt und das Gerät hält an, damit der Wassertank nicht überläuft. Zum Entleeren des Wassertanks: Schalten Sie das Gerät aus und trennen Sie es vom Stromnetz. - Page 30 Anschließen des Wasserablaufschlauchs für permanenten Wasserablauf Für den langfristigen Betrieb ist es zu empfehlen, einen Schlauch für den kontinuierlichen Wasserablass anzuschließen. Anbringen des Schlauchs: Schrauben Sie die Verschlusskappe ab, entfernen Sie den Stopfen und bewahren Sie beide sorgfältig auf. Führen Sie den Wasserablaufschlauch in das Wasserablaufrohr ein.
- Page 31 Filterreinigung: Reinigen Sie den Verdunster- und den Kondensator-Filter des Geräts alle zwei Wochen. Greifposition Zugang zu den Filtern: Ziehen Sie den Verdunster- und den Kondensator-Filter vorsichtig an den Griffen heraus. Verwenden Sie eine feste Bürste und/oder einen Staubsauger, um Staub und Partikel vom Filter zu entfernen.
-
Page 32: Nützliche Informationen
Replace the batteries. Pipe temperature sensor failure. Arrange for a professional to check the pipe temperature sensor and Schutzfunktionen Display showing E1. related circuits. Room temperature sensor failure. Arrange for a professional to check Verzögerter Kompressorstart Frostschutz the room temperature sensor and Display showing E2. -
Page 33: Entsorgung
über die Umgebungstemperatur. Kühlung funktioniert nicht Türen und Fenster sind offen oder es sind richtig. andere Wärmequellen vorhanden. Schließen Sie Fenster und Türen und Die Filter sind verschmutzt. entfernen andere Wärmequellen. Filter reinigen. Lufteinlass/Luftauslass ist verstopft. Entfernen Sie alle Fremdkörper. Es gibt direkte Sonneneinstrahlung. - Page 34 Climatiseur Portable | Model PB-AC01 Merci d’avoir choisi un produit Pro Breeze. Nous vous conseillons de lire le manuel d’instruction avant le premier usage, et de le conserver soigneusement pour toute consultation ultérieure. Sommaire Notice de Sécurité Informations Spécifiques Concernant le Gaz Réfrigérant R290 Attention ┃...
- Page 35 Le nettoyage et l’entretien de l’appareil ne • • Ne pas utiliser ou placer l'appareil, le cordon doivent pas être effectués par des enfants d'alimentation ou tout autre accessoire dans sans surveillance. une salle de bain ou proche d’un endroit •...
-
Page 36: Informations Spécifiques Concernant Le Gaz Réfrigérant R290
Informations • L'entretien et les réparations nécessitant Spécifiques Concernant l'assistance d'un personnel qualifié doivent le Gaz Réfrigérant R290 être effectués sous la supervision d'une personne spécifiée lors de l'utilisation de réfrigérants inflammables. • L'appareil doit être installé, utilisé et stocké CAUTION dans une zone à... -
Page 37: Spécifications
Attention • Ne pas utilisez l’appareil si la température de la chambre est supérieure à 32°C en mode climatiseur ou inférieur à 5°C en mode déshumidificateur. Spécifications • Tension d’entrée : 220 V-240 V ~ • Fréquence : 50 Hz •... -
Page 38: Accessoires
Pièces Vue Frontale Panneau de commande Volets d’aération horizontaux Volets d’aération verticaux Corps Roulettes Vue Arrière Poignée avec compartiment pour la télécommande Corps Support en forme de C pour le conduit d’évacuation d’air Cordon d’alimentation Raccord du tuyau d’évacuation d’air chaud Support pour cordon d’alimentation Roulettes Filtre de l’évaporateur... -
Page 39: Panneau De Commande
Panneau de commande TIMER COOL SLEEP FULL HIGH Boutons allant de droite ā gauche Télécommande • Bouton de marche/arrêt • Bouton de vitesse du ventilateur • Bouton Baisser Bouton de vitesse Bouton du mode • Bouton Augmenter élevée du ventilateur de refroidissement •... -
Page 40: Avant Et Après L'installation, Respecter Les Instructions Ci-Dessous
Installation Avant et après l’installation, respecter les instructions ci-dessous : • Pour le déplacer vers l’emplacement choisi, veiller à maintenir l’appareil en position verticale. • Ne pas placer ou utiliser l’appareil, le cordon d’alimentation ou un des accessoires dans une salle de bain ou un endroit humide ou mouillé. -
Page 41: Installation Du Cadre D'étanchéité Pour Fenêtre Coulissante
Installation du tuyau d’évacuation d’air chaud Débloquer et ouvrir complètement le support en forme de C pour le conduit d’évacuation d’air. Placer la lèvre du raccord circulaire sur le gradin inférieur du raccord du tuyau d’évacuation d’air chaud. Pousser fermement le raccord circulaire Raccord circulaire dans le raccord du tuyau d’évacuation d’air chaud pour le bloquer en position. -
Page 42: Remarques
Installation de la toile de calfeutrage Cadre pour fenêtre battante Côté A Ouvrir la fenêtre et nettoyer la poussière et les particules présentes sur les surfaces du châssis et du vantail. Coller du ruban velcro tout autour du Casement châssis de la fenêtre. Ne jamais coller le ruban velcro sur le joint de la fenêtre car celle-ci pourrait ne plus se fermer complètement. -
Page 43: Bouton De Marche/Arrêt
Commandes • Mode de déshumidification - Parfait pour réduire l’humidité de la pièce pendant les périodes humides de l’année. L’appareil va Bouton de marche/arrêt déshumidifier la pièce si la température ambiante est supérieure ou égale à 17°C et Allume et éteint l’appareil. que le ventilateur fonctionne à... -
Page 44: Bouton De La Minuterie
Bouton de la minuterie Permet de programmer la minuterie d’allumage Appuyer sur les boutons Augmenter et et d’extinction de 1 à 24 heures. Baisser pour régler la durée souhaitée (1-24 heures) avant l’arrêt. Pour programmer l’allumage : Les chiffres du temps clignotent cinq fois pour confirmer qu’une minuterie a été... -
Page 45: Vidage Du Réservoir D'eau
Vidage du réservoir d’eau Lorsque le réservoir d’eau est plein, 10 bips retentissent ; le voyant indicateur du réservoir d’eau plein s’allume et l’appareil interrompt son fonctionnement pour éviter tout débordement du réservoir d’eau. Pour vider le réservoir d'eau : Éteindre l’appareil et le débrancher de la Bouchon de prise murale. -
Page 46: Nettoyage
Raccordement du tuyau d’eau pour une vidange en continu En cas d'utilisation à long terme il est recommande de rattacher un tuyau d'eau port permettre une vidange en continu. Pour rattacher le tuyau Dévisser le bouchon d’évacuation, dévisser l’obturateur d’évacuation et ranger ces deux accessoires en toute sécurité. -
Page 47: Nettoyage Des Filtres
Nettoyage des filtres : Toutes les deux semaines, nettoyer les filtres de l’évaporateur et du condensa- teur de l’appareil. Position de grippe Pour accéder aux filtres : Attraper les filtres de l’évaporateur et du condensateur par les poignées et tirer doucement. -
Page 48: Fonctions De Sécurité
pipe temperature sensor and related circuits. Pipe temperature sensor failure. Display showing E1. Fonctions de sécurité Arrange for a professional to check the room temperature sensor and related circuits. Room temperature sensor failure. Display showing E2. Lancement différé du compresseur Protection antigel Appliance returns to operating at chosen settings once the internal pipe temperature... -
Page 49: Élimination
Poor cooling. There is direct sunlight. Draw curtains. Doors and windows are open or there are Close doors and windows and remove other heat sources. other heat sources. Entrée ou sortie d’air colmatée. Éliminer l’obstruction. Présence d’un rayonnement solaire direct. Tirer les rideaux. -
Page 50: Avvertenze Di Sicurezza
Condizionatore Portatile | Modello PB-AC01 Grazie per aver acquistato un prodotto di Pro Breeze. Si prega di leggere attentamente l'intero manuale prima del primo utilizzo e conservarlo in un luogo sicuro per riferimenti futuri. Pagina Sommario Avvertenze di sicurezza Informazioni specifiche relative al gas refrigerante R290 Attenzione ┃... - Page 51 La pulizia e la manutenzione dell'utente non • • Non posizionare né utilizzare l'apparecchio, il devono essere eseguite da bambini senza cavo di alimentazione o altri accessori in un supervisione. bagno, in luoghi bagnati o umidi. • Tenere l'apparecchio e tutti i componenti •...
-
Page 52: Risk Of Fire
Informazioni specifiche • La manutenzione e le riparazioni che relative al gas richiedono l'assistenza di altro personale refrigerante R290 qualificato devono essere eseguite sotto la supervisione di un individuo specificato nell'uso di refrigeranti infiammabili. • L'apparecchio deve essere installato, CAUTION utilizzato e conservato in un'area superiore a 13m²... - Page 53 Attenzione • Non utilizzare l'apparecchio se la temperatura dell’ambiente è superiore a 32°C in modalità raffreddamento o inferiore a 5°C in modalità deumidificazione. Specifiche • Tensione d’ingresso: 220 V-240 V ~ • Frequenza: 50 Hz • Capacità di raffreddamento: 9000 BTU/h •...
- Page 54 Parti Parte Frontale Pannello di controllo Deflettore aria orizzontale Deflettore aria verticale Corpo Ruote Parte Posteriore Manico/alloggiamento per il telecomando Corpo Morsetto a C Cavo di alimentazione Connettore per il tubo di scarico aria calda Avvolgicavo Ruote Filtro evaporatore Filtro radiatore Filtro condensatore Cappuccio esterno tappo dello scarico Accessori...
-
Page 55: Pannello Di Controllo
Pannello di controllo TIMER COOL SLEEP FULL HIGH Pulsanti che si muovono da sinistra Telecomando a destra • Tasto di accensione • Tasto velocità ventola Tasto velocità della Tasto modalità • Tasto Giù ventola alta fresco • Tasto Su High Cool Tasto modalità... - Page 56 Installazione Prima e dopo l’installazione, osservare quanto segue: • Quando si movimenta l'apparecchio nella posizione prescelta, fare in modo che rimanga in posizione verticale. • Non posizionare l’apparecchio, il cavo di alimentazione o i relativi accessori in un bagno o in un luogo bagnato o umido.
- Page 57 Installazione del tubo di scarico aria calda Sbloccare e aprire completamente il morsetto a C. Posizionare il bordo del connettore Parte inferiore circolare sul passo inferiore del connet- tore del tubo di scarico aria calda. Fissare il connettore circolare spingendo- lo con fermezza sul connettore per il tubo di scarico aria calda.
- Page 58 Installazione del tessuto per il Telaio fissaggio in finestre a battente Lato A Aprire la finestra e pulire il telaio e i battenti da polvere e particelle. Fissare il nastro di velcro lungo l’intero bordo della finestra. Non fissare mai alla Battenti guarnizione della finestra per non impedirne la chiusura completa.
- Page 59 Comandi • Modalità deumidificazione – Ideale per ridurre l’umidità della stanza nei periodi più umidi dell'anno. L'apparecchio deumidifica la Tasto di accensione stanza se la temperatura ambiente è superiore o pari a 17°C e la ventola gira a bassa velocità. Accende o spegne l’apparecchio.
- Page 60 Tasto timer Imposta il timer di accensione o spegnimento fra I valori dell’ora lampeggiano cinque volte 1 e 24 ore. per confermare l’impostazione del timer, quindi il display ritorna alla temperatura Impostazione del timer di accensione: della stanza. Selezionare le impostazioni desiderate Assicurarsi che l'apparecchio sia connesso prima dell'accensione.
-
Page 61: Svuotamento Del Serbatoio Dell'acqua
Svuotamento del serbatoio dell'acqua Quando il serbatoio dell'acqua è pieno, l’apparecchio emette 10 segnali acustici; la spia luminosa del serbatoio dell'acqua pieno si accende e l’apparecchio entra in pausa per evitare che il serbatoio dell'acqua trabocchi. Per svuotare il serbatoio dell'acqua: Tappo di Spegnere l’apparecchio e staccare la scarico... - Page 62 Collegamento del tubo dell'acqua per un drenaggio continuo Per un uso prolungato, si consiglia di collegare un tubo per il drenaggio continuo. Per collegare il tubo: Svitare il cappuccio esterno della valvola di scarico, togliere il tappo e riporre in modo sicuro.
-
Page 63: Pulizia Del Filtro
Pulizia del filtro: Pulire il filtro condensatore ed evapora- tore ogni due settimane. Per accedere ai filtri: Posizione di presa Afferrare filtro condensatore ed evaporatore nella posizione di presa e rimuovere delicatamente. Utilizzare uno spazzolino rigido e/o un aspirapolvere per pulire il filtro da polvere e particelle. -
Page 64: Funzioni Di Sicurezza
work. head of the remote control. Too far from appliance. The remote control does The remote control is not pointing towards Replace the batteries. not work. the receiving head of the remote control Funzioni di sicurezza Arrange for a professional to check the The batteries are dead. -
Page 65: Smaltimento
Poor cooling. Draw curtains. There is direct sunlight. Doors and windows are open or there are Close doors and windows and remove other heat sources. other heat sources. Intasamento dell’ingresso o Rimuovere l’ostruzione. dell’uscita dell'aria. Arriva la luce diretta del sole. Tirare le tende. -
Page 66: Advertencias De Seguridad
Acondicionador de Aire Portátil | Modelo PB-AC01 Gracias por elegir comprar un producto de Pro Breeze. Lea todo el manual cuidadosamente antes del primer uso y guárdelo en un lugar seguro para futuras consultas. Página Resumen Advertencias de seguridad Información específica sobre el gas refrigerante R290 Precaución ┃... - Page 67 La limpieza y el mantenimiento del usuario • • No coloque ni utilice el aparato, el cable de no deben ser realizados por niños sin alimentación ni ningún otro accesorio en un supervisión. lugar de baño, mojado o húmedo. • Mantenga el aparato y todas las piezas •...
- Page 68 Información específica • El mantenimiento y las reparaciones que sobre el gas requieran la asistencia de otro personal refrigerante R290 calificado deben realizarse bajo la supervisión de una persona especificada en el uso de refrigerantes inflamables. • El aparato debe instalarse, utilizarse y CAUTION almacenarse en un área que supere los 13m².
- Page 69 Precaución • No haga funcionar el aparato si la temperatura ambiente es superior a 32°C en modo de refrigeración o inferior a 5°C en modo deshumidificador. Spécifications • Voltaje de entrada: 220 V-240 V ~ • Frecuencia: 50 Hz • Capacidad de refrigeración: 9000 BTU/H •...
- Page 70 Piezas Vista frontal Panel de control Persiana horizontal Persiana vertical Cuerpo Ruedas Vista trasera Asa/Almacenamiento de control remoto Cuerpo Hebilla en forma de C Cable de alimentación Conector de manguera de extracción de calor Organizador de cables Ruedas Filtro del evaporador Filtro de radiación Filtro del condensador Tapa de drenaje...
-
Page 71: Panel De Control
Panel de control TIMER COOL SLEEP FULL HIGH Botones que se mueven se Mando a distancia izquierda a derecha • Botón de encendido • Botón de velocidad del ventilador Botón de velocidad Botón de modo de • Botón de bajar alta del ventilador refrigeración •... - Page 72 Instalación Antes y después de la instalación debe cumplir con lo siguiente: • Cuando mueva el aparato hasta la ubicación elegida asegúrese de mantenerlo en posición vertical. • No coloque ni utilice el aparato, cables o accesorios en el cuarto de baño ni en un lugar húmedo o mojado. •...
- Page 73 Instalación de la manguera de extracción de calor Desbloquee y abra por completo la hebilla en forma de C. Parte inferior Coloque el borde del conector circular sobre la rosca inferior del conector de la manguera de extracción de calor. Empuje el conector circular hacia abajo con firmeza hasta encajarlo en el Conector circular...
- Page 74 Instalación del montaje de tela de Cuadro sellado en ventana de bisagras Lado A Abra la ventana y limpie las superficies del marco y los batientes de polvo y partículas. Pegue la cinta de velcro alrededor de Marco de todo el marco de la ventana. Nunca la ventana pegue sobre el sellado de la ventana ya que impedirá...
-
Page 75: Botón De Encendido
Controles • Modo de deshumidificación - Ideal para reducir la humedad de la habitación en épocas húmedas del año. El aparato deshumidificará Botón de encendido la habitación si la temperatura ambiente es mayor o igual a 17 °C y el ventilador funciona Encender y apagar el aparato. - Page 76 Botón del temporizador Establezca un temporizador de encendido y Pulse los botones de subir y bajar para apagado entre 1 y 24 horas. ajustar el tiempo deseado (1-24 horas) hasta el apagado. Establecer un temporizador de encendido: Los dígitos horarios parpadearán cinco veces para confirmar que se ha ajustado un Asegúrese de que el aparato esté...
-
Page 77: Vaciar El Depósito De Agua
Vaciar el depósito de agua Cuando el depósito de agua se llena suenan 10 pitidos. La luz indicadora de tanque de agua lleno se iluminará y el aparato dejará de funcionar para evitar que el tanque de agua desborde. Para vaciar el depósito de agua: Apague el aparato y desenchúfelo de la Tara de toma de corriente. - Page 78 Conectar la manguera de agua para un vaciado continuo Se recomienda conectar la manguera para conseguir un viciado continuo cuando se vaya a usar durante un period. Para conectar la manguera de agua: Desenrosque la tapa de drenaje, quite el tapón de drenaje y guárdelos en un lugar seguro.
-
Page 79: Limpieza Del Filtro
Limpieza del filtro: Limpie los filtros del evaporador y el condensador del aparato cada dos semanas. Position de agarre Para acceder a los filtros: Sujete los filtros del evaporador y el condensador y retírelos con cuidado. Utilice un cepillo duro y/o aspiradora para limpiar cualquier rastro de polvo o partículas en los filtros. -
Page 80: Características De Seguridad
head of the remote control. The remote control does Too far from appliance. not work. The remote control is not pointing towards Replace the batteries. Características de Seguridad the receiving head of the remote control Arrange for a professional to check the The batteries are dead. - Page 81 There is direct sunlight. Draw curtains. Poor cooling. Doors and windows are open or there are Close doors and windows and remove other heat sources. other heat sources. Entrada de aire o salida de aire obstruida. Retire la obstrucción. Hay luz solar directa. Cierre las cortinas.
- Page 82 65 | Español...
- Page 84 Labs Atrium, Stables Market, Chalk Farm Road, London, NW1 8AH, UK. © Copyright 2018...